Orange, Dark Chocolate, Pistachio and Cardamom Cookies

Biscuits, Uncategorized

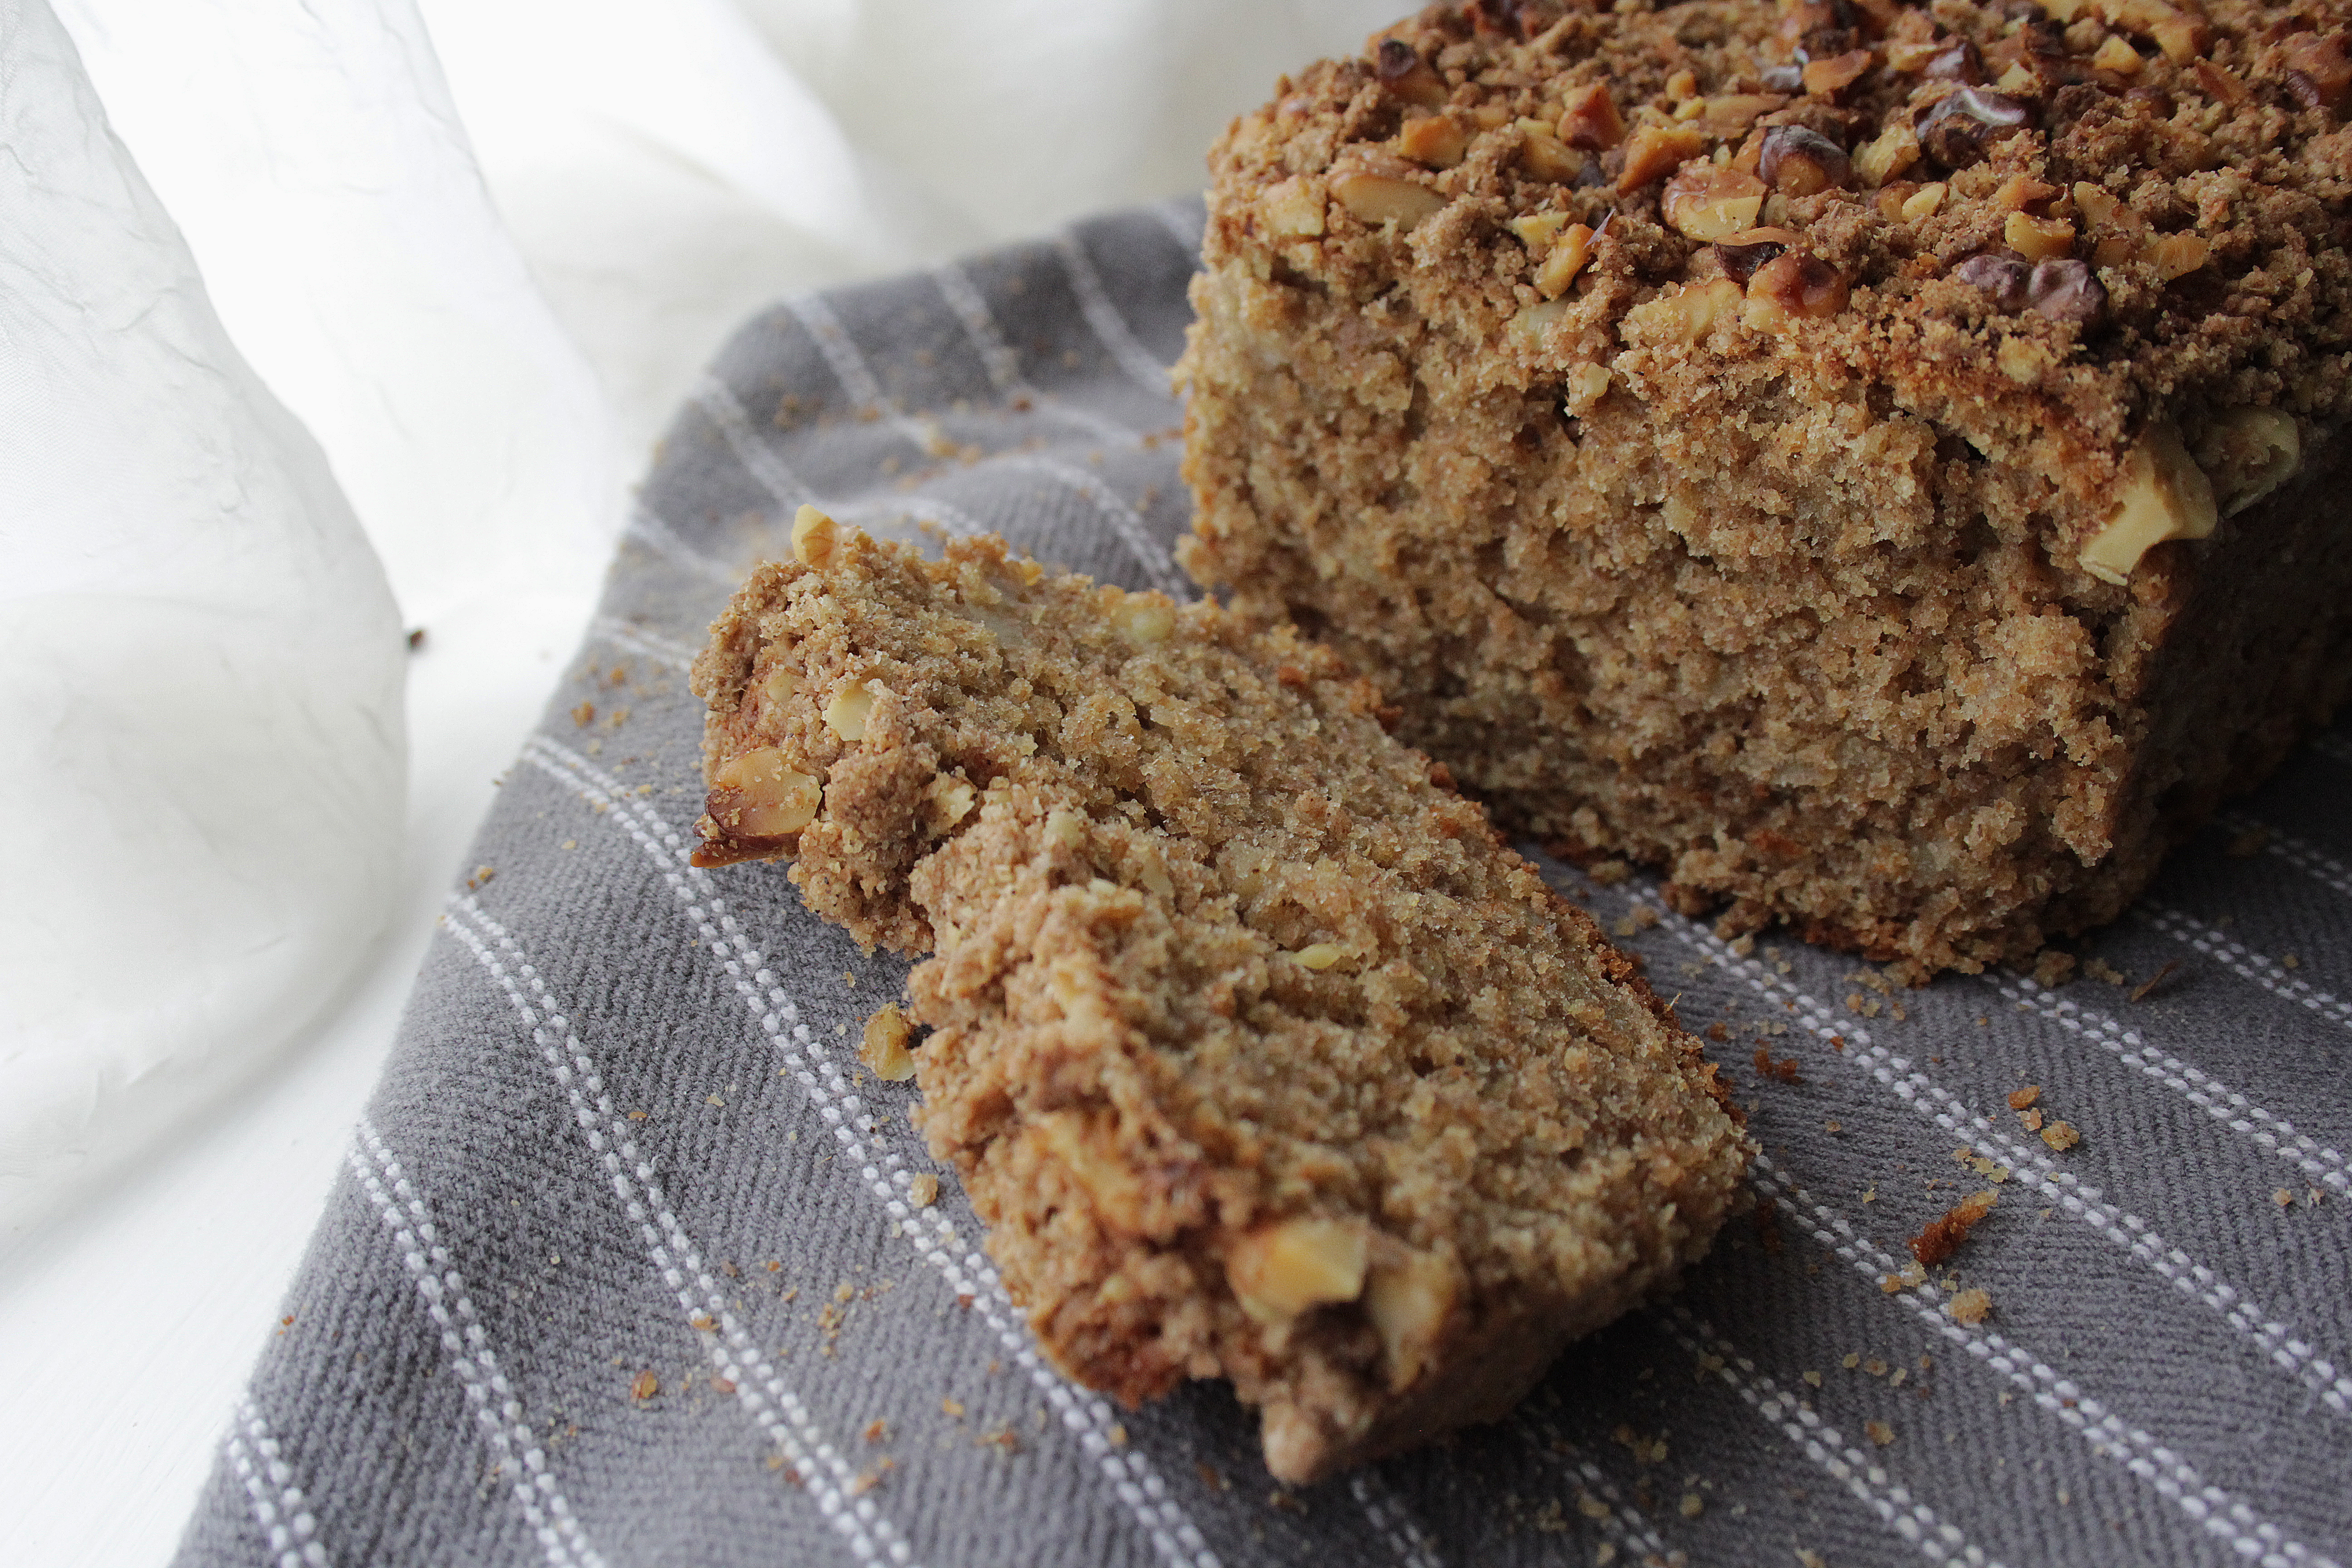
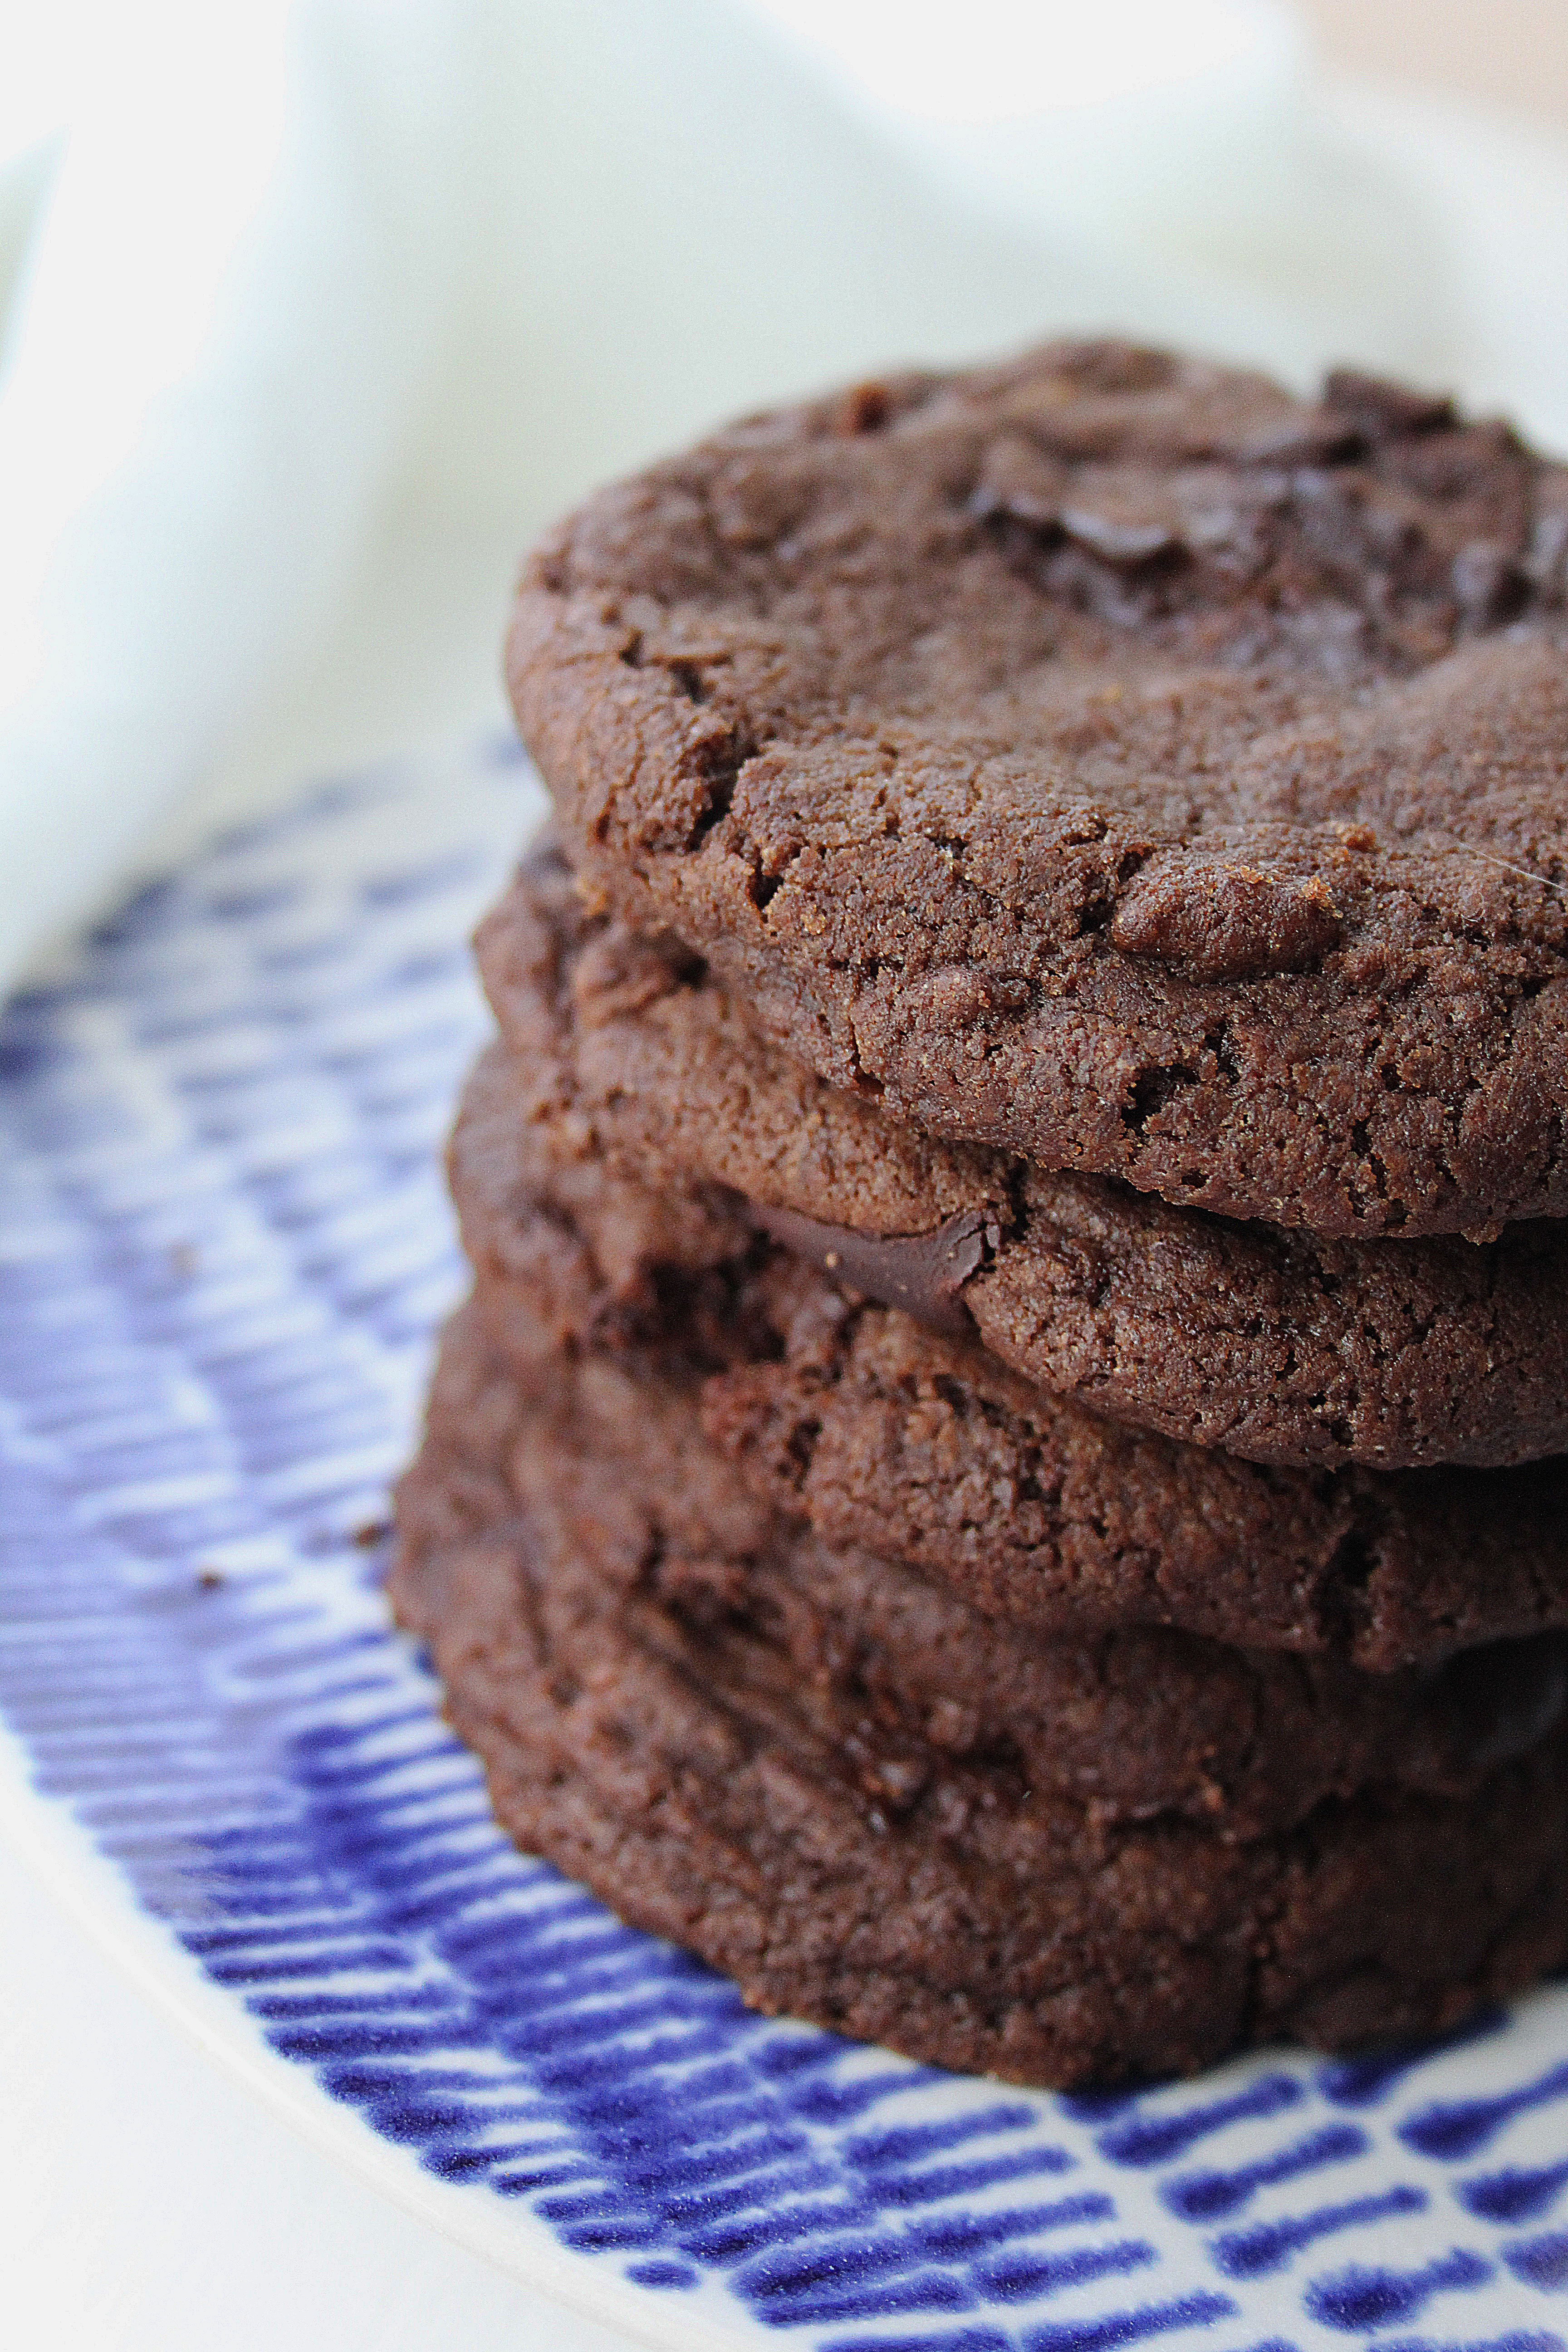
This recipe takes the classic chewy chocolate cookie and turns it into something altogether more grown up with a little help from crushed pistachios, orange zest, dark chocolate chunks and ground cardamom. Stash them away from kids (and other adults- let’s be honest) and enjoy when you’ve got a quiet moment to yourself, preferably with a strong coffee.

Ingredients (makes 20-24 large cookies)

  • 225g butter
  • 125g caster sugar
  • 150g dark brown soft sugar
  • zest 1 orange
  • 1tsp ground cardamom (or 8-10 cardamom pods, crushed)
  • 2 eggs
  • 100g pistachios, roughly chopped
  • 1tsp bicarbonate of soda
  • 300g plain flour
  • pinch sea salt
  • 300g dark chocolate, roughly chopped

Method:

  1. Place the butter, sugars, zest and ground cardamom in a large bowl (or bowl of a stand mixer with paddle attachment) and cream together until light and fluffy using electric beaters (or a wooden spoon if you’re slightly mad/ less lazy than me).
  2. Add the eggs one at a time, beating well between each addition. Once the eggs are fully incorporated, tip in the pistachios and stir. Now sift the bicarbonate of soda, flour and salt into the batter and beat briefly to form a soft dough.
  3. Finally, add the chocolate chunks and stir with a spoon to evenly distribute. The dough won’t be firm and to make cooking easier I like to freeze it before baking. To do this simply lay a long rectangle of cling film across your work surface, spoon on the dough in a long line and roll up, shaping into a log. Chill for half an hour and at this stage preheat the oven to 180c and line some baking trays.
  4. Once your cookie dough logs have firmed up a bit, unwrap them and cut into slices (about 1.5 cm thick). Place the slices on the prepared baking trays with generous spaces between them for spreading (I usually put about 4 on each tray).
  5. Bake for 10-12 minutes until lightly golden but still soft and chewy in the middle. Leave to cool on a wire rack.

Enjoy!

Spring Lemon and Courgette Cake

Cakes, Uncategorized

This deliciously fresh tasting cake made up of homemade lemon curd, tangy cream cheese frosting and moist courgette sponge makes for the a great Easter treat, and the recipe will serve you well over the coming months when you’re looking for a simple and zesty summer bake too.

Ingredients:

  • zest 3 lemons
  • 200g butter
  • 200g caster sugar
  • 3 eggs
  • 375g grated courgette (2-3)
  • 75g sultanas
  • 300g self raising flour
  • 1tsp baking powder
  • 1/2 tsp bicarbonate of soda
  • 4-5tbsp milk

For the lemon curd filling:

  • 4 lemons (juice and zest)
  • 200g caster sugar
  • 100g butter, cubed
  • 3 eggs, 1 egg yolk

For the cream cheese icing:

  • 300g cream cheese
  • 100ml double cream
  • 100g icing sugar

To decorate: edible flowers, courgette ribbons, chocolate eggs

Method:

  1. Make the lemon curd first; put the lemon zest and juice, caster sugar and eggs in a saucepan and briefly whisk. Set over a gentle heat and gradually add the butter cubes, whisking constantly. After a few minutes the curd will start to thicken- keep whisking until you have used up the butter and stop when the lemon curd coats the back of the spoon (about 10-15 minutes). Set aside for later and cover the surface with cling film to prevent a thick skin from forming.
  2. Preheat the oven to 160c. Grease and line two 8 inch cake tins.
  3. Place the butter, lemon zest and caster sugar in a large bowl (or bowl of a stand mixer) and cream together until light, pale and fluffy. Add the eggs in one at a time, beating well between each addition.
  4. Squeeze any excess moisture out of the grated courgette then fold into the batter along with the sultanas.
  5. Sift over the flour, baking powder and bicarbonate of soda. Carefully fold in followed by the milk. The batter will be very thick- don’t be alarmed!
  6. Split the batter between the two tins and level off. Bake for 30-35 minutes until golden, well risen and a skewer comes out clean when inserted.
  7. Leave the cakes to cool in their tins while you make the cream cheese icing. Place the cream cheese and cream in a bowl and beat together until thick, then sift in the icing sugar and beat to combine.
  8. Now it’s time to assemble your bake. Take your first cake and level off the top (if necessary) then pipe a circle of cream cheese icing around the edge. Fill the middle with your lemon curd (using the cream cheese line as a barrier) and place the other cake on top. Cover the complete cake with the remaining cream cheese icing and decorate as you wish.


Coffee and Cardamom Cakes with Pistachio Praline

Cakes

Coffee cake is one of my all time favourites, but this spin on a classic is perhaps even better (I know, big claim). The cardamom hum in the sponge goes really well with the simple coffee buttercream, and the crunch of earthy pistachio praline rounds off the overall flavour and prevents it from being overly sweet. Make these for any occasion (you can fool people into thinking they’re fancy with the help of a piping bag and edible flowers) and they are sure to go down a storm.

Ingredients:

  • 200g softened butter
  • 200g soft brown sugar
  • 3 eggs
  • 200g self raising flour
  • pinch salt
  • 8 cardamom pods, emptied and ground
  • 3tbsp coffee granules mixed with 3tbsp boiling water
  • 3tbsp milk

For the buttercream:

  • 200g softened butter
  • 400g icing sugar
  • 2tbsp coffee granules mixed with 2tbsp boiling water

For the praline:

  • 100g pistachios
  • 100g caster sugar

Method:

  1. Preheat the oven to 170c. Grease and line a brownie tin (around 20x20cm).
  2. Cream together the butter and sugar until light and fluffy then add in the eggs one at a time, mixing well between each addition. Add the flour, salt and ground cardamom and fold in until well combined. Do the same with the coffee and milk.
  3. Once your straightforward batter is ready, spoon into the tin and level off. Bake for 30-35 minutes until well risen and a skewer comes out clean when inserted. Cool in the tin.
  4. While the cake is cooling, make the praline. Place the sugar and pistachios in a heavy bottom pan and allow the sugar to melt (don’t stir, just tip the pan to move the sugar around). Once it’s melted and golden, swirl the pan to coat the nuts in the caramel then tip onto some greaseproof paper and leave to set hard.
  5. Now make your buttercream. Beat the butter until light then gradually add the icing sugar, whisking until very light. Add in the coffee and whisk again to combine. Once it’s streak free and smooth, pile into a piping bag ready to decorate.
  6. Slice the cooled cake into nine squares (or larger/smaller pieces depending on your appetite!). Pipe the coffee buttercream on top in little kisses (or freestyle with rosettes/patterns using different nozzles). Break up the praline and roughly crush then sprinkle a generous helping on top of the buttercream.

Enjoy!


Spelt Banana Bread with Walnut Crumble

Bread, Cakes

Banana bread is a staple in many a baking repertoire- it’s simple, tasty and for some reason one of the only cakes deemed acceptable to eat for breakfast (what’s not to like). My version calls for wholemeal spelt flour, making it nutty in flavour and a little courser in texture than a regular banana bread; delicious when paired with the walnut crumble topping!

Ingredients:

  • 2 eggs
  • 175g soft brown sugar
  • 75g melted butter
  • 3 ripe bananas, mashed
  • 200g wholemeal spelt flour
  • 2tsp baking powder
  • pinch salt
  • 1tsp mixed spice
  • 1tsp ground ginger

For the crumble topping:

  • 50g spelt flour
  • 25g soft butter
  • 25g soft light brown sugar
  • 1tsp mixed spice
  • 75g chopped walnuts

 Method:

  1. Preheat the oven to 170c. Grease and line a loaf tin.
  2. Place the eggs, sugar and butter in a large bowl or bowl of a stand mixer. Whisk until thick, pale and voluminous then fold in the mashed banana.
  3. Add the dry ingredients (flour, spices, salt and baking powder) and fold again until well combined. Tip the mix into the prepared loaf tin and level out.
  4. For the crumble topping, rub together the butter, flour, sugar and mixed spice between your fingers until they resemble course crumbs, then stir in the chopped walnuts. Sprinkle this liberally over the top of the banana bread and bake for 45-55 minutes until well risen and a skewer comes out clean when inserted.
  5. Serve warm or cold, on it’s own or with cinnamon butter, creme fraiche or yoghurt.

Enjoy!

Rhubarb & Mixed Nut Flapjacks (Vegan/ Dairy Free)

Biscuits

These bars are the perfect grab and go treat to keep you going on a hectic day- I love my rhubarb and ginger jam sandwiched between the peanut butter flapjack and nutty topping, but you could choose any marmalade or jam in your version.

Ingredients:

Flapjack base:

  • 75g coconut oil
  • 175g peanut butter (or another nut butter ie. almond, cashew)
  • 150g dark brown soft sugar
  • 4tbsp golden syrup
  • 300g porridge oats

Filling and topping:

  • 200g rhubarb and ginger jam (or your favourite jam- fig or raspberry would work well)
  • 200g flaked almonds
  • 75g pecans
  • 75g brazil nuts
  • 100g caster sugar
  • 2tbsp water

Method:

  1. Preheat the oven to 180c. Grease and line a brownie tray.
  2. For the base place the coconut oil, peanut butter, sugar and syrup in a saucepan. Melt together over a medium heat. Tip the oats into a large bowl and add the melted liquid. Stir together until well combined then pack down into the prepared baking tin. Bake for 25-30 minutes until golden brown.
  3. For the topping, heat the caster sugar and water together over a medium heat. Allow the sugar to dissolve then pour into a bowl along with all the nuts. Stir together to coat.
  4. Now you can assemble the next layers. Spread the jam all over the flapjack base and spoon on the nuts in an even layer. Press down the top then bake for 15-20 minutes, until the nuts are golden brown.
  5. Cool then slice into bars.


Enjoy!

One For the Kids: Easter Tiffin Nests

Chocolate

I’m sure lots of you could make these little treats with your eyes closed, but that’s not to say the end result isn’t absolutely delicious and for me, very nostalgic. Calling for only a few ingredients and with barely any skill required, these are the perfect thing to make with children over Easter- they (and you, be real) will love mixing together the melted chocolate with their favourite biscuits, and who doesn’t get worked up into a frenzy over mini eggs?!

Ingredients (makes 12):

For the tiffin base: 200g dark chocolate, 100g butter, 1tbsp golden syrup, pinch salt, 200g your favourite crushed biscuits (I used ginger snaps)

For the nest topping: 200g crumbled up shredded wheat, 150g milk chocolate (melted), mini eggs

Method:

  1. Line a 12 hole muffin tin with cupcake cases. Place the dark chocolate, butter and golden syrup in a heatproof bowl and set over a pan of gently simmering water. Stir occasionally until melted then remove from the heat and add the biscuits and salt. Stir to coat then distribute the mix between the cupcake cases. Smooth down and chill for half an hour.
  2. While the tiffin bases are firming up, stir together the melted milk chocolate and crumbled shredded wheat until it resembles little twigs.
  3. Take the chilled bases and top with a spoonful of the chocolate coated shredded wheat. Make a little dip in the centre and press in three mini eggs.
  4. Chill the complete nests for a further half an hour then remove the cupcake cases and serve!

Enjoy!

Dark Chocolate and Ginger Cookies

Biscuits, Chocolate

These cookies are big, chewy and packed full of dark chocolate chunks and stem ginger pieces; better still, they’re so easy to make and you can make the dough ahead of time and freeze it for future use!

cookies3

Ingredients (makes 15-20):

  • 200g plain flour
  • 50g cocoa powder
  • 1/2 tsp bicarbonate of soda
  • pinch salt
  • 150g caster sugar
  • 150g dark brown soft sugar
  • 2tbsp ginger syrup
  • 175g butter, melted
  • 1 egg and 1 egg yolk
  • 300g dark chocolate chunks
  • 100g chopped stem ginger

chocolate-cookies

Method:

  1. Line 2 baking trays with greaseproof paper.
  2. Sift the flour, cocoa powder, bicarbonate of soda, salt and caster sugar into a large mixing bowl. In a jug, mix together the dark brown soft sugar, melted butter, ginger syrup, egg and egg yolk.
  3. Pour the mixed wet ingredients into the dry. Beat with a wooden spoon until you have a smooth cookie dough.
  4. Add the chocolate chunks and chopped stem ginger and knead briefly into the dough.
  5. Take a tablespoon of the cookie dough and roll into a ball. Repeat until you have used it all up then line onto trays and press down with the palm of your hand. Chill for 20 minutes and preheat the oven to 190c.
  6. Once the cookies have firmed up a bit, bake for 10-12 minutes. Leave to cool on the trays (they will be soft when you take them out of the oven but will become chewy after cooling) then display on a platter and serve!

Enjoy!


Mince Pie Bars

Pastry, Uncategorized

These Bakewell inspired bars are made up of a crisp pastry base, zesty mince meat centre, cinnamon frangipane top, toasted almond sprinkling and a dollop of obligatory brandy cream; delicious and oh-so festive!

Ingredients:

  • 250g plain flour
  • 140g butter
  • 1tbsp caster sugar
  • 3 egg yolks
  • 3tbsp water
  • 1 jar good quality mince meat (optional: add the zest of 1 orange and a handful chopped walnuts to it)
  • 150g butter
  • 150g golden caster sugar
  • 75g ground almonds
  • 75g self-raising flour
  • 1/2 tsp cinnamon
  • 3 eggs
  • handful flaked almonds
  • 150ml double cream
  • 1tbsp brandy
  • 2tbsp icing sugar (plus extra for dusting)


Method:

  1. First, make the pastry (or skip steps 1 and 2 if you’re using shop bought shortcrust!). Place the butter, sugar and flour in a food processor and blitz until they form breadcrumbs. Pour into a large bowl. In a small bowl whisk together the water and egg. Add 4tbsp of this mix to the crumbs and stir with a cutlery knife. If there are still dry patches add a little more liquid until the mixture comes together to form a dough. Press into a thin disc shape and wrap in cling film. Chill for 15 minutes.
  2. Preheat the oven to 190c. Lightly grease a rectangular tart tin. Take your chilled pastry and roll out to about 3mm thick. Line into the tart tin, pushing it into the corners as you go. Chill again for 10 minutes.
  3. Now it’s time to blind bake. Screw up a piece of greaseproof paper and unfold, then press down into the case. Fill with baking beans and spread out to completely cover the base. Bake for 15 minutes until the sides are set then remove the beans and paper and bake for a further 5-10 minutes until the base is dry and sandy. Don’t let it colour as it will be returning to the oven when filled.
  4. Reduce the oven temperature to 170c.
  5. Now make the frangipane. Cream together the butter and sugar until light and fluffy then add the eggs one at a time, beating well between each addition (add a little of the flour to prevent curdling if you like). Once well combined, beat in the ground almonds and fold in the remaining flour and cinnamon.
  6. Now it’s time to assemble. Take your tart case and spread a generous layer of mince meat across the base. Top this with the frangipane and level out as best you can. Sprinkle with flaked almonds.
  7. Bake for 20-25 minutes or until the frangipane is cooked through. If the pastry or almonds are browning too much just cover loosely with foil.
  8. Once baked, cool on a wire rack while you make the brandy cream. To do this simply whisk together the brandy, cream and icing sugar until thick. Spoon onto each bar, dust with icing sugar and serve.


Cranberry and White Chocolate Brownies

Chocolate, Uncategorized

These brownies are rich, dense and studded with cranberries and white chocolate chunks- a great (and easy) festive treat to whip up for visiting family and friends over the coming weeks…

Ingredients:

  • 300g dark chocolate
  • 210g butter
  • 310g caster sugar
  • pinch salt
  • 3 eggs, 1 egg yolk
  • 3tsp vanilla extract
  • 120g plain flour
  • 150g white chocolate, chopped into chunks
  • 100g dried cranberries

Method:

  1. Preheat the oven to 180c. Grease and line a square baking tin/ brownie tray.
  2. Place the butter and chocolate in a heatproof bowl and set it over a pan of gently simmering water. Do not allow the water to touch the bottom of the bowl or it could cause the chocolate to seize.
  3. Stir the butter and chocolate occasionally until melted then set aside to cool for a few minutes. Once the chocolate has cooled a little, add the sugar and salt then whisk (with electric beaters or in the bowl of a stand mixer) until well combined.
  4. Now add the eggs and whisk on high until the mix has lightened in colour and is glossy (about 5 minutes- whisking well at this stage is what gives you that classic flaky top!).
  5. Sift in the flour and fold then finally stir in the white chocolate and cranberries. Tip into the lined baking tin and spread out. Bake for 25-30 minutes or until set but still very moist in the middle.


Enjoy!

Ginger Spice Christmas Cake with Bloom & Wild

Cakes, Uncategorized

This four layer ginger cake filled with lightly salted toffee sauce and tangy cream cheese frosting is a great alternative to the classic Christmas fruit cake, and is usually the preferred option in my house.

The Scandi-style flowers I’ve used for decoration were sent to me by Bloom & Wild, a brilliant flower delivery company who focus on carefully selecting the best seasonal blooms. The bouquet I received ( the Sadie) is part of their Christmas range and I would definitely recommend you check out their other options; I don’t know about you, but I find it tricky to find a wide range of good quality cut flowers outside of London (I know, first world problems), so it’s great to know I can choose more unusual varieties online and have them delivered straight to my door the next day by Bloom & Wild.

I hope you like how I’ve made use of the flowers and perhaps this could inspire some other botanical themed Christmas cakes!

Ingredients:

  • 380g butter
  • 220g black treacle
  • 80g golden syrup
  • 340g dark brown soft sugar
  • 6 eggs
  • 380g self raising flour
  • 3tbsp ground ginger
  • 2tbsp ground cinnamon
  • 60g soured cream
  • 6 pieces stem ginger, grated (from a jar)
  • For the toffee sauce: 50g butter, 50g dark brown soft sugar, 50g golden syrup, 75ml double cream, large pinch sea salt
  • For the cream cheese frosting: 200g unsalted butter (soft), 250g cream cheese, 900g icing sugar, seeds of 2 vanilla pods

Method:

  1. Preheat the oven to 170c. Grease and line two 8 inch cake tins.
  2. Place the butter, treacle, syrup and sugar in a large bowl (or bowl of a standing mixer). Beat together until light and fluffy.
  3. Add the eggs in one at a time along with a little of the flour to prevent curdling. Mix well between each addition. Once the eggs are fully incorporated, sift in the remaining flour, cinnamon and ginger. Fold gently then finally stir in the stem ginger and soured cream. Split between the 2 prepared tins and bake for 30-40 minutes.
  4. While the cakes are cooking, make the toffee sauce. Place the butter, syrup and sugar in a saucepan and melt over a medium heat. Once melted pour in the cream and add the salt. Mix to create a smooth sauce then set aside to cool and thicken.
  5. Now make your cream cheese frosting. Put the butter in a large bowl (or the bowl of a stand mixer) and beat until fluffy and light in colour. Add the cream cheese and vanilla and beat once again until well combined. Now, still beating, gradually add the icing sugar. Once all the icing sugar has been added increase the speed and mix until the consistency is light, thick and spreadable.
  6. When the cakes are ready, a skewer should come out clean when inserted. Rest in their tins for 10 minutes then remove and leave on a wire rack until they are completely  cool.
  7. Now you are ready to assemble your layer cake. Level off the sponges as best you can then slice in two (you should be left with 4 layers). Place one layer down on your plate or cake board. Secure with some cream cheese frosting if it’s a little slippy. Now spread over a few tablespoons of the toffee sauce. Allow it to sink into the sponge then apply a thick even layer of cream cheese frosting. Top with the next sponge and repeat until the sponges are used up.
  8. With the remaining cream cheese frosting, cover the cake all over and smooth down with a cake scraper. Decorate with fresh flowers dusted in frosty edible glitter or get creative and come up with your own design to suit the occasion.

More decorating ideas: 

  • Leave the cream cheese frosting rough and decorate with mini gingerbread houses to create a snow drift scene.
  • Top with traditional/vintage Christmas cake decorations.
  • Make little white meringue kisses and cover the top of the cake with them, then dust with gold edible glitter.
  • Top with frosted fruit and rustic greenery.

Enjoy!