Autumn Hedgerow Celebration Cake (Apple, Blackberry & Salted Caramel)

Cakes

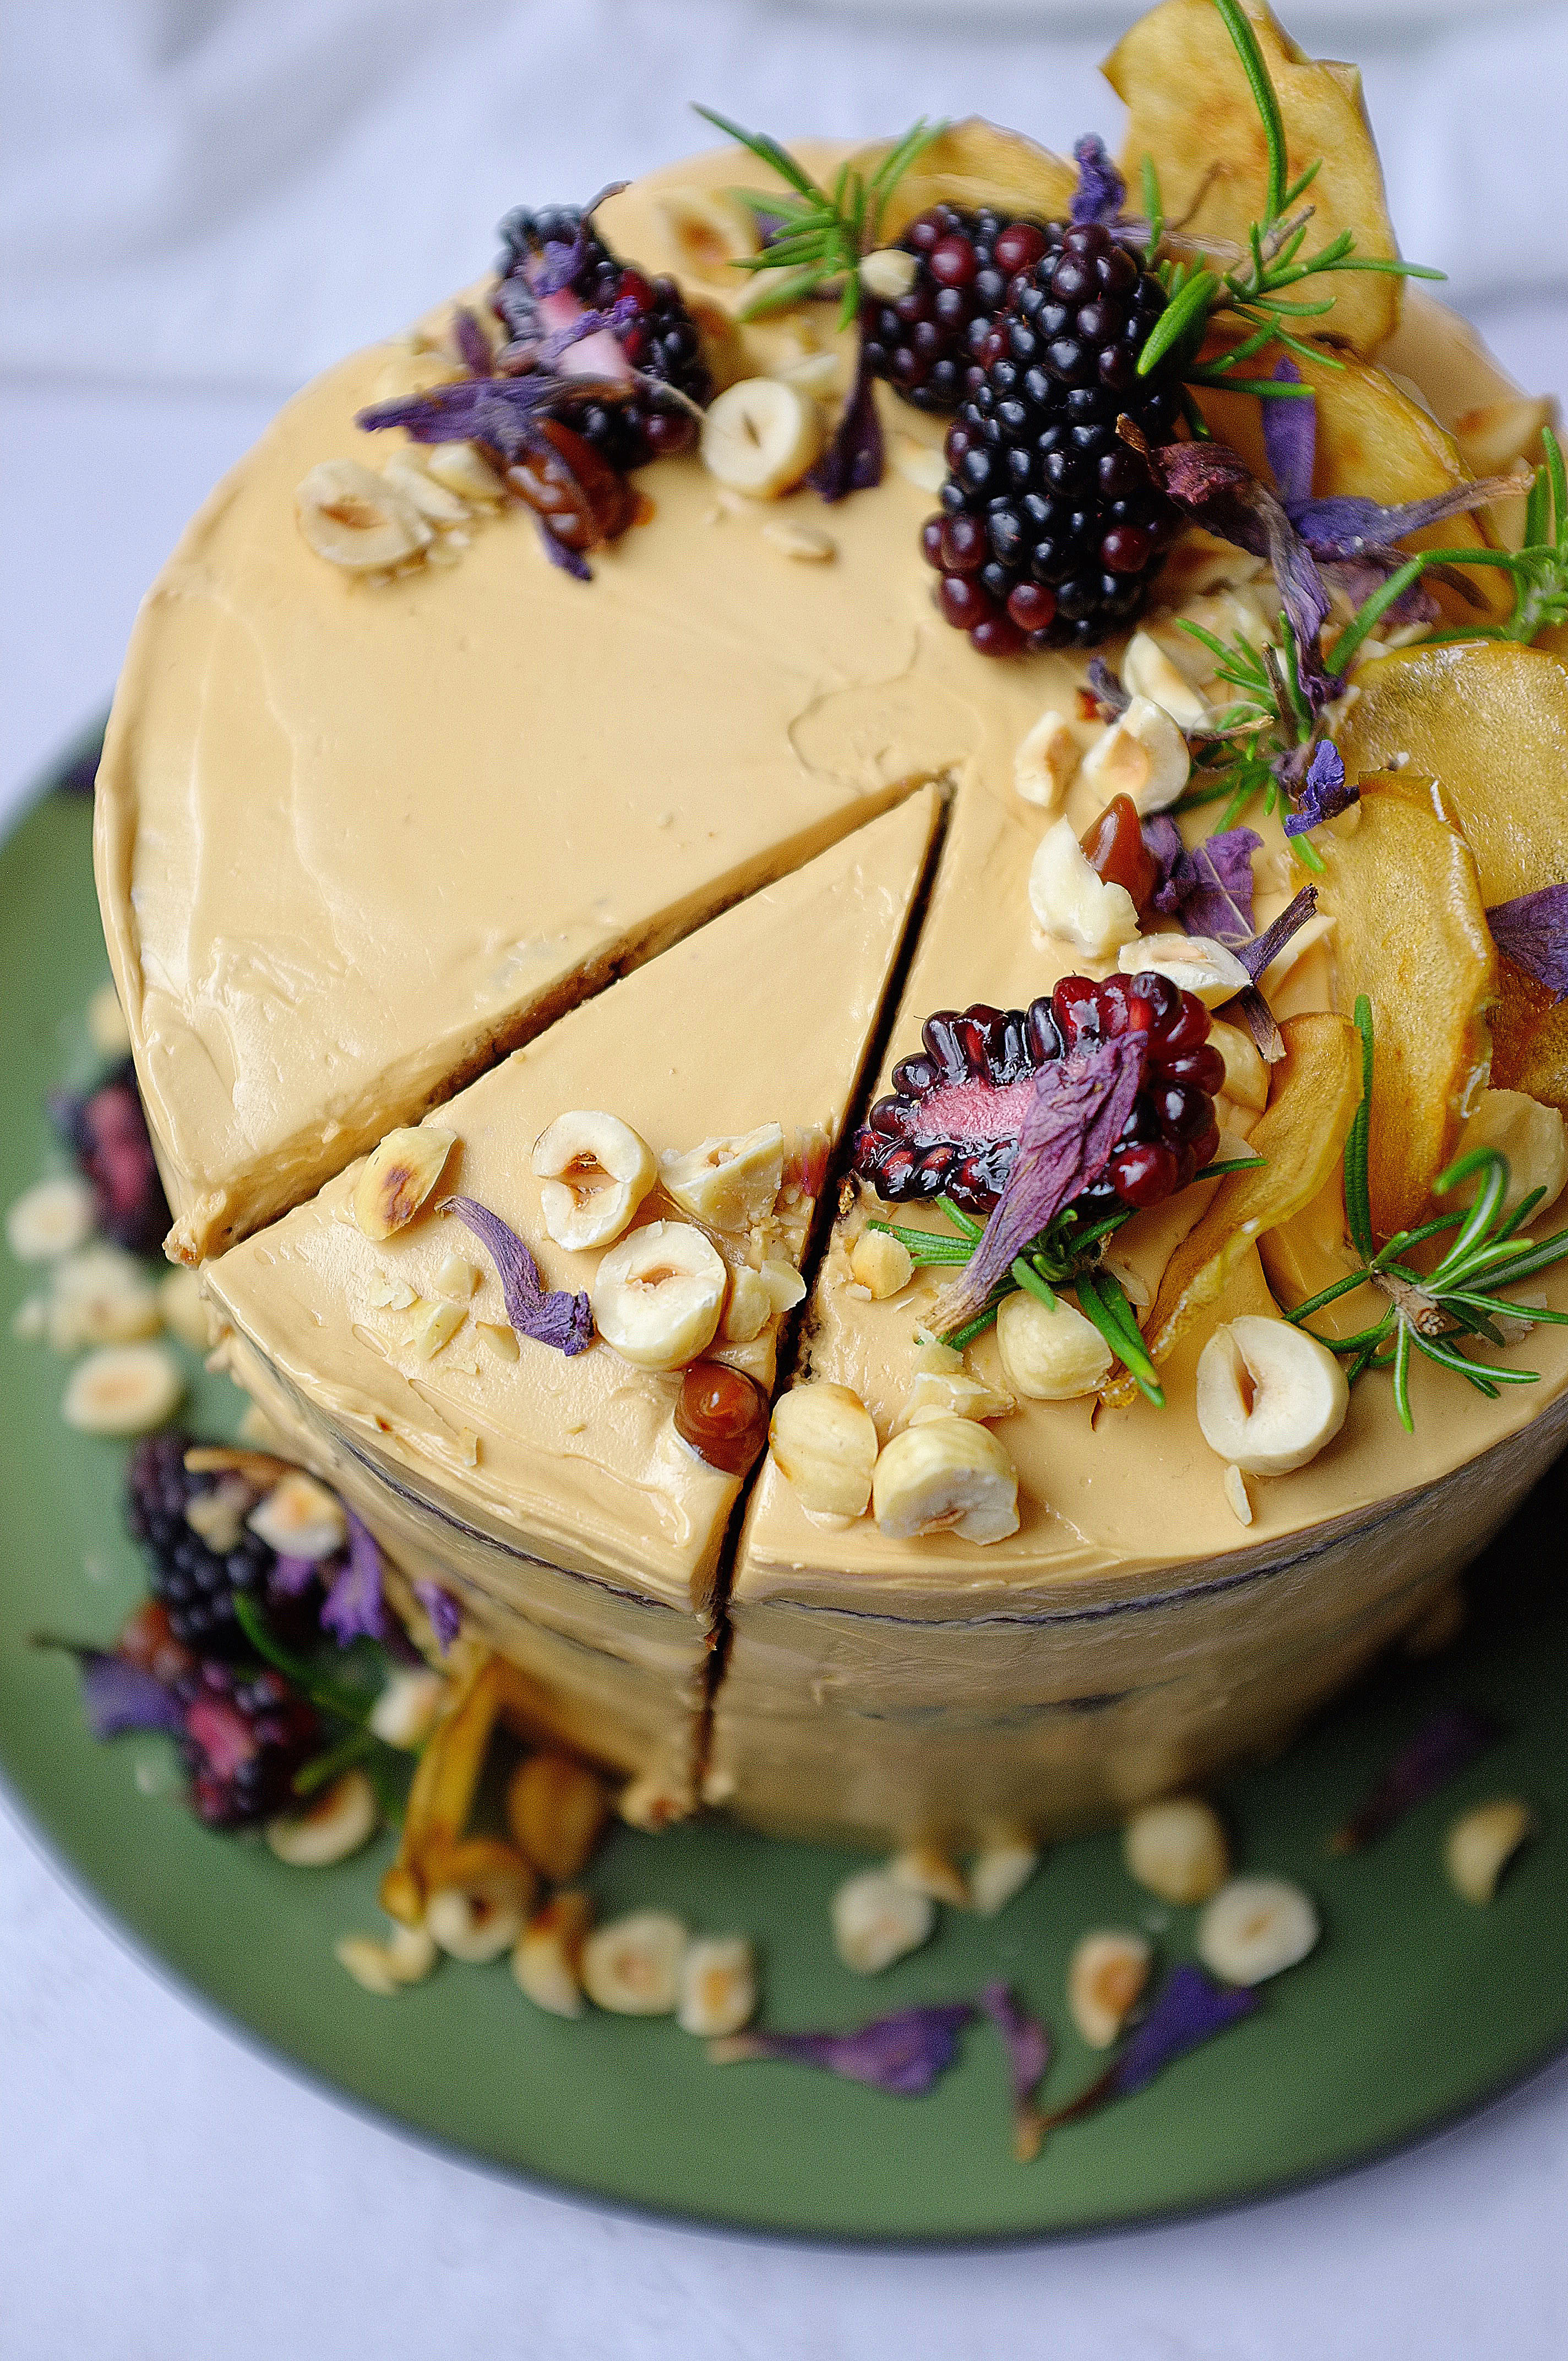
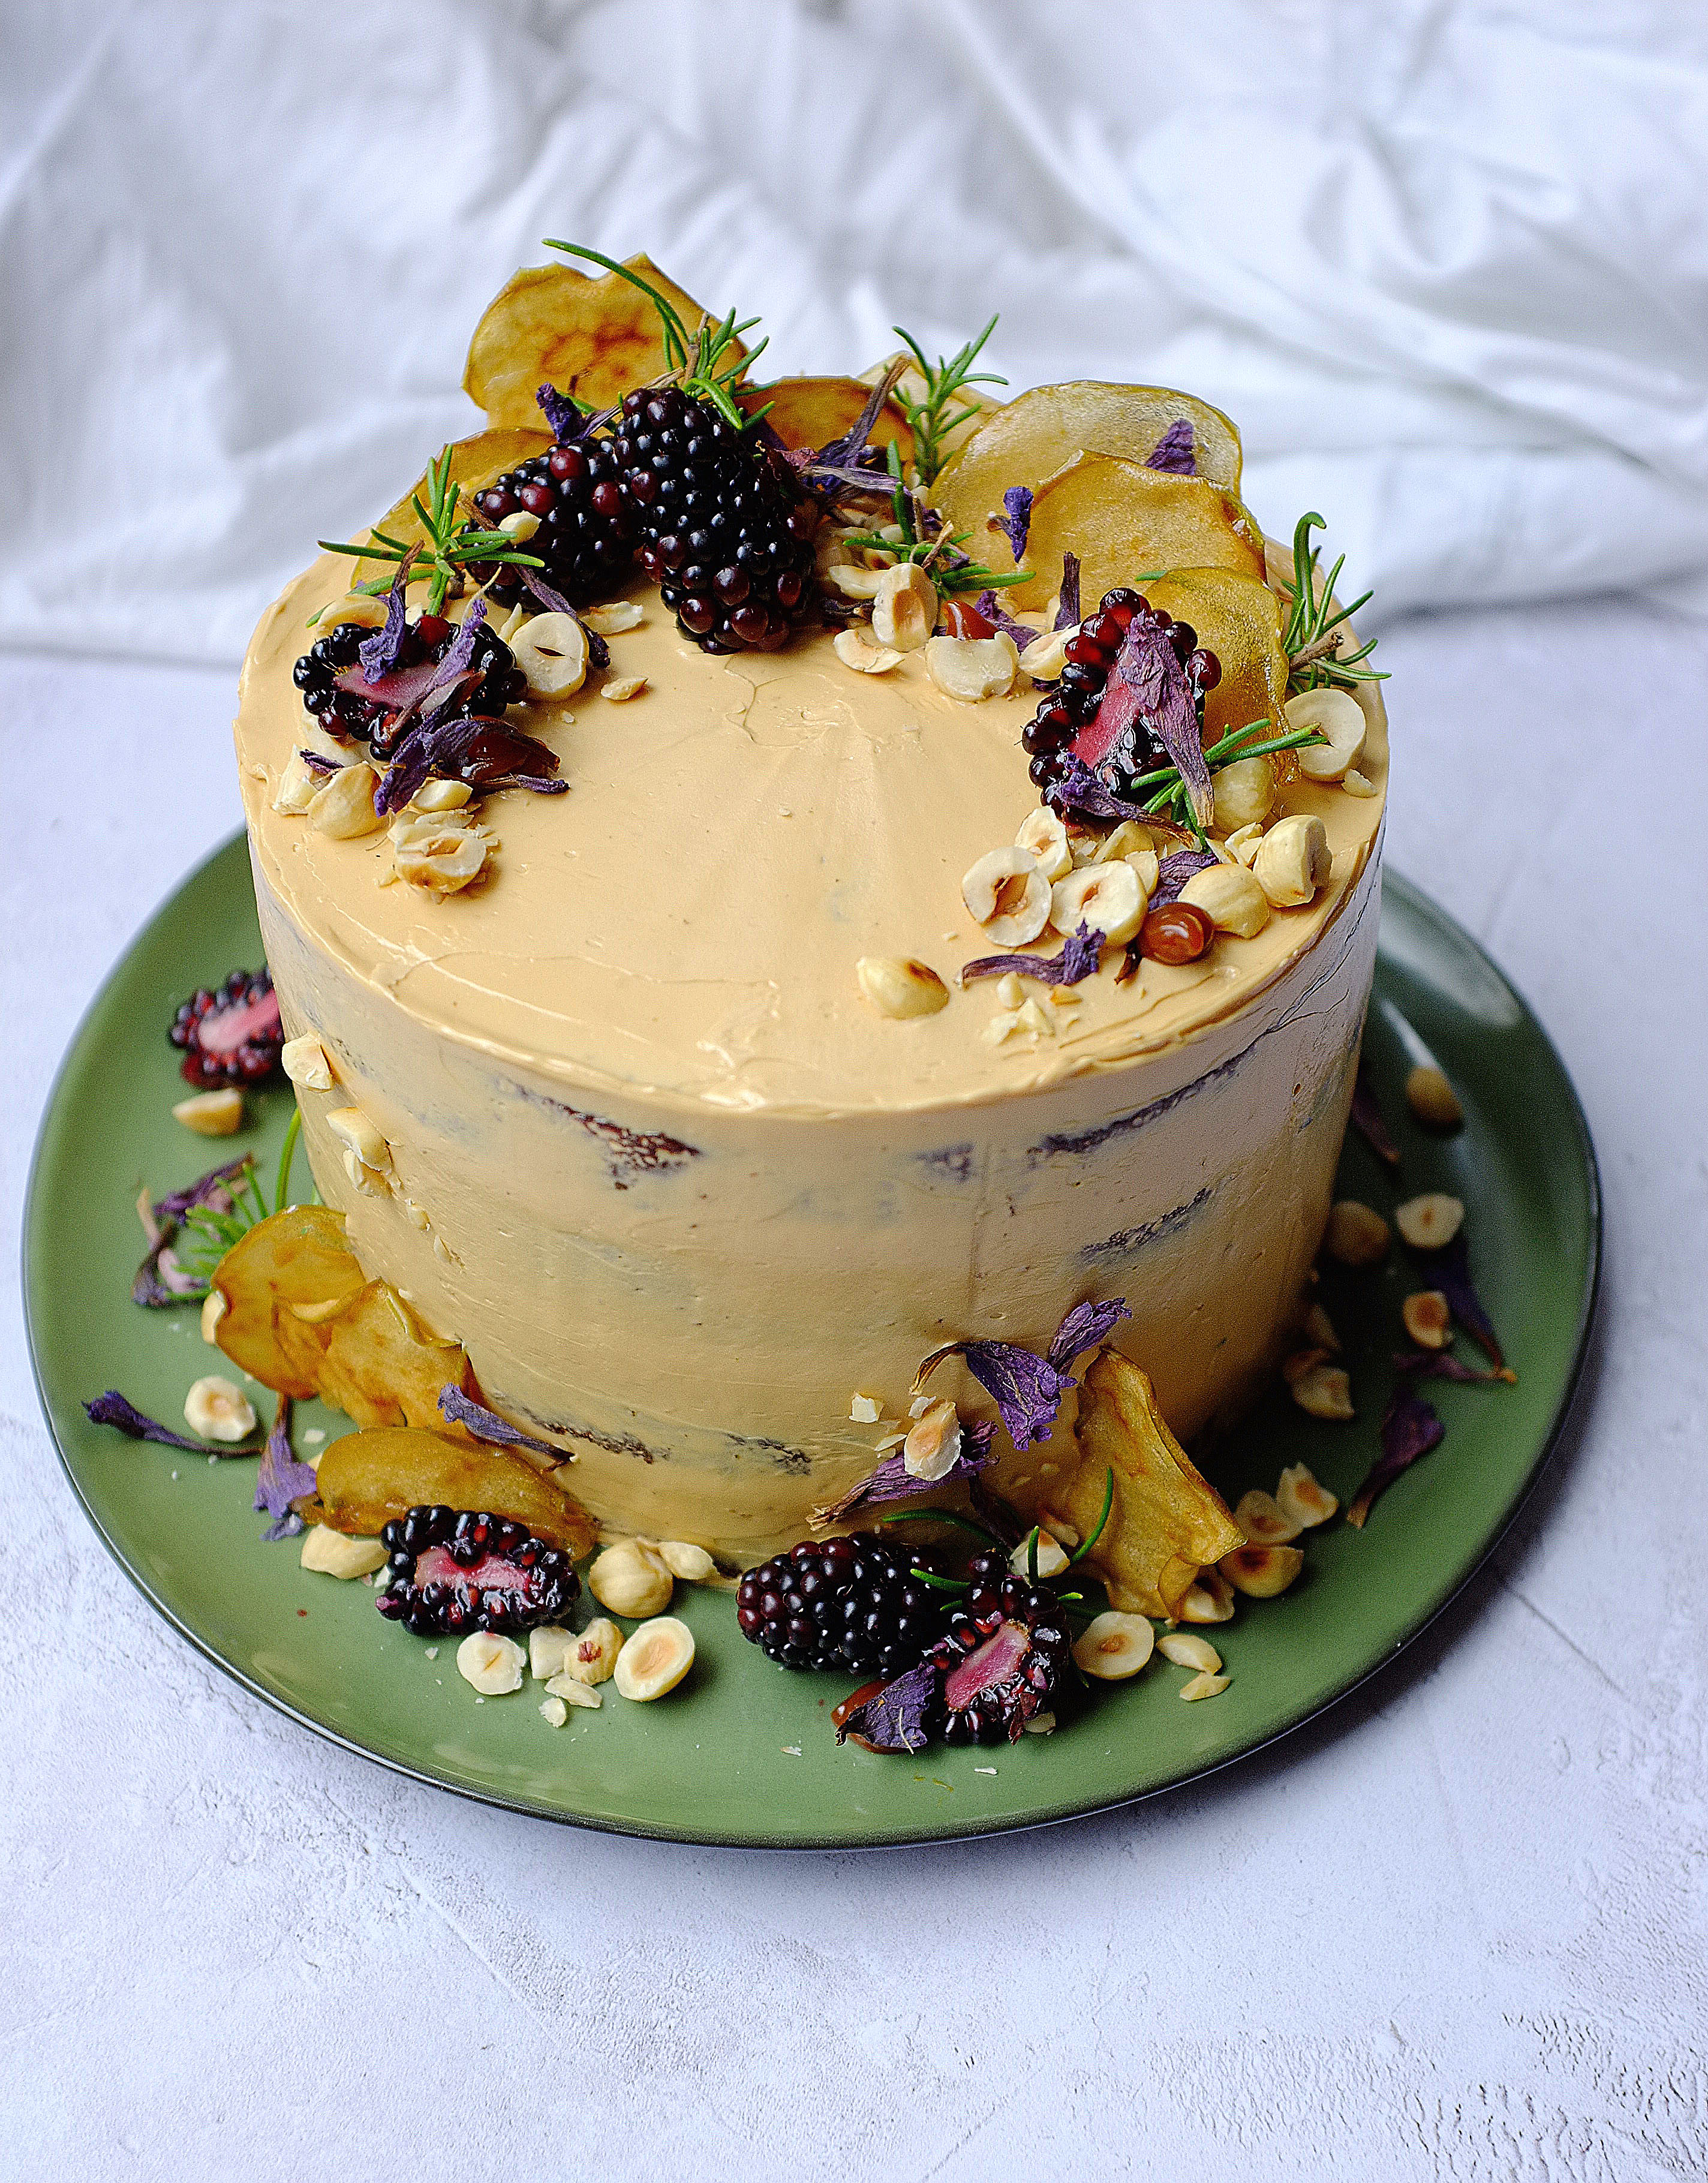
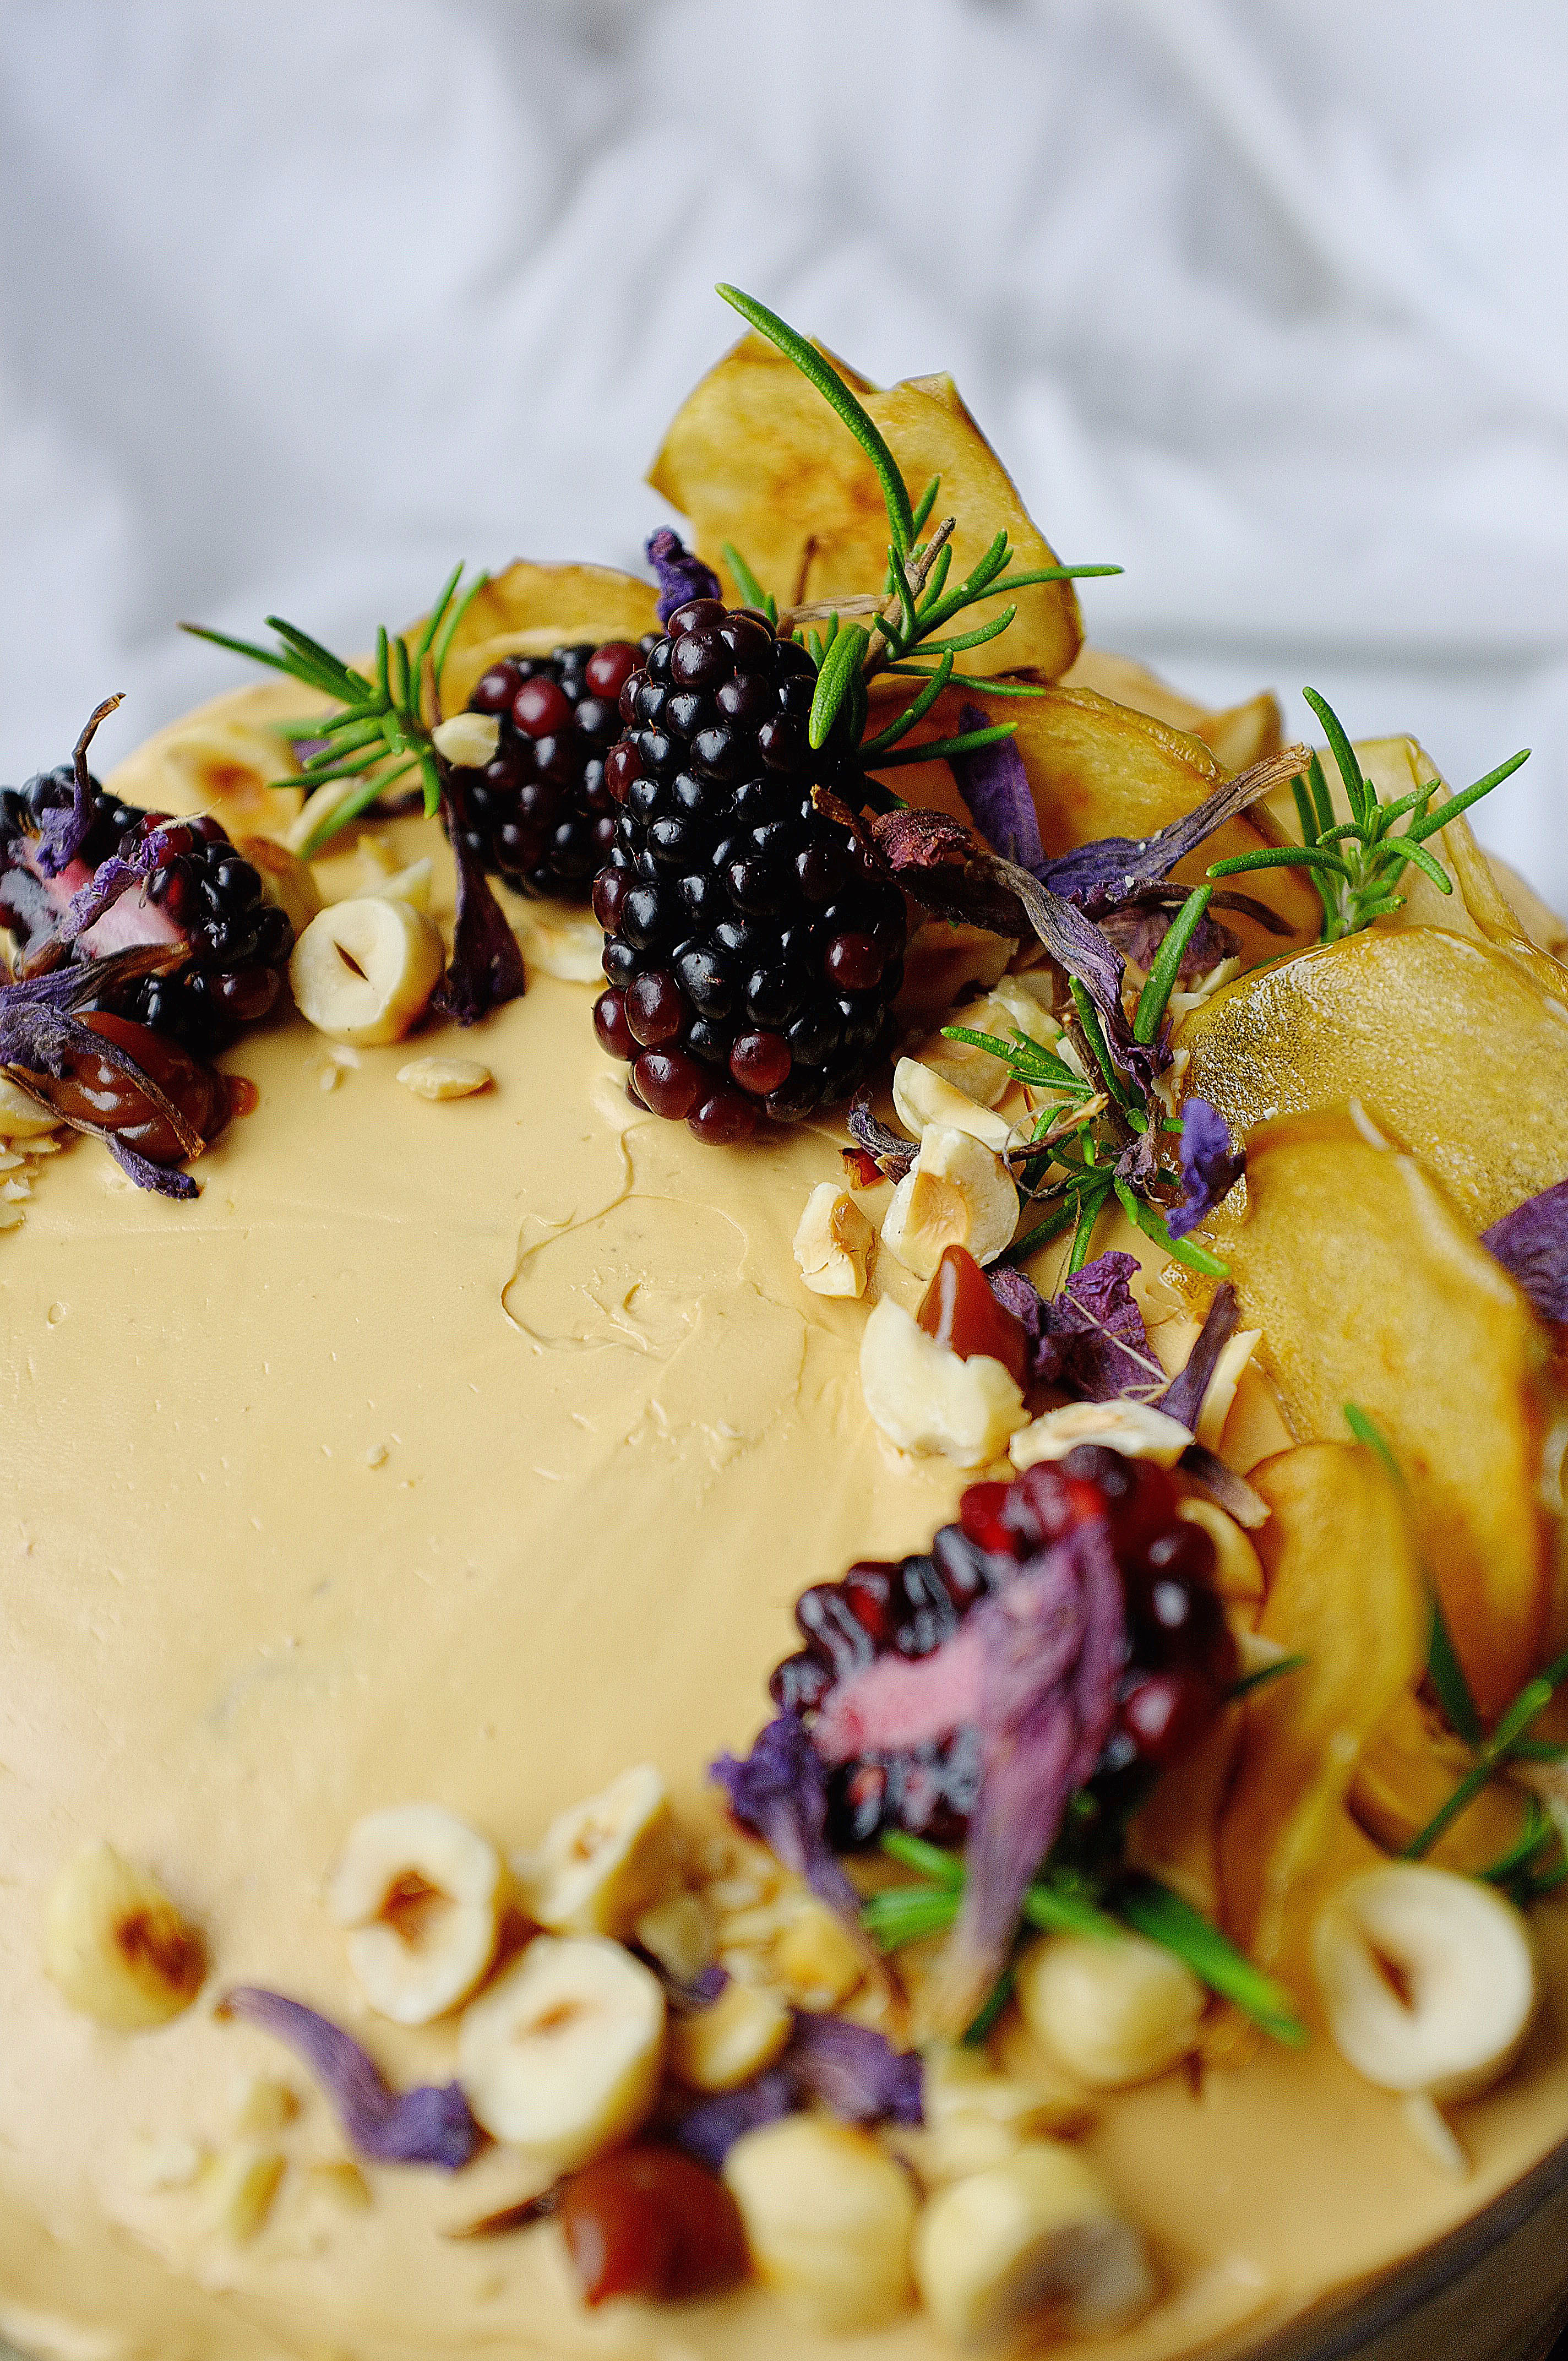
As someone who is perpetually cold I favour the summer months weather-wise, but when it comes to food seasons, Autumn is the winner for me. Root vegetables, roasts, comforting one-pot dinners and baked fruits, sugared and spiced; you can’t beat them. With this in mind and as an ode to the season and the produce that comes with it, I’ve created a hedgerow-themed celebration cake. Made up of spiced sponges studded with Bramley apple pieces, a tart blackberry compote and smooth salted caramel Swiss meringue buttercream- it’s a bit of a project bake, but so worth the effort.

Ingredients

For the cakes

  • 250g golden syrup
  • 190g unsalted butter
  • 175g light brown soft sugar
  • 375g self raising flour
  • 1 1/2 tsp bicarbonate of soda
  • 1 1/2 tsp ground cinnamon
  • 1 1/2 tsp ground ginger
  • 1tsp mixed spice
  • large pinch salt
  • 3 eggs
  • 260ml semi-skimmed milk
  • 1 very large Bramley apple, peeled, cored and diced
  • 1tsp corn flour

For the blackberry compote

  • 450g fresh blackberries
  • zest and juice 1 lemon
  • 5-6tbsp caster sugar

For the Swiss meringue buttercream (I’d only attempt this with electric whisk/beaters!)

  • 150g caster sugar, 50g butter, 100ml double cream, salt (this is for the caramel which is added to a Swiss meringue buttercream base)
  • 4 egg whites
  • 225g caster sugar
  • 275g unsalted butter, very soft (but not greasy)

To decorate

  • fresh blackberries, hazelnuts, apple crisps, rosemary sprigs

Method

  1. Grease and line two 8 inch cake tins. Preheat the oven to 170c.
  2. Start off by making the cakes. To do this place the syrup, butter and light brown soft sugar in a saucepan and melt over a medium heat. Set aside to cool a little.
  3. In a mixing bowl, stir together the flour, spices, salt and bicarbonate of soda, then make a well in the middle. Break the eggs into a jug and add the milk, then stir together with a fork and add into the well, along with the melted butter mixture. Whisk everything together with a hand whisk until just combined.
  4. Toss the apple pieces in corn flour and fold in, then distribute the batter between the two cake tins. Bake for 30-40 minutes or until a skewer comes out clean when inserted. Once baked let the cakes cool completely in the tins.
  5. Meanwhile, make the blackberry compote by placing the blackberries, lemon juice and zest and sugar in a saucepan set over a medium heat. Cook, stirring often until thickened and jammy. Set aside to cool.
  6. For the buttercream, start off by making a salted caramel sauce.To do this put the sugar in a heavy bottom saucepan and set it over a low heat. Wait until the sugar has all melted (swirl the pan to encourage it to do so but don’t stir!) then up the heat and allow it to reach a deep golden brown. When it gets to this stage, add the butter and stir (it will spit a little), then add the cream and stir again for a couple more minutes until slightly thickened. Remove from the heat and once cool enough to taste add salt to your liking. Set aside to cool completely.
  7. While the caramel is cooling, place the egg whites and caster sugar in a saucepan and whisk together (just a hand whisk will do here). Keep stirring over a medium heat until the mixture is hot to the touch and the sugar has dissolved, then transfer to a large bowl (or bowl of a stand mixer with whisk attachment) and whisk until it’s completely cool and will hold a stiff peak.
  8. Now continue to whisk, adding a heaped tablespoon of the butter every few seconds. Whisk until it’s all come together and is thick and glossy, then add 3-4 heaped tablespoons of your cooled caramel (add a little more or less to taste). Don’t worry if the mix looks curdled at any point, whisking will bring it back together with time. Once it’s ready you can start assembling the cake.
  9. Remove the cakes from the tins. If they’re domed at all, even off the tops, then slice each sponge in half, leaving you with 4 even layers. Place the first layer on your serving plate. Pile half the buttercream into a piping bag and pipe around the edge of the first layer twice (leaving a roughly 1.5 inch wall of buttercream). Fill this with a third of the blackberry compote then repeat the process until all the sponges are used up.
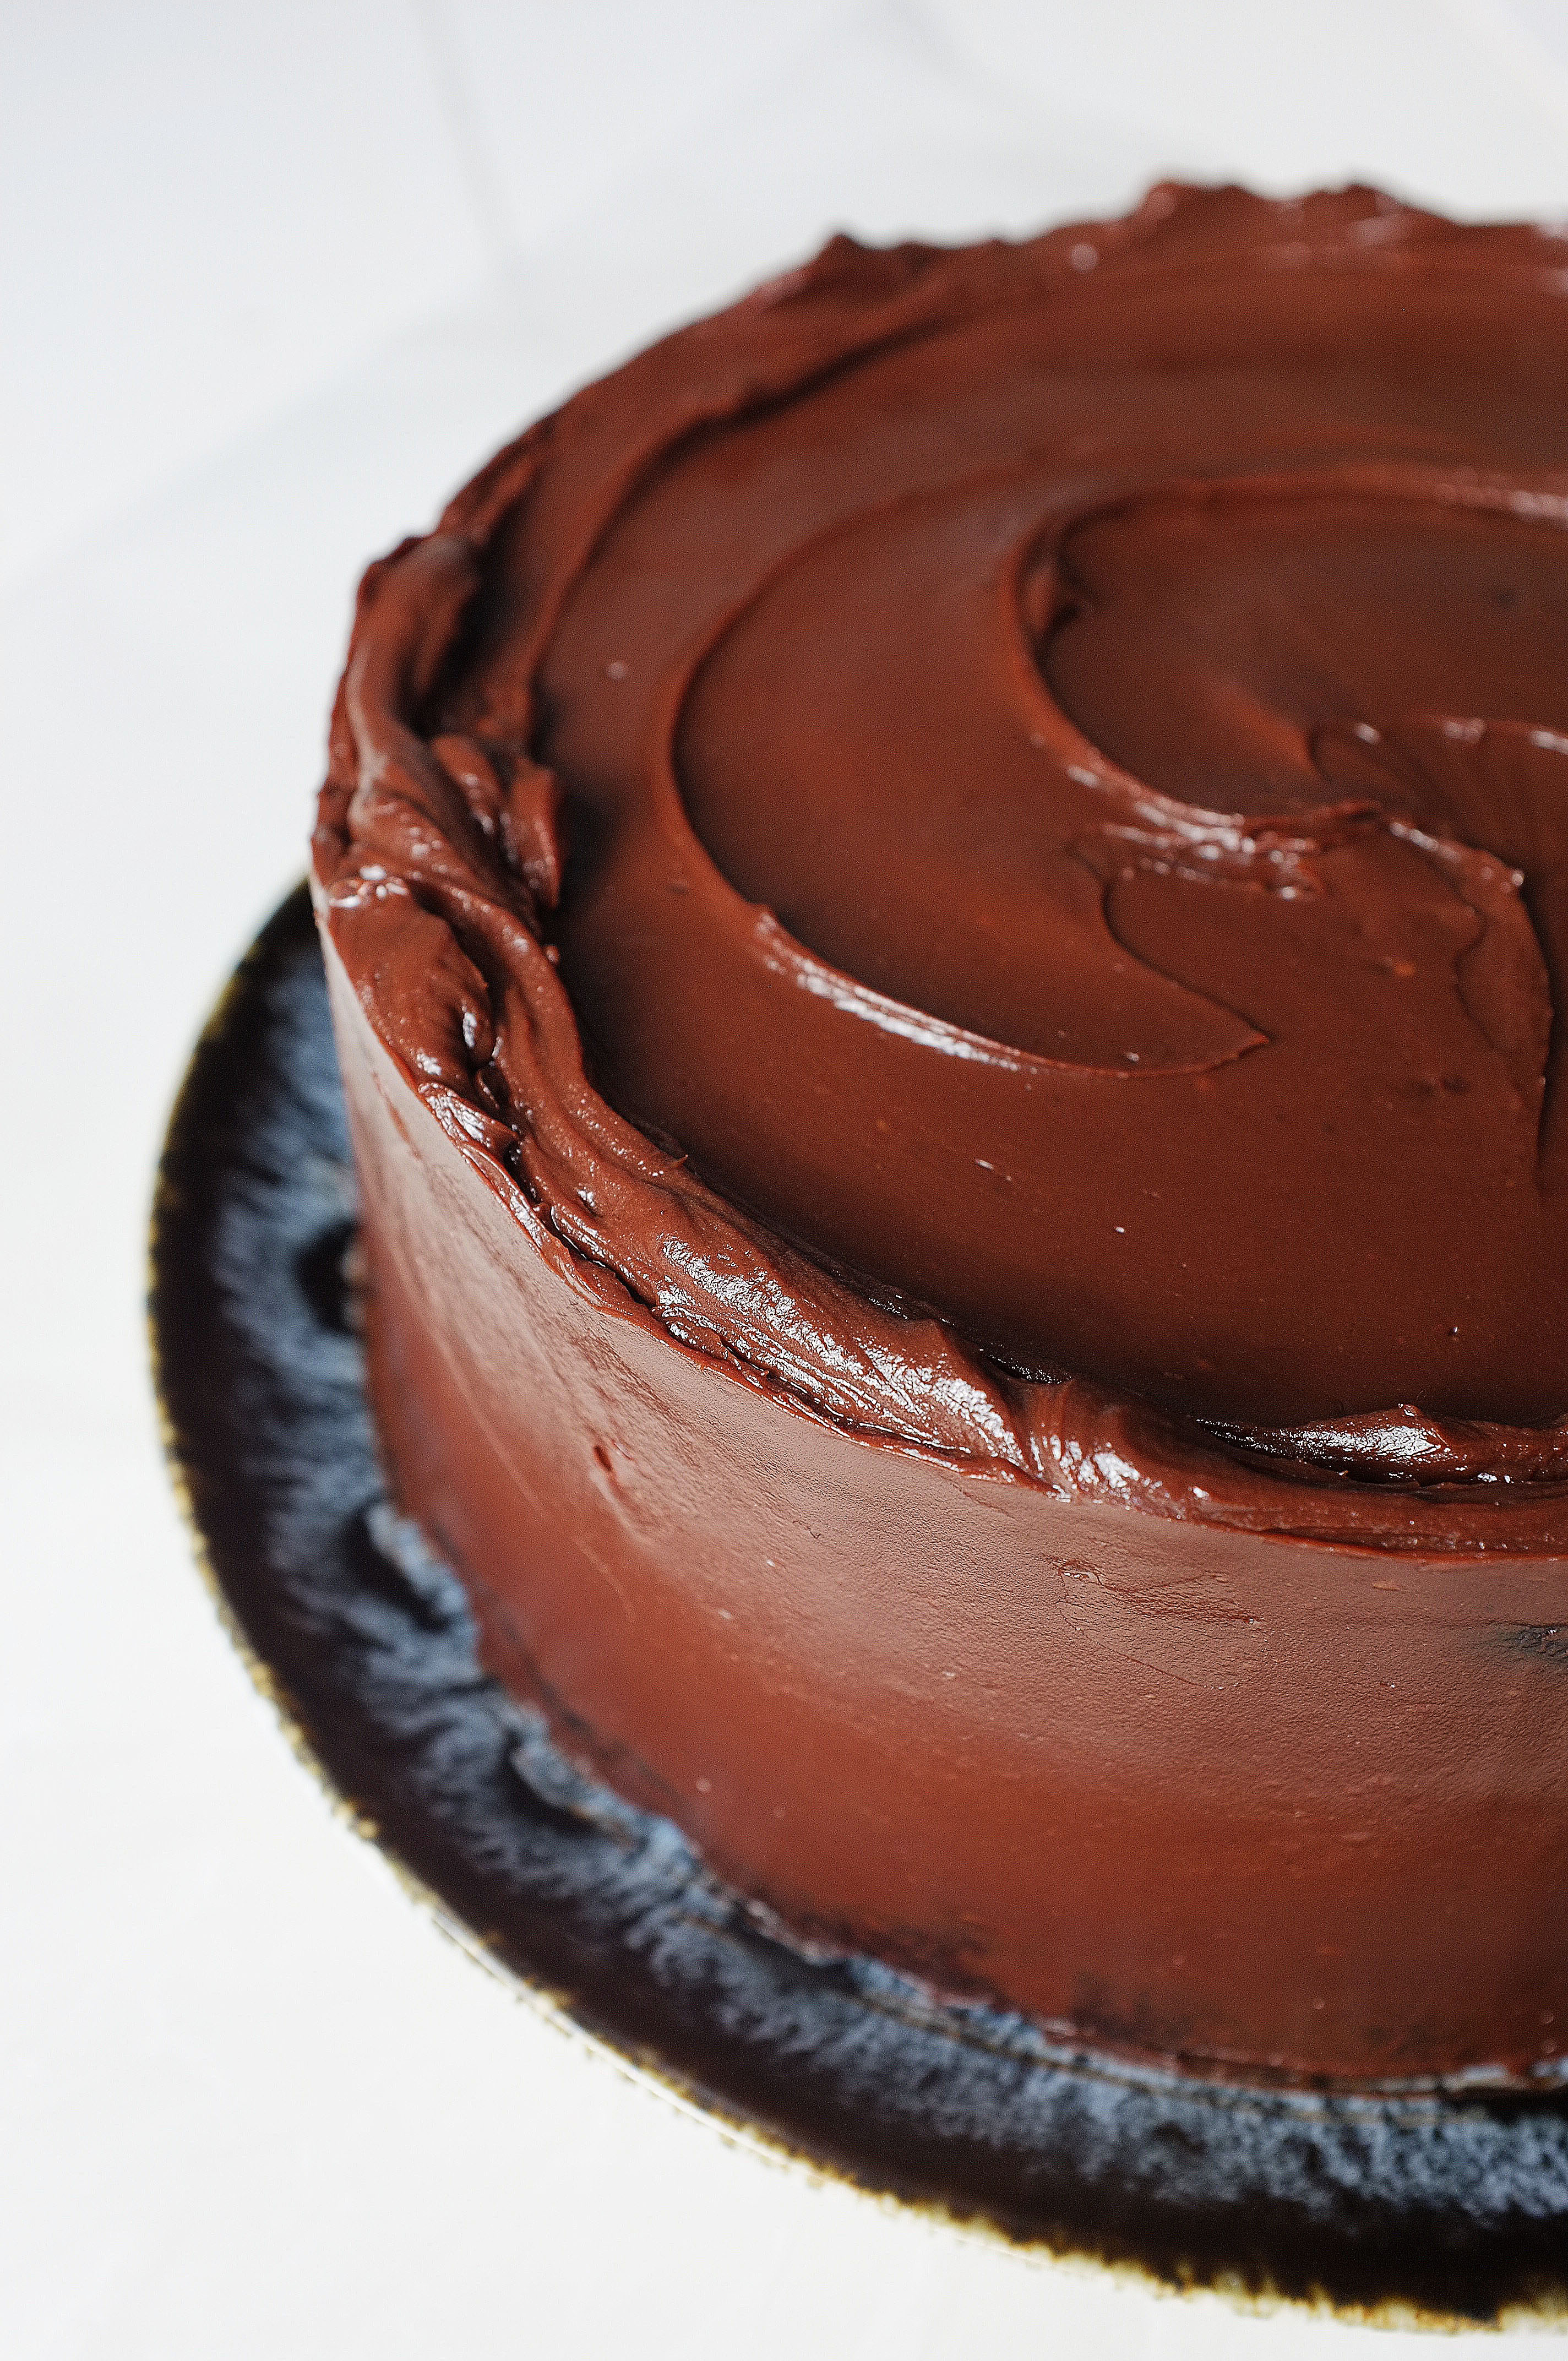
  10. Use the remaining buttercream to cover the whole cake, semi-naked style. Decorate as desired- I like rustic/natural decorations but the world is your oyster!

Advertisement

Burnt Butter Caramel and Raspberry Brownies

Chocolate, Uncategorized

Another iteration of my all-time favourite bake, this time with fresh raspberries offset by oozing pockets of burnt butter caramel (inspired by Chin Chin Lab’s burnt butter caramel nitro ice cream). Brownies might not seem like the obvious thing to make mid-summer, but as these are studded with some token summer berries and can therefore be deemed seasonal, you should probably make them.

Ingredients

For the caramel

  • 100g caster sugar
  • 50g butter
  • 60ml double cream
  • Pinch salt

For the brownie

  • 250g butter
  • 150g 80% dark chocolate
  • 100g 70% dark chocolate
  • 3 eggs, 1 egg yolk
  • 100g light brown soft sugar, 75g caster sugar
  • Generous pinch salt
  • 100g rye flour
  • 100g good quality milk chocolate, roughly chopped
  • 250g fresh raspberries

Method

  1. Start off by making the caramel. To do this place the sugar in a saucepan and heat gently. Meanwhile, place the butter in a small pan and melt until just past browned (it should be foaming and have little brown specks in the bottom), then take off the heat.
  2. At this point the sugar will have started to dissolve. Swirl the pan until the sugar melts entirely, then allow it to reach a deep golden brown colour. Now add in the burnt butter and cream, stirring until it comes together. Remove from the heat and add the salt. Pour the caramel into a baking paper-lined container and leave to firm up for around half an hour. Preheat the oven to 180c and line a brownie tin with baking paper.
  3. While the caramel is setting, make the brownie batter. Roughly chop the dark chocolate and tip into a heatproof bowl. Place the butter in a saucepan and heat gently until melted. Up the heat and brown until foaming (as before), then pour directly over the chocolate. Let it sit for a moment, then stir to create a smooth glossy mixture.
  4. Meanwhile, place the eggs and egg yolk, both sugars and salt in a large bowl (or bowl of a stand mixer with paddle attachment) and beat until pale and voluminous.
  5. Pour the chocolate down the side of the bowl and fold in, then add the flour and fold again.
  6. Chop the set caramel into rough pieces and set aside. Scape half the brownie batter into the lined tin and level out. Evenly distribute half the caramel pieces, chocolate chunks and raspberries then scrape over the remaining chocolate. Repeat the process with the caramel, chocolate and raspberries then bake for 25-35 minutes or until crisp and flaky on top but still fudgy (with a slight wobble) in the middle.
  7. Leave to cool completely in the tin then slice up an serve.

Classic Chocolate Fudge Cake (Gluten Free)

Cakes, Uncategorized

I can never understand why gluten free options are, not always but so often, dry, dense and disappointing. I’m not a coeliac myself and am not a fan of demonising gluten, however, if you are genuinely unable to enjoy it then I’m a firm believer that there should and can be delicious alternatives! This cake is the first of many gluten free versions of classic baking staples I’m planning, and seriously, it’s so moreish it brings a tear to my eye (deeply melodramatic but you get the message).

Ingredients

For the cakes (makes one 7-8 inch sandwich cake)

  • 200g ground almonds
  • 1tsp bicarbonate of soda
  • generous pinch salt
  • 175ml boiling water
  • 2tsp instant coffee
  • 80g cocoa powder
  • 300g golden caster sugar
  • 5 eggs
  • 225ml vegetable oil

For the ganache 

  • 300ml double cream
  • 200g 70% dark chocolate
  • 100g mik chocolate

Method

  1. Preheat the oven to 180c. Grease and line two 7-8 inch cake tins.
  2. Stir the almonds, bicarbonate of soda and salt together in a small bowl. Mix the cocoa, coffee and boiling water together in a jug until smooth and set aside.
  3. Beat the eggs, oil and sugar in a large mixing bowl (or in a stand mixer with paddle attachment) until pale and thick.
  4. Add the cocoa mix and continue whisking until you have a fairly liquid cake batter with no streaks. Add the almond mixture down the side of the bowl and fold in gently.
  5. Split the batter between the two tins and bake for 35-45 minutes until a skewer comes out with only a few moist crumbs attached.
  6. While the cake is baking, make the ganache. Finely chop the chocolate and pop it in a heatproof bowl. Meanwhile, pour the cream into a saucepan and set over a medium heat. When it reaches scalding point (just before a simmer), take off the heat and pour directly over the chocolate. Let it sit for a couple of minutes, then stir to create a smooth, glossy ganache. Allow this to cool and thicken to a spreadable consistency (15 minutes in the fridge once cooled to room temperature helps achieve this).
  7. Once the cakes are baked leave to cool in the tins for 10 minutes before transferring to a wire rack.
  8. To assemble your cake, level off your cakes if necessary, then fill and cover with ganache.

Enjoy!

Espresso, Pecan & Dark Chocolate Ice Cream Sandwiches

Biscuits, Uncategorized

These cookie sandwiches are a culmination of my three favourite things; coffee, chocolate and ice cream. The pecans add crunch, and the bitter note of espresso prevents the result from being overly sweet. There’s not a lot else to say- other than go forth and make them (but proceed with caution, they’re like crack).

Ingredients (makes 10-12 cookie sandwiches, with a little extra cookie dough which will freeze well)

For the ice cream

  • 400ml double cream
  • 400ml whole milk
  • 8 egg yolks
  • 150g caster sugar
  • pinch salt
  • 30g good quality instant coffee

For the cookies

  • 225g soft unsalted butter
  • 125g caster sugar
  • 175g dark brown soft sugar
  • 2 eggs
  • 1tsp bicarbonate of soda
  • generous pinch salt
  • 150g plain flour
  • 125g rye flour
  • 75g roughly chopped pecans
  • 100g roughly chopped dark chocolate (70%)

Method

  1. Start off by making the ice cream. To do this, pour the double cream, milk and instant coffee into a saucepan and set over a medium heat. Meanwhile, place the egg yolks, sugar and salt in a large bowl (or bowl of a stand mixer with whisk attachment) and whisk until pale and thick. Once the instant coffee has dissolved into the cream mixture, bring it to a simmer then take off the heat and gradually add into the eggs and sugar, whisking constantly until well combined.
  2. Pass the mixture through a sieve into a clean saucepan, then heat gently, stirring until thick (make sure the custard doesn’t get too hot, or you’ll be left with something that looks a bit like scrambled eggs!). Pass the thickened custard through a sieve into a bowl, then close cover with cling film and leave to cool completely (I like to chill the custard at this point to make sure it’s as cold as possible before churning, but it’s not absolutely necessary).
  3. Once cooled, pour the custard into an ice cream maker and churn until creamy and thick. Line a shallow square/rectangular baking tin (about 2-3cm deep) with cling film and scrape the churned ice cream into it. Level off, cover with cling film and place in the freezer for at least 4 hours, until fully set. At this point you can cut the ice cream into rounds using a 3-4 inch cookie cutter, then cover and return the rounds to the freezer until required.
  4. For the cookies, place the butter and both sugars in a large bowl (or bowl of a stand mixer with paddle attachment) and beat until pale and fluffy. Add in the eggs one at a time, beating well between each addition. Add the bicarbonate of soda, salt and both flours and very briefly mix again until combined. Now stir in the pecans and chocolate with a wooden spoon. Chill the cookie dough for 10 minutes.
  5. Preheat the oven to 180c. Line a couple of baking trays with greaseproof paper and space tablespoons of cookie dough over them, allowing plenty of room for spreading. Bake for 12-15 minutes or until soft in the middle but golden in colour. At about 8-10 minutes into baking, take the baking tray and bang it on the work top in one sharp movement. This allows the cookie to spread a little and ensures the perfect thickness. Repeat the process until you’ve used up the cookie dough, then leave the cookies to cool.
  6. For a neat result, you can cut the cookies into perfect circles with the cutter you used for the ice cream, but this isn’t essential.
  7. Once the cookies have cooled, sandwich two together with a round of espresso ice cream.

Enjoy!

Mocha Banana Bread (Vegan)

Cakes, Uncategorized

This vegan banana bread is perfect if you’re after maximum taste pay off in exchange for minimal effort; the method calls for just a mixing bowl and hand whisk and you’ll have it in the oven in less than 10 minutes. I add chunks of dark chocolate and a shot of espresso to my banana bread as it adds a great depth of flavour and slight bittersweet finish, but feel free to omit these (if you’re weird and don’t like my two favourite things).

Ingredients

  • 125ml vegetable oil
  • 100ml dairy free yoghurt (I used Alpro plain)
  • 100ml nut milk (I used almond)
  • 3 very ripe bananas (roughly mashed) plus 1 extra banana (halved down the middle)
  • 2tbsp instant coffee granules dissolved in 2tbsp boiling water
  • 75g light brown soft sugar
  • 75g caster sugar
  • 225g plain flour
  • 1tsp baking power
  • 1tsp bicarbonate of soda
  • generous pinch of salt
  • 150g 70% dark chocolate

Method

  1. Preheat the oven to 180c. Line a large loaf tin with greaseproof paper.
  2. Place the oil, yoghurt, milk, mashed banana, both sugars and coffee in a bowl and whisk together. Now add in the flour, baking powder, bicarbonate of soda and salt and whisk again until you have a smooth batter. Roughly chop 100g of the dark chocolate and stir that in, reserving the rest. Scrape the batter into the prepared tin and arrange the banana halves on top.
  3. Bake for 50-55 minutes or until well risen, springy and golden. Once baked, leave to cool in the tin, then melt the remaining dark chocolate and drizzle over the top.

Enjoy!

Sea Salt, Dark Chocolate & Almond Butter Cookies (Vegan)

Biscuits

In the spirit of Veganuary, I thought I’d keep my recipes plant based this month. I’m not vegan myself, but am completely on board with reducing my consumption of animal products, so should probably reflect this in my baking. This week I tackled a home baking classic: the chocolate chip cookie. I’m pretty smug about the result; you would never guess they contained neither eggs nor dairy as the texture is buttery and chewy and the flavour rich, nutty and indulgent. Definitely give them a try, I’ve had great feedback from my (very willing) testers!

Ingredients

  • 150g vegan butter ( I used Naturli’s Vegan Baking Block)
  • 150g smooth almond butter
  • 75ml almond milk
  • 175g light brown soft sugar
  • 150g caster sugar
  • 1tsp vanilla extract
  • 150g rye flour
  • 200g plain flour
  • 1tsp bicarbonate of soda
  • 1/2tsp baking powder
  • 300g 70% dark chocolate, roughly chopped
  • 75g almonds, roughly chopped
  • Sea salt

Method

  1. Preheat the oven to 170c. Place the vegan butter, almond butter, almond milk, both sugars and vanilla in a heatproof bowl and set over a pan of simmering water (ensuring that the water does not touch the base of the bowl). Heat, stirring occasionally, until all the ingredients have melted to form a smooth mixture. Set aside to cool for 10 minutes.
  2. In a large mixing bowl, stir together the rye flour, plain flour, bicarbonate of soda, baking powder and a pinch of salt. Add in the wet ingredients and mix with a wooden spoon until a soft dough has formed. Now evenly distribute 3/4 of the chocolate chunks and all the almonds through the mixture.
  3. Line 2 or 3 large baking trays with greaseproof paper. Using an ice cream scoop shape even balls of dough and arrange on the trays, allowing space for spreading ( I put up to 6 cookies on each tray). Take a couple of your reserved chocolate chunks and press into the top of each ball of dough, then sprinkle with some sea salt.
  4. Bake for 10 minutes, then carefully take the trays out and bang them sharply on a worktop. Pop them back in the oven for 3 minutes then bang once more and leave to cool. This technique is favoured by lots of bakers as it stops the cookies from puffing up too much and creates that wrinkly finish (you’ll probably need to bake the cookies in batches as this recipe will make 18-22).
  5. Leave the cookies to cool on the trays or serve warm. Best enjoyed freshly baked.

Enjoy!

Chocolate Tahini Tiffin with Orange and Fig (Vegan)

Chocolate, Uncategorized

It’s January. It’s bloody freezing. I’ve hit a new level of pale, the Christmas tree has gone to festive heaven and everyone appears to be chasing a dry January (with varying levels of success) or hitting the gym. With these bleak facts in mind, I’m not going to share a protein-5cal-superfood recipe (that would be off brand anyway); instead, here’s a delicious way to use up any old dried fruit and nuts you have lying around after Christmas. It’s not an energy ball but it’s not the worst thing you could be eating. Enjoy!

Ingredients

  • 200g 70% dark chocolate
  • 50g coconut oil
  • 100g tahini
  • 1tbsp maple syrup
  • generous pinch sea salt
  • zest 1 orange
  • 150g mixed nuts (I used pistachios, almonds and pecans), roughly chopped
  • 120g dried figs, roughly chopped (I love figs with orange and tahini, but you could use any dried fruit)
  • 2tbsp sesame seeds, lightly toasted

Method

  1. Place the chocolate, coconut oil, tahini, maple syrup, seas salt and orange zest in a large heatproof bowl. Set the bowl over a pan of simmering water (ensuring that the water doesn’t touch the bottom of the bowl) and melt gently, stirring occasionally.
  2. Once the contents of the bowl have melted, mix briefly to form a smooth, glossy liquid. Set aside to cool a little.
  3. Once the chocolate mix has cooled, stir through the mixed nuts, dried figs and most of the sesame seeds. Tip into a lined tin/mould (mine was roughly 20x12cm) and level out with the back of a spoon. Sprinkle over the remaining sesame seeds, then leave in the fridge to set for at least 2 hours.
  4. Once set, slice up and serve (keep refrigerated).

Spiced Pistachio and Sour Cherry Brownies

Chocolate, Uncategorized

No matter how many elaborate desserts or multi-step bakes I make, I will always have time for the humble brownie; there is something deeply satisfying about that fudgy melt-in-the-mouth core and crackly top, plus they are incredibly versatile- throw anything in (within reason) and you can guarantee a delicious result. These festive brownies are studded with orange-soaked sour cherries, pistachios and milk chocolate chunks, and hum with cardamom, cinnamon and mixed spice.

Ingredients

  • Juice of 1 orange
  • 100g roughly chopped sour cherries
  • 250g butter, cubed
  • 100g 80% dark chocolate
  • 150g 70% dark chocolate
  • 100g dark brown soft sugar
  • 100g golden caster sugar
  • 3 eggs, plus 1 egg yolk
  • large pinch sea salt
  • 1tsp ground cardamom
  • 1tsp ground mixed spice
  • 1/2tsp ground cinnamon
  • 100g plain flour
  • 75g roughly chopped pistachios
  • 150g roughly chopped milk chocolate

Method

  1. Preheat the oven to 180c. Grease and line a 22x22cm baking tin. Soak the sour cherries in the orange juice and set aside until required.
  2. Put the dark chocolate and butter in a heatproof bowl and set over a pan of gently simmering water. Leave to melt, stirring occasionally, then set aside to cool a little.
  3. Meanwhile beat together the sugars, salt, eggs and egg yolk in a stand mixer (or a large bowl) until very light and voluminous (it will pretty much double in size). This stage is well worth the effort- it will give you that classic cracked top.
  4. Once the egg mixture is ready, pour the chocolate mix down the side of the bowl and fold in using a large metal spoon. Add the flour, salt and spices and do the same until you have a smooth, lump free batter. Now add the pistachios, chocolate chunks and cherries (strain away the orange juice) and stir through to evenly distribute.
  5. Tip the mix into the prepared tin and level off then bake for 25-30 minutes. When it’s ready, the brownie will have a flaky crisp top but will still be gooey and moist on the inside. Set aside to cool in the tin then remove, slice up and serve.

Enjoy!

Spiced Christmas Buns with Cranberry and White Chocolate

Bread, Uncategorized

In the words of Jez (Peep Show reference, sorry if you don’t watch it), ‘I am a Christmassist’. I love everything associated this time of year; heady spices, mulled anything, twinkling lights, the smell of fir, infinite chocolate, roll necks and nostalgic films. With that in mind, I’ve got lots of festive recipes lined up for December, kicking off with these spiced buns, packed full of orange-soaked fruit and white chocolate- delicious warm from the oven with a strong coffee.

Ingredients

For the dough

  • 75g butter, plus extra for greasing
  • 220ml milk
  • 50g caster sugar
  • 1tsp sea salt
  • 500g strong white bread flour
  • 2 sachets fast action dried yeast (14g)
  • 2 eggs (1 for the dough and 1 for glazing)

For the filling

  • 75g dried cranberries, roughly chopped
  • 50g sultanas, roughly chopped
  • Zest and juice 2 oranges
  • 125g butter, softened
  • 125g dark brown soft sugar
  • 1tsp ground cinnamon
  • 1tsp ground ginger
  • 1/2 tsp mixed spice
  • 100g white chocolate, roughly chopped

For the topping

  • The reserved orange juice, plus 3tbsp caster sugar
  • A few extra cranberries, roughly chopped (optional)
  • 75g white chocolate, melted (optional)

Method

  1. Start off by making the dough. Put the butter and milk into a saucepan and very gently heat until the butter melts, then set aside until lukewarm. Stir together the sugar, salt, yeast and flour in a large bowl (or bowl of a stand mixer with dough hook attached) then make a well and add in the lukewarm milk/butter and one of the eggs. Mix the wet ingredients into the dry, first using a wooden spoon to bring everything together, then using your hands to form a soft dough (alternatively, do this by setting your dough hook to a low speed).
  2. Once you have a soft dough, turn it out onto a very lightly floured surface and knead for about 10 minutes (or just keep the dough in your stand mixer bowl and increase the speed of your dough hook for 6-8 minutes) or until your dough is smooth, stretchy and elastic.
  3. Now tip the dough into an oiled bowl, cover with oiled cling film and leave to prove for about an hour and a half, or until doubled in size.
  4. For the bun filling, place the cranberries, sultanas, orange zest and orange juice in a bowl and leave to soak for half an hour. Meanwhile, beat together the butter, sugar, cinnamon, ginger and mixed spice until smooth. Grease a high sided 20x30cm rectangular tin or 25x25cm square tin and line with greaseproof paper.
  5. Once the dough has proved, tip out onto a lightly floured surface and roll into a rectangle, about 5mm thick. Spread the cinnamon butter mixture across the surface of the rectangle in an even layer, ensuring that you go all the way to the edges. Now strain the orange juice away from the dried fruits into a saucepan (save this for later). Sprinkle the fruits over the cinnamon butter then lastly distribute the chopped white chocolate.
  6. Now, with the long side facing you, roll the rectangle up like a roulade. Slice into 12 even slices if you’re using a rectangular tin (about 2cm wide) or 9 even slices if you’re using a square (about 2.5cm wide). Arrange the pieces, swirl side up, in the prepared tin and cover with a piece of lightly oiled cling film. Leave to prove for 30-40 minutes or until well risen and springy (before this prove there will be little gaps between the buns, but they should be just touching when ready to bake). Preheat the oven to 180c.
  7. Once risen, whisk the remaining egg and brush all over the tops of the buns. Bake for 40-45 minutes or until golden and cooked through. Meanwhile, place the reserved orange juice and caster sugar in a saucepan and heat gently, until the sugar dissolves and the mixture is syrupy. When the buns are baked, brush the syrup all over the tops, then drizzle on the white chocolate and finish with chopped cranberries, if you like.

Miso Caramel Chocolate Fondants with Salted Cashew Crunch

Uncategorized

A classic, but better; think filthy dark chocolate fondant with an oozing liquid centre, then throw in the addition of pooling, hot, slightly-savoury miso caramel sauce and a salted, nutty crunch topping. Need I say more?

Ingredients (these quantities yielded 6 large fondants but would make 8 smaller ones)

For the miso caramel

  • 100g caster sugar
  • 25ml water
  • 50ml double cream
  • 2tbsp white miso
  • pinch salt

For the chocolate fondant base

  • 180g butter, plus a little more for greasing
  • A little cocoa powder, for dusting
  • 250g dark chocolate
  • 275g golden caster sugar
  • 4 eggs
  • 175g plain flour

For the salted cashew crunch

  • 75g cashews, toasted
  • 100g caster sugar
  • Generous pinch salt
  • 1tbsp sesame seeds

Method

  1. Before you make the chocolate mix, make the miso caramel. To do this place the sugar and water in a saucepan and heat gently until the sugar has completely dissolved, then increase the heat and boil until it reaches a deep golden colour. At this stage, add the double cream and stir for another minute before taking the saucepan off the heat and adding the miso paste and salt. Stir until smooth, taste and adjust the level of salt then pour into a heatproof tub and chill until firm.
  2. For the salted cashew crunch place the sugar in a pan and melt, then allow it to turn golden brown and add the cashews, sesame seeds and salt. Stir to coat the cashews with the caramel then tip onto a piece of greaseproof paper and leave to set hard, then roughly chop into a coarse crumb.
  3. Preheat the oven to 180c. Grease the insides of the fondant moulds with the extra butter, then dust with cocoa, shaking to coat. Tip out any excess then place all the moulds on a baking tray, ready to be filled.
  4. For the chocolate mix, place the chocolate and butter in a large heatproof bowl set over a pan of simmering water. Stir occasionally until smooth then set aside to cool a little. Whisk in the sugar (using a good old fashioned hand whisk will do) then the eggs, one at a time. Fold in the flour and once you’ve got a smooth mix split half of it between the moulds. Now create a little indent in the middle of the chocolate in each mould and scrape in a heaped tablespoon of your caramel. Top up with the remaining chocolate mix until each mould is filled to about 2cm below the rim.
  5. Bake the fondants for 17-22 minutes or until they are set on top and around the sides but still have a slight wobble in the middle (this time will vary from oven to oven and mould to mould so keep an eye on them- bare in mind my moulds have a 2inch wide base/3 inch wide rim/are 2 inches in height, and the fondants took 22 minutes in my old school oven!).
  6. Once the fondants are ready, leave to sit for a minute or two then run a knife around the edge of each mould. Carefully turn the fondants out onto serving plates and sprinkle with some salted cashew crunch. Serve with vanilla ice cream for added indulgence.


Enjoy!