Spiced Fig Cake with Brown Butter Caramel Sauce

Cakes

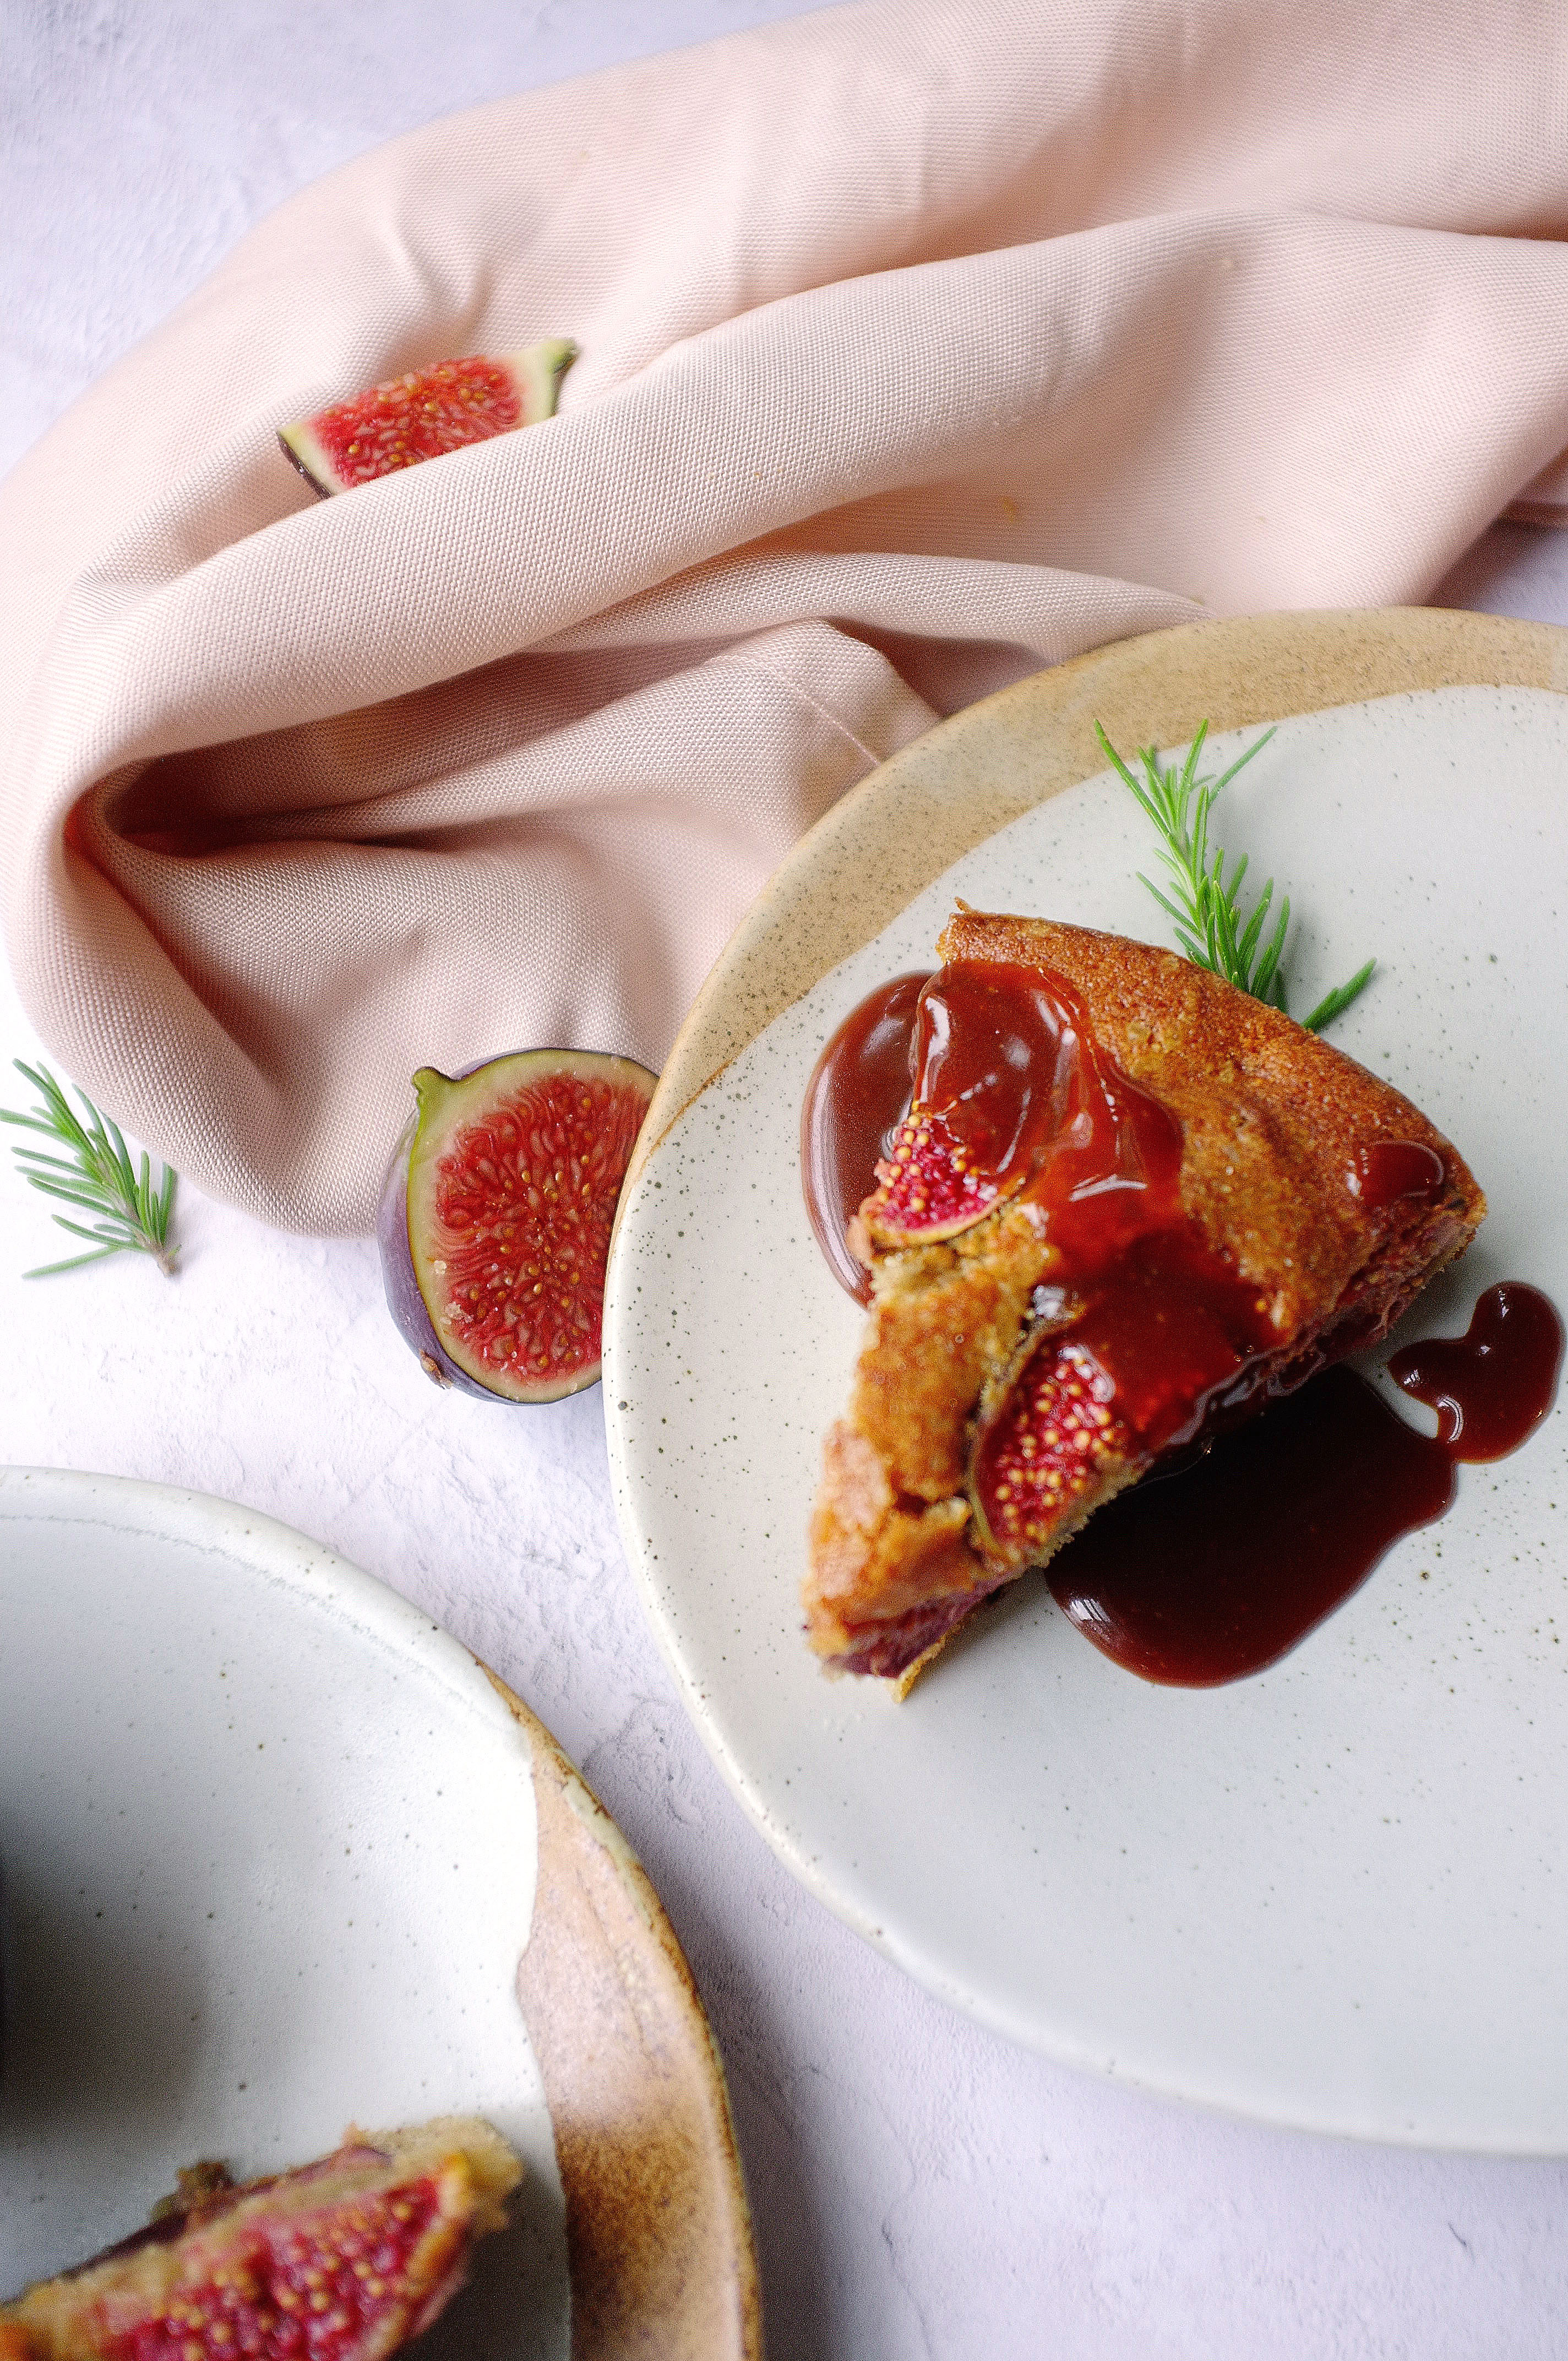
Jammy baked figs, warming spices and a slightly nutty, salty-sweet sauce; it’s seasonal bakes like this which make the transition from Summer to Autumn that bit easier (even when the rain is unrelenting, my holiday a distant memory and the sky an ominous shade of purple-grey).

Ingredients

Brown butter caramel

  • 75g butter
  • 200g caster sugar
  • 100ml double cream
  • good pinch salt

Spiced fig cake (makes one 8 inch cake)

  • 175g soft unsalted butter
  • 100g light brown soft sugar
  • 75g caster sugar
  • 3 eggs
  • zest 1 lemon
  • 3tbsp milk
  • 175g self raising flour
  • 1tsp ground cinnamon
  • 1tsp mixed spice
  • 1/2tsp ground cardamom
  • 1/4tsp freshly ground black pepper
  • pinch salt
  • 6-8 figs
  • 1tbsp demerara sugar

Method

  1. Start by making the caramel. Place the butter in a pan and melt down over a low heat. Once melted, increase the heat and foam until browned. Pour into a bowl and leave to cool.
  2. Tip the caster sugar into a heavy bottomed pan and heat gently, swirling occasionally (but not stirring) until it melts. Increase the heat until the caramel reaches a deep golden brown, then add the browned butter and stir (take care, it will spit a little). Once the butter is well incorporated add the cream and stir. Cook for a further couple of minutes until slightly thickened, then add the salt to taste.
  3. Preheat the oven to 170c and grease/line an 8 inch baking tin. Place the butter and sugars in a large bowl (or bowl of a stand mixer with paddle attachment) and cream until light and fluffy. Add the eggs in one at a time, beating well between each addition (add a little of the flour here if the mix looks like it might curdle). Mix in the lemon zest and milk.
  4. Add the flour, spices and salt to the bowl and fold in with a large metal spoon. Dice 2/3 of the figs and fold those into the mixture too, then scrape it all into the prepared tin. Slice the remaining figs into 6ths and arrange on top of the cake, then sprinkle over the demerara sugar.
  5. Bake for 30-35 minutes or until a skewer comes out clean when inserted.
  6. Once baked, leave the cake to cool in the tin for 10 minutes, then remove and transfer to a wire rack. You can serve this cold or warm (I prefer the latter), but either way, warm up the caramel just before serving and drizzle all over the cake slices.

Enjoy!

Advertisement

Craquelin Choux Buns with Honeyed Walnuts, Mascarpone and Orange

Pastry, Uncategorized

A couple of months ago I bought, then promptly forgot about, some delicious pine honey which I intended to use as the central flavour in a pastry-based recipe. Now that it’s been retrieved from the depths of my cupboard it has well and truly fulfilled that destiny in these crisp craquelin choux buns. Simply filled with honeyed orange mascarpone and walnuts (also baked in the honey and a little salt) these make for a delicious treat, but served alongside honey butterscotch sauce and they’re next level- perfect for a fancy Autumnal dessert.

Ingredients

For the craquelin top

  • 55g unsalted butter, cubed, at room temperature
  • 65g soft light brown sugar
  • 65g plain flour

For the choux

  • 85g butter
  • 220ml water
  • 100g plain flour
  • 3 eggs (plus 1 extra for glazing)
  • pinch of salt

For the filling

  • 300g mascarpone
  • 200ml double cream
  • 2tbsp (heaped) good quality honey (I used Greek Pine Honey)
  • Zest of 2 oranges

For the honeyed walnuts

  • 100g walnuts
  • 2tbsp (heaped) good quality honey (as before)
  • good pinch salt

For the sauce (optional)

  • 75ml honey
  • Juice 1/2 orange
  • 25g butter
  • 100ml double cream
  • Generous pinch salt

Method

  1. Start off by making the craquelin topping (when baked, this forms a crispy sweet layer). To do this simply mix the butter, sugar and flour in a large bowl (or in the bowl of a stand mixer with paddle attachment on a slow speed) until it starts to form large lumps, then bring it together with your hands. Place the dough on a large piece of baking paper, top with another piece of baking paper, and roll out to about 3mm thick. Pop this onto a tray and leave in the freezer to solidify.
  2. To make the choux, put the water, butter and salt in a saucepan set over a medium heat (do not let it boil at this stage). Meanwhile, sieve the flour to remove any lumps. When the butter has melted into the water, increase the heat and bring to a rolling boil, then tip in the flour and stir vigorously until you have a smooth paste-like mix which comes away from the edges of the pan. Continue to stir for another minute to cook out the rawness of the flour, then tip into a clean bowl and close cover with cling film (this eggless stage is known as a ‘panade’). Leave to cool to room temperature.
  3. Preheat the oven to 190c. Line 2 large baking trays with greaseproof paper.
  4. Once the panade has cooled it’s time to add the eggs; whisk in a jug to break them up then very gradually add into the panade while beating with electric beaters. Stop adding the egg (you might have a little leftover) when the smooth, lump-free mixture reluctantly drops off the end of a spoon. Pile the choux mix into a piping bag, fitted with a large round nozzle.
  5. Pipe rounds of about 4cm wide onto the prepared baking trays, leaving plenty of room for expansion. Whisk the remaining egg in a bowl and brush a small amount onto each mound, smoothing down the tip. Take your craquelin sheet and stamp out 3cm circles. Place one on top of each choux mound (the egg will help secure it in place). Bake the choux for around 35 minutes, then skewer a small hole in each bun and return to the oven for a further 5 minutes, to dry out the middles. Once baked, they should be crisp and golden brown with a crackled appearance on top. Cool while you make the other elements.
  6. Toss the walnuts in the honey and salt and spread out on a baking tray. Cook for around 10 minutes or until caramelised then set aside to cool. Once cooled, roughly chop.
  7. For the filling, just whisk together the mascarpone, cream, honey and orange zest until light and smooth. Pile into a piping bag. Finally, for the sauce heat the honey and orange juice in a saucepan and simmer for a couple of minutes, add in the butter and stir until it’s melted, then add the cream and salt. Keep gently simmering, stirring occasionally, until slightly thicker (a few minutes should be fine), then set aside.
  8. To assemble the choux buns, slice each one in half and pipe some mascarpone cream into the base. Top with a sprinkling of walnuts and a little sauce, then place the lid on. Serve with some extra sauce.

Enjoy!

Triple Chocolate Rye, Walnut and Espresso Cookies

Biscuits

I’ve tweaked and tested this recipe at least four times over the past month *woe is me*, and am at last at the point where I’m completely happy with the outcome. Technique-wise I’ve actually harked back to one of my original cookie recipes which I posted about four years ago- it’s so simple and calls for a good old mixing bowl and wooden spoon, but delivers that chewy, crinkly texture which just can’t be rivalled. In terms of ingredients I’ve used a combination of rye and plain flour, three types of chocolate (duh), walnuts and a good dose of espresso; the resulting flavour is well balanced and borderline addictive, so proceed with caution (not actually, definitely give them a go).

Ingredients

  • 150g plain flour
  • 125g rye flour
  • 1tsp bicarbonate of soda
  • Pinch salt
  • 1tbsp instant coffee (ground to a very fine powder)
  • 150g unsalted butter
  • 150g dark brown soft sugar
  • 150g golden caster sugar
  • 1 egg plus 1 egg yolk
  • 75g walnuts, coarsely chopped
  • 100g dark chocolate, coarsely chopped
  • 100g milk chocolate, coarsely chopped
  • 100g white chocolate, coarsely chopped

Method

  1. Preheat the oven to 180c. Line two large trays with baking paper.
  2. Place the plain flour, rye flour, bicarbonate of soda and salt in a large bowl and roughly mix together with a wooden spoon. Add the instant coffee, butter and sugars to a saucepan and gently melt over a medium heat, stirring occasionally.
  3. Once the ingredients have melted together, set aside to cool slightly then add in the egg and egg yolk and whisk briefly to combine.
  4. Pour the wet ingredients into the dry and mix together with a wooden spoon to form a soft cookie dough. Tip in the chocolate and walnuts into the bowl and mix to evenly distribute them through the dough. Chill the dough for at least 1 hour.
  5. Using an ice cream scoop, form balls of cookie dough and line onto the baking trays (leaving lots of space for spreading). You will need to do this in batches (unless you have a huge oven and lots of trays!).
  6. Bake the cookies for 10-12 minutes then set aside. They will be very soft when you get them out of the oven, but don’t worry, they’ll set up a little. Leave to cool and serve.

Enjoy!

Blackberry, Hazelnut and Lavender Honey Celebration Cake

Cakes, Uncategorized

This cake, decorated with whimsical blooms from the Eloise bouquet by Bloom and Wild, is made up of four layers of moist hazelnut sponge soaked in lavender honey syrup, filled with a fresh blackberry compote and covered in delicately flavoured lavender mascarpone cream. The bouquet is inspired by a summer meadow, so it seemed only right to pick out some of my favourite ingredients the British countryside has to offer for this recipe; together the balance of nutty, floral and fruity flavours are delicious. Try this one out in August/September for a really special seasonal centre piece.

Ingredients

For the lavender honey syrup (this is used to soak the sponges and flavour the mascarpone icing)

  • 100ml runny honey
  • 75ml water
  • 4 sprigs fresh lavender or 1tbsp dried lavender

For the blackberry compote

  • 400g fresh blackberries
  • 3tbsp runny honey
  • Zest and juice 1 lemon

For the hazelnut sponges

  • 350g soft unsalted butter
  • 325g light brown soft sugar
  • 6 eggs
  • 200g ground hazelnuts (to make these just blitz 200g blanched hazelnuts in a food processor until fine)
  • 150g plain flour
  • 2tsp baking powder
  • Pinch salt

For the lavender mascarpone cream

  • 3-4tbsp of the lavender honey
  • 350ml double cream
  • 300ml mascarpone

To garnish (optional)

  • The Eloise bouquet by Bloom and Wild
  • Fresh blackberries
  • Crushed and toasted hazelnuts

Method

  1. Start by making the lavender honey (to give it time to develop in flavour). To do this just place the honey, water and lavender (whichever sort you’re using) in a saucepan and gently heat until the honey has dissolved into the water. Once this has happened, simmer for 2 minutes then set aside and leave to infuse until required
  2. Now make the blackberry compote by gently heating the blackberries, honey, lemon zest and juice in a saucepan. Stir occasionally, until the blackberries release their juices and reduce down to form a compote consistency. Set aside to cool.
  3. Preheat the oven to 180c. Grease and line two 8 inch cake tins.
  4. Place the softened butter and sugar in a large bowl (or bowl of a stand mixer) and beat until very light and fluffy (about 5 minutes). Add the eggs, one at a time, beating very well between each addition (add a tablespoon of the flour each time to prevent curdling). Once all the eggs are well incorporated, fold in the ground hazelnuts, remaining flour, baking powder and salt with a large metal spoon.
  5. Divide the mix between the prepared tins and level the tops. Bake for 35-40 minutes (or until well risen and a skewer comes out clean when inserted). Once baked, prick the surfaces of the cakes with a fork and spoon over 3-4tbsp of the lavender honey syrup, then leave to cool completely in the tins.
  6. While the cakes are cooling, make the lavender mascarpone cream. Put all the ingredients in a large bowl (or bowl of a stand mixer) and whisk until thick and spreadable. Scrape half the mixture into a piping bag. Now you’re ready to assemble the cake (providing all your elements are completely cool!).
  7. To put the cake together, slice the sponges in half horizontally (so you have four even layers). Place the first layer down on your chosen plate and pipe a thick ring of mascarpone cream around the edge, then fill the middle with one third of the blackberry compote and repeat this until you’ve stacked up all four layers. With the remaining mascarpone cream, cover the cake and smooth with a palette knife. Decorate with blooms from the Eloise bouquet or freestyle with hazelnuts, fresh blackberries and lavender.

Enjoy!

Brown Butter, Pecan and White Chocolate Brownies (GF)

Chocolate, Uncategorized

If you do one thing this weekend, make these brownies; with brown butter delivering a deep nutty flavour, pecans adding a welcome crunch and dark brown sugar leaving you with a molasses hit, they 100% deliver on flavour and texture and are perhaps the most delicious brownies I’ve made to date (drops mic) (cringes).

Ingredients (makes 9-12 brownies)

  • 250g butter, cubed
  • 250g dark chocolate
  • 100g dark brown soft sugar
  • 100g golden caster sugar
  • 3 eggs, plus 1 egg yolk
  • large pinch sea salt
  • 100g gluten free plain flour (I used Doves Farm)
  • 100g chopped pecans
  • 75g chopped white chocolate
  • 75g chopped milk chocolate

Method (makes 9-12 brownies, depending on how hungry you are)

1) Preheat the oven to 180c. Grease and line a 22x22cm brownie tray.

2) Place the cubed butter in a saucepan and melt over a medium heat. Once completely melted, up the heat and allow the butter to foam until it smells nutty and reaches a deep golden colour. At this stage, remove from the heat and add in the chopped dark chocolate. Let it sit for a couple of minutes then stir briefly to create a smooth glossy mix. Set aside to cool a little.

3) While the chocolate mixture cools, place the sugars, salt, eggs and egg yolk in a stand mixer (or in a large bowl) and beat until very light and voluminous (it will pretty much double in size). This stage is well worth the effort- it will give you that classic cracked top.

4) Once the egg mixture is ready, pour the chocolate mix down the side of the bowl and fold in using a large metal spoon. Add the gluten free flour and do the same until you have a smooth, lump free batter. Now add the chocolate chunks and pecans and stir through to evenly distribute.

5) Tip the mix into the prepared tin and level off. Bake for 25-30 minutes.

6) When it’s ready, the brownie will have a flaky crisp top but will still be gooey and moist on the inside. Set aside to cool (completely) in the tin then remove, slice up and serve.


Rose Labneh with Sumac Baked Figs

Cooking

I know I’m getting a few months ahead of myself by posting a fig recipe (usually they come into season around late July), but when I saw some particularly plump, dark looking figs in my local fresh produce shop, I couldn’t help but cook them up with some delicious accompaniments. You could recreate this super simple recipe using any seasonal fruit- rhubarb, greengage or peach would work particularly well.

Ingredients (serves 6)

  • 400ml Greek yoghurt
  • 3tbsp runny honey
  • 2tsp rose water
  • 10-12 ripe figs
  • 1-2tsp sumac
  • Few sprigs thyme
  • 1 pomegranate, seeds only
  • 75g almonds

Method

  1. Place the yoghurt, 1tbsp of the honey and the rose water in a bowl. Mix together then transfer to a muslin cloth and tie up the corners. Sit this in a sieve over a bowl for at least 24 hours (refrigerated).
  2. After 24 hours the liquid will have drained from the yoghurt, leaving you with a thick, smooth labneh.
  3. Once the labneh is ready, prepare the other elements of your dessert. Preheat the oven to 200c and line a high sided baking tray with greaseproof paper. Slice the figs into either halves or quarters (depending on your visual preference!) and spread out on the tray (cut side up). Drizzle with the remaining 2tbsp honey and sprinkle over the sumac. Roughly break the thyme into the tray too.
  4. Roast the figs for 20-25 minutes until very tender and sticky. While the figs are cooking, toast the almonds in a dry frying pan until lightly coloured, then roughly chop.
  5. To serve, spread a generous spoonful of the labneh onto your dessert plates and arrange some fig pieces on top. Sprinkle over the almonds and pomegranate seeds and lastly, garnish with some thyme, if you like.

Enjoy!

Blood Orange and Ginger Celebration Cake

Cakes

This ode to the fruits of winter will brighten any grey day with it’s sticky layers of spiced sponge, fresh ginger mascarpone cream and smooth blood orange curd. Decorate with pomegranate seeds, candied blood orange slices and chopped pistachios for a welcome explosion of colour during these colder months.

Ingredients

For the cake

  • 250g golden syrup
  • 3 tbsp ginger syrup
  • 190g butter
  • 3-4 lumps stem ginger, diced
  • 175g dark brown soft sugar
  • zest 1 orange
  • 375g self-raising flour
  • 2tsp ground ginger
  • 1tsp ground cinnamon
  • 1 1/2 tsp bicarbonate of soda
  • a pinch of salt
  • 3 eggs
  • 260ml milk

For the blood orange curd

  • juice and zest 2 blood oranges
  • juice and zest 1 lemon
  • 2 eggs
  • 2 egg yolks
  • 100g caster sugar
  • 100g butter, cubed

For the ginger mascarpone cream

  • 1tbsp icing sugar
  • 1tbsp ginger syrup
  • 300ml double cream
  • 250g mascarpone

Garnish ideas (optional)

  • pomegranate seeds
  • chopped pistachios
  • candied orange slices
  • shards of tuile or ginger biscuit

Method

  1. Start off with the ginger cake. Grease and line two 7 inch cake tins and preheat the oven to 180c.
  2. Place the golden syrup, ginger syrup, butter, diced stem ginger, dark brown sugar and orange zest in a saucepan and melt over a low/medium heat. Once the ingredients are melted bring to the boil and leave to bubble for about a minute, then set aside to cool a little.
  3. Meanwhile, in a large bowl stir together the flour, ginger, cinnamon, bicarbonate of soda and salt. Make a large well in the centre and tip in the melted butter mixture. Whisk the wet and dry ingredients together until smooth and flour lump free. In a jug whisk the eggs and milk together with a fork and add those into the mixing bowl. Whisk once more to combine then split the batter between the prepared cake tins.
  4. Bake for 30-35 minutes or until a skewer comes out clean when inserted.
  5. While the cakes are baking make the blood orange curd. To do this simply place the blood orange zest and juice, lemon zest and juice, eggs and egg yolks and caster sugar into a heatproof bowl. Whisk together to combine then set over a pan of simmering water (without the water touching the bowl). Add the butter cubes one at a time, constantly whisking. Once all the butter has been added and is melted, continue to whisk until the curd has thickened to a coating consistency (this will take between 5-10 minutes). Once the curd is ready, set aside to cool in a clean bowl with cling film flat across the surface (this will prevent a skin from forming).
  6. When the cakes are ready leave them to cool completely in the tins. Once cool, even the tops off if necessary then slice each horizontally (so you are left with 4 even cake layers).
  7. Now make the mascarpone cream; tip the double cream, icing sugar, ginger syrup and mascarpone into a bowl (or bowl of a stand mixer) and whisk until thickened and smooth.
  8. Once all your components are cool it’s time to assemble the cake. Place one layer on your chosen serving plate and pipe dots of mascarpone cream around the edge then fill the centre with blood orange curd. Repeat until you’ve used up the cake layers and decorate the top as desired.


Enjoy!

Orange, Parsnip and Ginger Cake

Cakes

Don’t be put off by the inclusion of parsnips in this recipe; they’re deliciously sweet root vegetables which work in the same way as carrots when baked alongside nuts, sugar and spice. I’ve filled and topped this cake with refreshing ginger mascarpone which acts as the perfect contrast to the spiced walnut, parsnip and orange sponge.

Ingredients

For the cake:

  • 4 eggs
  • 200g caster sugar
  • 50g light brown soft sugar
  • 300ml sunflower oil
  • 225g plain flour
  • 2tsp baking powder
  • 1 1/2 tsp bicarbonate of soda
  • large pinch salt
  • 2tsp ground ginger
  • 1tsp cinnamon
  • 1/2 grated nutmeg (fresh)
  • 450g grated parsnip
  • 100g sultanas
  • zest 2 oranges
  • 175g chopped walnuts

For the ginger mascarpone:

  • 450g mascarpone
  • 3tbsp ginger syrup
  • 2-3tbsp icing sugar
  • 100ml double cream

For decoration:

  • 3 stem ginger balls, diced
  • 50g chopped and toasted walnuts
  • a little caramel sauce (optional)

Method

  1. Preheat the oven to 180c. Grease and line two 8 inch cake tins.
  2. Place the eggs, sugars and oil in a large bowl (or bowl of a stand mixer) and beat until pale and thick. Stir together the plain flour, baking powder, bicarbonate of soda, salt, ginger, cinnamon and nutmeg in another bowl then add to the egg mixture and beat briefly to throughly combine. Stir in the grated parsnip, sultanas, orange zest and walnuts.
  3. Split the cake batter evenly between the two prepared tins and level off. Bake for 45-55 minutes or until a skewer comes out clean when inserted. Once baked, leave the cakes to cool in the tins.
  4. While the cakes are cooling, make the ginger mascarpone. To do this simply whisk together all the ingredients until smooth.
  5. To assemble the cake spread a generous layer of ginger mascarpone over the first sponge, sandwich on the second then spread over the remaining mascarpone. Top with stem ginger pieces, chopped walnuts and caramel sauce, if you like.

Enjoy!

Chocolate Honeycomb Celebration Cake

Cakes

Whenever I bake a chocolate cake (the layered kind, not the flourless, fudgy sort) I’m looking for a sponge which actually tastes of chocolate, is really moist without being overly dense and isn’t too sickly sweet. I’m always tweaking my go to chocolate cake with these characteristics in mind and think I’ve pretty much cracked it with this recipe. I’ve teamed the light chocolate layers with honeycomb toppers, salted toffee cream filling and a rich ganache coating here, but you could definitely fill it with chocolate buttercream if you want a pure chocolate fest.

Note: this cake is so extra and is definitely one for a special occasion- you could half the recipe and just coat with ganache if you’re after something indulgent but a little more modest

Ingredients (makes a tall 8 inch celebration cake- feeds 12-14 people)

For the cake:

  • 375g plain flour
  • 300g caster sugar
  • 85g cocoa powder
  • 2tsp baking powder
  • 2tsp bicarbonate of soda
  • large pinch sea salt
  • 3 eggs
  • 325ml milk
  • 175ml vegetable oil
  • 2tsp vanilla extract
  • 100g dark chocolate
  • 325ml just boiled water
  • 2tsp instant coffee granules

For the toffee cream filling:

  • 325g soft light brown sugar
  • 225ml double cream
  • 175g butter
  • pinch sea salt

For the ganache:

  • 200g dark chocolate
  • 150g milk chocolate
  • 300ml double cream

For the honeycomb (this makes more than enough- I use about half and store the rest in a jar for my many weak snacking moments):

  • 60g butter
  • 120g caster sugar
  • 60g golden syrup
  • 1 1/2tsp bicarbonate of soda

Method

  1. Preheat the oven to 170c (325F / gas mark 3). Grease and line two 8 inch cake tins.
  2. Melt the dark chocolate in a heatproof bowl set over a pan of simmering water (or in the microwave in short stints, stirring often). Set aside.
  3. In a large bowl stir together the flour, caster sugar, cocoa powder, baking powder, bicarbonate of soda and salt. In a jug, lightly whisk the eggs, milk, vegetable oil and vanilla extract. Make a well in the dry ingredients and pour the contents of the jug into it. Stir the wet and dry ingredients together until well combined then add the melted chocolate and stir again (I just use a balloon whisk for this- nothing electric is required as you don’t need to incorporate much air).
  4. Pour your just boiled water over the instant coffee granules and once they’ve dissolved, gradually add to the chocolate batter, stirring gently with your whisk as you go. The final cake batter will be very thin but don’t worry, it bakes beautifully.
  5. Split the mix evenly between the prepared tins and bake for 45-55 minutes (until a skewer comes out clean with a few moist crumbs attached). Once baked leave to cool completely in the tins.

  1. While your cakes are cooking and cooling you can get on with the filling, ganache and honeycomb toppers.
  2. For the filling, place the cream and sugar in a saucepan and gently heat until the sugar has dissolved and you are left with a smooth caramel coloured cream. Set aside, add the salt (to taste) and cool completely. Once your cream has cooled take the butter and whisk (in a stand mixer or with electric beaters) until it reaches a light, whipped consistency then gradually add your cream mixture. Keep whisking this until it has thickened and is spreadable. Set aside for later.
  3. For the ganache chop up the chocolate and scrape into a heatproof bowl or jug, then heat the cream until it just reaches boiling point and pour directly on top. Leave for a couple on minutes then stir to make sure the chocolate has melted into the cream leaving you with a smooth ganache. Set aside to cool and thicken.
  4. For the honeycomb line a baking tray with some lightly oiled baking paper then place the butter, sugar and golden syrup in a saucepan. Gently heat until all the ingredients start melting together then stir to combine. Turn up the heat and leave to bubble until it reaches a deep golden colour then add the bicarbonate of soda and briefly mix to make sure it’s evenly distributed- it should now start bubbling up and becoming lacy in appearance. At this point pour it quickly onto the lined baking tray and leave to set hard.
  5. Once you’ve made all your elements and they’ve cooled to room temperature you’re ready to assemble the cake. To do this slice any uneven tops off your sponges then slice in half horizontally, leaving you with four layers.
  6. Sandwich the layers on top of one another, filling with the toffee cream as you go. Once stacked, spread any remaining toffee cream all over the cake and then chill for 10 minutes (this setting time makes it easier to cover the cake neatly in ganache).
  7. After chilling the cake spread the ganache all over its surface. I used a palette knife to create a line pattern on my cake to tie in with the honeycomb theme but you could make it super sleek and smooth or go for a really rustic look- it’s up to you. To finish it off break up the honeycomb and use as decorations; I also made some toppers by setting melted chocolate over bubble wrap, but it really isn’t necessary!

I hope you all enjoy this recipe- my family and friends went absolutely mad for it so it’s definitely worth the effort if you’re up for a little bit of a baking project!

Gooseberry and Elderflower Layer Cake

Cakes

Layers of zesty elderflower sponge sandwiched together with tart gooseberry compote and lightly whipped elderflower cream make up this delicious nod to the British countryside. Bake it for a special mid-summer occasion or round off a Sunday lunch with a generous slice.

Ingredients:

  • 275g soft butter
  • 275g caster sugar
  • zest 1 lemon
  • 5 eggs
  • 275g self raising flour
  • 3-4tbsp elderflower cordial

For the gooseberry compote:

  • 500g fresh (or frozen and defrosted) gooseberries
  • 75g caster sugar
  • 50ml water

For the elderflower cream:

  • 600ml double cream
  • 4-5tbsp elderflower cordial
  • 1-2tbsp icing sugar

Method:

  1. Preheat the oven to 170c. Grease and line two 8 inch cake tins.
  2. Place the butter, sugar and zest in a large bowl (or bowl of a stand mixer with paddle attachment) and cream together until light, pale and fluffy.
  3. Add in the eggs one at a time, beating well between each addition to ensure they are fully incorporated. Now tip in the elderflower cordial and briefly mix once more to distribute it evenly through the batter.
  4. Sift over the flour and fold in with a large metal spoon. Split the mixture between the two prepared tins and level out. Bake for 35-45 minutes or until a skewer comes out clean when inserted.
    While the cakes are baking, make the gooseberry compote. Put the gooseberries, sugar and water in a saucepan and gently heat, stirring occasionally, until the fruits are soft and a loose compote has formed (10-15 minutes).
  5. When the cakes are ready, leave to cool completely in the tins. While they cool, make the elderflower cream. To do this simply whisk together the cream, cordial and sugar until soft peaks form.
  6. Once all your elements are cool, assemble the cake. Spread a generous layer of compote and several dollops of elderflower cream between each sponge, then finish with a few sprigs of elderflower for a simple, effortless summer pudding.

Enjoy!