Salted Chocolate Cake with Coffee Mascarpone & Hazelnut Praline Caramel

Cakes

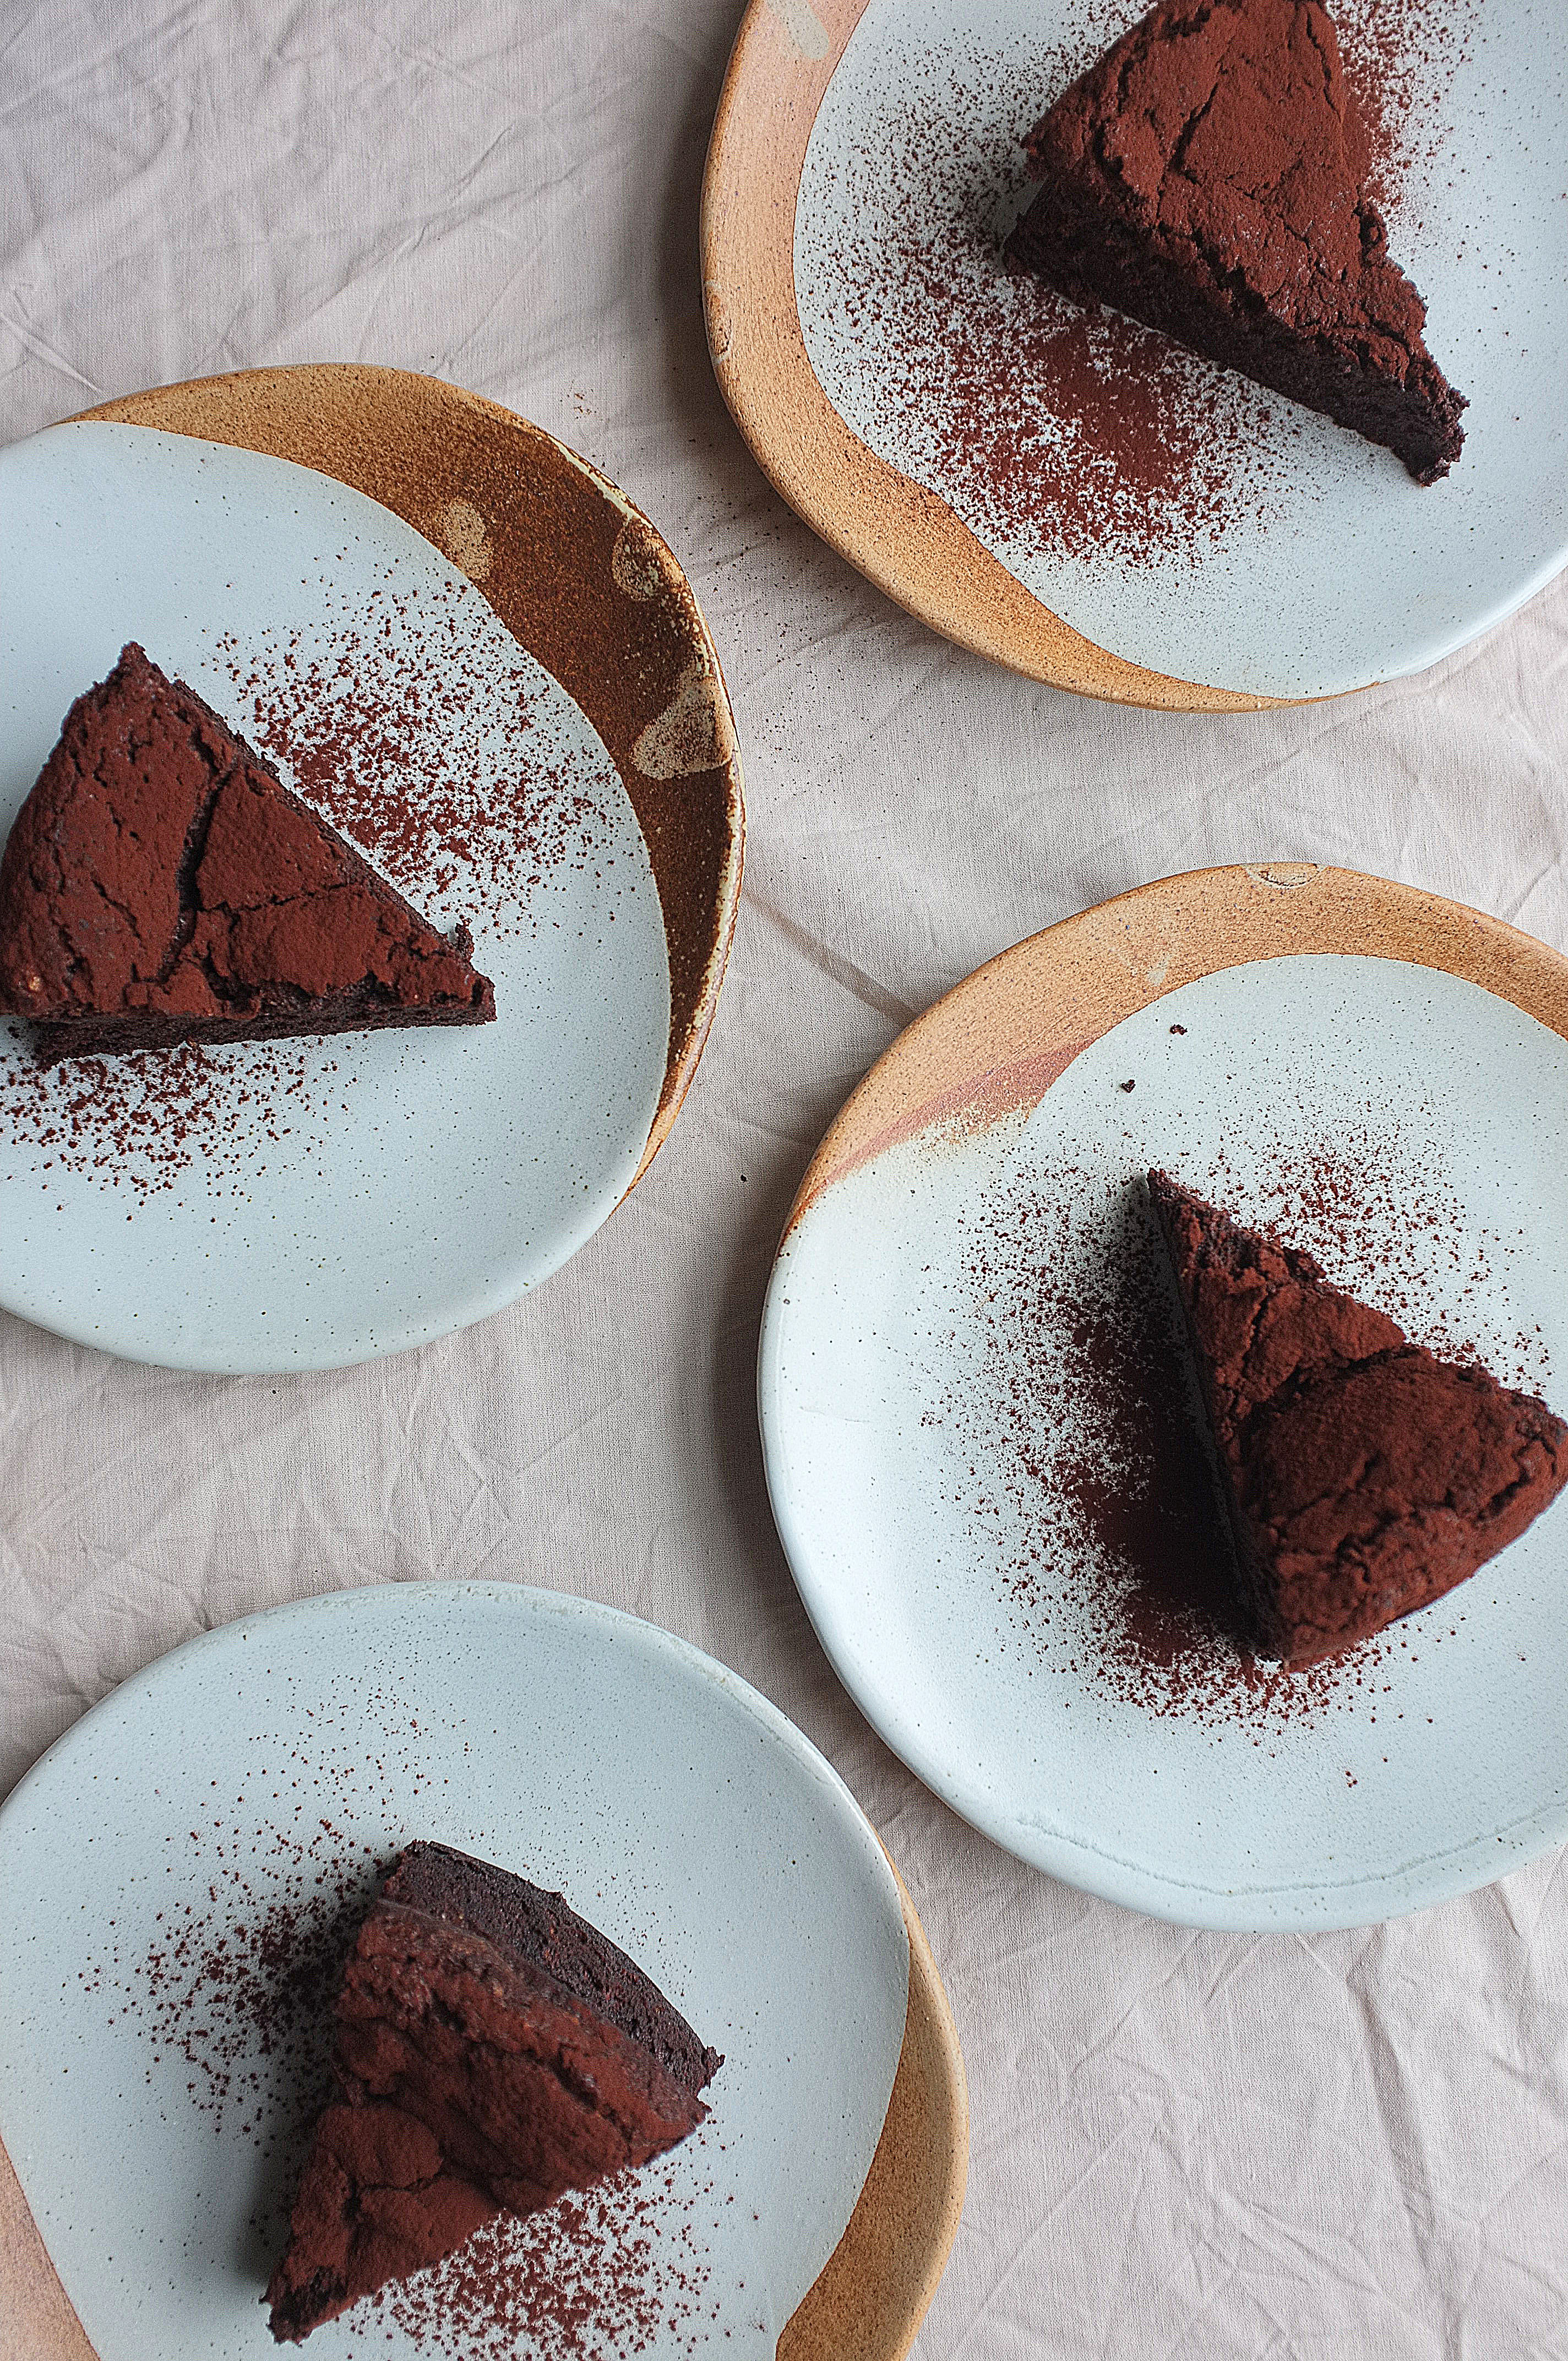
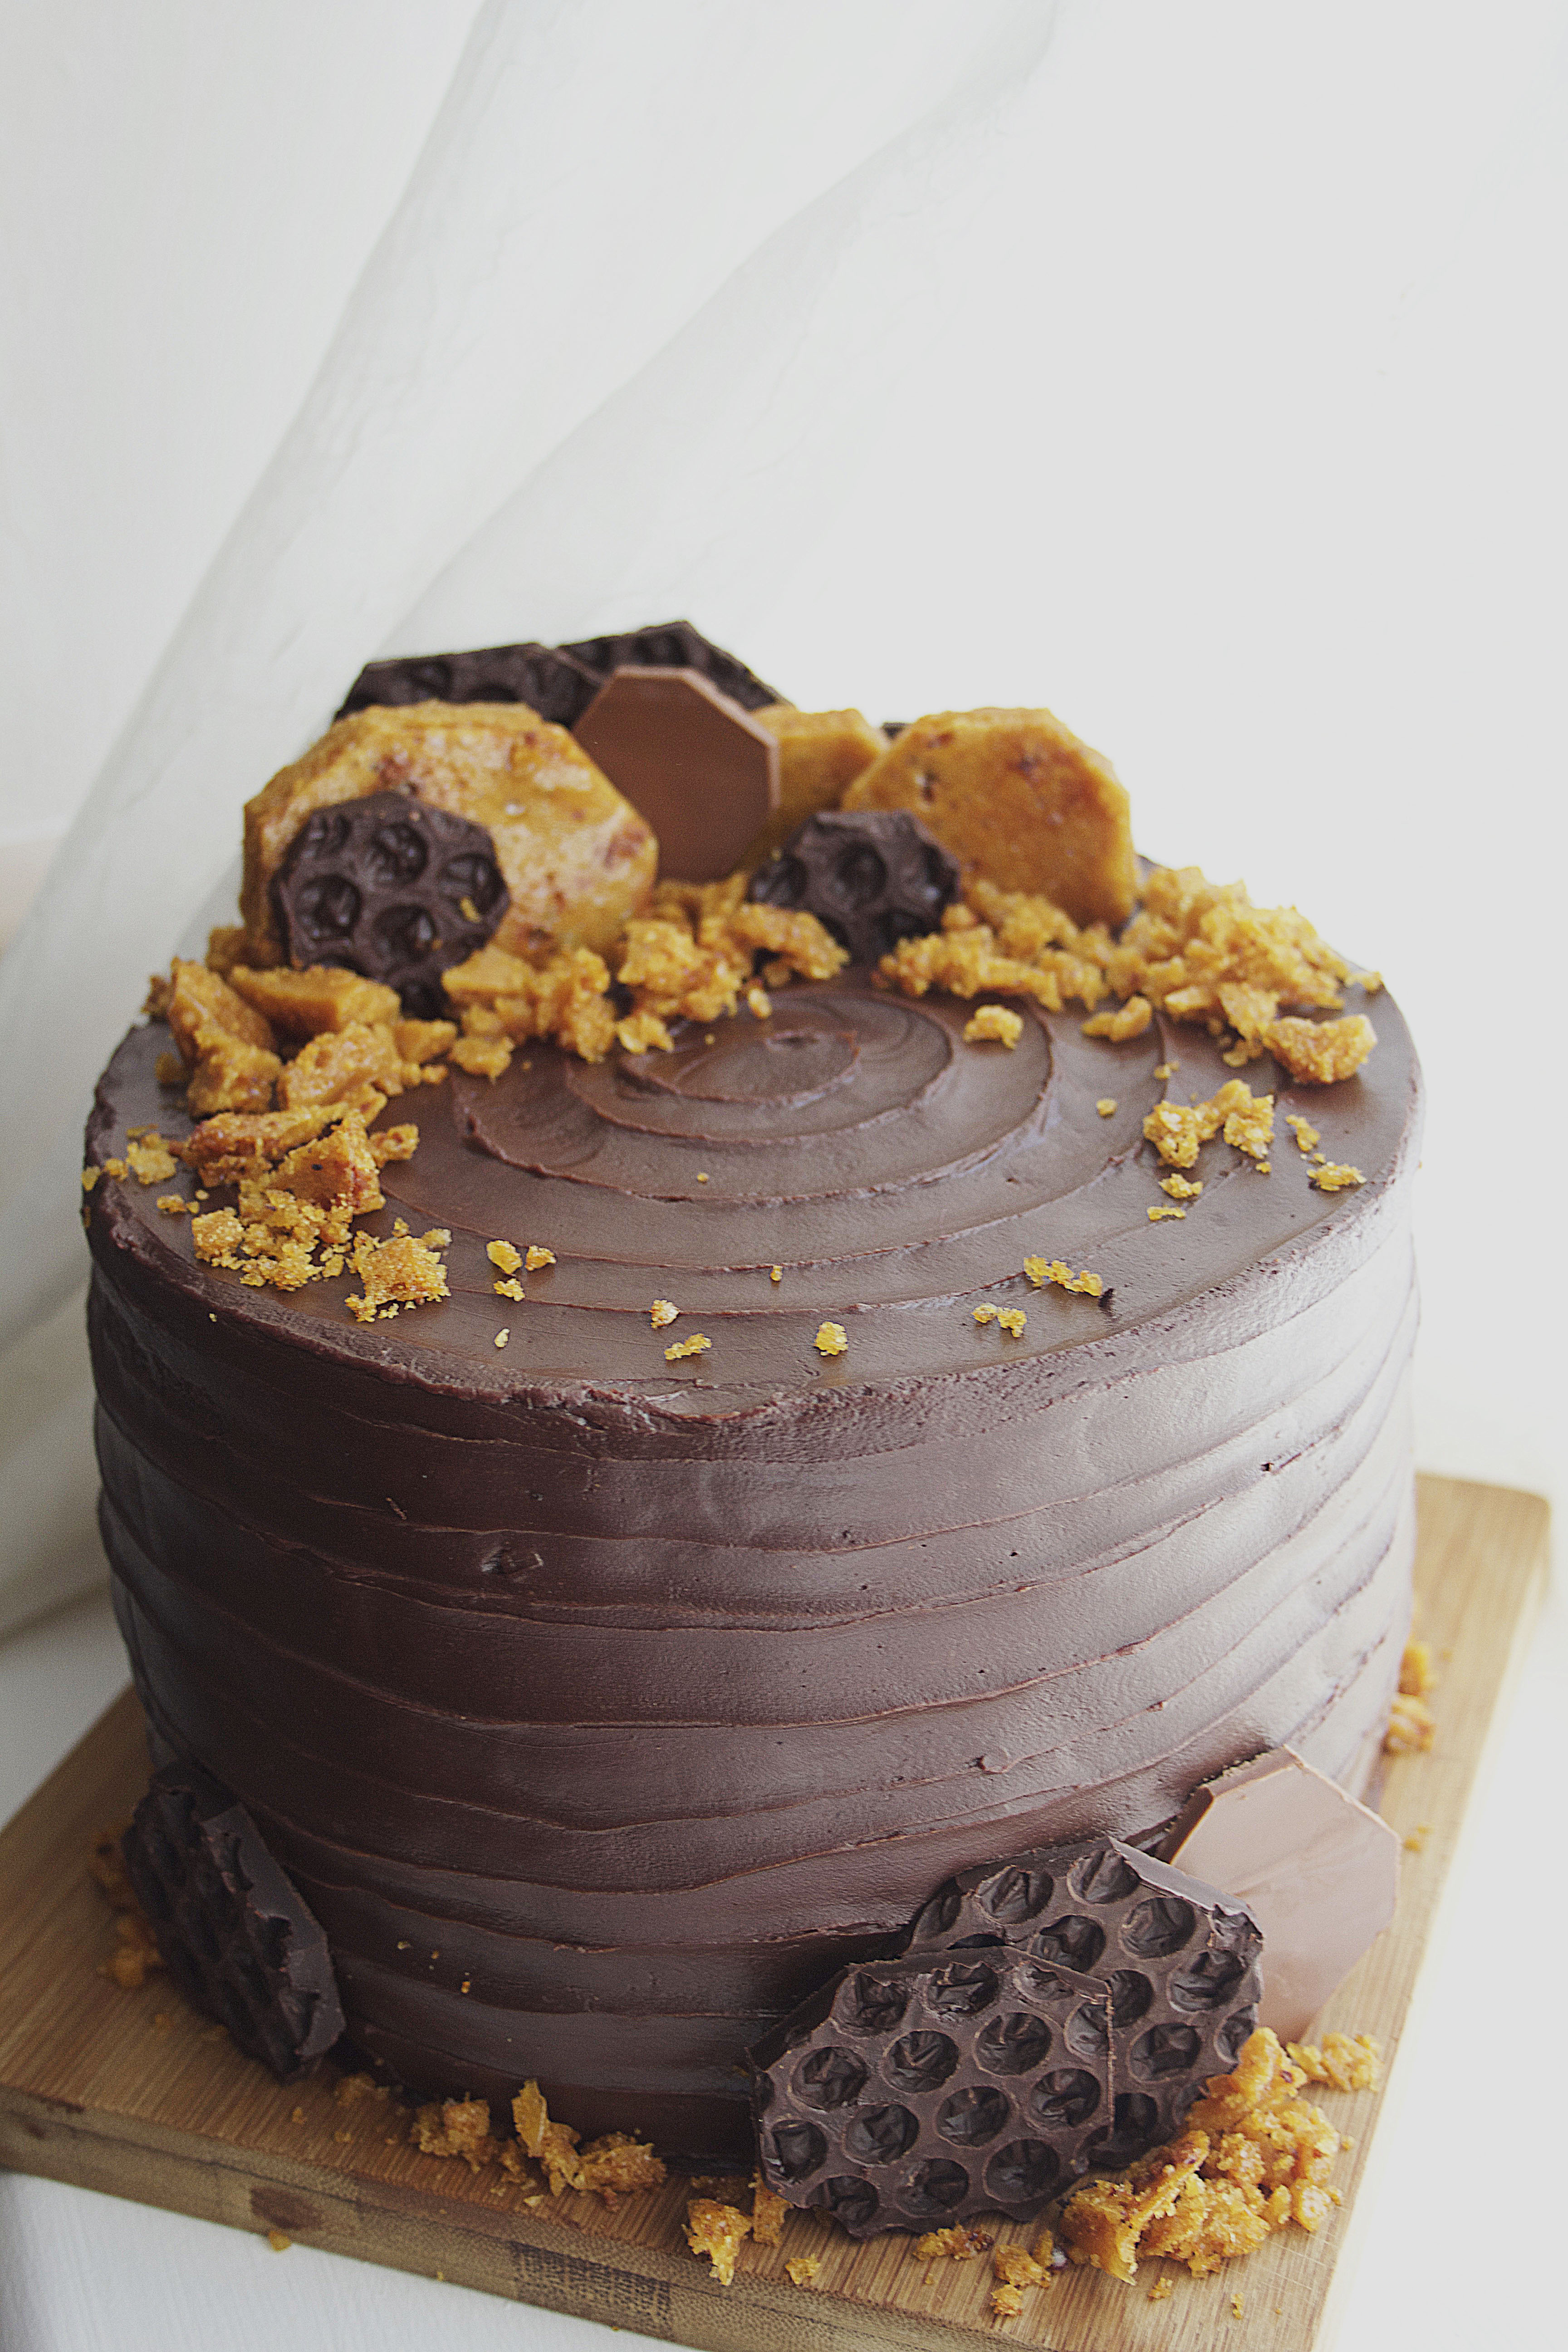
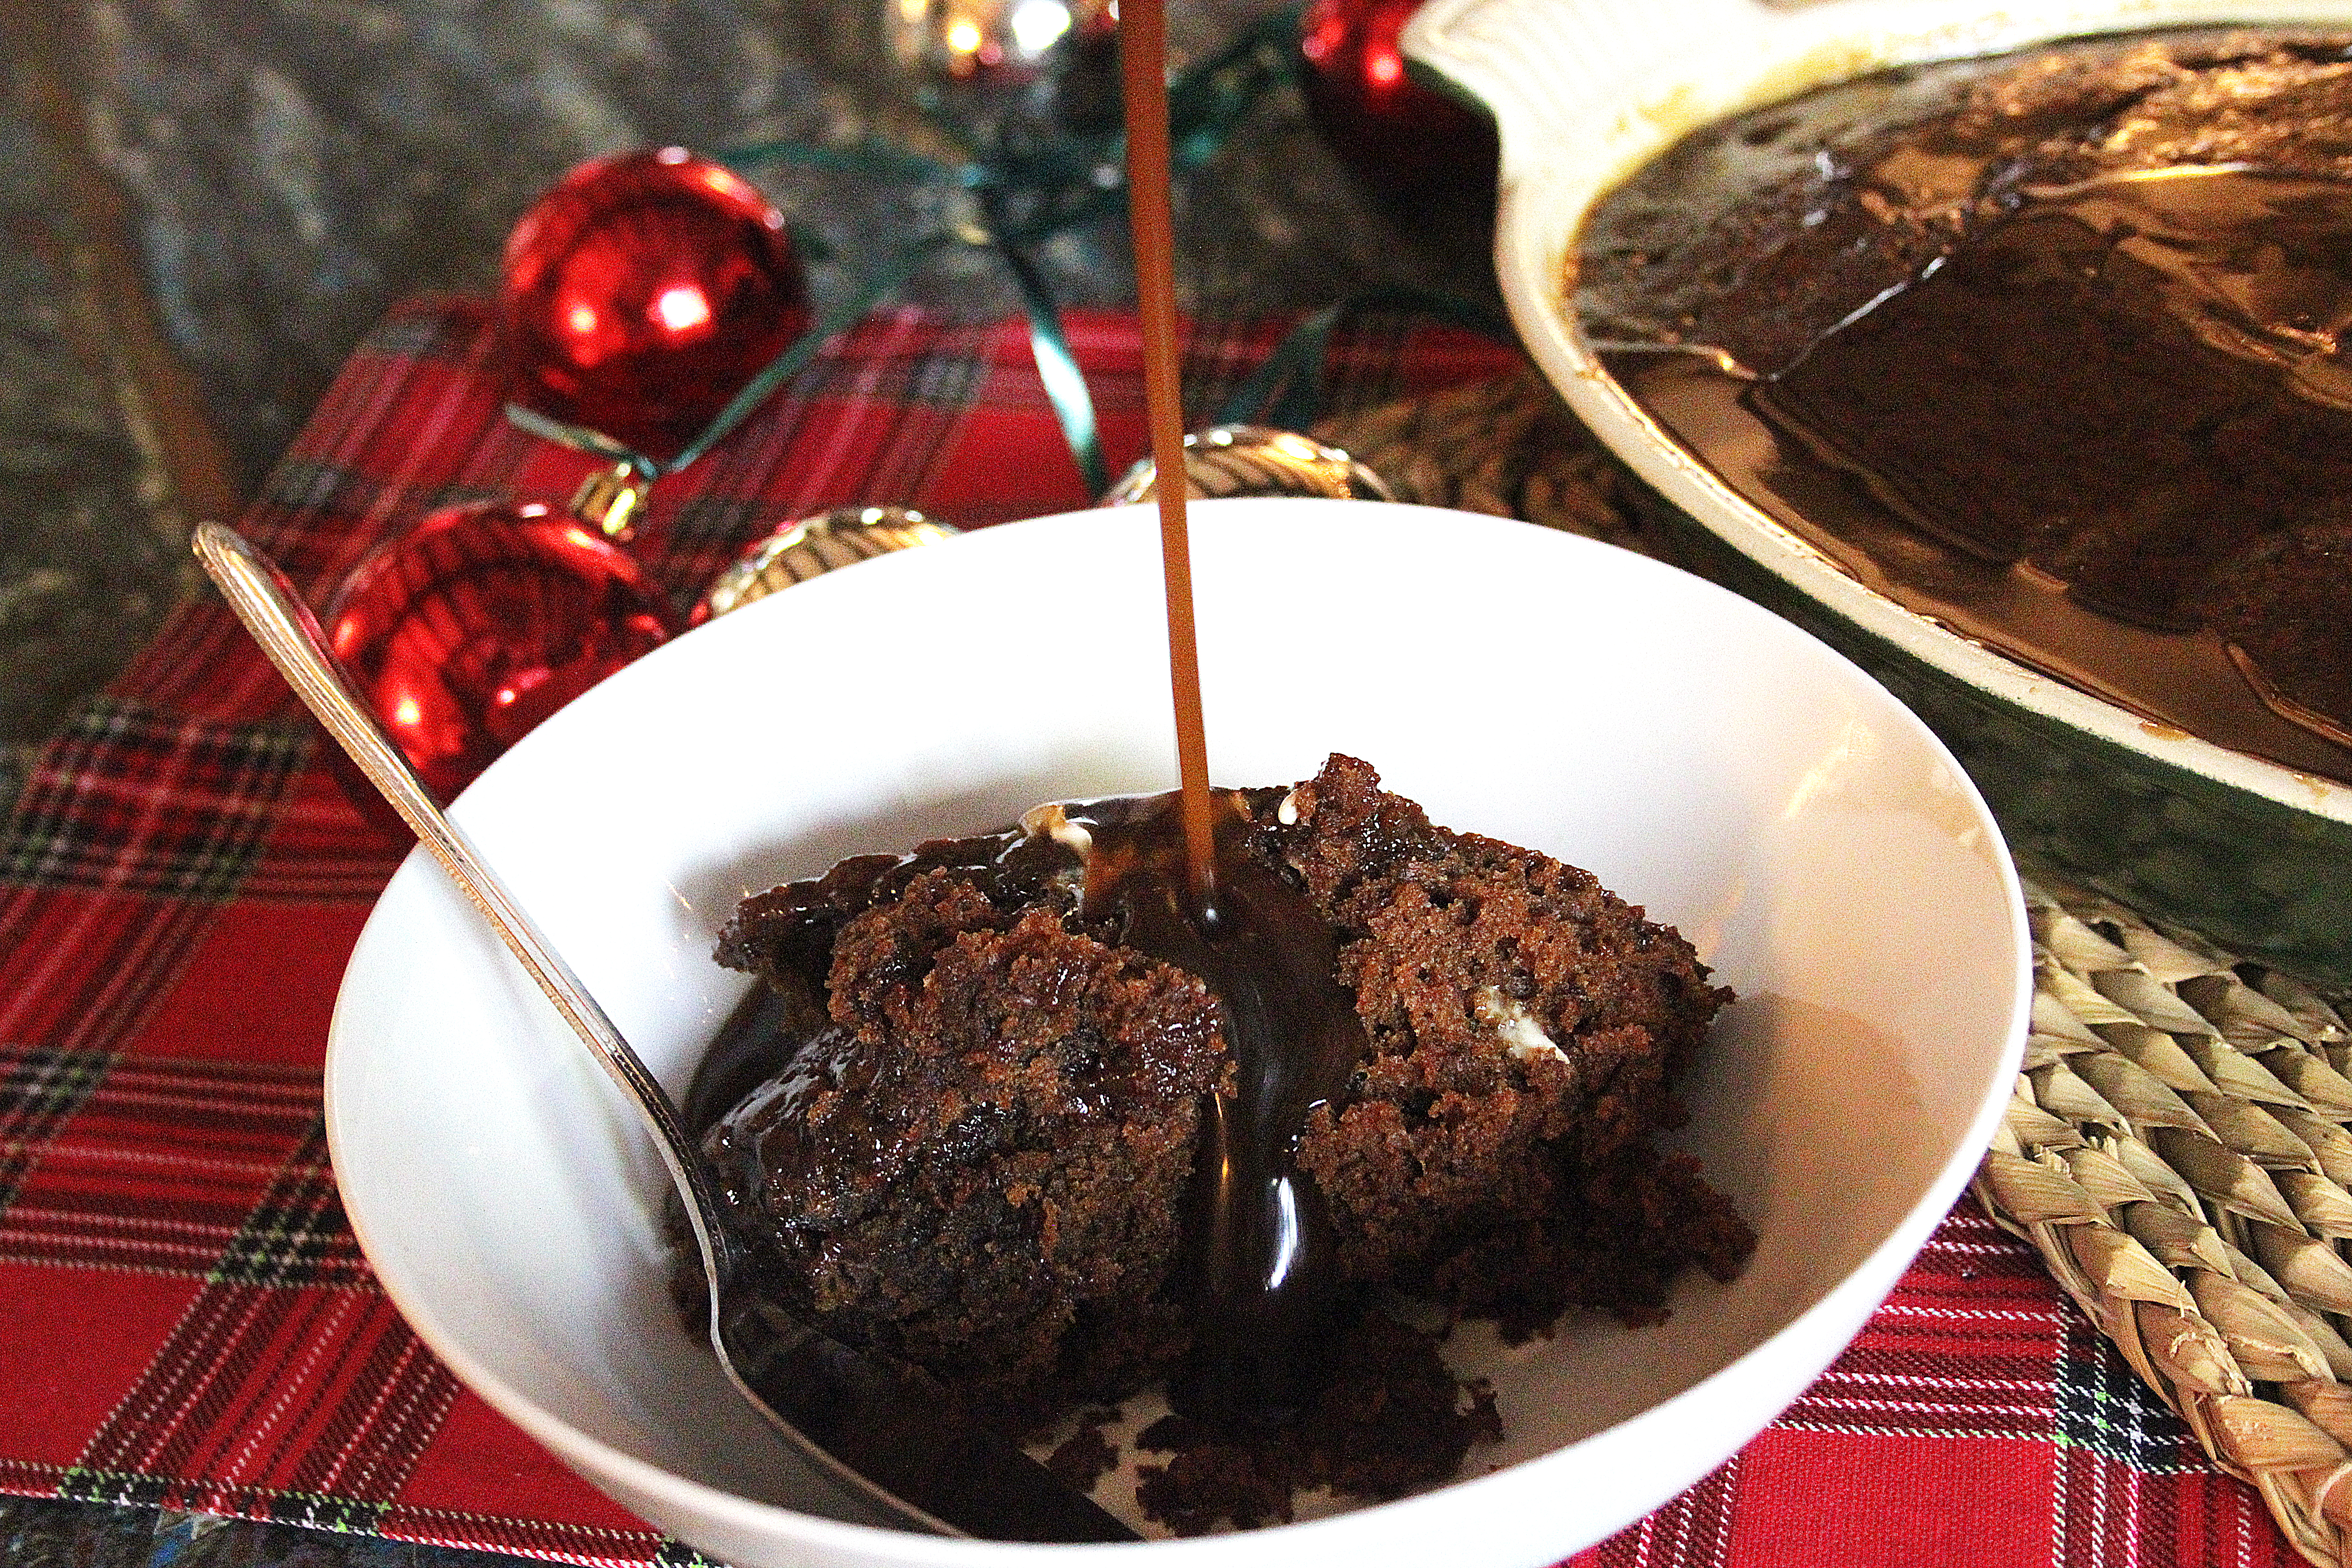
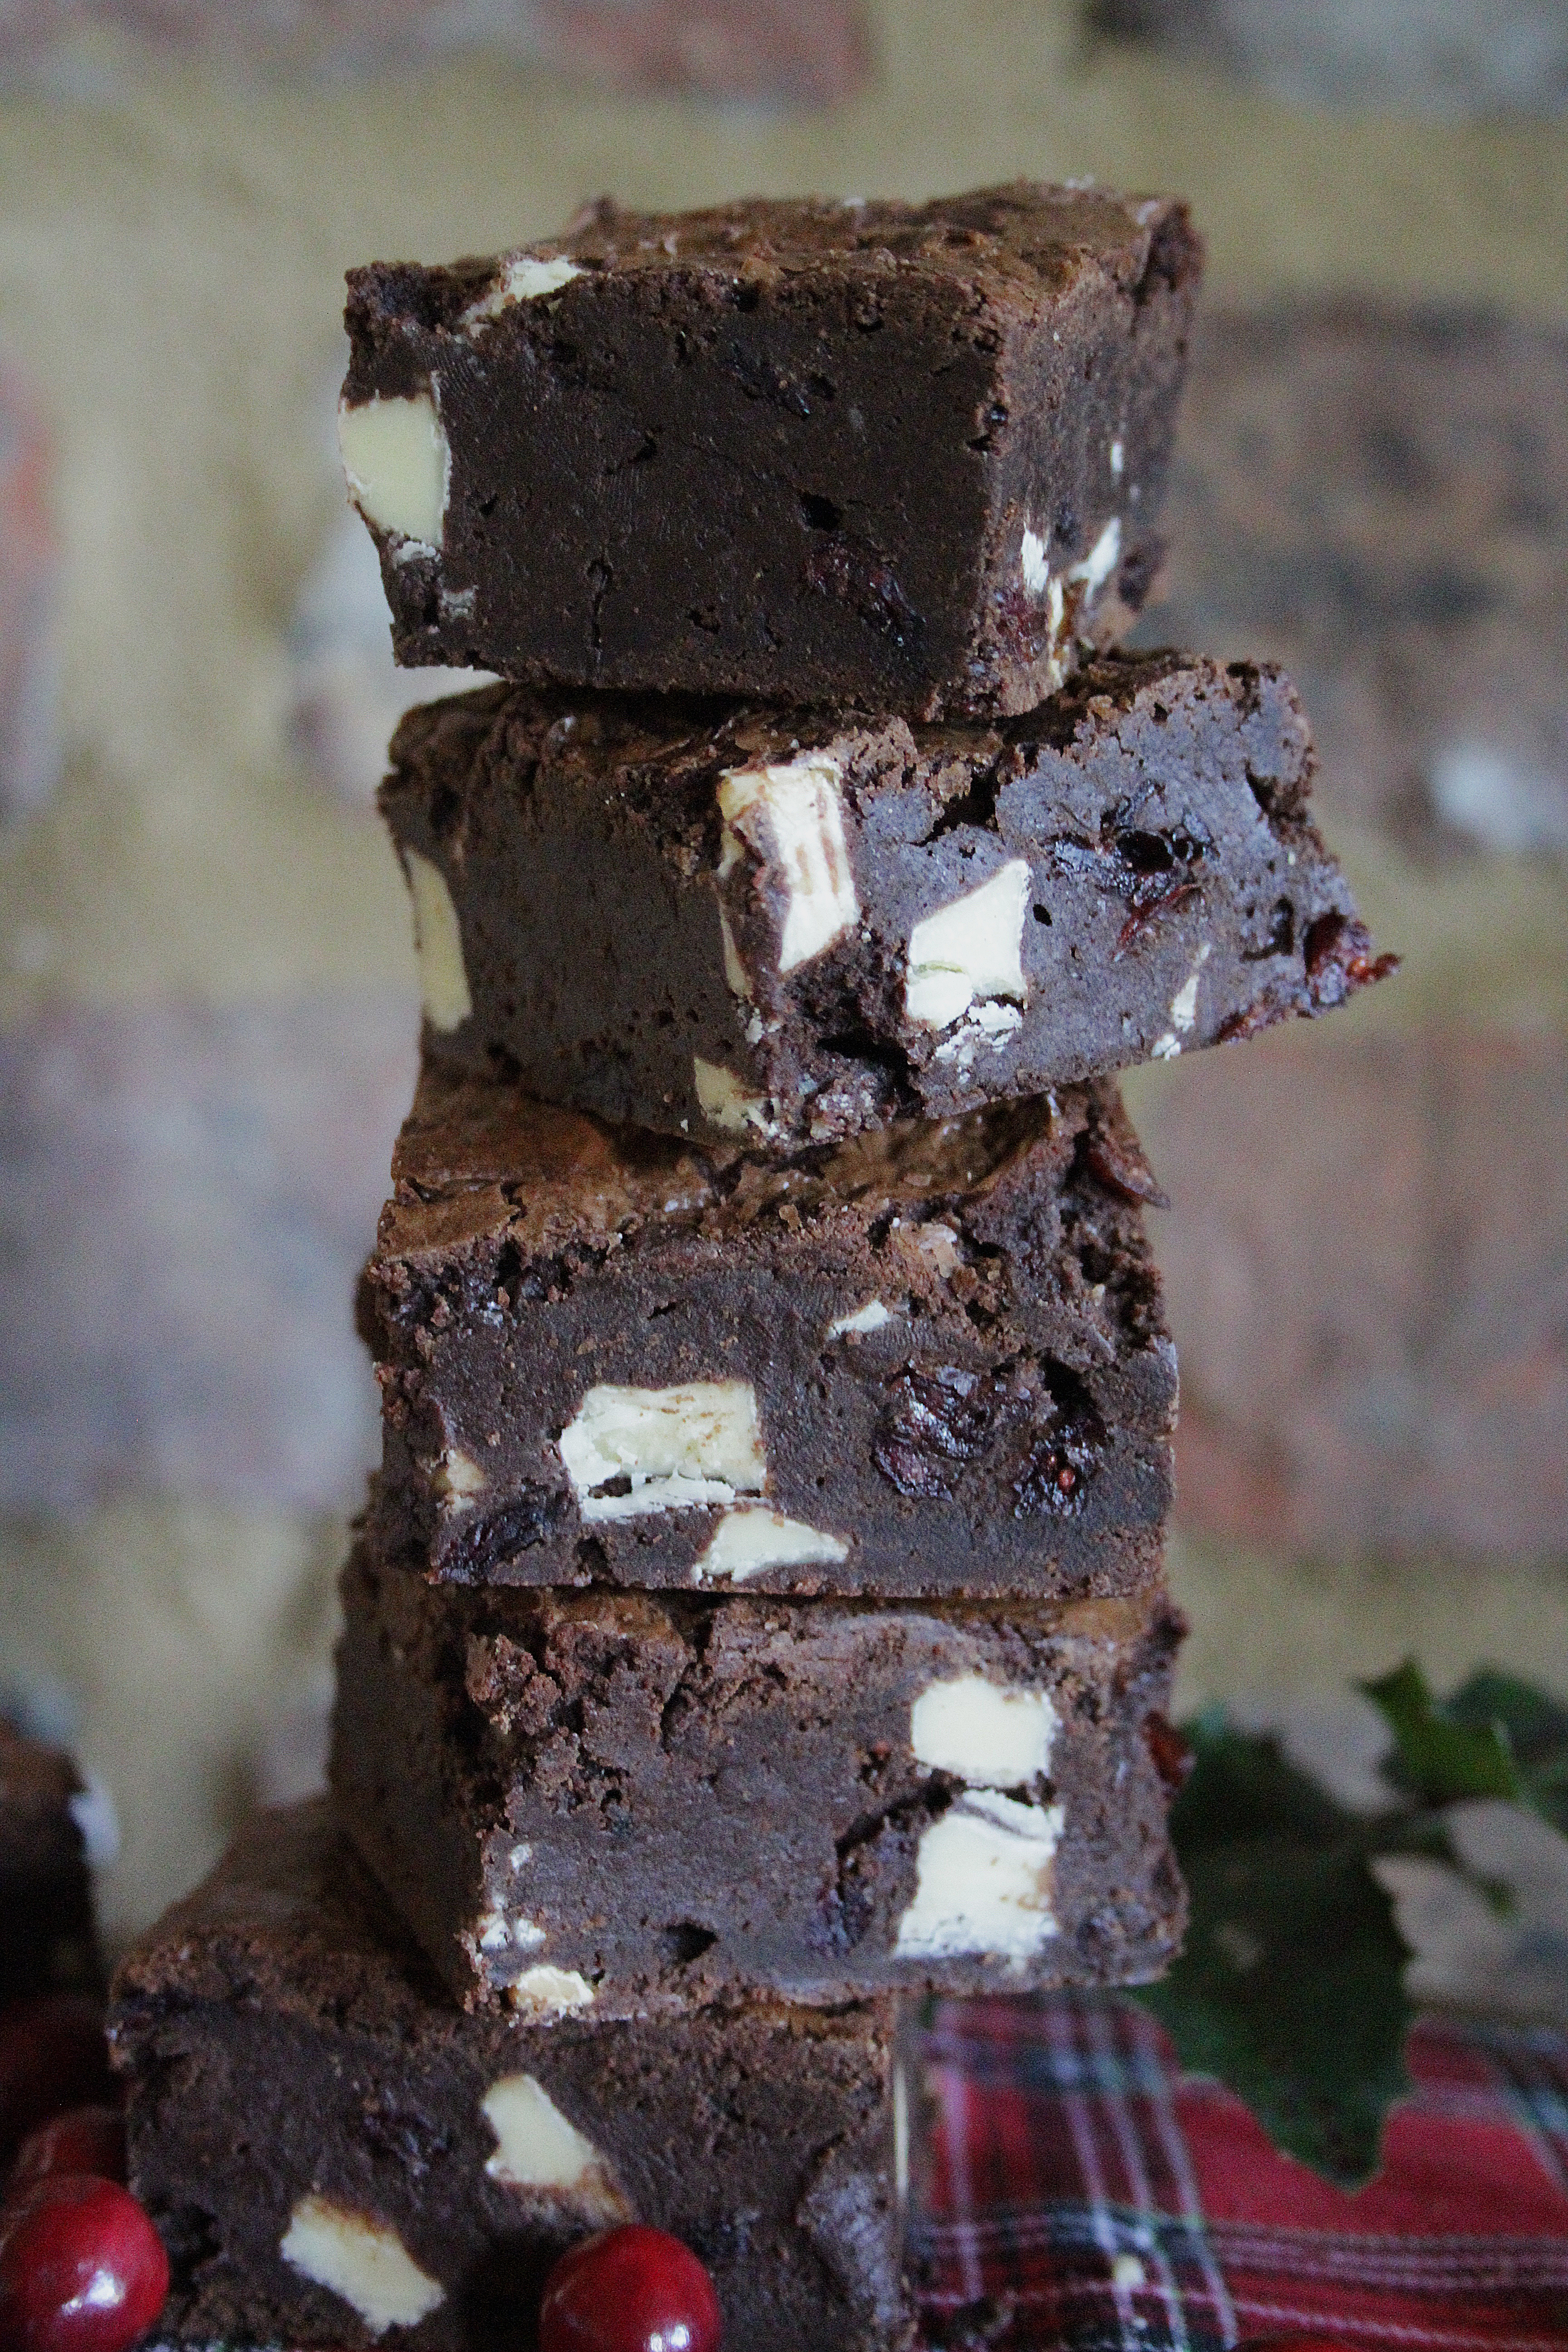
I made this cake last weekend for my Dad’s birthday and it went down a storm. Granted, the flavours aren’t subtle and it’s not for the faint hearted (which neatly mirrors my Dad’s personality actually), but the punchy combination of bitter coffee, nutty hazelnut, rich but surprisingly light chocolate sponge and salted milk chocolate ganache just work (duh- that amount of cream, sugar, salt and chocolate is always going to be delicious).

Ingredients (serves 12-14)

For the hazelnut praline caramel

  • 100g blanched hazelnuts, toasted
  • 100g caster sugar
  • 100ml double cream
  • Generous pinch sea salt

For the sponges

  • 375g plain flour
  • 300g caster sugar
  • 85g cocoa powder
  • 2tsp baking powder
  • 2tsp bicarbonate of soda
  • large pinch sea salt
  • 3 eggs
  • 325ml milk
  • 175ml vegetable oil
  • 2tsp vanilla extract
  • 100g dark chocolate
  • 325ml just boiled water
  • 2tsp instant coffee

For the salted milk chocolate ganache

  • 200g milk chocolate
  • 75g dark chocolate
  • 275ml double cream
  • Generous pinch sea salt

For the coffee mascarpone filling

  • 2tbsp instant coffee
  • 2tbsp caster sugar
  • 200g mascarpone
  • 100ml double cream

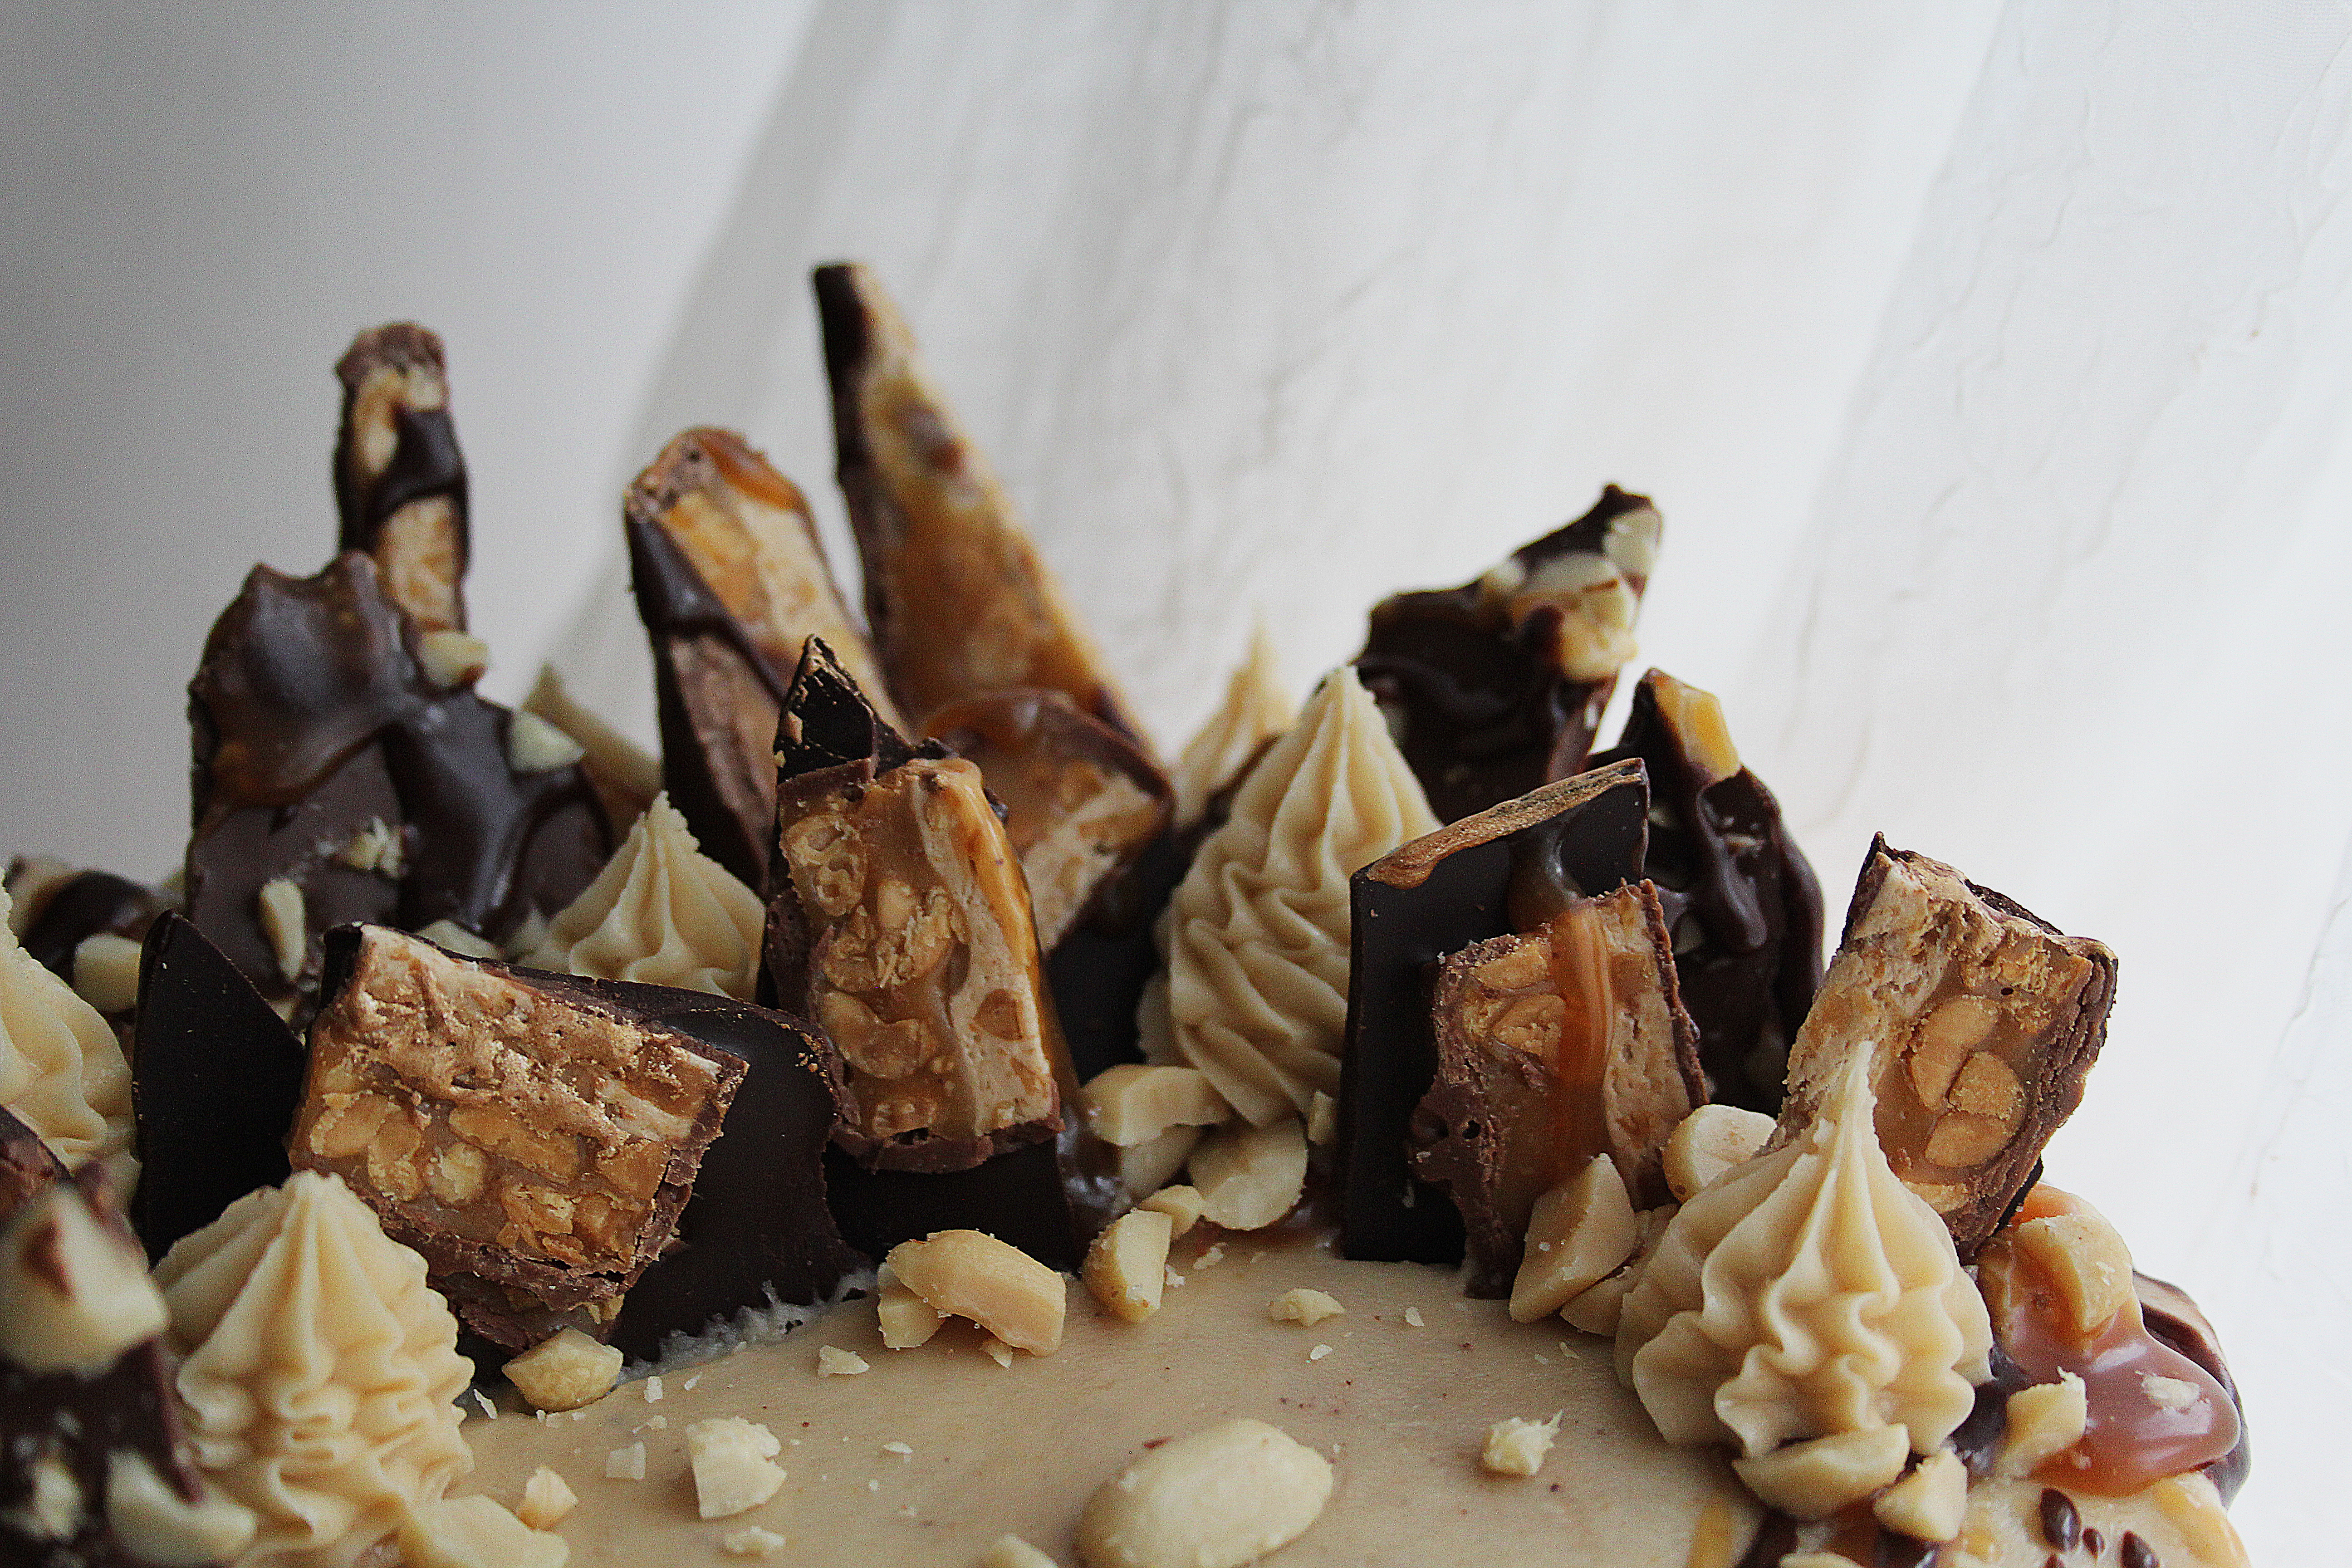
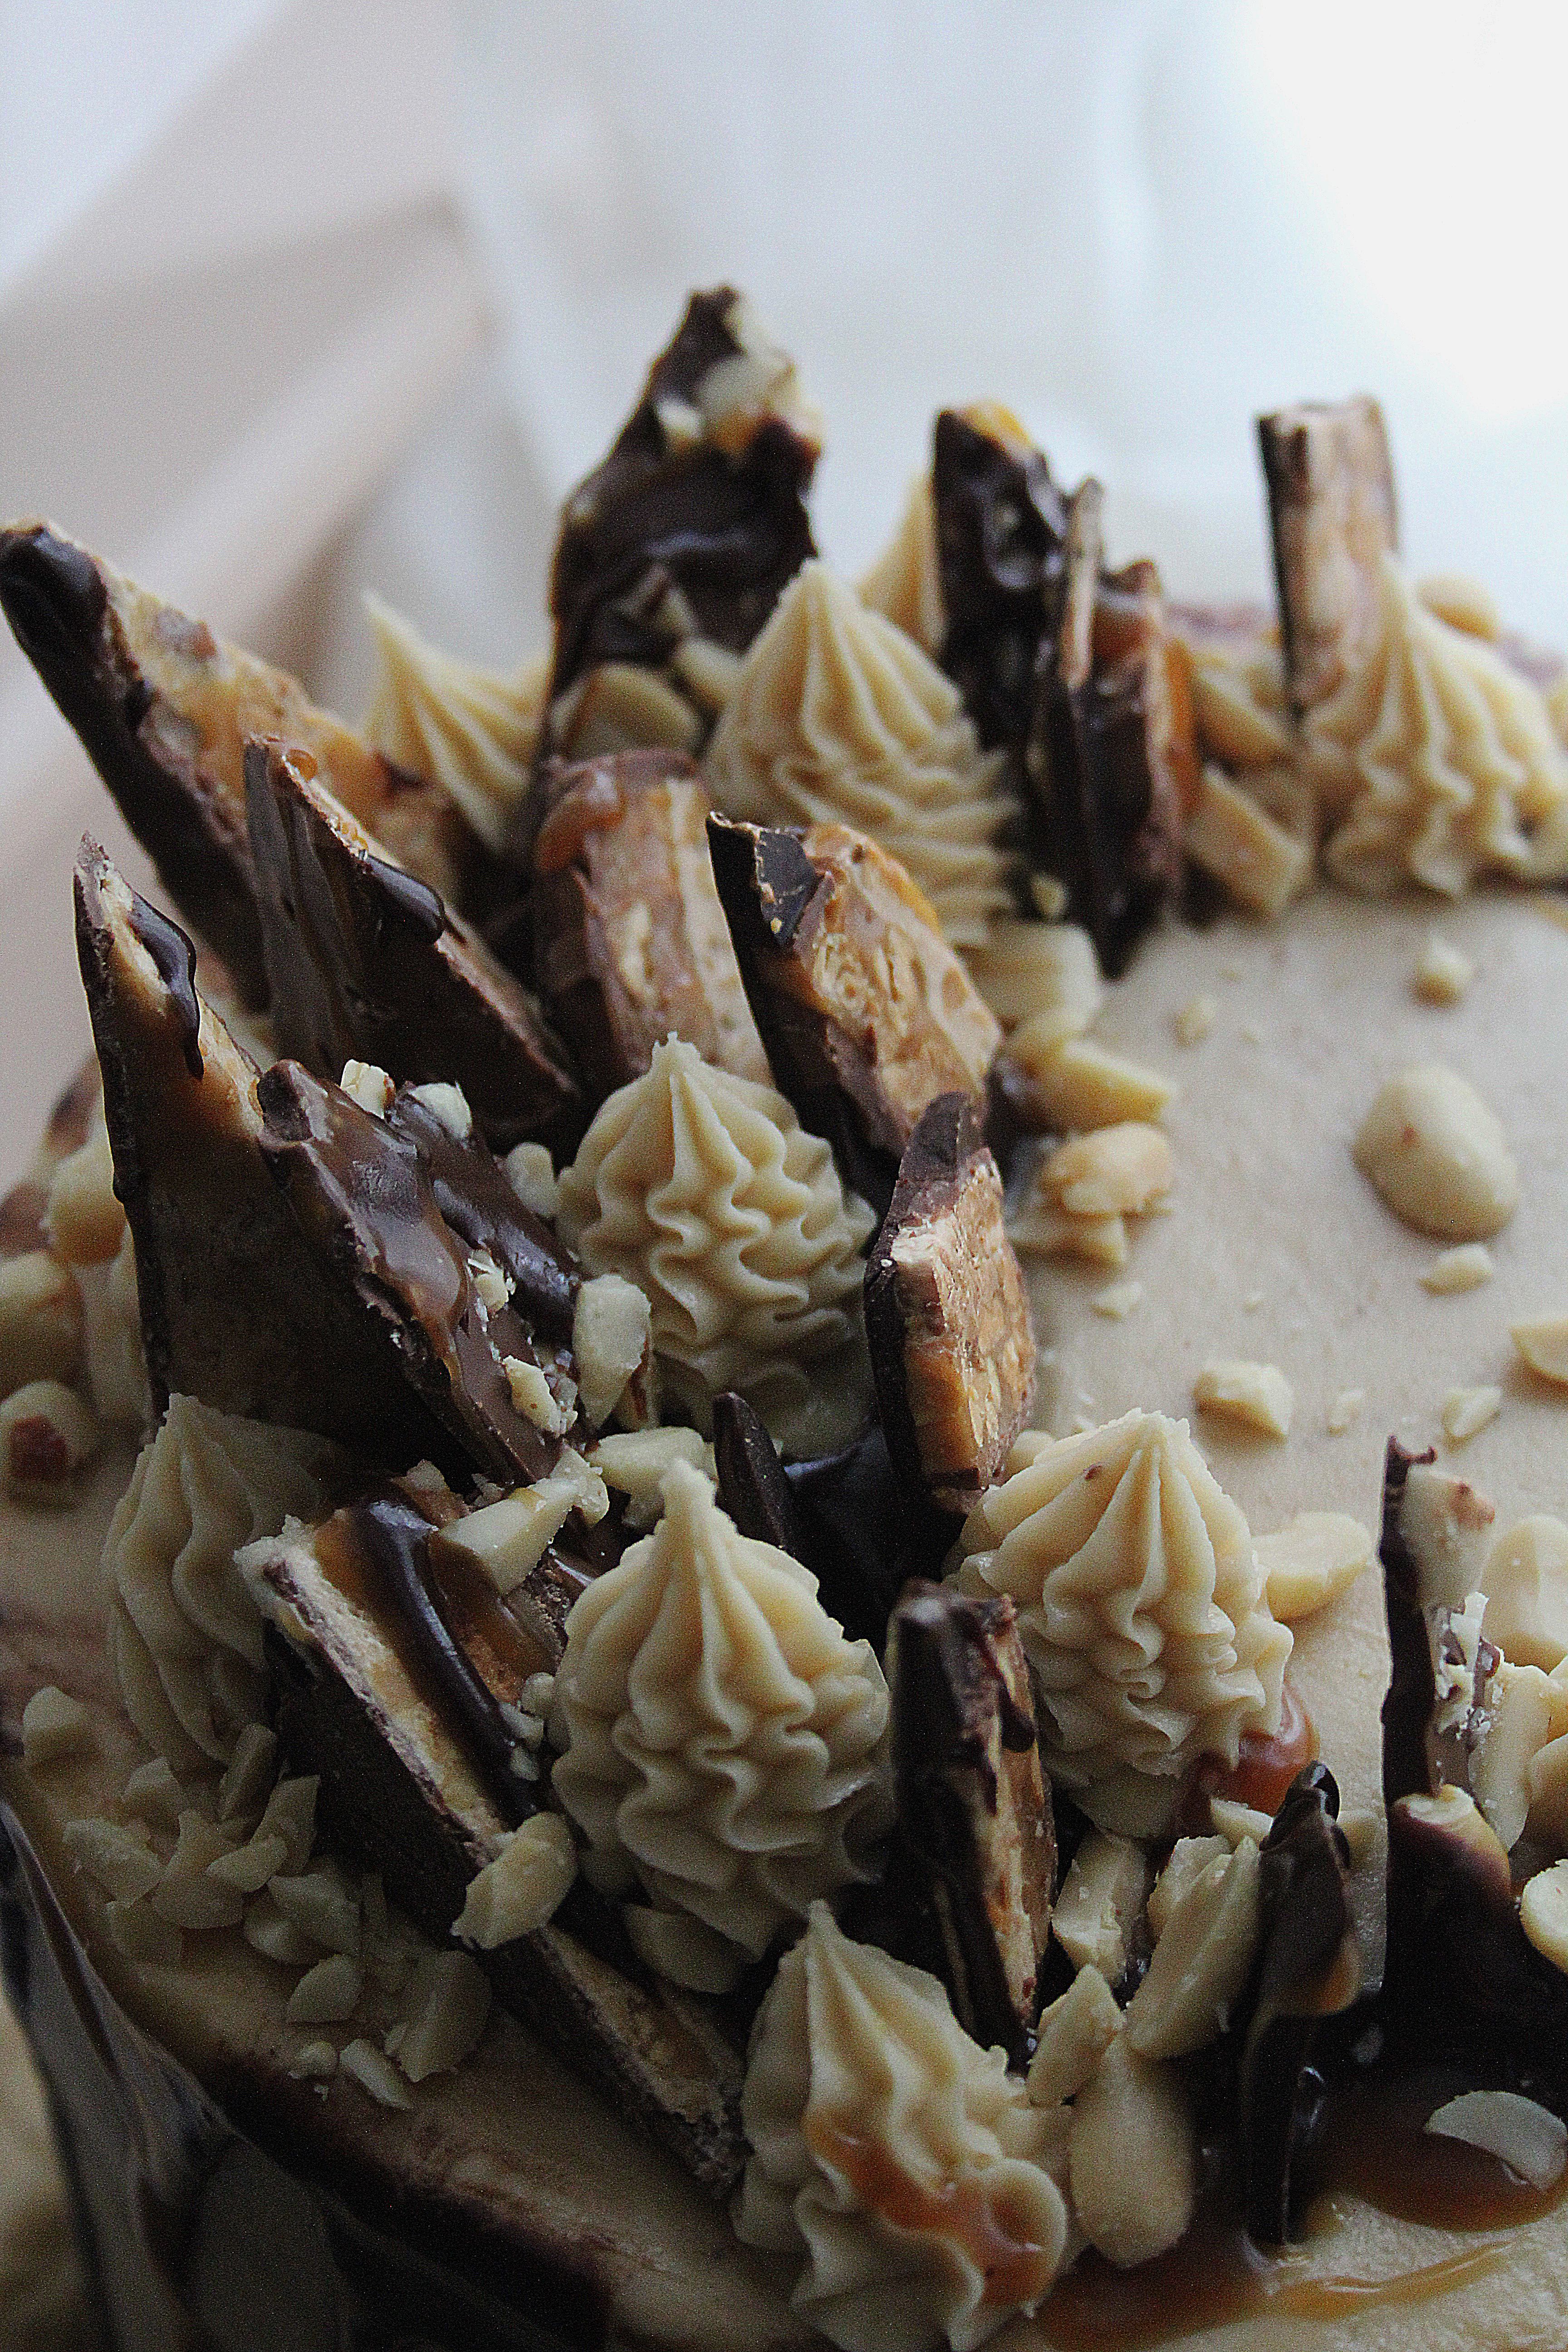
  1. Start off by making the hazelnut praline caramel.To do this simply place the caster sugar in a heavy bottom pan over a medium heat and swirl the pan until it melts. Once melted, up the heat until the sugar reaches a deep golden brown. At this stage add the toasted hazelnuts, stir to coat then tip onto a baking paper lined baking tray. Leave to set hard, then blitz into a paste. Set aside. Pour the cream into a saucepan and gently heat. Once the cream is gently simmering add in the praline paste and stir to create a caramel. Cook down for a few minutes until thickened, then set aside to cool.
  2. Preheat the oven to 170c. Grease and line two 8 inch baking tins. Melt the dark chocolate in a heatproof bowl set over a pan of simmering water (or in the microwave in short stints, stirring often). Set aside.
  3. In a large bowl stir together the flour, caster sugar, cocoa powder, baking powder, bicarbonate of soda and salt. In a jug, lightly whisk the eggs, milk, vegetable oil and vanilla extract. Make a well in the dry ingredients and pour the contents of the jug into it. Stir the wet and dry ingredients together until well combined then add the melted chocolate and stir again (I just use a balloon whisk for this- nothing electric is required as you don’t need to incorporate much air).
  4. Pour your just boiled water over the instant coffee granules and once they’ve dissolved, gradually add to the chocolate batter, stirring gently with your whisk as you go. The final cake batter will be very thin but don’t worry, it bakes beautifully.
  5. Split the mix evenly between the prepared tins and bake for 45-55 minutes (until a skewer comes out clean with a few moist crumbs attached). Once baked leave to cool completely in the tins.
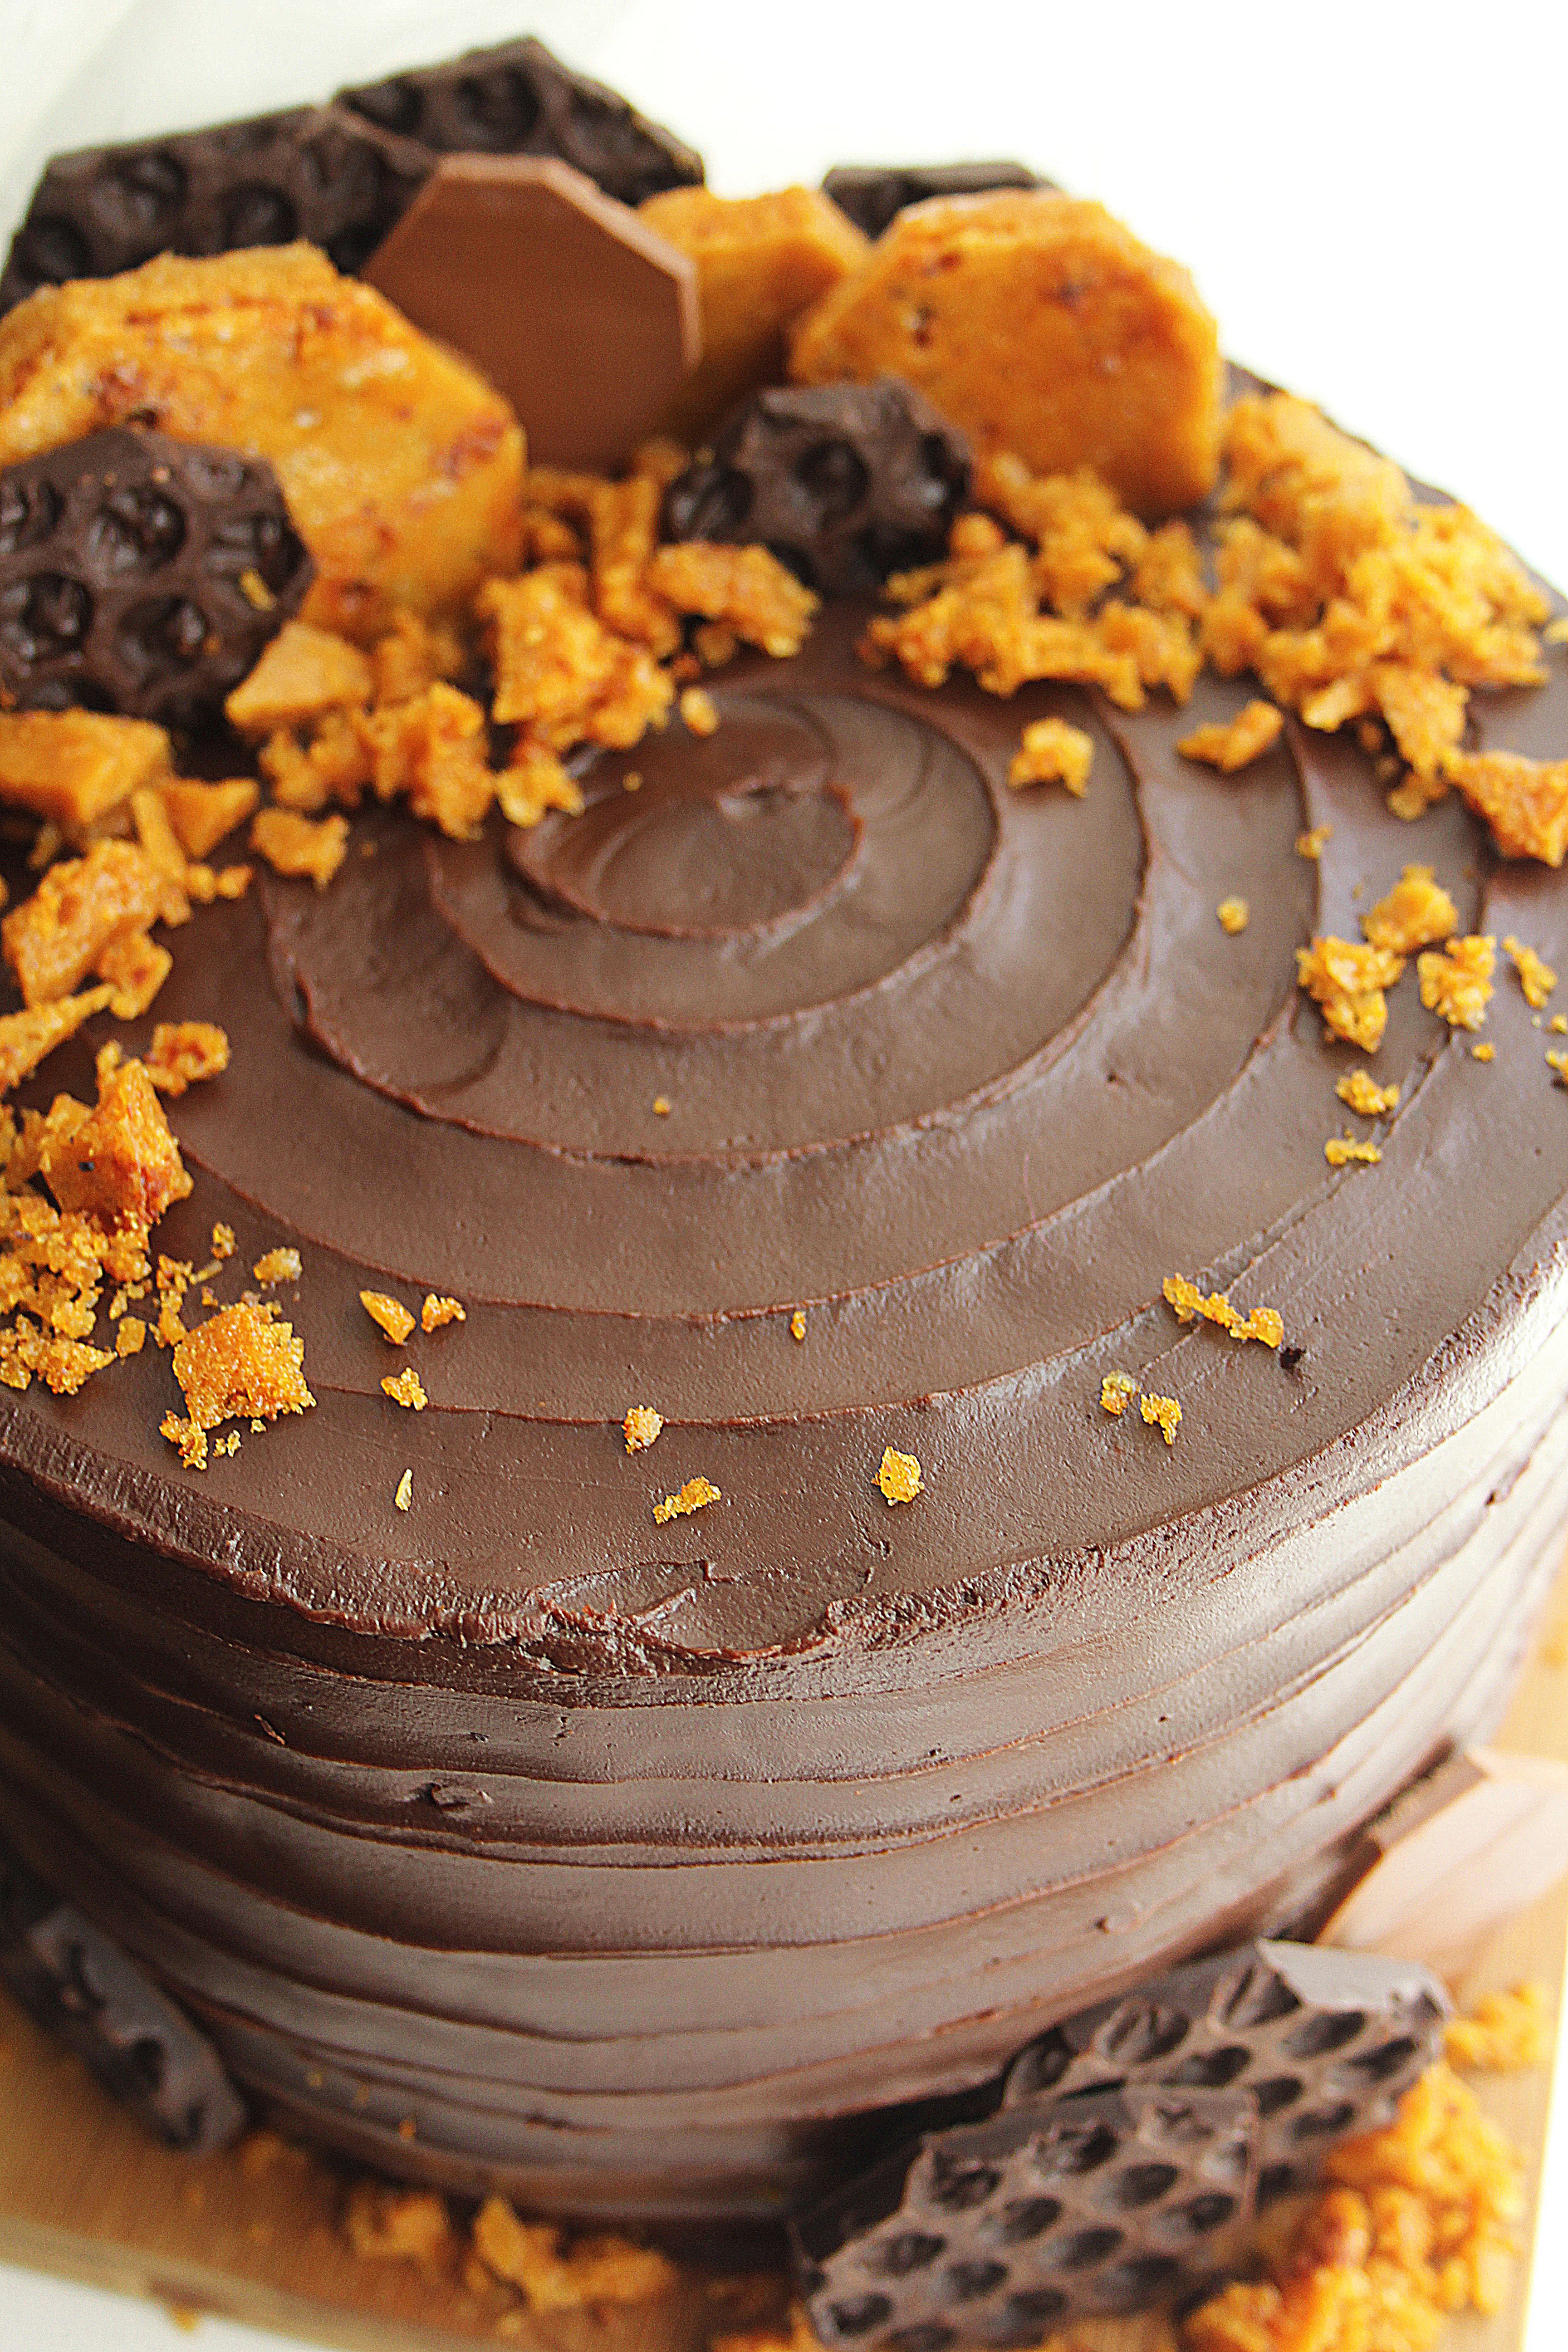
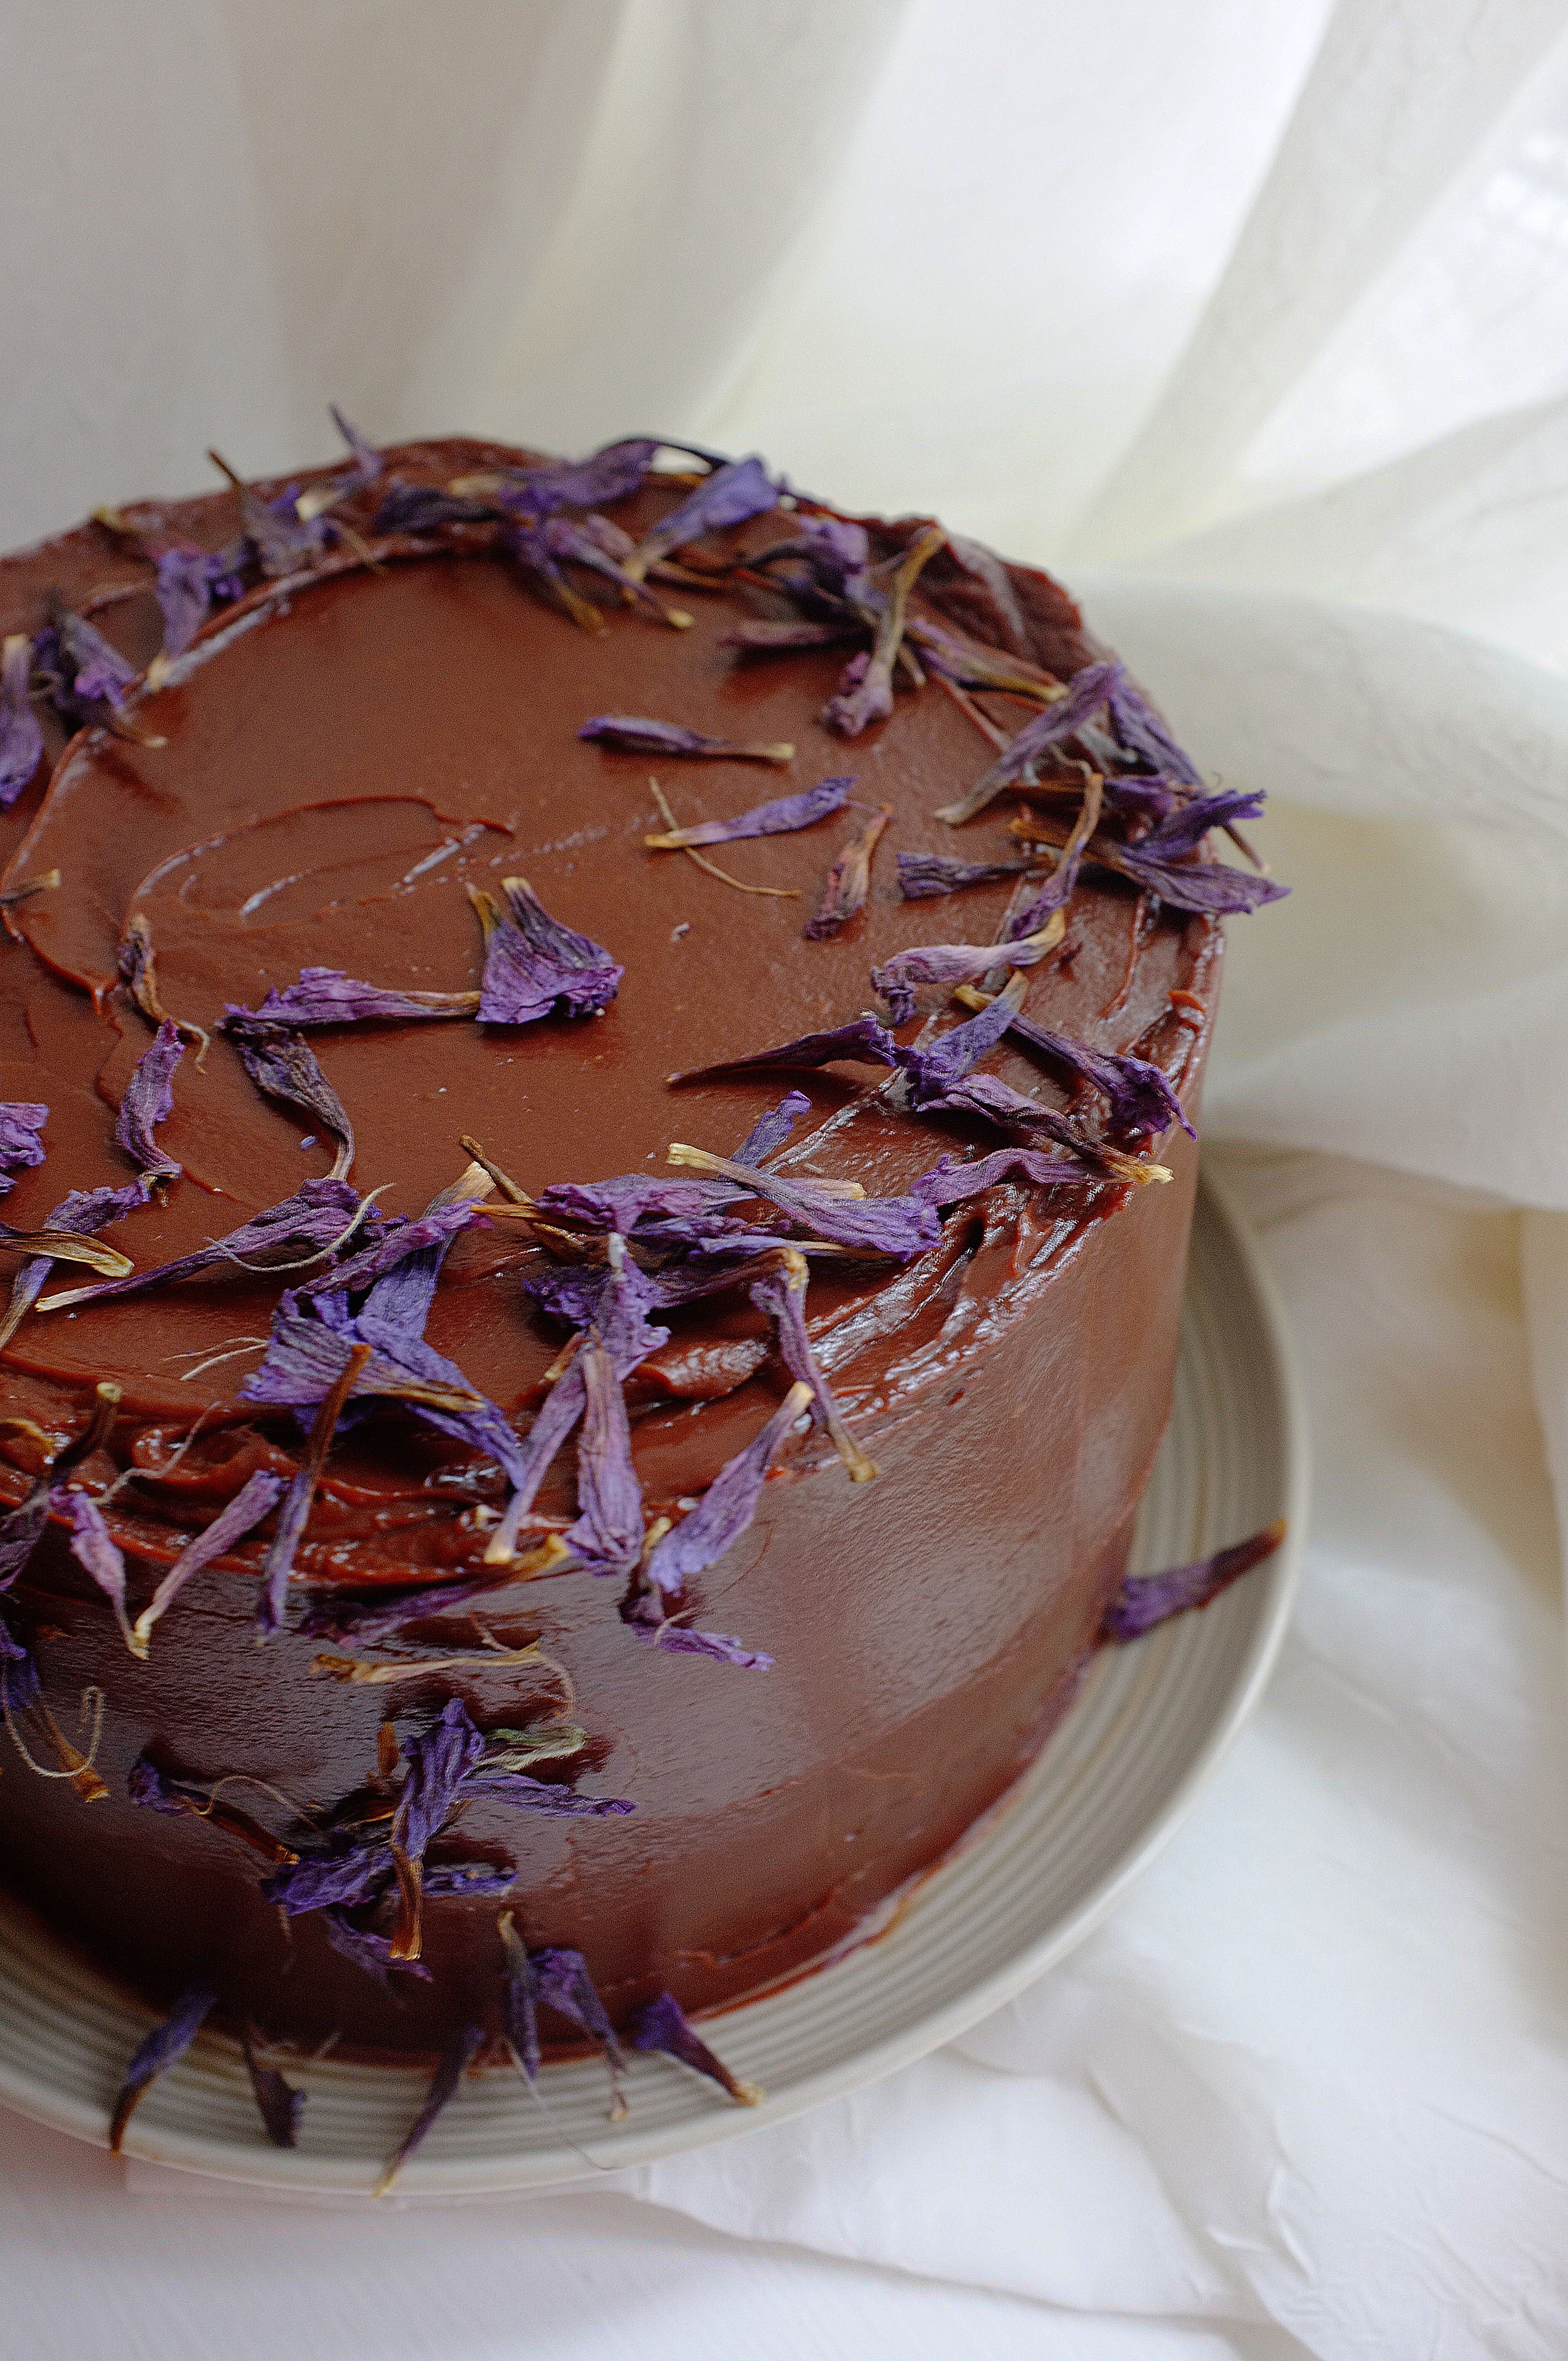
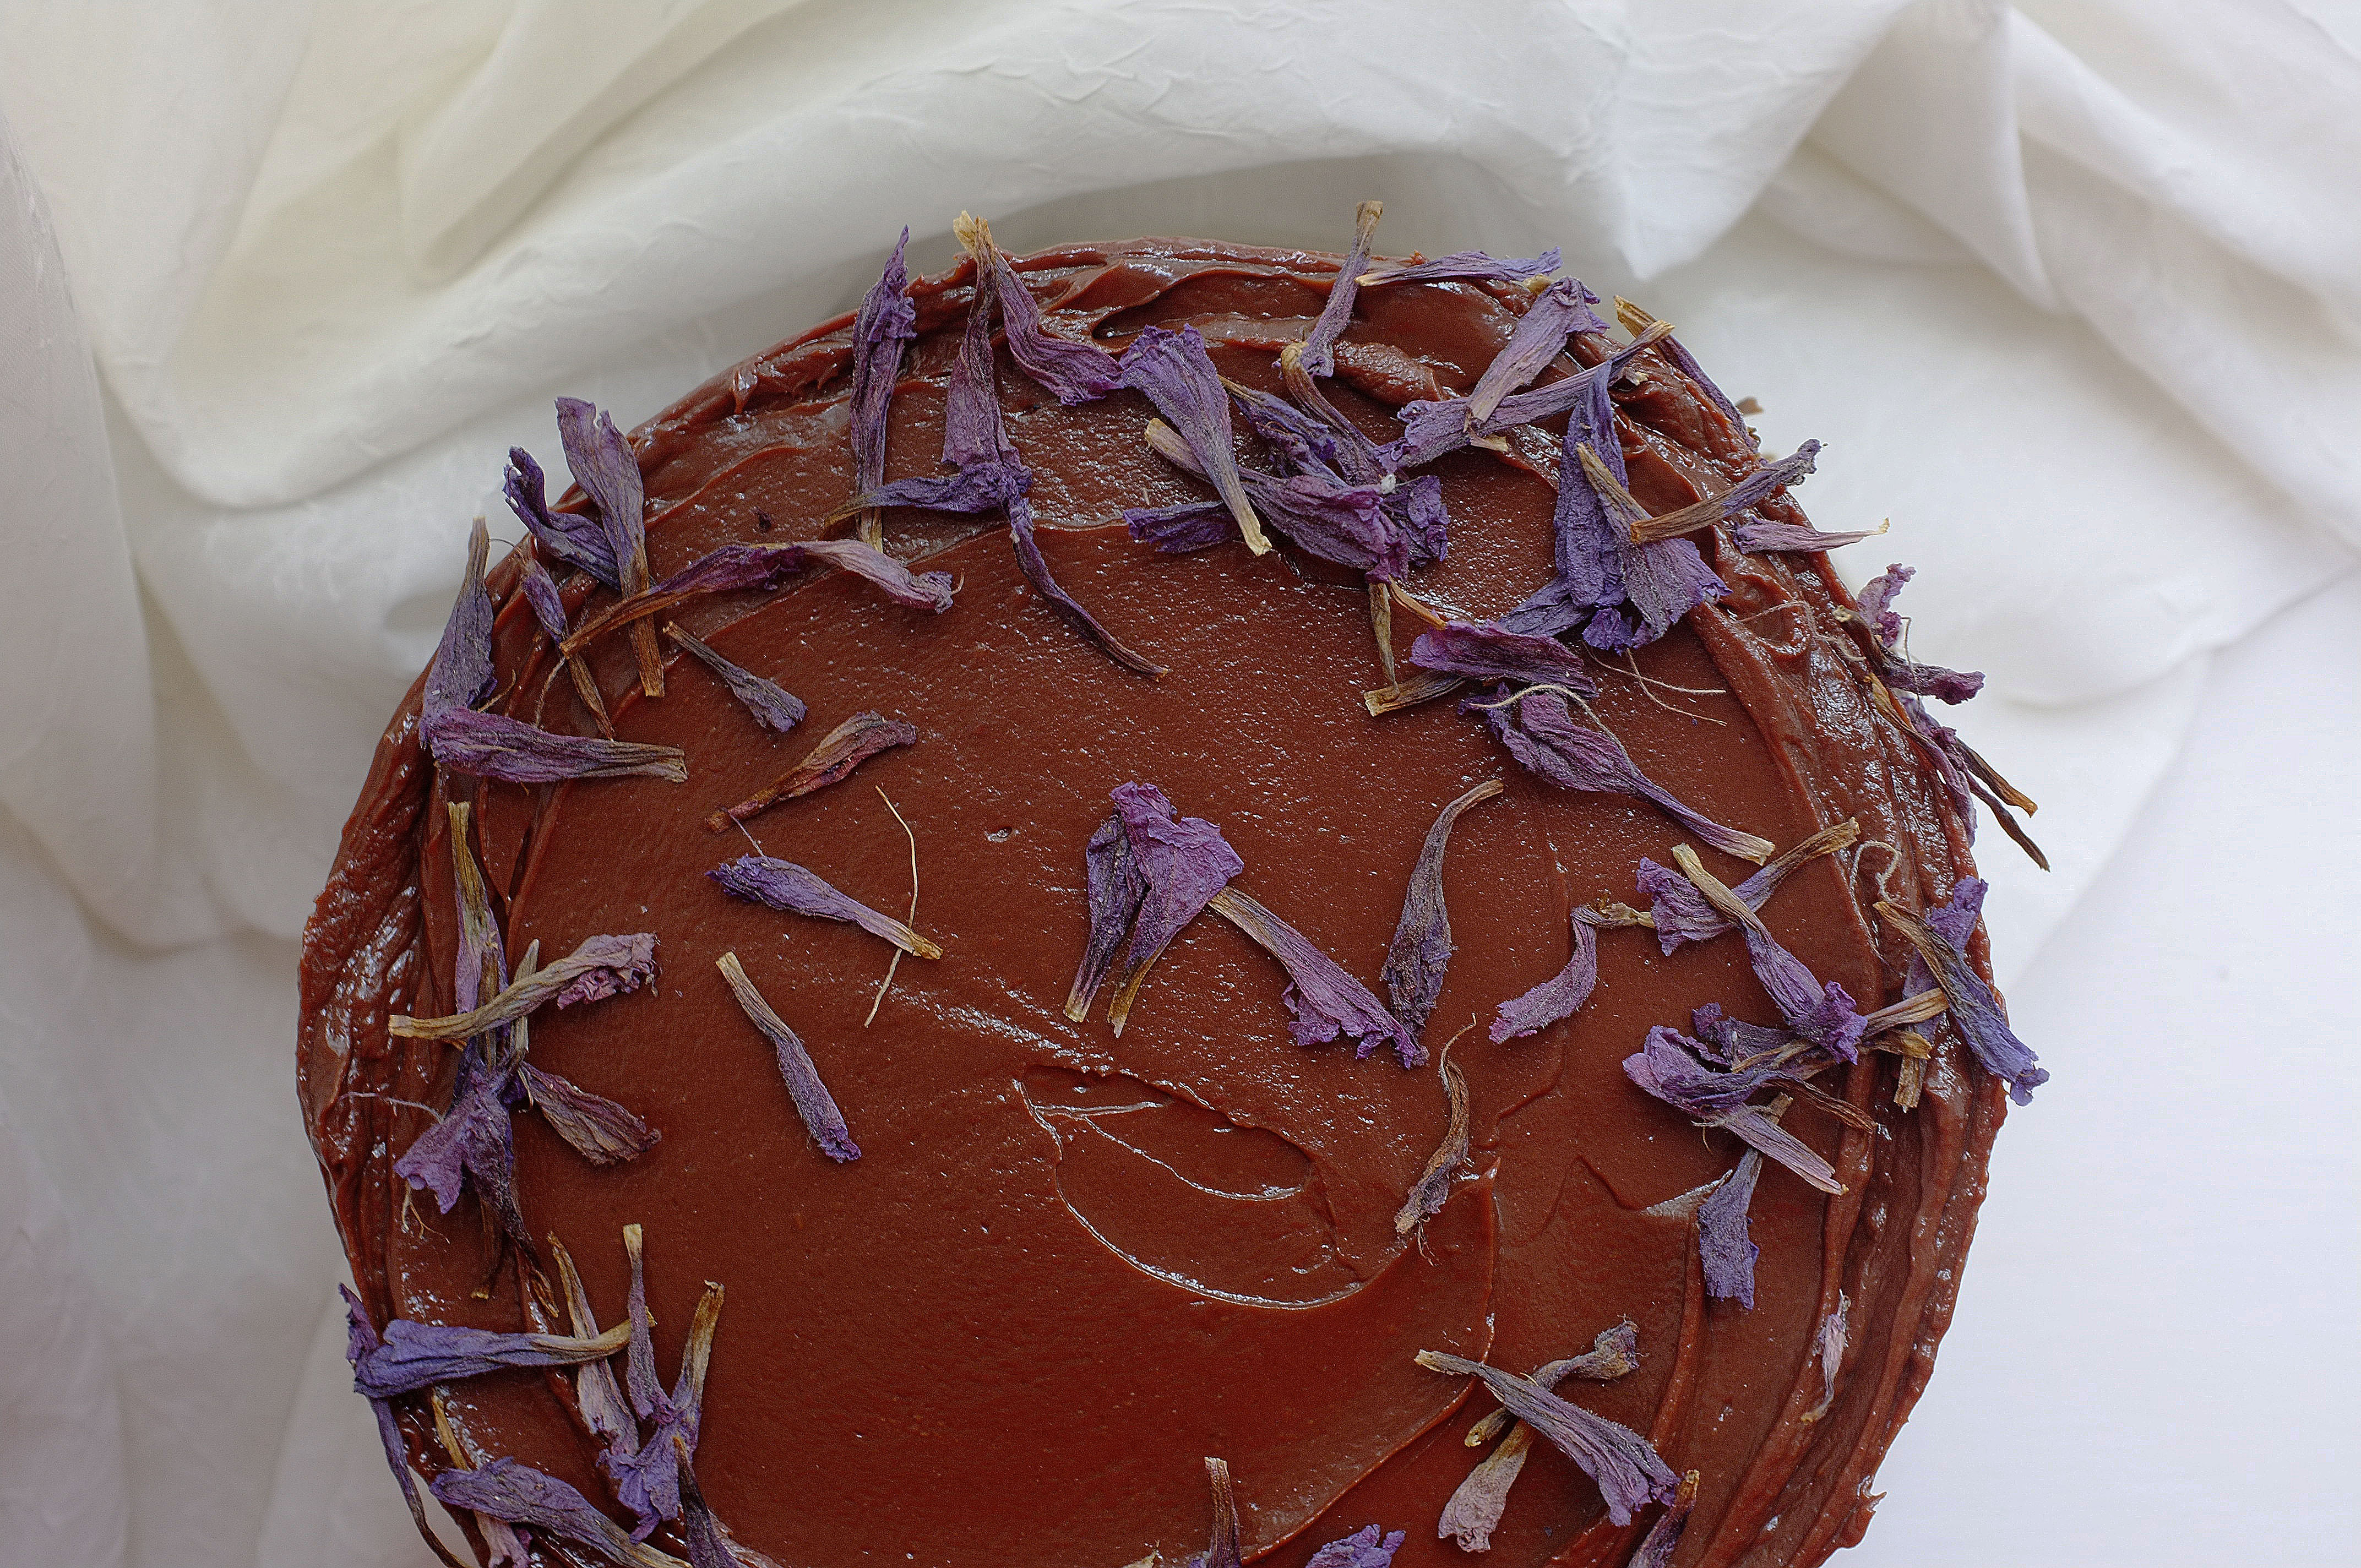
  6. While the cakes are cooling make the ganache. Chop the chocolate into small pieces and place in a heatproof bowl. Heat the cream in a saucepan until it meets scalding point then pour over the chocolate. Allow the cream to melt the chocolate for a few minutes then stir until smooth and glossy. Add salt to taste then set aside to cool.
  7. For the coffee mascarpone crush the coffee into a fine powder then just whisk together all the ingredients until smooth.
  8. When all the elements are cool you’re ready to assemble the cake. Your cakes will probably have a domed top, so trim these off then divide each one into two even layers (leaving you with 4 layers overall).
  9. Scrape the hazelnut praline caramel into a piping bag. Split the mascarpone into thirds. Spread one third of the mascarpone over the first sponge layer then pipe over a third of the caramel in a zigzag (so that each slice will have some caramel inside!). Repeat this step until you’ve used up the sponges, then rustically cover the whole cake in the thickened ganache.
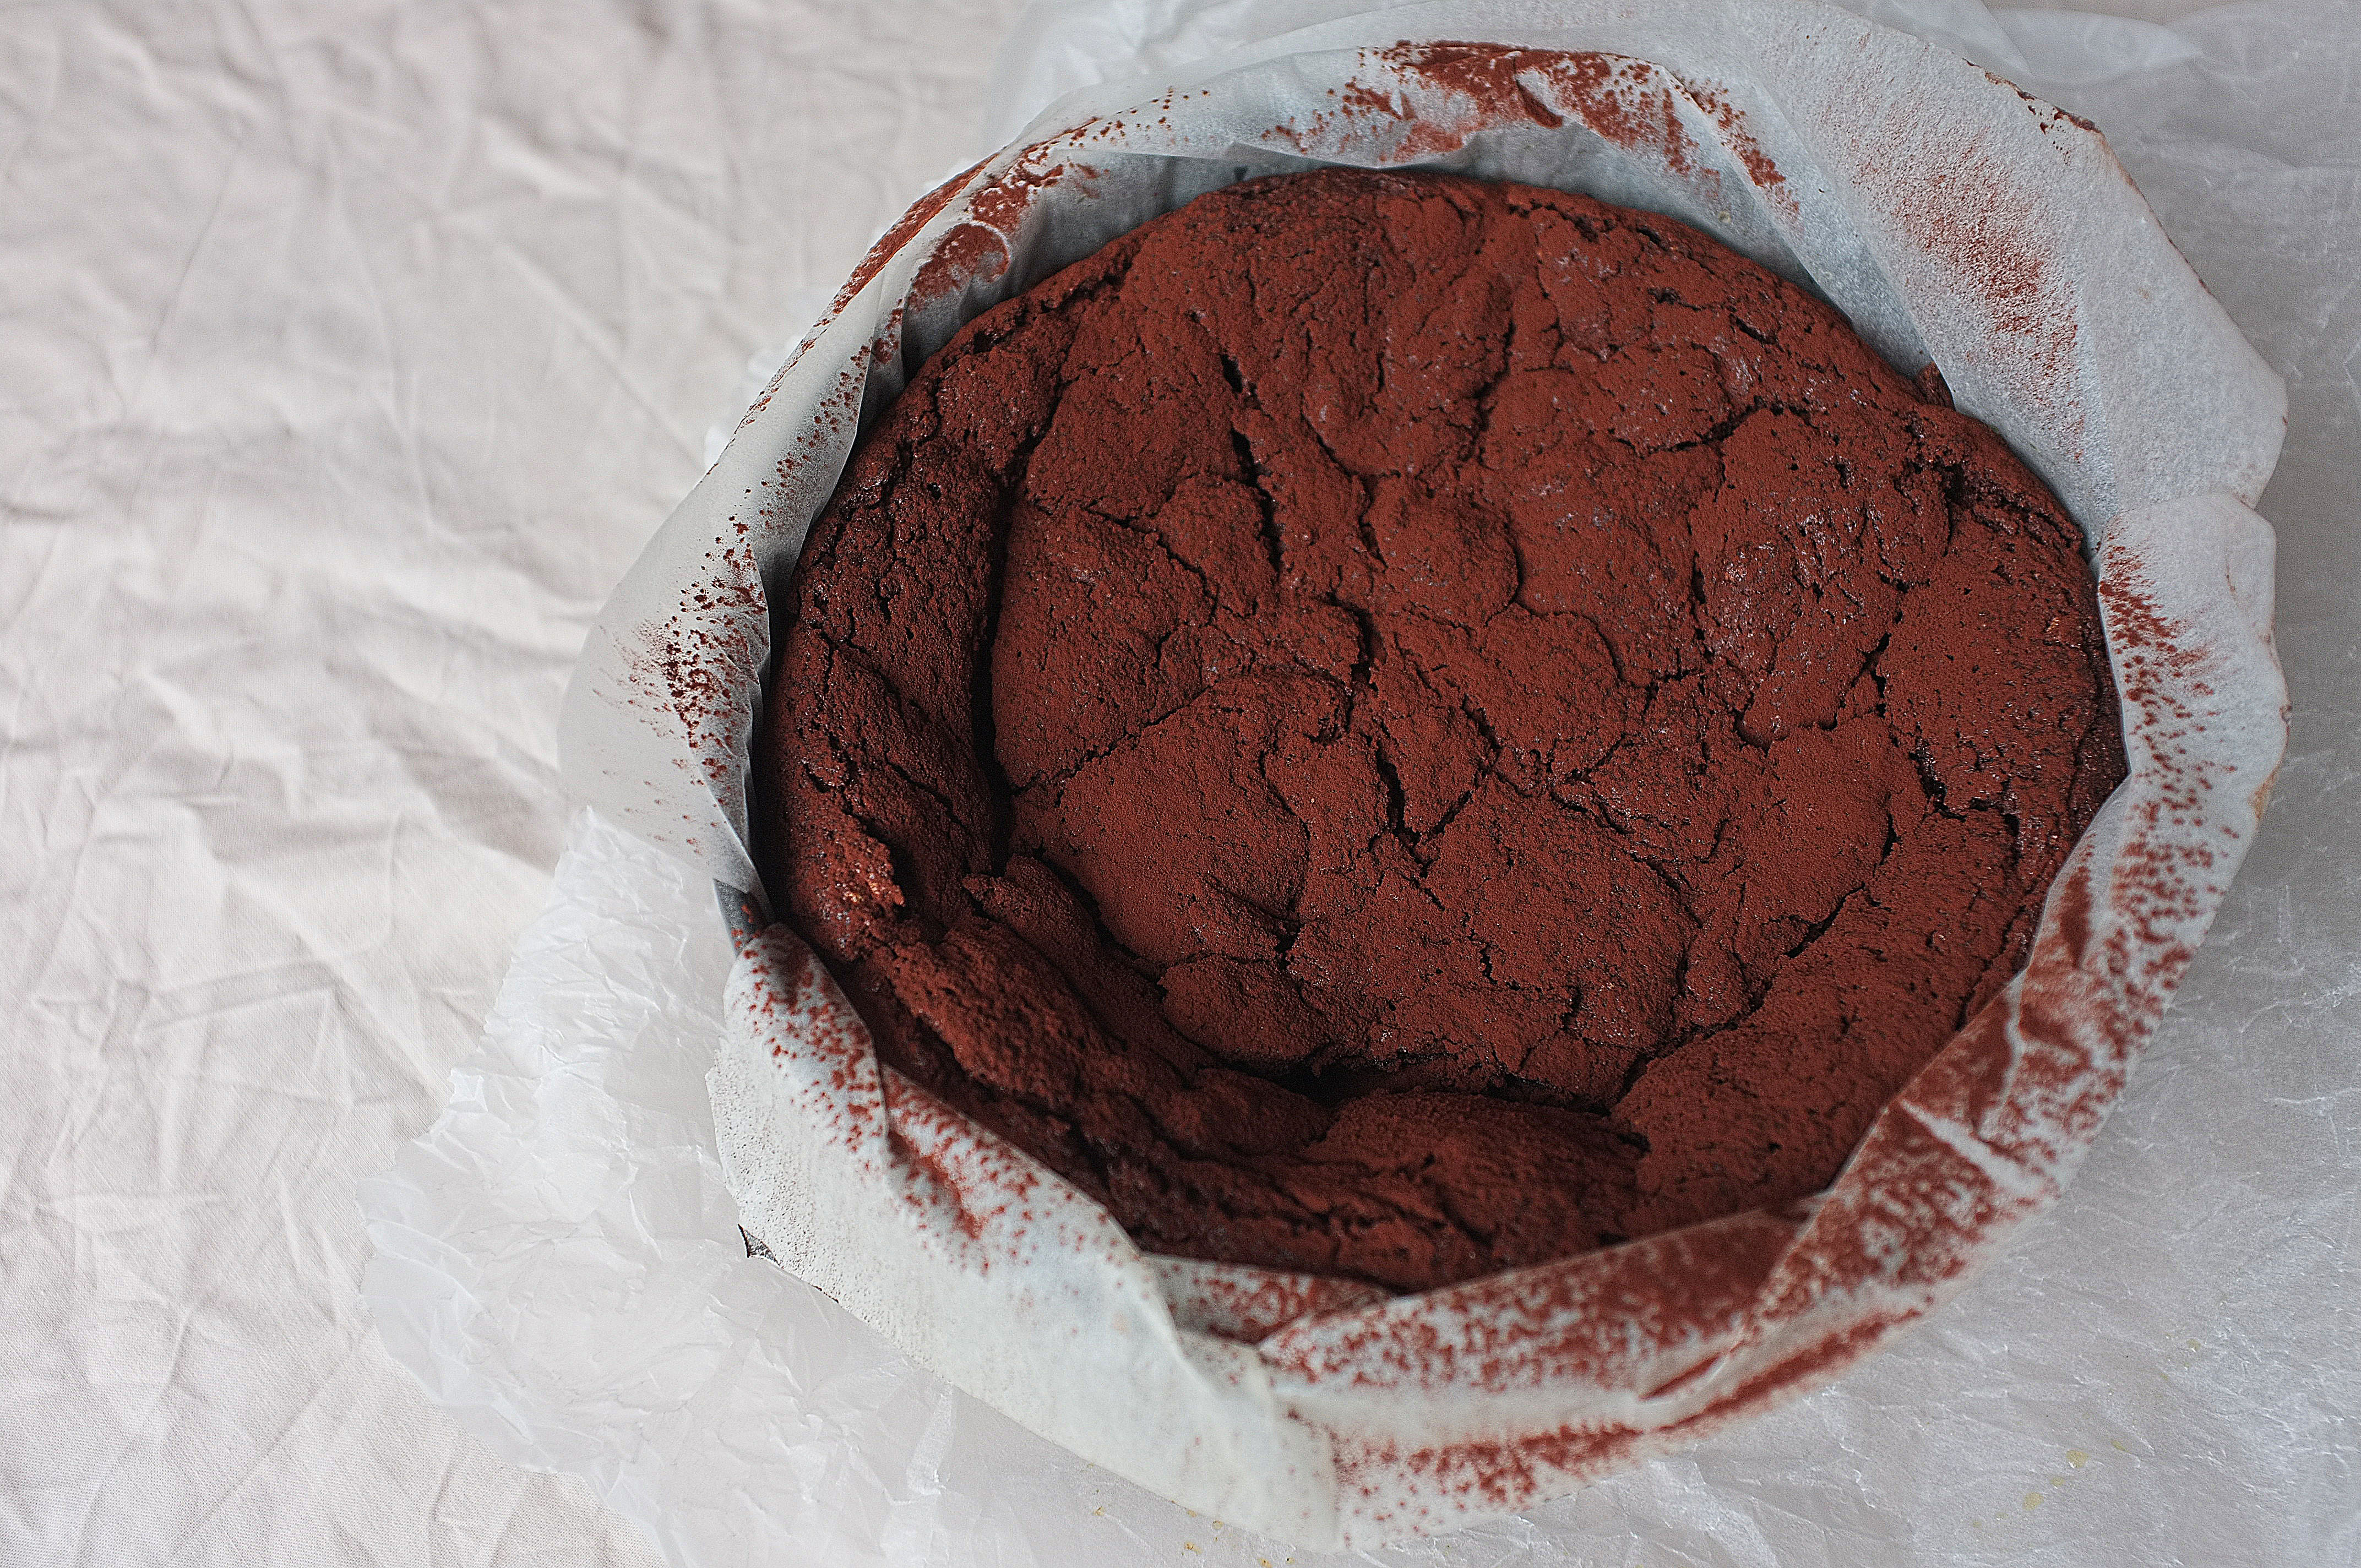
  10. Garnish with edible dried flower petals.
Advertisement

Orange, Cardamom and White Chocolate Shortbread

Biscuits, Uncategorized

These buttery shortbreads, dipped in white chocolate and flavoured with warming cardamom and citrus, have got me feeling (dare I say it) pretty festive. The format might be a bit retro but there’s something comforting and nostalgic about bedding in with a batch of homemade biscuits and a cup of builder’s tea at this time of year. Give them a try for a quick and easy twist on a classic.

Ingredients (makes 20-24 biscuits)

  • 225g soft butter
  • 100g caster sugar
  • zest 1 orange
  • 150g plain flour
  • 1 1/2 tsp ground cardamom
  • 75g rye flour
  • 100g cornflour
  • Pinch of salt
  • 100g white chocolate
  • 50g pistachios, finely chopped (optional)

Method

  1. Place the butter, sugar and orange zest in a large bowl (or bowl of a stand mixer with paddle attachment) and beat until very light and fluffy. Add in the flours, salt and ground cardamom and beat briefly until the flour is just incorporated and the mix starts to come together in large clumps (it’s important not to over-mix here as beating for too long could result in a tough biscuit which isn’t buttery and short!).
  2. Bring the mix together with your hands and roll out on a floured surface to about 1cm thick. Stamp out biscuits using a cookie cutter (or just slice the dough into squares with a knife) and line up on a lined baking tray. Chill for at least 30 minutes, or until firm. Preheat the oven to 180c.
  3. Once your biscuits have firmed up, bake for 12-15 minutes or until the edges are golden. Leave to cool on a wire rack.
  4. Melt the white chocolate in a heatproof bowl set over a saucepan of simmering water (or melt in the microwave at 30 second increments, stirring between each) then dip each biscuit in, about half way up. Place the dipped biscuits on a piece of greaseproof paper for the chocolate to set and sprinkle with pistachios.

Enjoy!

Dark Chocolate, Olive Oil and Espresso Torte

Cakes, Uncategorized

No intricate decorations, fillings or tiers here, just one humble layer of ludicrously fudgy, crinkly chocolate joy (which is, entirely by chance, dairy and gluten free). For a real depth of flavour and the perfect balance of bitter and sweet, take note of my chocolate recommendations and use a good quality olive oil (this recipe idea actually stemmed from a yearning to bake with a deliciously floral, wincingly expensive extra virgin oil I picked up in Greece last month*).

* Disclaimer: don’t judge, I was in that holiday headspace where you flash your card with the sort of cavalier attitude usually reserved for Monopoly money… sufficed to say, I could do with passing GO right now

Ingredients

  • 200g 50% dark chocolate
  • 200g 80% dark chocolate
  • 200ml good quality olive oil
  • 275g light brown soft sugar
  • 75ml strong espresso
  • 5 eggs
  • Generous pinch sea salt

Method

  1. Preheat the oven to 170c. Grease and line a 9 or 10 inch cake tin.
  2. Roughly chop all the chocolate and place it in a heatproof bowl along with the olive oil. Put the sugar and coffee in a saucepan and gently heat until the sugar has completely dissolved (avoid bringing it to the boil at this stage).
  3. Once the sugar has dissolved increase the heat and bring to the boil to form a syrup, then pour over the chocolate. Leave for a few minutes while the chocolate melts, then stir everything (chocolate, olive oil, sugar, espresso) together to form a smooth, glossy liquid. Set aside to cool to room temperature, then stir in the egg yolks.
  4. Place the egg whites in a large bowl with the salt (or bowl of a stand mixer) and whisk to stiff peaks. Carefully fold the whites into the chocolate mixture in two batches using a large metal spoon, then scrape the mixture into the prepared cake tin (make sure you don’t scrape from a height or you’ll knock out some of that air you’ve just put into the whites!).
  5. Bake for 50-60 minutes, then leave to cool completely in the tin. When cooling, the top of the cake will dip and crack- don’t worry, it’s a smooth, flourless torte, not a sponge cake! Once cool, slice up and finish with a dusting of cocoa powder. Serve with creme fraiche, if you like.


Cherry, Chocolate and Tahini Parfait with Sesame Crumble

Chocolate, Cooking, Uncategorized

We’ve been enjoying a very unusual bout of beautiful hot weather here in the UK, so today’s recipe is an iced one. I served this up for my boyfriends birthday (after he broke the news to me that he didn’t want a cake- yeah, sacrilege I know) and although it requires a little more effort to make than a simple sponge, the creamy, indulgent and slightly bittersweet (thanks to the tahini and very dark chocolate) result is well worth it.

Ingredients

For the chocolate ripple

  • 150g bitter dark chocolate
  • 150ml double cream
  • pinch sea salt

For the cherry compote

  • 200g fresh cherries (de-stoned)
  • 3tbsp honey or caster sugar
  • Zest and juice of 1 orange

For the parfait base

  • 4 eggs
  • 75g caster sugar
  • 125ml whole milk
  • 250ml double cream
  • 150g tahini

For the tahini crumble

  • 25g tahini
  • 25g demerara sugar
  • 25g butter, cubed
  • 100g plain flour
  • 1tbsp black sesame seeds

Method

  1. Start by making the chocolate ganache for the ripple. To do this simply place the chocolate, salt and cream in a heatproof bowl and set over a pan of simmering water (don’t allow the water to touch the bottom of the bowl). Stir occasionally until it melts together and forms a smooth ganache. Set aside to cool.
  2. Now prepare the cherry compote. Put the cherries, honey (or sugar), orange zest and juice in a saucepan and gently heat, stirring occasionally, until it reaches a sticky compote consistency (5-10 minutes). Transfer to a bowl and leave to cool.
  3. Now it’s time to make the parfait base. Line a loaf tin with 2 layers of cling film, leaving an overhang on all sides.
  4. Separate the eggs. Put the yolks in a large bowl along with the sugar and whisk until pale, meanwhile, heat the milk until just boiling in a saucepan. Remove the milk from the heat and pour into the egg yolks, then stir together until smooth. Return the mix to a clean pan and gently heat, stirring constantly. After a few minutes, the mix will start to thicken- once it coats the back of the spoon set aside and cool to room temperature.
  5. Once the ganache, compote and custard have cooled to room temperature, whisk the double cream to soft peaks. In a separate bowl whisk the egg whites to medium peaks. Stir the tahini into the egg yolk mixture. Fold the double cream into the egg yolk/ tahini with a large metal spoon, then do the same with the egg whites, retaining as much air as possible. Ripple through 2/3 of the chocolate ganache and 2/3 of the cherry compote.
  6. Spoon the remaining chocolate ganache and cherry compote into the bottom of the prepared tin, then spoon in the parfait mix. Cover with cling film and freeze for at least 4 hours.
  7. While the parfait is freezing, make the sesame crumble. Preheat the oven to 180c. Rub together the butter and flour until they resemble breadcrumbs. Stir through the sugar and tahini, then tip onto a lined baking tray- bake for 10 minutes then check, shake and return to the oven to 10 more minutes, or until the crumble is golden brown. Stir through the sesame seeds and set aside to cool.
  8. Take the parfait out of the oven 10 minutes before you’d like to serve it to allow it to soften slightly. Sprinkle on the sesame crumble and finish with some fresh cherries.

Enjoy!

Tahini & Pistachio Brownies

Chocolate

First off, apologies for the brief recipe hiatus. I’ve recently moved house and have been trying to figure out the perfect temperature to bake with in my new (incredibly retro) gas oven. And no, it’s not been as simple as converting degrees to gas marks- this oven has its own special way of working (i.e. it’s lukewarm for the majority of settings until the last when it turns into Mordor and burns everything in sight). Anyway I think I’ve cracked it now, so here’s my first recipe a la 1980s oven; tahini and pistachio brownies. They’re really simple to make but deliver everything you’d expect from a really good brownie- a dense, moist texture with added crunch from the pistachios and a deep indulgent chocolate flavour, which is definitely enhanced by the slightly salty, nutty pockets of tahini and halva.

Ingredients

  • 250g good quality dark chocolate
  • 250g unsalted butter
  • 250g golden caster sugar
  • 4 eggs
  • generous pinch sea salt
  • 150g plain flour
  • 100g milk chocolate, roughly chopped
  • 50g dark chocolate, roughly chopped
  • 75g chopped pistachios
  • 100g halva, crumbled
  • 100g tahini, well stirred

Method

  1. Preheat the oven to 180c. Grease and line a 22x22cm brownie tray.
  2. Place the dark chocolate and the butter in a heatproof bowl and set over a pan of simmering water (don’t allow the water to touch the base of the bowl or the chocolate will burn). Melt gently, stirring occasionally, then set aside to cool a little.
  3. In a large bowl (or bowl of a stand mixer) whisk together the golden caster sugar and eggs until pale and voluminous (about 3-5 minutes). Fold in the cooled chocolate mixture followed by the sea salt and flour. Add the milk chocolate and dark chocolate chunks and most of the pistachios (reserve a few for sprinkling on the top) then stir.
  4. Tip half the brownie mix into the prepared tin then dollop over half the tahini and sprinkle on half the halva. Top with the rest of the brownie mix and repeat, then finish with the reserved pistachios.
  5. Bake for 30-35 minutes or until the middle is almost set but retains a slight wobble. Set aside to cool completely in the tin.
  6. Once cooled, slice up and serve.

Chocolate Honeycomb Celebration Cake

Cakes

Whenever I bake a chocolate cake (the layered kind, not the flourless, fudgy sort) I’m looking for a sponge which actually tastes of chocolate, is really moist without being overly dense and isn’t too sickly sweet. I’m always tweaking my go to chocolate cake with these characteristics in mind and think I’ve pretty much cracked it with this recipe. I’ve teamed the light chocolate layers with honeycomb toppers, salted toffee cream filling and a rich ganache coating here, but you could definitely fill it with chocolate buttercream if you want a pure chocolate fest.

Note: this cake is so extra and is definitely one for a special occasion- you could half the recipe and just coat with ganache if you’re after something indulgent but a little more modest

Ingredients (makes a tall 8 inch celebration cake- feeds 12-14 people)

For the cake:

  • 375g plain flour
  • 300g caster sugar
  • 85g cocoa powder
  • 2tsp baking powder
  • 2tsp bicarbonate of soda
  • large pinch sea salt
  • 3 eggs
  • 325ml milk
  • 175ml vegetable oil
  • 2tsp vanilla extract
  • 100g dark chocolate
  • 325ml just boiled water
  • 2tsp instant coffee granules

For the toffee cream filling:

  • 325g soft light brown sugar
  • 225ml double cream
  • 175g butter
  • pinch sea salt

For the ganache:

  • 200g dark chocolate
  • 150g milk chocolate
  • 300ml double cream

For the honeycomb (this makes more than enough- I use about half and store the rest in a jar for my many weak snacking moments):

  • 60g butter
  • 120g caster sugar
  • 60g golden syrup
  • 1 1/2tsp bicarbonate of soda

Method

  1. Preheat the oven to 170c (325F / gas mark 3). Grease and line two 8 inch cake tins.
  2. Melt the dark chocolate in a heatproof bowl set over a pan of simmering water (or in the microwave in short stints, stirring often). Set aside.
  3. In a large bowl stir together the flour, caster sugar, cocoa powder, baking powder, bicarbonate of soda and salt. In a jug, lightly whisk the eggs, milk, vegetable oil and vanilla extract. Make a well in the dry ingredients and pour the contents of the jug into it. Stir the wet and dry ingredients together until well combined then add the melted chocolate and stir again (I just use a balloon whisk for this- nothing electric is required as you don’t need to incorporate much air).
  4. Pour your just boiled water over the instant coffee granules and once they’ve dissolved, gradually add to the chocolate batter, stirring gently with your whisk as you go. The final cake batter will be very thin but don’t worry, it bakes beautifully.
  5. Split the mix evenly between the prepared tins and bake for 45-55 minutes (until a skewer comes out clean with a few moist crumbs attached). Once baked leave to cool completely in the tins.

  1. While your cakes are cooking and cooling you can get on with the filling, ganache and honeycomb toppers.
  2. For the filling, place the cream and sugar in a saucepan and gently heat until the sugar has dissolved and you are left with a smooth caramel coloured cream. Set aside, add the salt (to taste) and cool completely. Once your cream has cooled take the butter and whisk (in a stand mixer or with electric beaters) until it reaches a light, whipped consistency then gradually add your cream mixture. Keep whisking this until it has thickened and is spreadable. Set aside for later.
  3. For the ganache chop up the chocolate and scrape into a heatproof bowl or jug, then heat the cream until it just reaches boiling point and pour directly on top. Leave for a couple on minutes then stir to make sure the chocolate has melted into the cream leaving you with a smooth ganache. Set aside to cool and thicken.
  4. For the honeycomb line a baking tray with some lightly oiled baking paper then place the butter, sugar and golden syrup in a saucepan. Gently heat until all the ingredients start melting together then stir to combine. Turn up the heat and leave to bubble until it reaches a deep golden colour then add the bicarbonate of soda and briefly mix to make sure it’s evenly distributed- it should now start bubbling up and becoming lacy in appearance. At this point pour it quickly onto the lined baking tray and leave to set hard.
  5. Once you’ve made all your elements and they’ve cooled to room temperature you’re ready to assemble the cake. To do this slice any uneven tops off your sponges then slice in half horizontally, leaving you with four layers.
  6. Sandwich the layers on top of one another, filling with the toffee cream as you go. Once stacked, spread any remaining toffee cream all over the cake and then chill for 10 minutes (this setting time makes it easier to cover the cake neatly in ganache).
  7. After chilling the cake spread the ganache all over its surface. I used a palette knife to create a line pattern on my cake to tie in with the honeycomb theme but you could make it super sleek and smooth or go for a really rustic look- it’s up to you. To finish it off break up the honeycomb and use as decorations; I also made some toppers by setting melted chocolate over bubble wrap, but it really isn’t necessary!

I hope you all enjoy this recipe- my family and friends went absolutely mad for it so it’s definitely worth the effort if you’re up for a little bit of a baking project!

Cherry and White Chocolate Brownies

Chocolate

These fudgy brownies incite frenzied eating in my house; they barely saw the light of day when I made them last and half my family were out… It’s hardly surprising they are so addictive though- white chocolate matches brilliantly with fresh cherry compote (particularly when accompanied by a very generous glug of slightly unseasonal brandy).

Ingredients:

For the compote:

  • 300g cherries (stones removed)
  • 2tbsp caster sugar
  • 1tbsp water
  • large glug brandy (this amount is totally down to your taste)

For the brownies:

  • 300g dark chocolate
  • 200g butter
  • 2 eggs
  • caster sugar
  • 225g plain flour
  • 200g white chocolate chunks

Method:

  1. Start by making the compote. Roughly chop the cherries. Place in a pan along with the sugar, water and brandy. Heat gently, stirring occasionally, until the cherries become soft and the syrupy liquid starts to thicken (about 10 minutes). Once the consistency is somewhat jam-like, taste and add more brandy if you like (you can leave out the brandy entirely if it’s not your jam- ha.). Set aside to cool.
  2. Preheat the oven to 170c. Grease and line a brownie tin (around 22x22cm is perfect).
  3. Place the butter and dark chocolate in a  heatproof bowl and set over a pan of gently simmering water (don’t let the water touch the base of the bowl). Stir occasionally and remove from the heat once melted together.
  4. Place the eggs and caster sugar in a large bowl (or bowl of a stand mixer) and beat together until well combined.
  5. Add the chocolate mixture to the bowl and fold in followed by the flour and 2/3 of the white chocolate chunks. Tip into the lined baking tin and level out.
  6. Dollop the compote all over the surface of the brownie and finish by sprinkling on the remaining white chocolate. Bake for 25-35 minutes until the top is set but the inside is moist and a little gooey.
  7. Allow the brownie to cool completely in the tin then slice up and serve.

Enjoy!

Snickers Celebration Cake

Cakes

Alternating layers of brown sugar cake and chocolate sponge sandwiched with peanut buttercream, chopped peanuts, salted caramel sauce and chocolate ganache make up this look-at-me celebration cake (and ode to the Snickers bar)… A bit of a project? Yes. Worth it? Definitely!

snickers1

Ingredients:

For the chocolate sponge:

  • 50g dark chocolate (melted and cooled)
  • 250g soft butter
  • 250g soft light brown sugar
  • pinch salt
  • 100g cocoa powder
  • 250g plain flour
  • 2 1/2 tsp baking powder
  • 3 eggs
  • 225ml milk

For the brown sugar sponge:

  • 4 eggs
  • 165g dark brown soft sugar
  • 150g self raising flour
  • 20g melted butter
  • 60ml boiling water

snickers2

For the peanut buttercream:

  • 150g smooth peanut butter
  • 100g soft butter
  • 500g icing sugar
  • 5tbsp milk

For the ganache:

  • 100g dark chocolate
  • 100g milk chocolate
  • 200ml double cream

For the salted caramel:

  • 150g caster sugar
  • 150ml water
  • pinch salt (to taste)
  • 75ml double cream

For decoration (optional):

  • chopped peanuts
  • chocolate shards
  • chopped Snickers bars
  • thin ganache to create drips
  • excess caramel

snickers3

Method:

  1. Preheat the oven to 160c. Grease and line two 7 inch cake tins ready for the chocolate cake layers.
  2. To make the chocolate cake, cream together the butter, sugar and salt.
  3. Add the eggs one at a time, beating well between each addition.
  4. Now sift in about two thirds of the cocoa, flour and baking powder. Fold, then incorporate the melted chocolate with the same gentle action.
  5. Fold in the rest of the dry ingredients followed by the milk. Distribute this batter between the two cake tins and bake for 30 minutes (or until a skewer comes out clean when inserted).
  6. Cool the cakes in the tins for 10 minutes then transfer to a cooling rack.
  7. Line the cake tins again and increase the oven temperature to 170c. Now you’re ready to make the brown sugar sponge layers!
  8. To make this sponge place the eggs and sugar in a large bowl (or bowl of a stand mixer) then whisk until light and voluminous (about 10 minutes). Sift in the flour and fold, then add the melted butter and boiling water to the side of the bowl. Fold very gently to retain the air then distribute between the tins. Bake for 25-30 minutes until springy (or until a skewer comes out clean when inserted).
  9. When the brown sugar sponges are cooked, cool in the tins for 10 minutes then transfer to a cooling rack. You should now have four cake layers (two chocolate and two brown sugar) and are ready to make the fillings.

snickers-4

  1. Start off by making the caramel. Just place the sugar and water in a heavy bottom saucepan and gently heat to dissolve the sugar (do not boil or stir, just be patient!). After the sugar has dissolved increase the heat and boil for a few minutes; once the syrup reaches a deep amber colour remove from the heat and whisk in the cream (be careful as it will spit a little). Set aside to cool slightly then stir in the salt.
  2. For the ganache simply chop up the chocolate and transfer to a jug or bowl. Heat the cream to just below boiling point and pour all over, allowing the chocolate to slowly melt. After a couple of minutes, stir the mixture to achieve a lovely smooth, glossy consistency. Set aside.
  3. Finally, for the peanut buttercream beat the peanut butter and butter together with electric beaters (or a stand mixer). Once well combined continue whisking while you add the icing sugar a little at a time. Once you’ve added all the icing sugar increase the speed and add the milk; whisk until very light, fluffy and smooth.
  4. To assemble the cakes stack a chocolate layer with ganache and salted caramel, followed by a brown sugar layer. Repeat this process then cover the entire cake with peanut butter icing. You can be as neat as you like! Decorate with peanuts, Snickers pieces and chocolate shards (more is more in this case!).

Enjoy!

Date and Ginger Pudding with Maple Sauce

Cakes, Uncategorized

This indulgent ginger and date pudding is made for those miserable winter evenings where you just want to curl up and watch a film with a bowl of something warm, comforting and nostalgic…

Ingredients:

  • 225g butter
  • 225g soft dark brown sugar
  • 70g black treacle
  • 165g golden syrup
  • 200g pitted dates
  • 200ml boiling water
  • 100ml milk
  • 350g plain flour
  • 2tsp bicarbonate of soda
  • 2tbsp ground ginger
  • 1tsp ground cinnamon
  • 1tsp mixed spice
  • 2 eggs
  • For the sauce: 100g dark brown sugar, 75g butter, 50ml maple syrup, 50g golden syrup, 75ml double cream, pinch sea salt

Method:

  1. Preheat the oven to 170c. Grease a pudding dish (or chosen vessel) with butter.
  2. Roughly chop the dates and place in a small bowl, then pour over the boiling water. While the dates are soaking, melt the butter, sugar, treacle and syrup in a large saucepan. Once melted, add the soaked dates and water. Stir together.
  3. Now gradually pour in the milk. Stir together until well combined. Set aside.
  4. Sift the plain flour, bicarbonate of soda, ginger, cinnamon and mixed spice into a large mixing bowl. Make a well in the middle and break in the eggs. Briefly mix the eggs to break up then gradually add the melted ingredients from the saucepan. Stir together with a wooden spoon until you have a smooth, lump-free batter.
  5. Pour the batter into the prepared dish and bake for 40-50 minutes (or until a skewer comes out with a few moist crumbs attached when inserted).
  6. While the pudding is cooking, make the butterscotch sauce. To do this simply place the sugar, butter and syrups in a small saucepan and melt together until gently bubbling, then remove from the heat and stir in the cream and salt.
  7. Serve the pudding warm with a generous helping of sauce and vanilla ice cream.

treacke

Cranberry and White Chocolate Brownies

Chocolate, Uncategorized

These brownies are rich, dense and studded with cranberries and white chocolate chunks- a great (and easy) festive treat to whip up for visiting family and friends over the coming weeks…

Ingredients:

  • 300g dark chocolate
  • 210g butter
  • 310g caster sugar
  • pinch salt
  • 3 eggs, 1 egg yolk
  • 3tsp vanilla extract
  • 120g plain flour
  • 150g white chocolate, chopped into chunks
  • 100g dried cranberries

Method:

  1. Preheat the oven to 180c. Grease and line a square baking tin/ brownie tray.
  2. Place the butter and chocolate in a heatproof bowl and set it over a pan of gently simmering water. Do not allow the water to touch the bottom of the bowl or it could cause the chocolate to seize.
  3. Stir the butter and chocolate occasionally until melted then set aside to cool for a few minutes. Once the chocolate has cooled a little, add the sugar and salt then whisk (with electric beaters or in the bowl of a stand mixer) until well combined.
  4. Now add the eggs and whisk on high until the mix has lightened in colour and is glossy (about 5 minutes- whisking well at this stage is what gives you that classic flaky top!).
  5. Sift in the flour and fold then finally stir in the white chocolate and cranberries. Tip into the lined baking tin and spread out. Bake for 25-30 minutes or until set but still very moist in the middle.


Enjoy!