Cardamom Carrot Cake with Honeyed Rose Cream and Figs

Cakes, Uncategorized

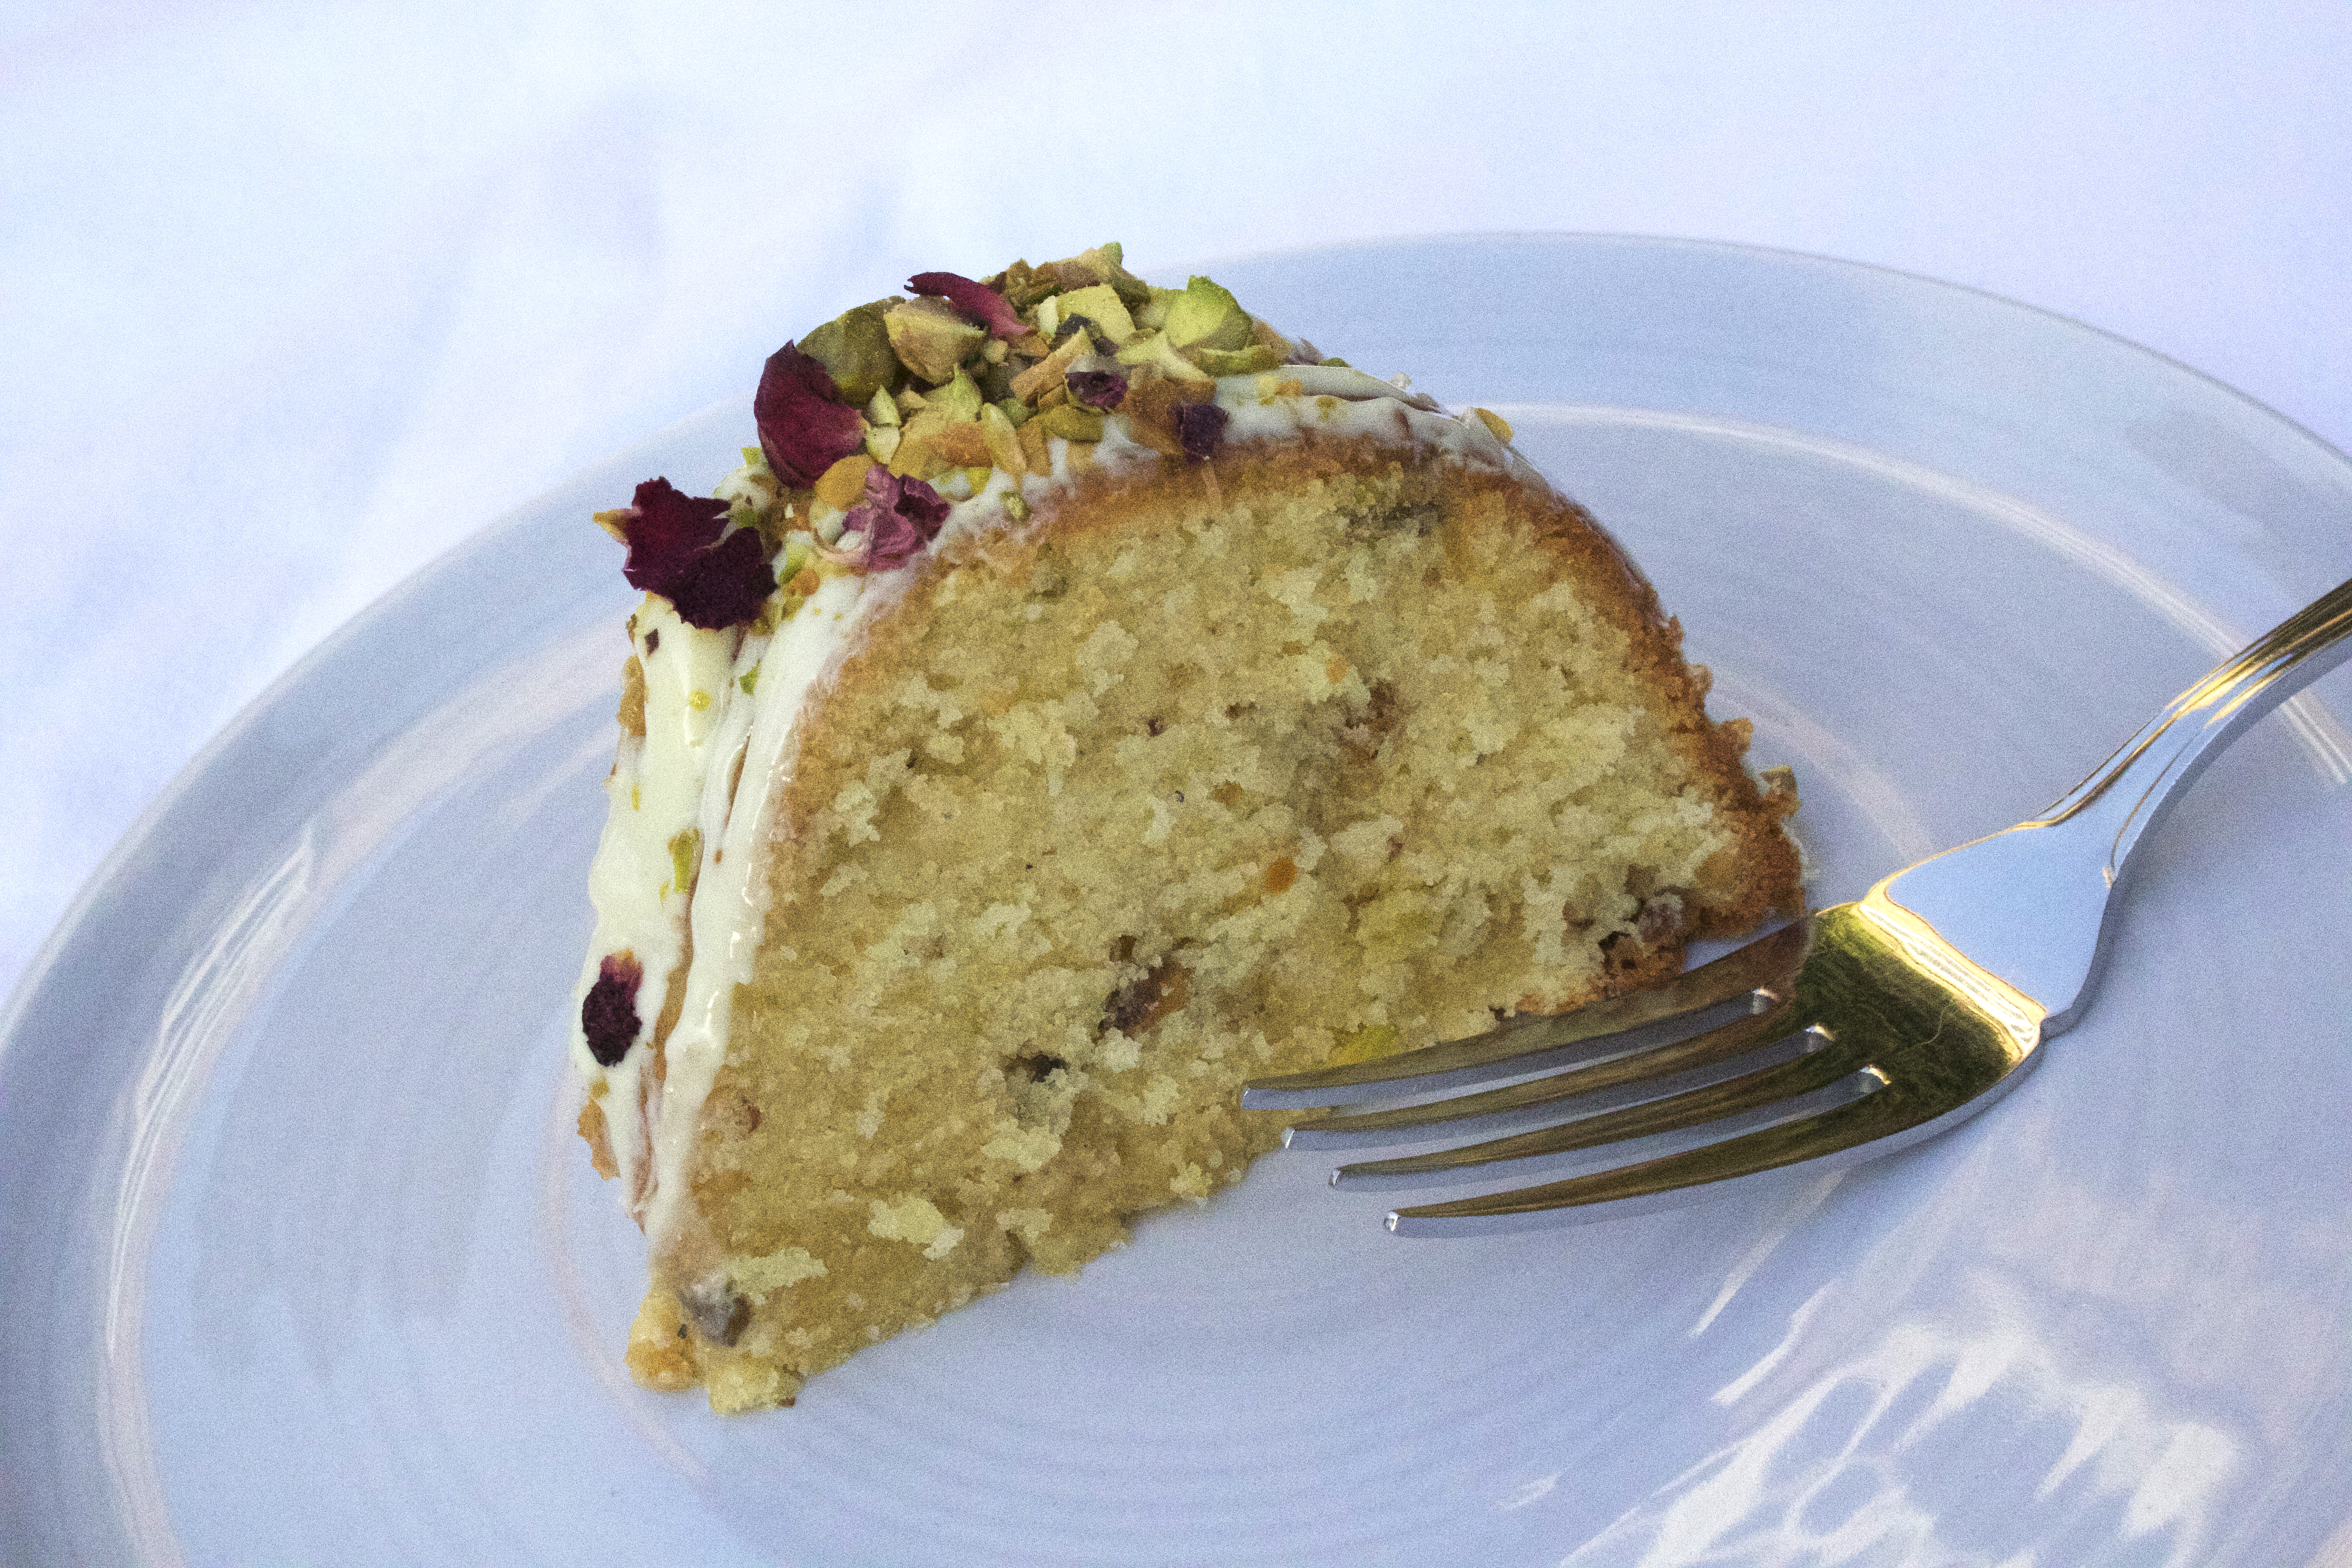
At last we approach fig season- one of my absolute favourite fruits, and so synonymous with Middle Eastern cuisine that it would be wrong to incorporate them into a bake which didn’t boast nuts, heady spices or sweet floral flavours; of course this cake contains all three, making it one of my favourite recipes I’ve posted on here to date. It’s not too sweet, nor is the icing too heavy, just a well balanced, flavoursome bake with flavours which work beautifully together. I hope you enjoy.

Ingredients

For the cakes

  • 100g chopped dried figs
  • zest and juice 1 orange
  • 2-3tbsp rose water
  • 250g butter, cubed
  • 200g caster sugar
  • 50g soft light brown sugar
  • 4 eggs
  • 400g grated carrot
  • 225g plain flour
  • 1tsp bicarbonate of soda
  • 2tsp baking powder
  • large pinch salt
  • 1 1/2 tsp cinnamon
  • 2 heaped tsp ground cardamom
  • 1tsp mixed spice
  • 100g pistachios, roughly chopped

For the icing

  • 300ml double cream
  • 200g cream cheese
  • 3tbsp honey
  • 2-3tbsp rose water

Optional

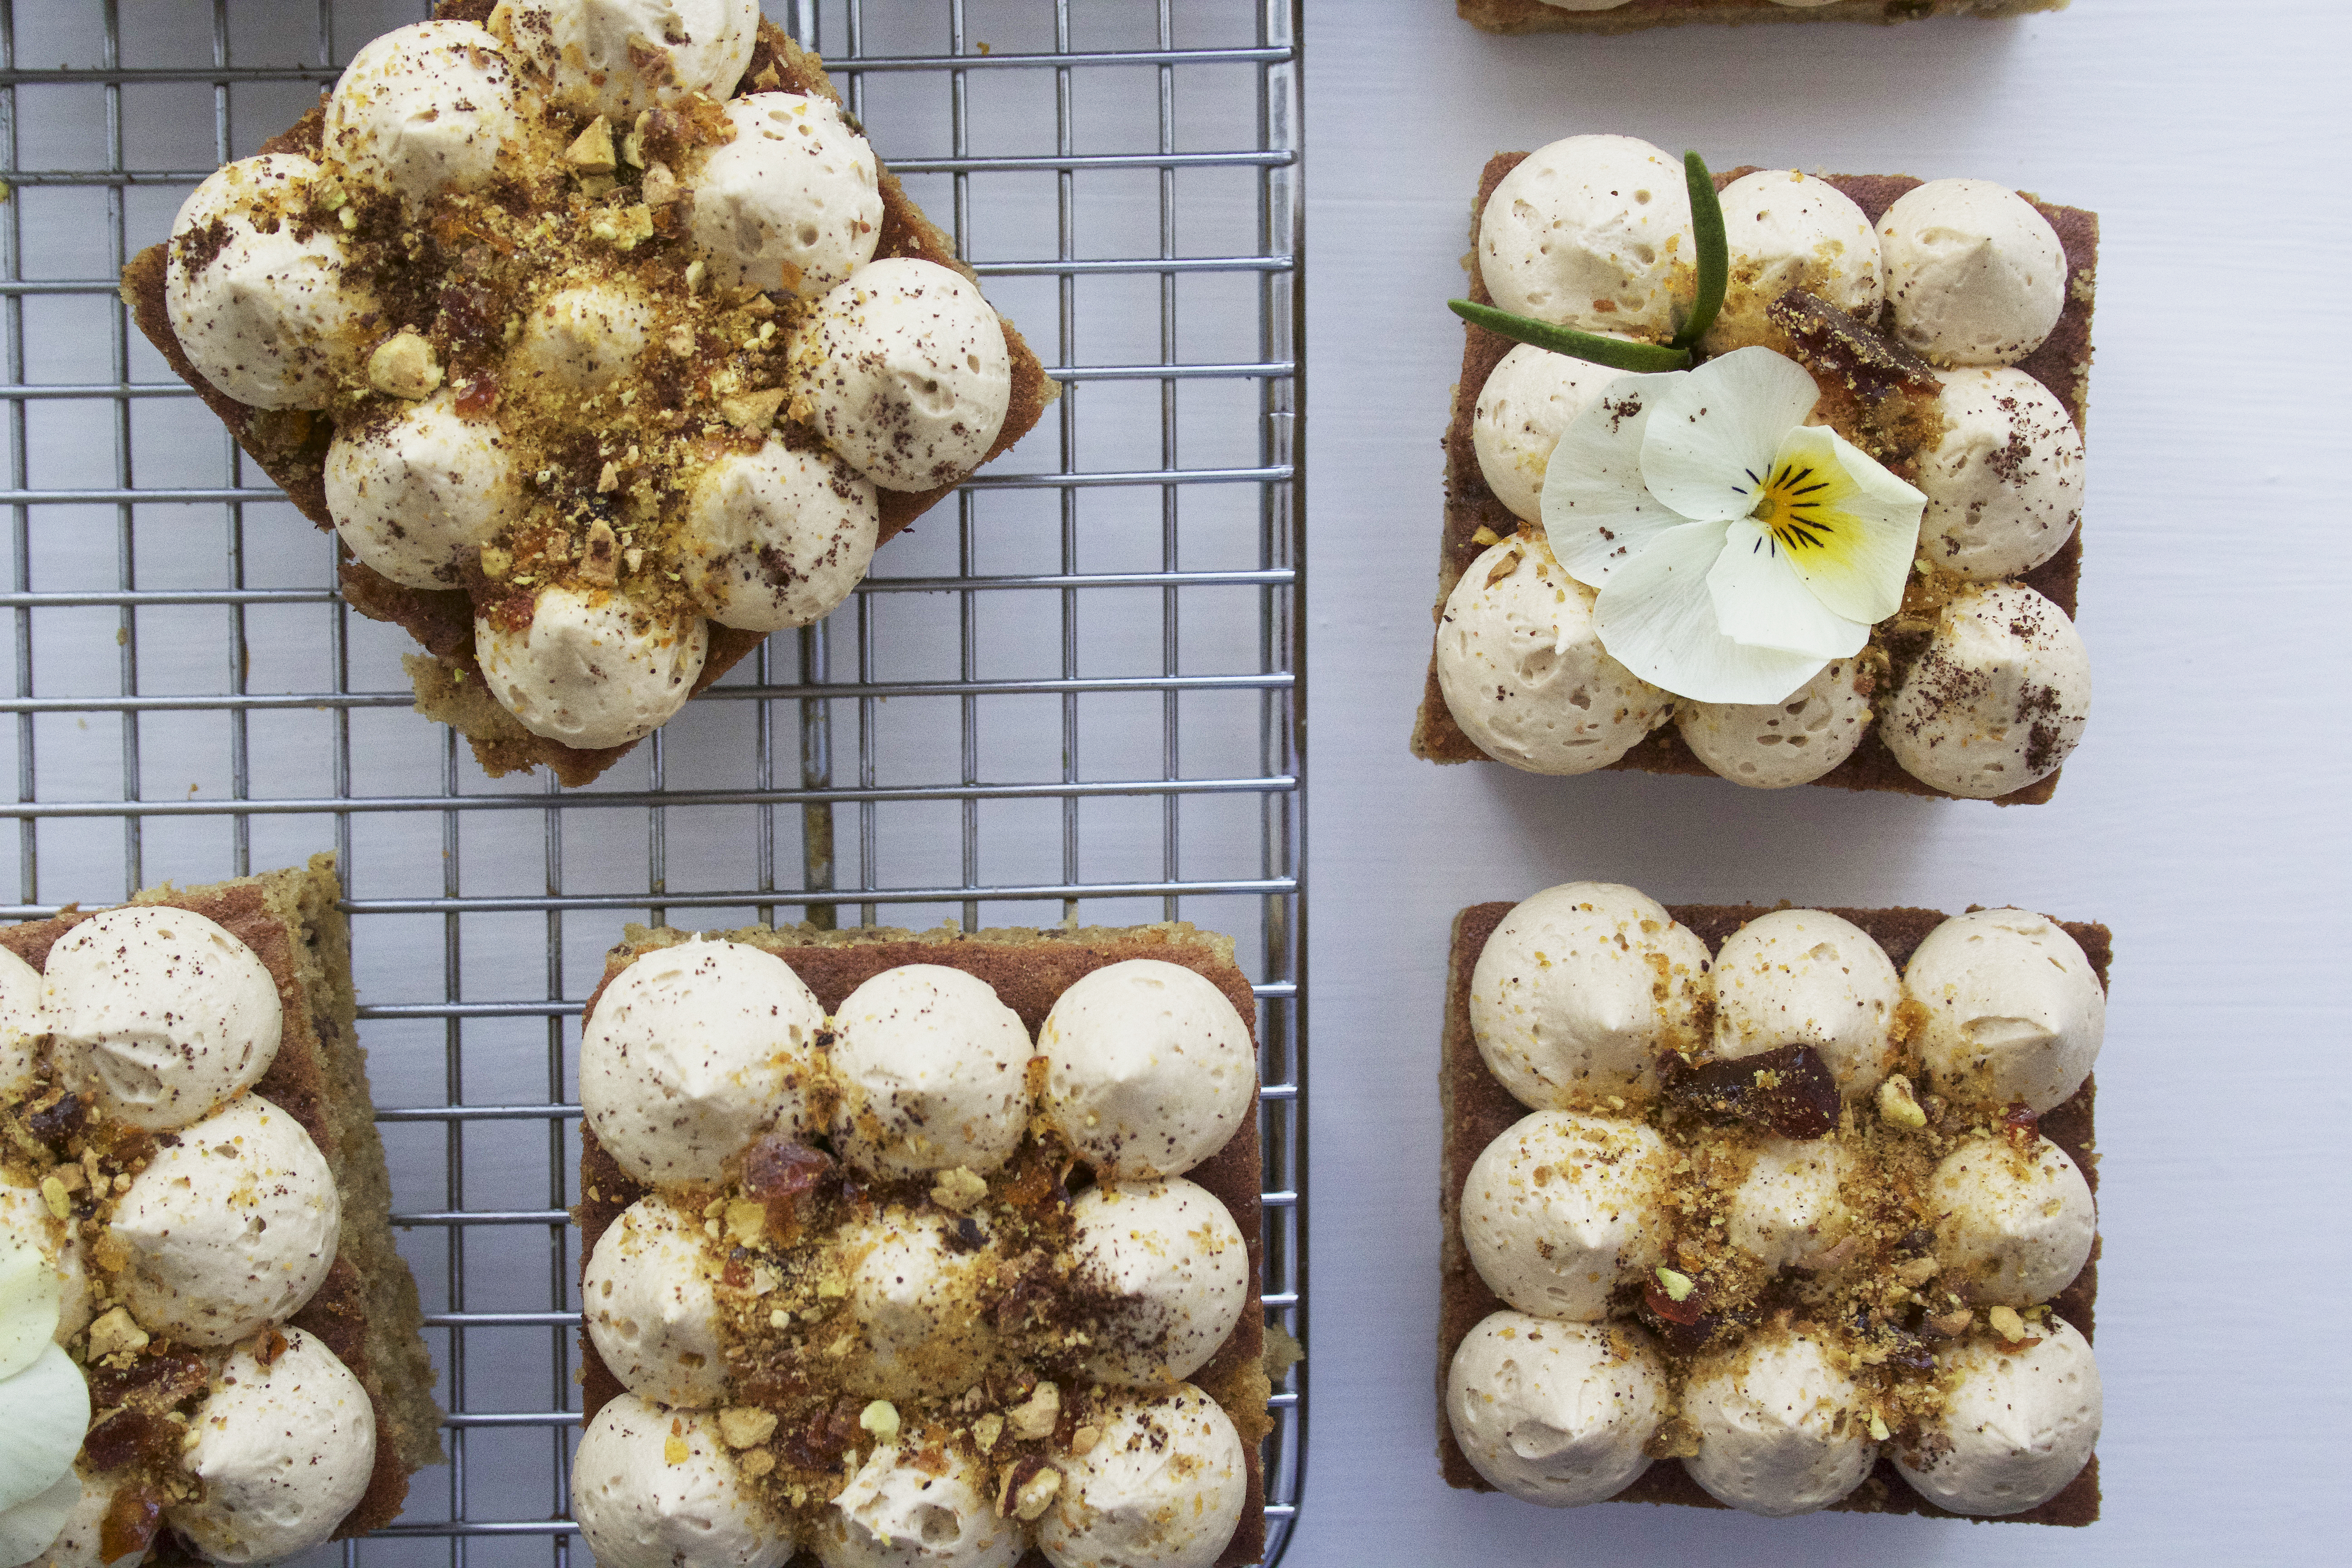
  • 50g chopped pistachios
  • 1tbsp dried rose petals
  • 4-5 figs

Method

  1. Preheat the oven to 180c. Grease and line two 7 inch cake tins.
  2. Roughly chop the figs and discard the stalks. Tip into a bowl and add the orange juice and rose water. Leave to soak until required.
  3. In a large bowl (or bowl of a stand mixer with paddle attachment) cream together the butter and both sugars until pale and thick. Add in the eggs one at a time, beating well between each addition (add a small amount of the flour with each egg to prevent curdling).
  4. Stir through the grated carrot and soaked figs (along with any juice the figs haven’t absorbed). Mix together the dry ingredients and pistachios and fold through the batter until no streaks of flour remain.
  5. Split the batter between the prepared tins and level off. Bake for 25-35 minutes or until a skewer comes out clean when inserted.
  6. Let the cakes sit in the tins for 10 minutes, then turn out onto a wire rack and leave to cool completely.
  7. Meanwhile, place the cream, cream cheese, honey and rose water in a large bowl (or bowl of a stand mixer with whisk attachment) and whisk until pipe-able. Adjust the levels of sweetness and rose flavour to taste.
  8. Once the cakes have cooled down, slice them in half horizontally, leaving you with 4  equal layers. Pile the rose and honey cream into a piping bag with round nozzle. Place the first layer onto a serving plate and pipe little mounds all over the surface, then top with the next layer. Repeat until all the cream mixture is used up, then sprinkle rose petals and pistachios over the top and arrange the figs in an attractive way, if using.
Advertisement

Chocolate Tahini Tiffin with Orange and Fig (Vegan)

Chocolate, Uncategorized

It’s January. It’s bloody freezing. I’ve hit a new level of pale, the Christmas tree has gone to festive heaven and everyone appears to be chasing a dry January (with varying levels of success) or hitting the gym. With these bleak facts in mind, I’m not going to share a protein-5cal-superfood recipe (that would be off brand anyway); instead, here’s a delicious way to use up any old dried fruit and nuts you have lying around after Christmas. It’s not an energy ball but it’s not the worst thing you could be eating. Enjoy!

Ingredients

  • 200g 70% dark chocolate
  • 50g coconut oil
  • 100g tahini
  • 1tbsp maple syrup
  • generous pinch sea salt
  • zest 1 orange
  • 150g mixed nuts (I used pistachios, almonds and pecans), roughly chopped
  • 120g dried figs, roughly chopped (I love figs with orange and tahini, but you could use any dried fruit)
  • 2tbsp sesame seeds, lightly toasted

Method

  1. Place the chocolate, coconut oil, tahini, maple syrup, seas salt and orange zest in a large heatproof bowl. Set the bowl over a pan of simmering water (ensuring that the water doesn’t touch the bottom of the bowl) and melt gently, stirring occasionally.
  2. Once the contents of the bowl have melted, mix briefly to form a smooth, glossy liquid. Set aside to cool a little.
  3. Once the chocolate mix has cooled, stir through the mixed nuts, dried figs and most of the sesame seeds. Tip into a lined tin/mould (mine was roughly 20x12cm) and level out with the back of a spoon. Sprinkle over the remaining sesame seeds, then leave in the fridge to set for at least 2 hours.
  4. Once set, slice up and serve (keep refrigerated).

Pecan Pie Cheesecake with Brown Butter Pastry and a Caramel Core

Uncategorized

I’m under no illusion that this bake is a bit of a project and should probably come with a health warning, but I can honestly say that the the result it delivers is well worth the effort and extra 4539 calories (joking about the calories… although probably not far off). I’ve gone for a brown butter rye pastry in place of a biscuit base here, which might sound controversial (maverick), but it matches up to the nutty pecan topping really well and acts as a great textural contrast to the smooth, caramel-cored cheesecake filling. Give it a go, but be warned, it’s been described as ‘like crack’ by my eloquent taste-testers (who aren’t and never have been ‘on crack’, for the record).

Ingredients

For the base

  • 150g butter
  • 175g plain flour
  • 75g rye flour
  • 1tsp cinnamon
  • 50g icing sugar
  • 2 egg yolks
  • 2tbsp milk

For the caramel core

  • 100g caster sugar
  • 25ml water
  • 50ml double cream
  • pinch sea salt
  • 2tbsp rum or bourbon (optional)

For the filling

  • 600g full fat cream cheese
  • 150g caster sugar
  • 2tbsp corn flour
  • 2 eggs
  • 180ml soured cream
  • pinch salt

For the topping

  • 1 egg
  • 50g dark brown soft sugar
  • 3tbsp golden syrup or honey
  • 1tbsp butter, melted
  • 1tbsp plain flour
  • 100g pecan halves, lightly toasted

Method

  1. Start off by browning the butter for the pastry. To do this simply melt it in a pan until it’s gently foaming, smells nutty and is a light golden brown colour. At this stage pour the butter in a heatproof bowl and pop in the fridge or freezer to set hard.
  2. While the butter is firming up, make the caramel core. Place the sugar and water in a pan and gently heat until the sugar has completely dissolved and you are left with a clear syrup, then increase the heat and boil until it reaches a deep golden brown. Add in the cream (be careful as it will spit!) and stir for a further two minutes on the heat, then remove from the heat and add the salt and rum to taste. Set aside until needed.
  3. Back to the pastry; once your butter has firmed up, chop into cubes and tip into a food processor along with the flours, cinnamon and sugar. Pulse until it resembles breadcrumbs, then add in the milk and egg yolks. Pulse again a few times until the mix comes together in large lumps, then tip out onto your work surface and shape into a disc. Wrap in cling film and chill for 10 minutes. Preheat the oven to 180c. Grease a 2.5inch tall/ 8inch wide spring form cake tin with butter and place a disc of greaseproof paper in the base.
  4. Roll out the pastry to about 3mm thick on a floured work surface then line the prepared tin, pushing the pastry into the corners as you go (I actually find it easier to cut out a circle of pastry for the base and 2 long rectangles for the walls when I’m using a cake tin for pies and tarts- just make sure you blend the joins between the pieces together and don’t leave any gaps). Trim away any excess from the top of the tin, prick a fork all over the base (not all the way through) to prevent air bubbles, then chill for 10 minutes, or until very firm. If you like you can cut out some leaves for decoration at this stage.
  5. Once firm, line the pastry case with baking paper and fill with baking beans (ensuring that they come all the way to the top of the walls), then blind bake for about 15 minutes, or until the walls are supporting themselves. At this stage, remove the paper and beans and return to the oven for another 10-15 minutes, or until the pastry is cooked through and golden. Set aside. Reduce the oven temperature to 120c.
  6. For the cheesecake filling simply whisk together the cream cheese, sugar and corn flour until smooth, then add in the eggs one at a time, beating well between each addition. Lastly, whisk in the soured cream and salt. Tip half of this mixture into the pastry case then drizzle over the caramel. Top with the remaining cheesecake mix (this should come to about an inch below the rim of the pastry case). Bake for 50-55 minutes, or until the middle retains a little wobble. Set aside and allow to settle and cool down slightly. Increase the oven temperature to 170c.
  7. While the cheesecake is baking, mix together all the topping ingredients, except the pecans,until smooth. Once your cheesecake has cooled to a point where it’s no longer hot to the touch, arrange the pecan halves across the surface, then pour over the syrupy mixture. Return to the oven for 10-15 minutes until the topping has thickened slightly. Set aside to cool then chill to set up for at least 4 hours (ideally overnight). When you’re ready to serve, run a knife around the edge of the tin and gently release the cheesecake, then slice up and enjoy!

Carrot, Apple and Walnut Loaf with Maple Icing

Cakes

Looking at the photographs of this cake, you could be fooled into thinking it’s mid Autumn and the trees are turning. They’re not, but given the weather here in the UK (it’s pretty miserable; grey skies and that fluffy rain which get’s you far more wet than you’d think) it might as well be. With this in mind I thought I’d bake something spiced, nutty, simple and comforting to combat the bad weather blues: enter this moist carrot and apple loaf cake laced with cinnamon, ginger and walnuts topped with maple cream cheese frosting…

Ingredients:

  • 225ml vegetable oil
  • 225g soft light brown sugar
  • 4 eggs
  • 125g grated carrot
  • 125g grated apple
  • 225g self raising flour
  • 1tsp bicarbonate of soda
  • 2tsp ginger
  • 2tsp cinnamon
  • pinch salt
  • 100g chopped walnuts
  • zest 1 lemon

For the icing;

  • 5tbsp maple syrup
  • 2 heaped tbsp icing sugar
  • 250g cream cheese (full fat)
  • 100ml double cream

Method:

  1. Preheat the oven to 170c. Grease and line a large loaf tin with baking paper.
  2. Place the oil, sugar and eggs in a large bowl (or bowl of a stand mixer with paddle attachment) and, using electric beaters, beat together until voluminous and well combined. Now add the grated carrot and apple and briefly beat again to evenly distribute.
  3. Sift the flour, bicarbonate of soda, spices and salt over the wet ingredients and beat in until just combined. Lastly, fold in the walnuts and lemon zest. Pour the batter into the prepared loaf tin and bake for 40-50 minutes until a skewer comes out clean when inserted. Cool in the tin.
  4. While the cake is cooling, make the maple cream cheese icing. Simply whisk together all the ingredients until thick and spreadable.
  5. Once the cake is completely cool, top with the cream cheese icing and some walnuts, edible flowers or apple crisps, if you’re feeling fancy.

Enjoy!

Coffee and Cardamom Cakes with Pistachio Praline

Cakes

Coffee cake is one of my all time favourites, but this spin on a classic is perhaps even better (I know, big claim). The cardamom hum in the sponge goes really well with the simple coffee buttercream, and the crunch of earthy pistachio praline rounds off the overall flavour and prevents it from being overly sweet. Make these for any occasion (you can fool people into thinking they’re fancy with the help of a piping bag and edible flowers) and they are sure to go down a storm.

Ingredients:

  • 200g softened butter
  • 200g soft brown sugar
  • 3 eggs
  • 200g self raising flour
  • pinch salt
  • 8 cardamom pods, emptied and ground
  • 3tbsp coffee granules mixed with 3tbsp boiling water
  • 3tbsp milk

For the buttercream:

  • 200g softened butter
  • 400g icing sugar
  • 2tbsp coffee granules mixed with 2tbsp boiling water

For the praline:

  • 100g pistachios
  • 100g caster sugar

Method:

  1. Preheat the oven to 170c. Grease and line a brownie tin (around 20x20cm).
  2. Cream together the butter and sugar until light and fluffy then add in the eggs one at a time, mixing well between each addition. Add the flour, salt and ground cardamom and fold in until well combined. Do the same with the coffee and milk.
  3. Once your straightforward batter is ready, spoon into the tin and level off. Bake for 30-35 minutes until well risen and a skewer comes out clean when inserted. Cool in the tin.
  4. While the cake is cooling, make the praline. Place the sugar and pistachios in a heavy bottom pan and allow the sugar to melt (don’t stir, just tip the pan to move the sugar around). Once it’s melted and golden, swirl the pan to coat the nuts in the caramel then tip onto some greaseproof paper and leave to set hard.
  5. Now make your buttercream. Beat the butter until light then gradually add the icing sugar, whisking until very light. Add in the coffee and whisk again to combine. Once it’s streak free and smooth, pile into a piping bag ready to decorate.
  6. Slice the cooled cake into nine squares (or larger/smaller pieces depending on your appetite!). Pipe the coffee buttercream on top in little kisses (or freestyle with rosettes/patterns using different nozzles). Break up the praline and roughly crush then sprinkle a generous helping on top of the buttercream.

Enjoy!


Rhubarb & Mixed Nut Flapjacks (Vegan/ Dairy Free)

Biscuits

These bars are the perfect grab and go treat to keep you going on a hectic day- I love my rhubarb and ginger jam sandwiched between the peanut butter flapjack and nutty topping, but you could choose any marmalade or jam in your version.

Ingredients:

Flapjack base:

  • 75g coconut oil
  • 175g peanut butter (or another nut butter ie. almond, cashew)
  • 150g dark brown soft sugar
  • 4tbsp golden syrup
  • 300g porridge oats

Filling and topping:

  • 200g rhubarb and ginger jam (or your favourite jam- fig or raspberry would work well)
  • 200g flaked almonds
  • 75g pecans
  • 75g brazil nuts
  • 100g caster sugar
  • 2tbsp water

Method:

  1. Preheat the oven to 180c. Grease and line a brownie tray.
  2. For the base place the coconut oil, peanut butter, sugar and syrup in a saucepan. Melt together over a medium heat. Tip the oats into a large bowl and add the melted liquid. Stir together until well combined then pack down into the prepared baking tin. Bake for 25-30 minutes until golden brown.
  3. For the topping, heat the caster sugar and water together over a medium heat. Allow the sugar to dissolve then pour into a bowl along with all the nuts. Stir together to coat.
  4. Now you can assemble the next layers. Spread the jam all over the flapjack base and spoon on the nuts in an even layer. Press down the top then bake for 15-20 minutes, until the nuts are golden brown.
  5. Cool then slice into bars.


Enjoy!

Snickers Celebration Cake

Cakes

Alternating layers of brown sugar cake and chocolate sponge sandwiched with peanut buttercream, chopped peanuts, salted caramel sauce and chocolate ganache make up this look-at-me celebration cake (and ode to the Snickers bar)… A bit of a project? Yes. Worth it? Definitely!

snickers1

Ingredients:

For the chocolate sponge:

  • 50g dark chocolate (melted and cooled)
  • 250g soft butter
  • 250g soft light brown sugar
  • pinch salt
  • 100g cocoa powder
  • 250g plain flour
  • 2 1/2 tsp baking powder
  • 3 eggs
  • 225ml milk

For the brown sugar sponge:

  • 4 eggs
  • 165g dark brown soft sugar
  • 150g self raising flour
  • 20g melted butter
  • 60ml boiling water

snickers2

For the peanut buttercream:

  • 150g smooth peanut butter
  • 100g soft butter
  • 500g icing sugar
  • 5tbsp milk

For the ganache:

  • 100g dark chocolate
  • 100g milk chocolate
  • 200ml double cream

For the salted caramel:

  • 150g caster sugar
  • 150ml water
  • pinch salt (to taste)
  • 75ml double cream

For decoration (optional):

  • chopped peanuts
  • chocolate shards
  • chopped Snickers bars
  • thin ganache to create drips
  • excess caramel

snickers3

Method:

  1. Preheat the oven to 160c. Grease and line two 7 inch cake tins ready for the chocolate cake layers.
  2. To make the chocolate cake, cream together the butter, sugar and salt.
  3. Add the eggs one at a time, beating well between each addition.
  4. Now sift in about two thirds of the cocoa, flour and baking powder. Fold, then incorporate the melted chocolate with the same gentle action.
  5. Fold in the rest of the dry ingredients followed by the milk. Distribute this batter between the two cake tins and bake for 30 minutes (or until a skewer comes out clean when inserted).
  6. Cool the cakes in the tins for 10 minutes then transfer to a cooling rack.
  7. Line the cake tins again and increase the oven temperature to 170c. Now you’re ready to make the brown sugar sponge layers!
  8. To make this sponge place the eggs and sugar in a large bowl (or bowl of a stand mixer) then whisk until light and voluminous (about 10 minutes). Sift in the flour and fold, then add the melted butter and boiling water to the side of the bowl. Fold very gently to retain the air then distribute between the tins. Bake for 25-30 minutes until springy (or until a skewer comes out clean when inserted).
  9. When the brown sugar sponges are cooked, cool in the tins for 10 minutes then transfer to a cooling rack. You should now have four cake layers (two chocolate and two brown sugar) and are ready to make the fillings.

snickers-4

  1. Start off by making the caramel. Just place the sugar and water in a heavy bottom saucepan and gently heat to dissolve the sugar (do not boil or stir, just be patient!). After the sugar has dissolved increase the heat and boil for a few minutes; once the syrup reaches a deep amber colour remove from the heat and whisk in the cream (be careful as it will spit a little). Set aside to cool slightly then stir in the salt.
  2. For the ganache simply chop up the chocolate and transfer to a jug or bowl. Heat the cream to just below boiling point and pour all over, allowing the chocolate to slowly melt. After a couple of minutes, stir the mixture to achieve a lovely smooth, glossy consistency. Set aside.
  3. Finally, for the peanut buttercream beat the peanut butter and butter together with electric beaters (or a stand mixer). Once well combined continue whisking while you add the icing sugar a little at a time. Once you’ve added all the icing sugar increase the speed and add the milk; whisk until very light, fluffy and smooth.
  4. To assemble the cakes stack a chocolate layer with ganache and salted caramel, followed by a brown sugar layer. Repeat this process then cover the entire cake with peanut butter icing. You can be as neat as you like! Decorate with peanuts, Snickers pieces and chocolate shards (more is more in this case!).

Enjoy!

Cardamom, Pistachio and White Chocolate Cake

Cakes, Uncategorized

This cake is super easy to bake and is great if you’re looking to experiment with different flavours; the cardamom adds a distinct hum of spice to the light sponge which pairs really well with the earthy pistachios and super sweet white chocolate topping.

Ingredients:

For the cake:

  • 350g soft butter
  • 350g caster sugar
  • 6 eggs
  • 375g self raising flour
  • 1tsp baking powder
  • pinch salt
  • 1 1/2 tsp cardamom seeds, crushed to a fine powder
  • 150ml milk
  • 100g chopped pistachios

For the topping:

  • 150g white chocolate, chopped into small pieces
  • a few crushed pistachios and some dried rose petals (optional)

Method:

  1. Preheat the oven to 160 (fan). Generously grease a bundt in with butter then sprinkle over some flour. Shake to coat the edges completely then tip out any excess (this should ensure that the cake doesn’t stick).
  2. Cream together the butter and sugar with an electric whisk  (or a stand mixer) until light and fluffy. Add the eggs one at a time, beating between each addition (add a little bit of the flour each time if you’re worried about curdling!).
  3. Once the eggs are fully incorporated and you have a smooth mixture, add the (remaining) flour, baking powder, salt milk, and cardamom. Whisk until light and well combined.
  4. Now fold in the pistachios and scrape the batter into the prepared bundt tin. Even out and bake for 30-40 minutes.
  5. When your cake is ready a skewer should come out clean when inserted. Once cooked, rest for 5 minutes in the tin then turn out onto a wire rack and allow to cool completely.
  6. While your cake is cooling, melt the white chocolate gently in a heatproof bowl above a pan of simmering water. Set aside to cool.
  7. Once your cake and topping have cooled you’re ready to decorate. To do this drizzle the white chocolate over the bundt and let it drip down the sides. Sprinkle with pistachios and rose petals for a simple but elegant finish.