Tiramisu Loaf Cake

Uncategorized

If you don’t like coffee (!?), this isn’t for you. If you do- go forth and enjoy the triple caffeine hit this cake delivers via coffee sponge, coffee liqueur soak and coffee mascarpone.

Ingredients (I used 3×7 inch based loaf tin) 

Coffee sponge

  • 175g soft unsalted butter
  • 75g caster sugar
  • 100g light brown soft sugar
  • 3 eggs
  • 5tbsp milk
  • 3tbsp instant coffee
  • 175g self-raising flour
  • Pinch of salt
  • 3tbsp coffee liqueur

Mascarpone Icing

  • 250g mascarpone
  • 300ml double cream
  • 1tbsp instant coffee
  • 4 heaped tbsp. icing sugar

Other ingredients

  • 1tbsp cocoa powder

Method 

  1. Preheat the oven to 180c. Line a loaf tin with baking paper. Heat the milk and add the coffee. Stir to dissolve and set aside.
  2. Place the butter and both sugars in a large bowl (or bowl of a stand mixer with paddle attachment) and beat until very light and fluffy, scraping down the sides of the bowl where necessary.
  3. Once the butter and sugars are creamed together, add in the eggs one at a time, beating well between each addition and adding in a tbsp. of the flour each time if you’re worried about curdling.
  4. Add in the coffee mixture, remaining flour and salt and fold together to create a streak free batter. Scrape the batter into the prepared tin and level off. Bake for 30-35 minutes or until a skewer comes out clean when inserted. Set aside to cool slightly.
  5. When the cake is still a little warm, level off the top with a knife and discard (AKA eat) the crust. Horizontally slice the remaining cake into three even layers. Drizzle each layer with 1tbsp of the coffee liqueur (it soaks in better when the cake is warm). Leave to cool completely.
  6. For the mascarpone icing take 3tbsp of the cream and heat, then add in the instant coffee. Stir to dissolve and set aside to cool.
  7. Take the remaining cream, the mascarpone and the icing sugar and whisk together to create a light but spreadable consistency. Half the mixture and stir the coffee cream into one half, creating a light coffee colour (having the two tones makes for a nice ombre effect when icing but this isn’t totally necessary).
  8. To assemble the cake, take the bottom liqueur soaked layer and top with a big spoonful of the coffee coloured mascarpone icing- be generous! Spread the icing into an even layer and repeat this with white mascarpone icing and the next layer, then coat the whole cake in both icings, creating an ombre effect, if you like.
  9. Finish with a generous dusting of cocoa powder.

Fig, Oxford Blue & Smoked Salt Honey Flatbread

Uncategorized
I’m not entirely sure what to call this- a pizette? A flatbread? Does anyone care? Probably not. What’s important is that it’s a delicious mix of smoky, sweet, salty, satiating and all the good things (which I don’t want to list because it will ruin the alliteration I’ve got going there).
Ingredients 

Dough:

  • 500g strong white bread flour, plus a little extra for dusting
  • 5g salt
  • 7g fast action dried yeast
  • 1tbsp. Nigella seeds
  • 325ml lukewarm water

Other ingredients:

  • A little olive or rapeseed oil
  • 1 red onion, sliced
  • 2 garlic cloves, crushed
  • 3-4 ripe figs
  • 100g Oxford Blue cheese, crumbled
  • 100g feta, crumbled
  • A few sprigs of dill
  • A few torn mint leaves
  • 2tbsp. Runny honey
  • Large pinch of smoked sea salt
  • Black pepper

Method

  1. Start off by making the dough. Place the flour, salt, yeast and nigella seeds in a large bowl (or bowl of a stand mixer with dough hook attachment) and mix together with a wooden spoon to combine.
  2. Add the lukewarm water and bring together, then tip out onto a clean surface and knead for about 10 minutes, until smooth and elastic (or use a dough hook on a medium speed for around 5 minutes). Transfer the dough to a lightly oiled bowl and cover with oiled cling film or a damp, clean tea towel. Leave to prove for 1-1.5 hours or until at least doubled in size.
  3. While the dough is proving, sauté the red onion in a little oil until very soft then add the garlic and saute for one minute. Set aside. Slice the figs into rounds. Gently heat the honey and add the smoked salt (heating it allows the flavour to infuse). Set aside.
  4. Once the dough is ready, knock back by punching down the centre. Split the dough into four and shape into balls. Cover with a damp tea towel.
  5. Heat your grill to 200c. Heat a little oil in a small frying pan (about 8 inches diameter) over a medium/high heat. Take your first ball of dough and, working quickly, stretch to around 8 inches, leaving the edges a little thicker than the centre. Place into the hot pan, stretching a little more and re-adjusting if necessary.
  6. Add a quarter of the onion first, followed by a quarter of the cheeses and 4-5 slices of fig. Cook in the pan until the base is golden brown and crisp (around 3-4 minutes) then drizzle over a little more oil and transfer to the grill and continue to cook for around 5 minutes or until the dough is golden and cooked through and the toppings are nicely caramelised. To finish, add some of the smoked salt honey, a few herbs and a good grind of black pepper. Repeat this process with the remaining dough and toppings.

Enjoy!

Sea Salt and Caramelised Almond Brownies (Vegan/GF)

Chocolate

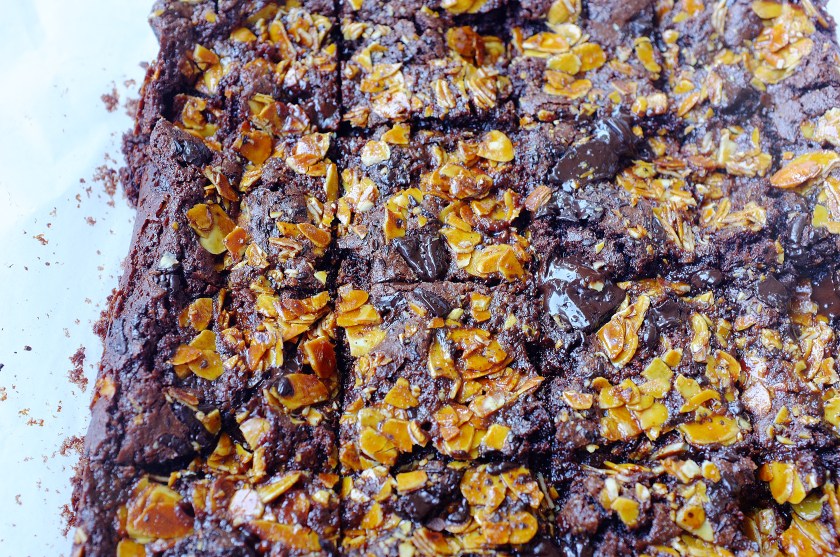
Eggs and flour have been hard to come by since the UK entered the lockdown zone, so I’ve been working on a few bakes free from both. I thought brownies would be a good place to start and after a few variations, I decided that this caramelised almond version was far superior to any others I’d tried (and actually one of the best brownies I’ve made, regardless of ingredients). If you don’t like almonds this will be a bit of a non-starter as I’ve used almond butter in place of dairy, ground almonds in place of flour and flaked caramelised almonds as a crispy, almost florentine-esque topping, otherwise please do try; they’re moist (sorry) and incredibly moreish.

Ingredients (makes 12-16 brownies in a roughly 9×9 inch tin)

Caramelised almonds (you can omit these if you like, although I think the texture contrast and salt/nutty flavour is delicious!)

  • 75g flaked almonds (or any other nuts you like)
  • 75g caster sugar
  • generous pinch sea salt

Brownie batter

  • 3tbsp ground flaxseed
  • 250g dark chocolate
  • 170g almond butter (or your favourite nut butter, or tahini)
  • 50g vegan margarine/butter
  • 120ml aquafaba (the water from a can of chickpeas)
  • 100g light brown soft sugar
  • 75g caster sugar
  • 100g ground almonds (or blitz up 100g oats into a flour)
  • generous pinch sea salt
  • An additional 100g dark chocolate, roughly chopped (optional- I like adding chocolate chunks to brownies as I don’t understand the concept of too much chocolate, but you can leave this out if you’d rather)

Method

  1. Preheat the oven to 170c. Grease and line a 9×9 brownie tin.
  2. Start by making the almond brittle. To do this place a piece of baking paper on a heatproof work top or baking tray. Put the sugar in a small saucepan and allow it to melt, swirling the pan occasionally until the sugar has completely dissolved. Once the caramel reaches a golden colour, stir through the flaked almonds and salt, then tip onto the paper and spread out into as thin a layer as you can. Leave to set hard while you make the batter.
  3. Put the flaxseed in a small bowl with 5tbsp water. Stir and set aside. Put the chocolate, almond butter and vegan butter in a heatproof bowl and set over a pan of gently simmering water (don’t let the base of the bowl touch the water). Let the ingredients melt together, stirring occasionally.
  4. Meanwhile, place the aquafaba in the bowl of a stand mixer with whisk attachment (or use an electric whisk and large mixing bowl). Whisk the aquafaba until stiff peaks form (about 10-15 minutes). By this point the chocolate mix will be glossy and smooth- set aside to cool.
  5. Now add the sugars and flax mix to the aquafaba and whisk to create a glossier texture (about 2-3 minutes). Scrape the cooled chocolate mixture into the aquafaba and briefly whisk again until it’s combined, then fold the ground almonds and salt in with a large metal spoon.
  6. Spoon half the batter into the prepared tin then scatter over half of the roughly chopped chocolate (if using). Now add the remaining batter and level off. Break up the almond brittle into uneven pieces and scatter all over the top of the brownie along with the remaining chocolate. Bake for 35-40 minutes (longer than a regular brownie) or until there is just a slight wobble left in the middle. Once baked, leave to cool completely in the tin before slicing up and serving.


Brown Butter Banana Sheet Cake with Salted Peanut Icing

Cakes

You can’t go wrong with banana and peanut butter, and as there are lots of families at home at the moment, I thought I’d  post a recipe which delivers on that flavour combination but is super simple to make and portion. I’ve added brown butter to the batter but you could just melt it normally, and feel free to substitute the spelt flour with plain (although spelt is actually all I could find in my local supermarket and works well in this recipe).

Ingredients (makes 10-12 good sized cake bars in a 7×10 inch tin)

  • 150g butter
  • 2 eggs
  • 4 medium sized bananas (or 3 large), very ripe and roughly mashed up
  • 75g Greek yoghurt, full fat
  • 130g light brown soft sugar
  • 225g spelt flour
  • 1tsp ground cinnamon
  • 1/2tsp ground mixed spice
  • 1 1/2tsp baking powder
  • pinch salt

Peanut Buttercream

  • 115g smooth peanut butter
  • 115g softened butter
  • 200g icing sugar
  • pinch salt

Extras

  • Handful of salted peanuts, roughly chopped
  • Extra cinnamon, for sprinkling

Method

  1. Preheat the oven to 170c. Grease and line a 7×10 inch high sided baking tin.
  2. Place the butter in a saucepan and gently melt, then turn up the heat and let it brown until it foams and smells nutty. Set aside to cool a little.
  3. In a large bowl, mix together the eggs, mashed banana, yoghurt and sugar. Once the butter is lukewarm stir that in too. Briefly whisk the spelt flour, baking powder, spices and salt together in a separate bowl then add to the wet ingredients. Stir until just combined then pour the batter into the prepared tin.
  4. Bake the cake for 25-35 minutes or until a skewer comes out clean when inserted. Leave to cool completely in the tin.
  5. While the cake is cooling, make the peanut buttercream. To do this place the butter and peanut butter in a large bowl (or bowl of a stand mixer with paddle attachment) and mix with electric beaters (or the paddle attachment) until well combined and slightly whipped. Add the icing sugar and salt and briefly stir with a wooden spoon (to prevent a cloud of icing sugar), then return to beating on a high speed until you have a light and fluffy consistency.
  6. To assemble, take the cooled cake out of the tin and roughly ripple the buttercream all over the top. Sprinkle with chopped peanuts and a little cinnamon. Slice up and serve.

Orange Roast Rhubarb and Rose Meringues

Uncategorized

Brilliant pink forced rhubarb is back in season (about time, I’m getting so bored of the UK’s perpetual wash of grey). For this recipe I very simply roasted the rhubarb stems in orange and sugar, then paired it with lightly whipped rose cream and mini button-meringues; the perfect bite!

Ingredients (makes 20-24)

  • 4 egg whites
  • 200g caster sugar

Orange roast rhubarb

  • 2 large stalks forced rhubarb
  • 6tbsp caster sugar
  • zest and juice 1 orange

Rose cream

  • 300ml double cream
  • 4-5tbsp icing sugar
  • 1 1/2- 2tsp rose water (taste often and add a little at a time)

Method

  1. Preheat the oven to 120c. Line a large baking tray (or two) with greaseproof paper.
  2. Place the egg whites in a large bowl (or bowl of a stand mixer with whisk attachment) and whisk to medium-stiff peaks. Add a small amount of the sugar at a time, whisking constantly, until it’s all well incorporated and you have a smooth glossy meringue (rub a little of the mixture between your thumb and index finger and if you can’t feel any sugar grains, it’s ready).
  3. Pile the meringue into a piping bag fitted with a large round nozzle. Pipe 20-24 little mounds of meringue onto the prepared trays, then take a teaspoon and press into the centre of each one to create a dip. Bake the meringues for 40-50 minutes or until they’re crisp and peel away from the paper easily. Turn the oven off and leave to cool in there for about an hour.
  4. Preheat the oven to 170c. For the rhubarb, slice the stalks into 1-2 inch pieces and toss in the sugar, orange zest and orange juice. Roast for 15-20 minutes or until tender but holding it’s shape. Set aside.
  5. For the cream, just whisk together the cream, rose water and icing sugar until softly whipped. Scrape into a piping bag.
  6. Pipe a little cream into the dip in each meringue then top with a piece of rhubarb.

Sesame, Miso and Chocolate Tart (Vegan)

Uncategorized

This tart (using ‘tart’ as a loose term for this- there’s no pastry or baking involved) is so easy to put together but makes for a really delicious plant based dessert. The crunchy base is laced with tahini and sesame seeds so the earthy flavour really comes through, and the filling has a savoury note thanks to miso paste, and is super smooth and creamy courtesy of my favourite plant based brand- Oatly.

Ingredients

Base

  • 100g dark chocolate
  • 75g tahini
  • 1tbsp maple syrup
  • large pinch sea salt
  • 100g sesame seeds
  • 50g finely chopped mixed nuts (I used cashews and pistachios)

Filling

  • 225g dark chocolate
  • 30g vegan butter (I used Stork)
  • 300ml Oatly cream alternative
  • 3tbsp maple syrup
  • large pinch sea salt
  • 3tbsp white miso paste

Sesame shards

  • 75g sesame seeds
  • 100g caster sugar

Method

  1. Grease and line an 8 inch cake tin. For the base, place the chocolate, tahini, maple and salt in a heatproof bowl set over a saucepan of simmering water (don’t allow the base of the bowl to touch the water or the chocolate may burn). Gently melt all the ingredients together then stir through the sesame seeds and chopped nuts. Scrape this mixture into the lined cake tin and spread out into one even layer. Place this in the fridge to set for at least 30 minutes.
  2. For the filling, roughly chop the chocolate and place in a heatproof bowl along with the vegan butter. Set aside. Put the Oatly cream, maple, salt and miso paste in a saucepan and, stirring often, heat to just below boiling point. Pour this mixture over the chocolate and butter and allow it to sit for a moment before stirring together to form a smooth glossy ganache. Let this cool then pour it over the chilled base. Transfer to the fridge again and chill for another hour or until set.
  3. While the tart is chilling, make the sesame shards. Before you start, place a piece of greaseproof paper on a large baking tray. Now put the sugar in a small saucepan. Allow the sugar to melt, swirling the pan occasionally, then, once the caramel is golden take off the heat, stir in the sesame seeds and spread into an even layer on the greaseproof paper. Leave to cool and harden, then break into shards.
  4. Slice up the tart and serve with shards of sesame caramel and a sprinkling of sea salt.

Chocolate Fudge Cake (Vegan)

Chocolate

Although I enjoy experimenting with different flavour combinations and ingredients, a wedge of proper classic chocolate fudge cake is always a winner. With that in mind and in the spirit of hashtag Veganuary I thought I should probably develop a plant based alternative. The resulting cake is made up of moist well risen sponges (with espresso and salt used to bring out the chocolate flavour), salted bitter chocolate ganache and sweet cocoa buttercream. I defy anyone to do anything but ask for another slice.

Ingredients

  • 120ml aquafaba (the starchy water from a can of chickpeas- one 400g tin supplies around 120ml)
  • 375g plain flour
  • 275g caster sugar
  • 85g cocoa powder
  • 2tsp baking powder
  • 2tsp bicarbonate of soda
  • large pinch sea salt, plus extra for the top
  • 40g ground flaxseed mixed with 60ml water
  • 325ml oat milk
  • 175ml vegetable oil
  • 3 heaped tsp instant coffee dissolved into 300ml boiled water
  • 100g dark chocolate, melted and cooled

For the ganache

  • 200g dark chocolate
  • 200ml vegan cream (I used Oatly)
  • 1tbsp caster sugar
  • pinch sea salt

For the buttercream

  • 200g vegan butter (I used STORK)
  • 300g icing sugar
  • 4 heaped tbsp cocoa powder
  • pinch sea salt
  • 3-4tbsp oat milk

Method

  1. Preheat the oven to 180c. Grease and line two 8 inch cake tins.
  2. You’ll need two bowls and some electric beaters (or, even better, a stand mixer with whisk attachment). Place the aquafaba in one bowl (or the bowl of the stand mixer) and whisk until stiff peaks form (about 10 minutes). In the other bowl, stir together the flour, sugar, cocoa powder, salt, baking powder and bicarbonate of soda.
  3. Once the aquafaba has reached stiff peaks, whisk in the soaked flaxseed. Make a well in the dry ingredients bowl and add the oat milk and vegetable oil. Mix together using a balloon whisk until just combined, then very slowly mix in the boiling water and coffee, followed by the melted chocolate. The mix will look very loose but that’s fine.
  4. Finally, fold in the aquafaba mixture. Distribute the batter between the two prepared tins and bake for 35-40 minutes or until a skewer comes out clean when inserted. Leave the cakes to cool completely in the tins.
  5. While the sponges are cooling, roughly chop the dark chocolate and place in a heatproof bowl. Pour the cream into a small saucepan along with the salt and caster sugar and heat to scalding point to dissolve the sugar. Pour the cream over the dark chocolate and leave to sit for a couple of minutes before stirring together to form a smooth glossy ganache. Set aside to cool completely.
  6. For the buttercream, simply place the vegan butter in a large bowl (or bowl of a stand mixer with paddle attachment) and beat until fluffy. Add the icing sugar, cocoa powder and salt and cover the bowl with a clean tea towel, then beat until well combined (this will avoid a sugar cloud- if you’re using electric beaters, just mix in most of the icing sugar with a wooden spoon before whisking at a high speed to avoid a face full of icing sugar!). Add in the milk and beat again until very light and fluffy.
  7. Once all the components are cool, slice the sponges in half horizontally, leaving you with four even layers. Top the first layer with 1/3 of the buttercream, followed by the next sponge. Repeat until you’ve used up the sponges, then cover the whole cake in the ganache (which will have thickened as it cooled). Finish with sea salt or nut brittle, if you like.

Melting Chocolate and Clementine Snowflakes with Salted Cardamom Honeycomb

Uncategorized

I’m not usually one for novelty shapes but when Nordic Ware sent me a six hole snowflake baking tin I couldn’t resist (it is Christmas after all). Chocolate fondants never fail to make me happy so I thought a simple festive twist on the classic melt-in-the-middle puddings was in order; the snowflakes themselves taste predominantly of dark chocolate, spiked with a little clementine zest, but the honeycomb really makes for a well rounded dessert full of flavour and texture. Add ice cream too for optimum indulgence.

Ingredients

Makes 6-8 puddings

  • 1-2tbsp cocoa powder, for dusting
  • 140g 70% dark chocolate
  • 140g butter, plus extra for greasing
  • 140g golden caster sugar
  • 3 eggs, 2 egg yolks
  • 125g plain flour
  • Zest 3 clementines

For the honeycomb

  • 100g caster sugar
  • 2 1/2 tbsp golden syrup
  • 1tsp ground cardamom
  • pinch salt
  • 1tsp bicarbonate of soda

Method

  1. Brush the moulds inside with melted butter then coat in cocoa powder, tap out any excess and set aside.
  2. Melt the chocolate and butter in a heatproof bowl set over a pan of simmering water, then leave to cool a little.
  3. Place the eggs, yolks, sugar and clementine zest in a large bowl or bowl of a stand mixer with whisk attachment and whisk until pale and thick.
  4. Add the flour and mix together briefly, then add the chocolate mix, a quarter at a time. Mix well between each addition. Split the mix between the moulds then chill for 15 minutes. Preheat the oven to 180c.
  5. Meanwhile, make the honeycomb. To do this line a medium high sided baking tray with baking paper then place the sugar, syrup, salt and ground cardamom in a small saucepan. Heat until the sugar has dissolved and you have a golden, slightly simmering liquid, then add the bicarbonate of soda, remove from the heat and mix (just a few seconds, until the bicarbonate of soda has disappeared.). It will rise up quickly and go foamy. Tip into the prepared tin and leave to set hard.
  6. Take the puddings from the fridge and bake for 9-11 minutes for the perfect saucy middle. Break up the honeycomb and serve a few shards with each pudding.


Winter Citrus Pavlova with Dark Chocolate and Spice

Uncategorized

Pavlova is a Great British classic, and although we usually associate it with summer days and strawberries, it’s a really versatile dessert which can be adapted for any time of year simply by changing up the seasonal fruit toppings. I love this variety as the fresh winter citrus and spiced mascarpone combined with a pop of pomegranate makes for a fresh alternative to a heavy Christmas pudding; perfect after a mammoth Turkey feast.

Ingredients

For the meringue

  • 6 large egg whites
  • 300g golden caster sugar
  • 75g dark brown soft sugar 
  • 1tsp white wine vinegar
  • 1tsp corn flour

For the toppings

  • 400ml double cream
  • 200g mascarpone
  • 4or 5 clementines, zest and flesh
  • 1 1/2 tsp ground cardamom
  • 1tsp ground cinnamon
  • 3-4tbsp icing sugar
  • 100g dark chocolate
  • 100g pomegranate seeds
  • 75g pistachios, roughly chopped
  • 5-6 figs, sliced (optional)
  • Thyme and rosemary, to garnish (optional)

Method

    1. Preheat the oven to 160c. Line a large baking tray with greaseproof paper.
    2. Place the egg whites in the bowl of a stand mixer with whisk attachment. Whisk to medium peaks and start adding the sugar, a spoonful at a time. Once all the sugar (both brown and caster) has been added whisk until stiff peaks form and you’ve got a glossy, non-granular meringue. Stir the corn flour and white wine vinegar together in a small cup and mix into the meringue.
    3. Pile the meringue onto the prepared baking tray and roughly spread into a 30x20cm rectangle. I think the more wild and asymmetric the better. Place the tray in the oven and reduce the temperature to 120c immediately. Cook for 1 hour or until the outside is crisp, then turn the oven off and leave to cool in there for at least an hour (this prevents the meringue cracking too much which can happen when the temperature suddenly changes).
    4. Once cooled, set aside and prepare the toppings. For the cream, whisk together the mascarpone, cream, clementine zest, ground cardamom, ground cinnamon and icing sugar.
    5. Meanwhile melt the dark chocolate gently in a heatproof bowl set over a pan of simmering water. Slice the clementine flesh into rounds.
    6. To assemble the pavlova pile the cream onto the meringue, then arrange the clementine pieces and figs (if using) on top. Drizzle over the dark chocolate then sprinkle on pomegranate seeds and chopped pistachios. Finish with sprigs of rosemary and thyme, if using.


Coffee Halva, Pear and Walnut Loaf Cake with Salted Tahini Butter

Cakes

It’s no secret that I love anything laden with sesame, so was thrilled when Sesame Kingdom sent me some of their delicious coffee halva, halva spread and tahini. I’m going to incorporate each of the products into a bake, and thought I’d start off with the halva, which I’ve used in brownies, ice cream and chocolate cakes before. I thought this time it made sense to try it out with some seasonal fruit and nuts and it works really well in this understated loaf format (especially warm, thickly sliced and smothered in salted tahini butter!).

Ingredients

  • 175g soft unsalted butter
  • 100g light brown soft sugar
  • 75g golden caster sugar
  • 3 eggs
  • 2tbsp instant coffee, dissolved in 2tbsp just-boiled water
  • 175g self raising flour
  • pinch salt
  • 75g walnuts
  • 2 Conference pears, peeled and diced
  • 150g coffee halva, mine was by Sesame Kingdom (plain would work too)

For the tahini butter

  • 75g butter
  • 75g tahini
  • large pinch salt

Method

  1. Preheat the oven to 170c. Grease and line a large loaf tin. 
  2. Place the butter and both sugars in a large bowl (or bowl of a stand mixer with paddle attachment) and cream together until pale and fluffy. Add in the eggs one at a time, beating well between each addition and adding a small amount of the flour if the mix looks like it may curdle. 
  3. Fold in the remaining flour, salt and coffee using a large metal spoon. Add 2/3 of the walnuts and pear pieces and fold again. Scrape half of the batter into the tin then sprinkle over half of the halva. Add the remaining batter then top with the last of the halva, walnuts and pear pieces.
  4. Bake for 34-40 minutes or until a skewer comes out clean when inserted.
  5. Beat the butter, salt and tahini together until light. Serve the loaf warm with a generous helping of tahini butter.