Tahini & Pistachio Brownies

Chocolate

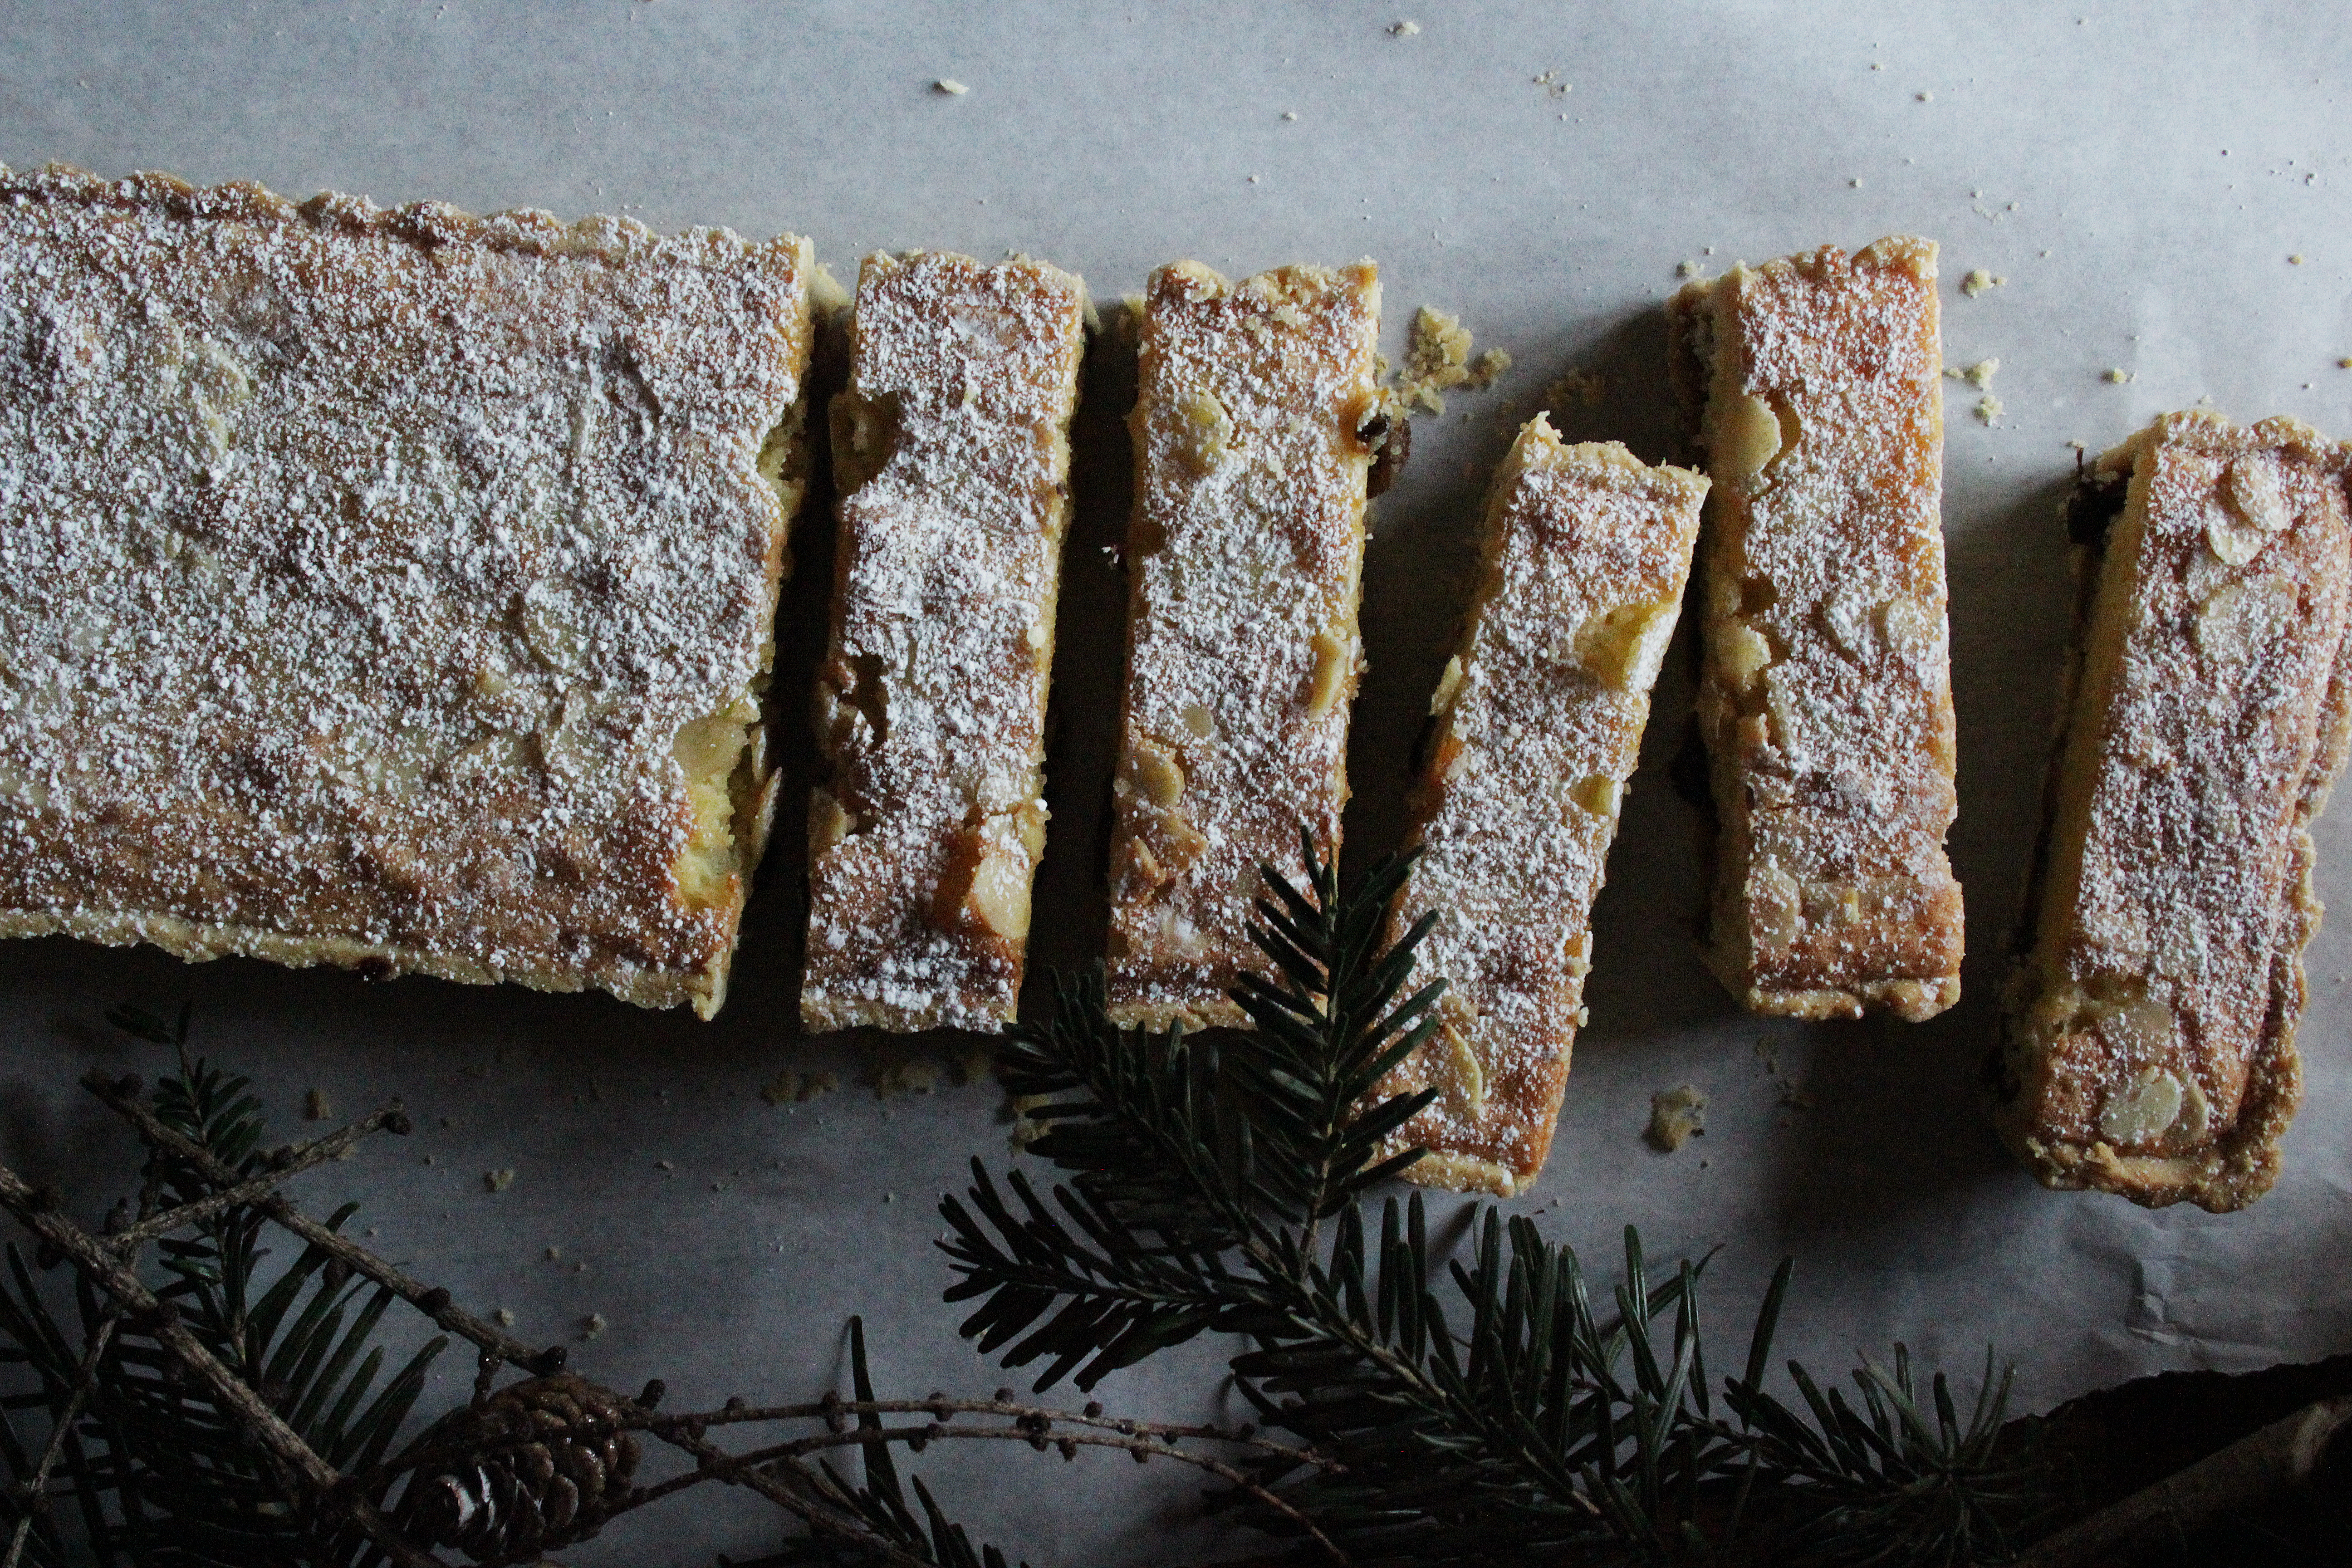
First off, apologies for the brief recipe hiatus. I’ve recently moved house and have been trying to figure out the perfect temperature to bake with in my new (incredibly retro) gas oven. And no, it’s not been as simple as converting degrees to gas marks- this oven has its own special way of working (i.e. it’s lukewarm for the majority of settings until the last when it turns into Mordor and burns everything in sight). Anyway I think I’ve cracked it now, so here’s my first recipe a la 1980s oven; tahini and pistachio brownies. They’re really simple to make but deliver everything you’d expect from a really good brownie- a dense, moist texture with added crunch from the pistachios and a deep indulgent chocolate flavour, which is definitely enhanced by the slightly salty, nutty pockets of tahini and halva.

Ingredients

  • 250g good quality dark chocolate
  • 250g unsalted butter
  • 250g golden caster sugar
  • 4 eggs
  • generous pinch sea salt
  • 150g plain flour
  • 100g milk chocolate, roughly chopped
  • 50g dark chocolate, roughly chopped
  • 75g chopped pistachios
  • 100g halva, crumbled
  • 100g tahini, well stirred

Method

  1. Preheat the oven to 180c. Grease and line a 22x22cm brownie tray.
  2. Place the dark chocolate and the butter in a heatproof bowl and set over a pan of simmering water (don’t allow the water to touch the base of the bowl or the chocolate will burn). Melt gently, stirring occasionally, then set aside to cool a little.
  3. In a large bowl (or bowl of a stand mixer) whisk together the golden caster sugar and eggs until pale and voluminous (about 3-5 minutes). Fold in the cooled chocolate mixture followed by the sea salt and flour. Add the milk chocolate and dark chocolate chunks and most of the pistachios (reserve a few for sprinkling on the top) then stir.
  4. Tip half the brownie mix into the prepared tin then dollop over half the tahini and sprinkle on half the halva. Top with the rest of the brownie mix and repeat, then finish with the reserved pistachios.
  5. Bake for 30-35 minutes or until the middle is almost set but retains a slight wobble. Set aside to cool completely in the tin.
  6. Once cooled, slice up and serve.
Advertisement

Dark Chocolate and Salted Tahini Cookies

Biscuits

Tahini, a thick sesame paste commonly used in Middle Eastern cooking, is my go to ingredient for when I want to  add a deep, nutty and slightly bitter flavour to a dish. I don’t usually think of incorporating tahini into my baking (for some unknown reason), and more often than not I’ll just pop it into baba ganoush, add it into a yoghurt dressing or drizzle it neat over slow cooked lamb and roasted roots to balance out a sweet date syrup glaze. This being said, yesterday I fancied making some cookies (someone put a stop to my wild and spontaneous lifestyle please…) and decided to bring tahini into the mix alongside sea salt and rich dark chocolate- the major players in my cookie game. The resulting cookies are absolutely delicious with a good balance of sweet, savoury, nutty and salty flavours; one hundred percent give the recipe a go, it’s a real winner.

Ingredients

  • 115g tahini
  • 110g unsalted butter
  • 125g caster sugar
  • 150g dark brown soft sugar
  • 2 eggs
  • 1tsp bicarbonate of soda
  • 2tsp sea salt
  • 300g plain flour
  • 300g coarsely chopped dark chocolate, plus 50g extra for decoration (optional)
  • 2tbsp toasted sesame seeds (optional)

Method

  1. Preheat the oven to 180c. Line 3 large baking trays with greaseproof paper.
  2. Place the butter, tahini and both sugars in a large bowl (or bowl of a stand mixer) and beat until light and fluffy. Add in the eggs one at a time, beating well between each addition. If the mix curdles or you’re worried about curdling, add 2tbsp of the flour with each egg.
  3. Once the eggs are well incorporated add the bicarbonate of soda, salt and flour then mix to combine. Finally, add in the coarsely chopped chocolate and very briefly mix once more just to distribute through the dough.
  4. Pop the dough in the fridge for half an hour to firm up a little, then line even balls onto the prepared trays leaving room for spreading (I like to use an ice cream scoop for this). Bake for 12-15 minutes or until the edges of the cookies are turning a light golden colour but the middles are still very soft (they will firm up during cooling).
  5. To finish the cookies melt the additional dark chocolate and drizzle over the tops, then sprinkle with toasted sesame seeds.

Enjoy!

Gooseberry and Elderflower Layer Cake

Cakes

Layers of zesty elderflower sponge sandwiched together with tart gooseberry compote and lightly whipped elderflower cream make up this delicious nod to the British countryside. Bake it for a special mid-summer occasion or round off a Sunday lunch with a generous slice.

Ingredients:

  • 275g soft butter
  • 275g caster sugar
  • zest 1 lemon
  • 5 eggs
  • 275g self raising flour
  • 3-4tbsp elderflower cordial

For the gooseberry compote:

  • 500g fresh (or frozen and defrosted) gooseberries
  • 75g caster sugar
  • 50ml water

For the elderflower cream:

  • 600ml double cream
  • 4-5tbsp elderflower cordial
  • 1-2tbsp icing sugar

Method:

  1. Preheat the oven to 170c. Grease and line two 8 inch cake tins.
  2. Place the butter, sugar and zest in a large bowl (or bowl of a stand mixer with paddle attachment) and cream together until light, pale and fluffy.
  3. Add in the eggs one at a time, beating well between each addition to ensure they are fully incorporated. Now tip in the elderflower cordial and briefly mix once more to distribute it evenly through the batter.
  4. Sift over the flour and fold in with a large metal spoon. Split the mixture between the two prepared tins and level out. Bake for 35-45 minutes or until a skewer comes out clean when inserted.
    While the cakes are baking, make the gooseberry compote. Put the gooseberries, sugar and water in a saucepan and gently heat, stirring occasionally, until the fruits are soft and a loose compote has formed (10-15 minutes).
  5. When the cakes are ready, leave to cool completely in the tins. While they cool, make the elderflower cream. To do this simply whisk together the cream, cordial and sugar until soft peaks form.
  6. Once all your elements are cool, assemble the cake. Spread a generous layer of compote and several dollops of elderflower cream between each sponge, then finish with a few sprigs of elderflower for a simple, effortless summer pudding.

Enjoy!

Cherry and White Chocolate Brownies

Chocolate

These fudgy brownies incite frenzied eating in my house; they barely saw the light of day when I made them last and half my family were out… It’s hardly surprising they are so addictive though- white chocolate matches brilliantly with fresh cherry compote (particularly when accompanied by a very generous glug of slightly unseasonal brandy).

Ingredients:

For the compote:

  • 300g cherries (stones removed)
  • 2tbsp caster sugar
  • 1tbsp water
  • large glug brandy (this amount is totally down to your taste)

For the brownies:

  • 300g dark chocolate
  • 200g butter
  • 2 eggs
  • caster sugar
  • 225g plain flour
  • 200g white chocolate chunks

Method:

  1. Start by making the compote. Roughly chop the cherries. Place in a pan along with the sugar, water and brandy. Heat gently, stirring occasionally, until the cherries become soft and the syrupy liquid starts to thicken (about 10 minutes). Once the consistency is somewhat jam-like, taste and add more brandy if you like (you can leave out the brandy entirely if it’s not your jam- ha.). Set aside to cool.
  2. Preheat the oven to 170c. Grease and line a brownie tin (around 22x22cm is perfect).
  3. Place the butter and dark chocolate in a  heatproof bowl and set over a pan of gently simmering water (don’t let the water touch the base of the bowl). Stir occasionally and remove from the heat once melted together.
  4. Place the eggs and caster sugar in a large bowl (or bowl of a stand mixer) and beat together until well combined.
  5. Add the chocolate mixture to the bowl and fold in followed by the flour and 2/3 of the white chocolate chunks. Tip into the lined baking tin and level out.
  6. Dollop the compote all over the surface of the brownie and finish by sprinkling on the remaining white chocolate. Bake for 25-35 minutes until the top is set but the inside is moist and a little gooey.
  7. Allow the brownie to cool completely in the tin then slice up and serve.

Enjoy!

Snickers Celebration Cake

Cakes

Alternating layers of brown sugar cake and chocolate sponge sandwiched with peanut buttercream, chopped peanuts, salted caramel sauce and chocolate ganache make up this look-at-me celebration cake (and ode to the Snickers bar)… A bit of a project? Yes. Worth it? Definitely!

snickers1

Ingredients:

For the chocolate sponge:

  • 50g dark chocolate (melted and cooled)
  • 250g soft butter
  • 250g soft light brown sugar
  • pinch salt
  • 100g cocoa powder
  • 250g plain flour
  • 2 1/2 tsp baking powder
  • 3 eggs
  • 225ml milk

For the brown sugar sponge:

  • 4 eggs
  • 165g dark brown soft sugar
  • 150g self raising flour
  • 20g melted butter
  • 60ml boiling water

snickers2

For the peanut buttercream:

  • 150g smooth peanut butter
  • 100g soft butter
  • 500g icing sugar
  • 5tbsp milk

For the ganache:

  • 100g dark chocolate
  • 100g milk chocolate
  • 200ml double cream

For the salted caramel:

  • 150g caster sugar
  • 150ml water
  • pinch salt (to taste)
  • 75ml double cream

For decoration (optional):

  • chopped peanuts
  • chocolate shards
  • chopped Snickers bars
  • thin ganache to create drips
  • excess caramel

snickers3

Method:

  1. Preheat the oven to 160c. Grease and line two 7 inch cake tins ready for the chocolate cake layers.
  2. To make the chocolate cake, cream together the butter, sugar and salt.
  3. Add the eggs one at a time, beating well between each addition.
  4. Now sift in about two thirds of the cocoa, flour and baking powder. Fold, then incorporate the melted chocolate with the same gentle action.
  5. Fold in the rest of the dry ingredients followed by the milk. Distribute this batter between the two cake tins and bake for 30 minutes (or until a skewer comes out clean when inserted).
  6. Cool the cakes in the tins for 10 minutes then transfer to a cooling rack.
  7. Line the cake tins again and increase the oven temperature to 170c. Now you’re ready to make the brown sugar sponge layers!
  8. To make this sponge place the eggs and sugar in a large bowl (or bowl of a stand mixer) then whisk until light and voluminous (about 10 minutes). Sift in the flour and fold, then add the melted butter and boiling water to the side of the bowl. Fold very gently to retain the air then distribute between the tins. Bake for 25-30 minutes until springy (or until a skewer comes out clean when inserted).
  9. When the brown sugar sponges are cooked, cool in the tins for 10 minutes then transfer to a cooling rack. You should now have four cake layers (two chocolate and two brown sugar) and are ready to make the fillings.

snickers-4

  1. Start off by making the caramel. Just place the sugar and water in a heavy bottom saucepan and gently heat to dissolve the sugar (do not boil or stir, just be patient!). After the sugar has dissolved increase the heat and boil for a few minutes; once the syrup reaches a deep amber colour remove from the heat and whisk in the cream (be careful as it will spit a little). Set aside to cool slightly then stir in the salt.
  2. For the ganache simply chop up the chocolate and transfer to a jug or bowl. Heat the cream to just below boiling point and pour all over, allowing the chocolate to slowly melt. After a couple of minutes, stir the mixture to achieve a lovely smooth, glossy consistency. Set aside.
  3. Finally, for the peanut buttercream beat the peanut butter and butter together with electric beaters (or a stand mixer). Once well combined continue whisking while you add the icing sugar a little at a time. Once you’ve added all the icing sugar increase the speed and add the milk; whisk until very light, fluffy and smooth.
  4. To assemble the cakes stack a chocolate layer with ganache and salted caramel, followed by a brown sugar layer. Repeat this process then cover the entire cake with peanut butter icing. You can be as neat as you like! Decorate with peanuts, Snickers pieces and chocolate shards (more is more in this case!).

Enjoy!

Brown Sugar Meringues with Rum Caramel and Bananas

Cooking, Uncategorized

Meringue is a guaranteed crowd pleaser throughout the year, whether you enjoy it torched on top of lemon meringue pie or piled high with summer fruits as the base of a retro pavlova. Though these classic forms of meringue are delicious, I thought I’d try out a brown sugar variation for a richer flavour; they worked brilliantly and the brown sugar adds a deep molasses kick which pairs really well with rum caramel sauce, caramelised bananas, peanuts and creme fraiche.

meringues1

meringues4

Ingredients (makes 6-8 large meringues):

For the meringues:

  • 225g dark brown soft sugar
  • 50g caster sugar
  • 4 large egg whites
  • pinch salt

For the rum sauce:

  • 200g granulated sugar
  • 50ml water
  • 40g butter
  • 75ml double cream
  • pinch salt
  • 2-3 tbsp dark rum

For the caramelised banana:

  • 100g caster sugar
  • 25g butter
  • 2 bananas

For the toppings:

  • chopped peanuts
  • some creme fraiche

meringues2

Method:

  1. Preheat the oven to 120c. Line 2 baking trays with greaseproof paper.
  2. Place a heatproof bowl over a pan of simmering water and add the brown sugar and egg whites. Whisk with electric beaters until the sugar has dissolved and the mixture is voluminous and hot to the touch.
  3. Remove the bowl from the heat and keep whisking. Add the caster sugar a tablespoon at a time and increase the speed on your beaters. Whisk until you have stiff peaks.
  4. Pile the meringue into nests on the prepared baking trays. Bake for 1 1/2 to 2 hours. Switch the oven off when you can easily peel the meringues off the paper and they are crisp. Leave in the oven to cool for an hour.
  5. While the meringues are cooling make the caramel. Place the sugar and water in a saucepan and heat gently until the sugar dissolves. Once the sugar has dissolved bring to a boil and allow to turn into a deep caramel colour. Remove from the heat and add the cream, butter and salt. Whisk until smooth (it will spit). Allow the sauce to cool slightly then add the rum. Taste and add more if you feel it needs it (hardcore). Set aside.
  6. For the bananas, place the sugar in a heavy bottom pan. Heat, allowing the sugar to melt. Swirl occasionally but do not stir. Take the sugar to a golden colour and add the butter (it will spit). Stir together then add the banana pieces. Cook for a few minutes then turn over and remove from the pan.
  7. To assemble top the meringues with creme fraiche, followed by the bananas, sauce and peanuts.

meringues3

Enjoy!

Rhubarb, White Chocolate and Thyme Cake

Cakes, Uncategorized

I’m on a bit of a rhubarb trip at the moment- in our house it’s going in just about anything, primarily, my mouth (I jest, but seriously; salad, granita, posset, sorbet, you name it). It’s got a versatile tart flavour and brilliant pink colour (if you buy the forced variety) which lends itself to so many recipes and pairs with lots of other ingredients, so naturally I’ve put it into a cake. This lightly flavoured thyme cake is sandwiched with a tart rhubarb compote which partners beautifully with the sweet white chocolate buttercream. Try it out and top with candied rhubarb ribbons and herby decorations for a statement nod to the season.

rhubarb-3

Ingredients:

For the cake:

  • 350g soft butter
  • 350g caster sugar
  • 6 large eggs
  • 350g self-raising flour, sifted
  • 2tsp baking powder
  • 1tsp vanilla extract
  • pinch of salt
  • 2tsp finely chopped thyme

For the rhubarb filling:

  • 400g rhubarb
  • 75g caster sugar

For the white chocolate buttercream:

  • 200g melted white chocolate
  • 250g soft butter
  • 500g icing sugar
  • 2-3tbsp milk

For the decorations (optional ideas): 

  • Candied rhubarb ribbons (to make these dissolve 100g caster sugar in 200ml water then bring to the boil and cool. Peel strips of rhubarb and dip into this syrup then line onto a baking tray and dry out in the oven at 110c for 1 hour. Once ready, mould around spoon handles or use as little strip decorations)
  • thyme/rosemary sprigs, freeze dried fruit, mini meringue kisses
  • 100g white chocolate (melt this then pour out onto a lined tray and set. Break into shards and use as desired)

rhubarb-2

rhubarb-1

Method:

  1. Preheat the oven to 170c and grease/line two 7 inch cake tins.
  2. For the cake, place all the ingredients in a large mixing bowl (or bowl of a stand mixer) and beat (with paddle attachment or electric beaters) until light and well combined. This all in one method is so easy and so long as you don’t over-beat results in a lovely even sponge.
  3. Split the batter between the two prepared cake tins and level out. Bake for 40-45 minutes or until a skewer comes out clean when inserted, and the tops are springy to the touch.
  4. While the cakes are cooking, make the rhubarb compote. Simply place the ingredients in a saucepan and stir occasionally over a gentle heat until the rhubarb breaks down and resembles a loose jam. Turn off the heat and set aside.
  5. Once the cakes are ready leave to cool in the tins for 10 minutes then turn out onto a rack to cool completely.
  6. While the cakes are cooling make the buttercream. For this just beat together the butter and icing sugar until really light and fluffy, then add the melted white chocolate (ensuring it is cool) and milk and beat again for a couple of minutes. Your buttercream should be pale (not yellow) and light when it’s ready.
  7. To assemble the cake, slice the sponges horizontally into two even layers so you have four in total. Place one down on your plate/board and spread over a dollop of the buttercream followed by 1/3 of the rhubarb compote. Repeat until you have a 4 layer cake. Take a few spoonfuls of the remaining buttercream, spread a thin layer all over the cake with a palette knife or cake scraper and chill for 10 minutes (this is your crumb coating).
  8. To finish, use all the remaining buttercream to cover the gaps and visible cake (unless you’re going for the naked look!) and smooth down. To decorate, use candied rhubarb, mini meringues, herbs, freeze dried fruits and chocolate shards!

rhubarb-6

rhubarb-5

Enjoy!

Carrot Cake with Pecan Brittle

Cakes, Uncategorized

This cake is a straight forward throw-it-all-in, mix, bake and frost situation (but tastes uh-mazing). The pecan brittle is optional but I think the nutty crunch and slightly bitter caramel really adds to the spiced sponge and tangy cream cheese frosting- definitely a winner!

carrot-cake-pecan1

Ingredients:

  • 225ml vegetable oil
  • 225g soft light brown sugar
  • 4 eggs
  • 250g grated carrot
  • 225g self raising flour
  • 1tsp bicarbonate of soda
  • 2tsp ginger
  • 2tsp cinnamon
  • pinch salt
  • 1/2tsp mixed spice
  • 75g chopped pecans
  • For the brittle: 100g caster sugar, 100g pecans, pinch salt
  • For the frosting: 80g butter, 250g full fat cream cheese, 400g icing sugar, zest 1 lemon

carrot-cake-3

Method:

  1. Preheat the oven to 180c. Grease and line a square brownie tray (about 22x22cm).
  2. Place the oil, sugar, eggs and grated carrot in a large mixing bowl and briefly whisk to combine. Now sift in the flour, bicarbonate of soda, ginger, cinnamon, salt and mixed spice and beat together with a wooden spoon until smooth. Fold in the pecans.
  3. Tip this mixture into the square tin and bake for 25-35 minutes until golden brown and a skewer comes out clean when inserted.
  4. While the cake is cooking, make the brittle. To do this simply place the pecans and sugar in a  heavy bottom pan and gently heat until the sugar melts (don’t stir but swirl the pan occasionally). Once the sugar has melted allow it to reach deep golden brown then pour onto a piece of greaseproof paper and allow to set hard and cool.
  5. Once your cake is cooked and cooling on a rack (in the tin), make the frosting. Beat the butter until smooth then add the cream cheese and whisk until combined. Gradually pour in the icing sugar and continue to whisk for a few minutes- you should achieve light smooth consistency. Stir in the lemon zest last.
  6. Turn the cake out of the tin once it’s cooled and level off if necessary. Spread a generous layer of the cream cheese frosting all over then break up the brittle and sprinkle on.
  7. Slice up and serve (and try to resist coming back for a second piece).

carrot-cake-2


Mince Pie Bars

Pastry, Uncategorized

These Bakewell inspired bars are made up of a crisp pastry base, zesty mince meat centre, cinnamon frangipane top, toasted almond sprinkling and a dollop of obligatory brandy cream; delicious and oh-so festive!

Ingredients:

  • 250g plain flour
  • 140g butter
  • 1tbsp caster sugar
  • 3 egg yolks
  • 3tbsp water
  • 1 jar good quality mince meat (optional: add the zest of 1 orange and a handful chopped walnuts to it)
  • 150g butter
  • 150g golden caster sugar
  • 75g ground almonds
  • 75g self-raising flour
  • 1/2 tsp cinnamon
  • 3 eggs
  • handful flaked almonds
  • 150ml double cream
  • 1tbsp brandy
  • 2tbsp icing sugar (plus extra for dusting)


Method:

  1. First, make the pastry (or skip steps 1 and 2 if you’re using shop bought shortcrust!). Place the butter, sugar and flour in a food processor and blitz until they form breadcrumbs. Pour into a large bowl. In a small bowl whisk together the water and egg. Add 4tbsp of this mix to the crumbs and stir with a cutlery knife. If there are still dry patches add a little more liquid until the mixture comes together to form a dough. Press into a thin disc shape and wrap in cling film. Chill for 15 minutes.
  2. Preheat the oven to 190c. Lightly grease a rectangular tart tin. Take your chilled pastry and roll out to about 3mm thick. Line into the tart tin, pushing it into the corners as you go. Chill again for 10 minutes.
  3. Now it’s time to blind bake. Screw up a piece of greaseproof paper and unfold, then press down into the case. Fill with baking beans and spread out to completely cover the base. Bake for 15 minutes until the sides are set then remove the beans and paper and bake for a further 5-10 minutes until the base is dry and sandy. Don’t let it colour as it will be returning to the oven when filled.
  4. Reduce the oven temperature to 170c.
  5. Now make the frangipane. Cream together the butter and sugar until light and fluffy then add the eggs one at a time, beating well between each addition (add a little of the flour to prevent curdling if you like). Once well combined, beat in the ground almonds and fold in the remaining flour and cinnamon.
  6. Now it’s time to assemble. Take your tart case and spread a generous layer of mince meat across the base. Top this with the frangipane and level out as best you can. Sprinkle with flaked almonds.
  7. Bake for 20-25 minutes or until the frangipane is cooked through. If the pastry or almonds are browning too much just cover loosely with foil.
  8. Once baked, cool on a wire rack while you make the brandy cream. To do this simply whisk together the brandy, cream and icing sugar until thick. Spoon onto each bar, dust with icing sugar and serve.


5 Minutes with Bake Off Champion Nadiya Hussain

Cakes, Cooking, Reviews

Since winning the Great British Bake Off last year, mother of three Nadiya Hussain has ran with her mantra of ‘I can and I will’ by taking on numerous projects; from documentary making and recipe book writing to royal baking and countless television appearances, it seems Nadiya’s future in the food industry is bright. Last month, the reigning Bake Off champ kindly took 5 minutes out of her hectic schedule to chat food, the Queen and instant fame with myself and fellow food blogger Hannah Bond (A Bond Girl’s Food Diary  ) …right after she humoured us with some fan girl photos.

So, it’s been a year since Bake Off- what’s the most exciting project you’ve worked on since? It’s a tough one but I think I would have to choose baking the Queen’s 90th birthday cake- that’s a moment in history and I can’t believe I got to do it – I still have to pinch myself!

How did you manage to get that commission? I was on a shoot and my agent called and told me- I was sure she’d got it wrong- as if they’d want me and not a professional… when I realised it was true I was a bit like, can I say no?! Of course I didn’t but it was a lot of pressure at first- it’s a big deal!

Screen Shot 2019-10-25 at 16.06.21

(Photo Credit: Telegraph Online)

You’ve spoken about struggling with confidence- do you think winning Bake Off helped you overcome that? Not the winning, but the process. Doing things I was unsure of or uncomfortable with on my own without my children or husband made me realise I don’t have to be a nervous or anxious person.

Were you prepared for the instant fame Bake Off gave you? No, I honestly thought I would fly under the radar and go back to normal life… being in the spotlight is a new world and it’s not something I have ever experienced- I try to just take it in my stride and enjoy it because you never know when it’s going to end.

Did Mary Berry give you any long lasting advice after Bake Off? She just told me to look after my family- she is such a family orientated person and I think we had that in common… she’s a bit like that Grandma you want to adopt!

Some less serious questions now… what is your desert island dish? Marmite! Marmite crisps.. I can eat six packets in one go.

Dream dinner party guest? David Attenborough. Every time.

Favourite cuisine? Vietnamese- it’s so fresh.

Two kitchen essentials? The perfect spatula and my stand mixer.

Mary or Paul? I’m not answering that!

Screen Shot 2019-10-25 at 16.04.08

( Just fan-girling…)

Many thanks to Nadiya for chatting with us and sharing her thoughts on a very exciting year- look out for her BBC documentary series The Chronicles of Nadiya which traces her Bangladeshi roots and food heritage and pick up her book Nadiya’s Kitchen now.