Brown Butter Banana Sheet Cake with Salted Peanut Icing

Cakes

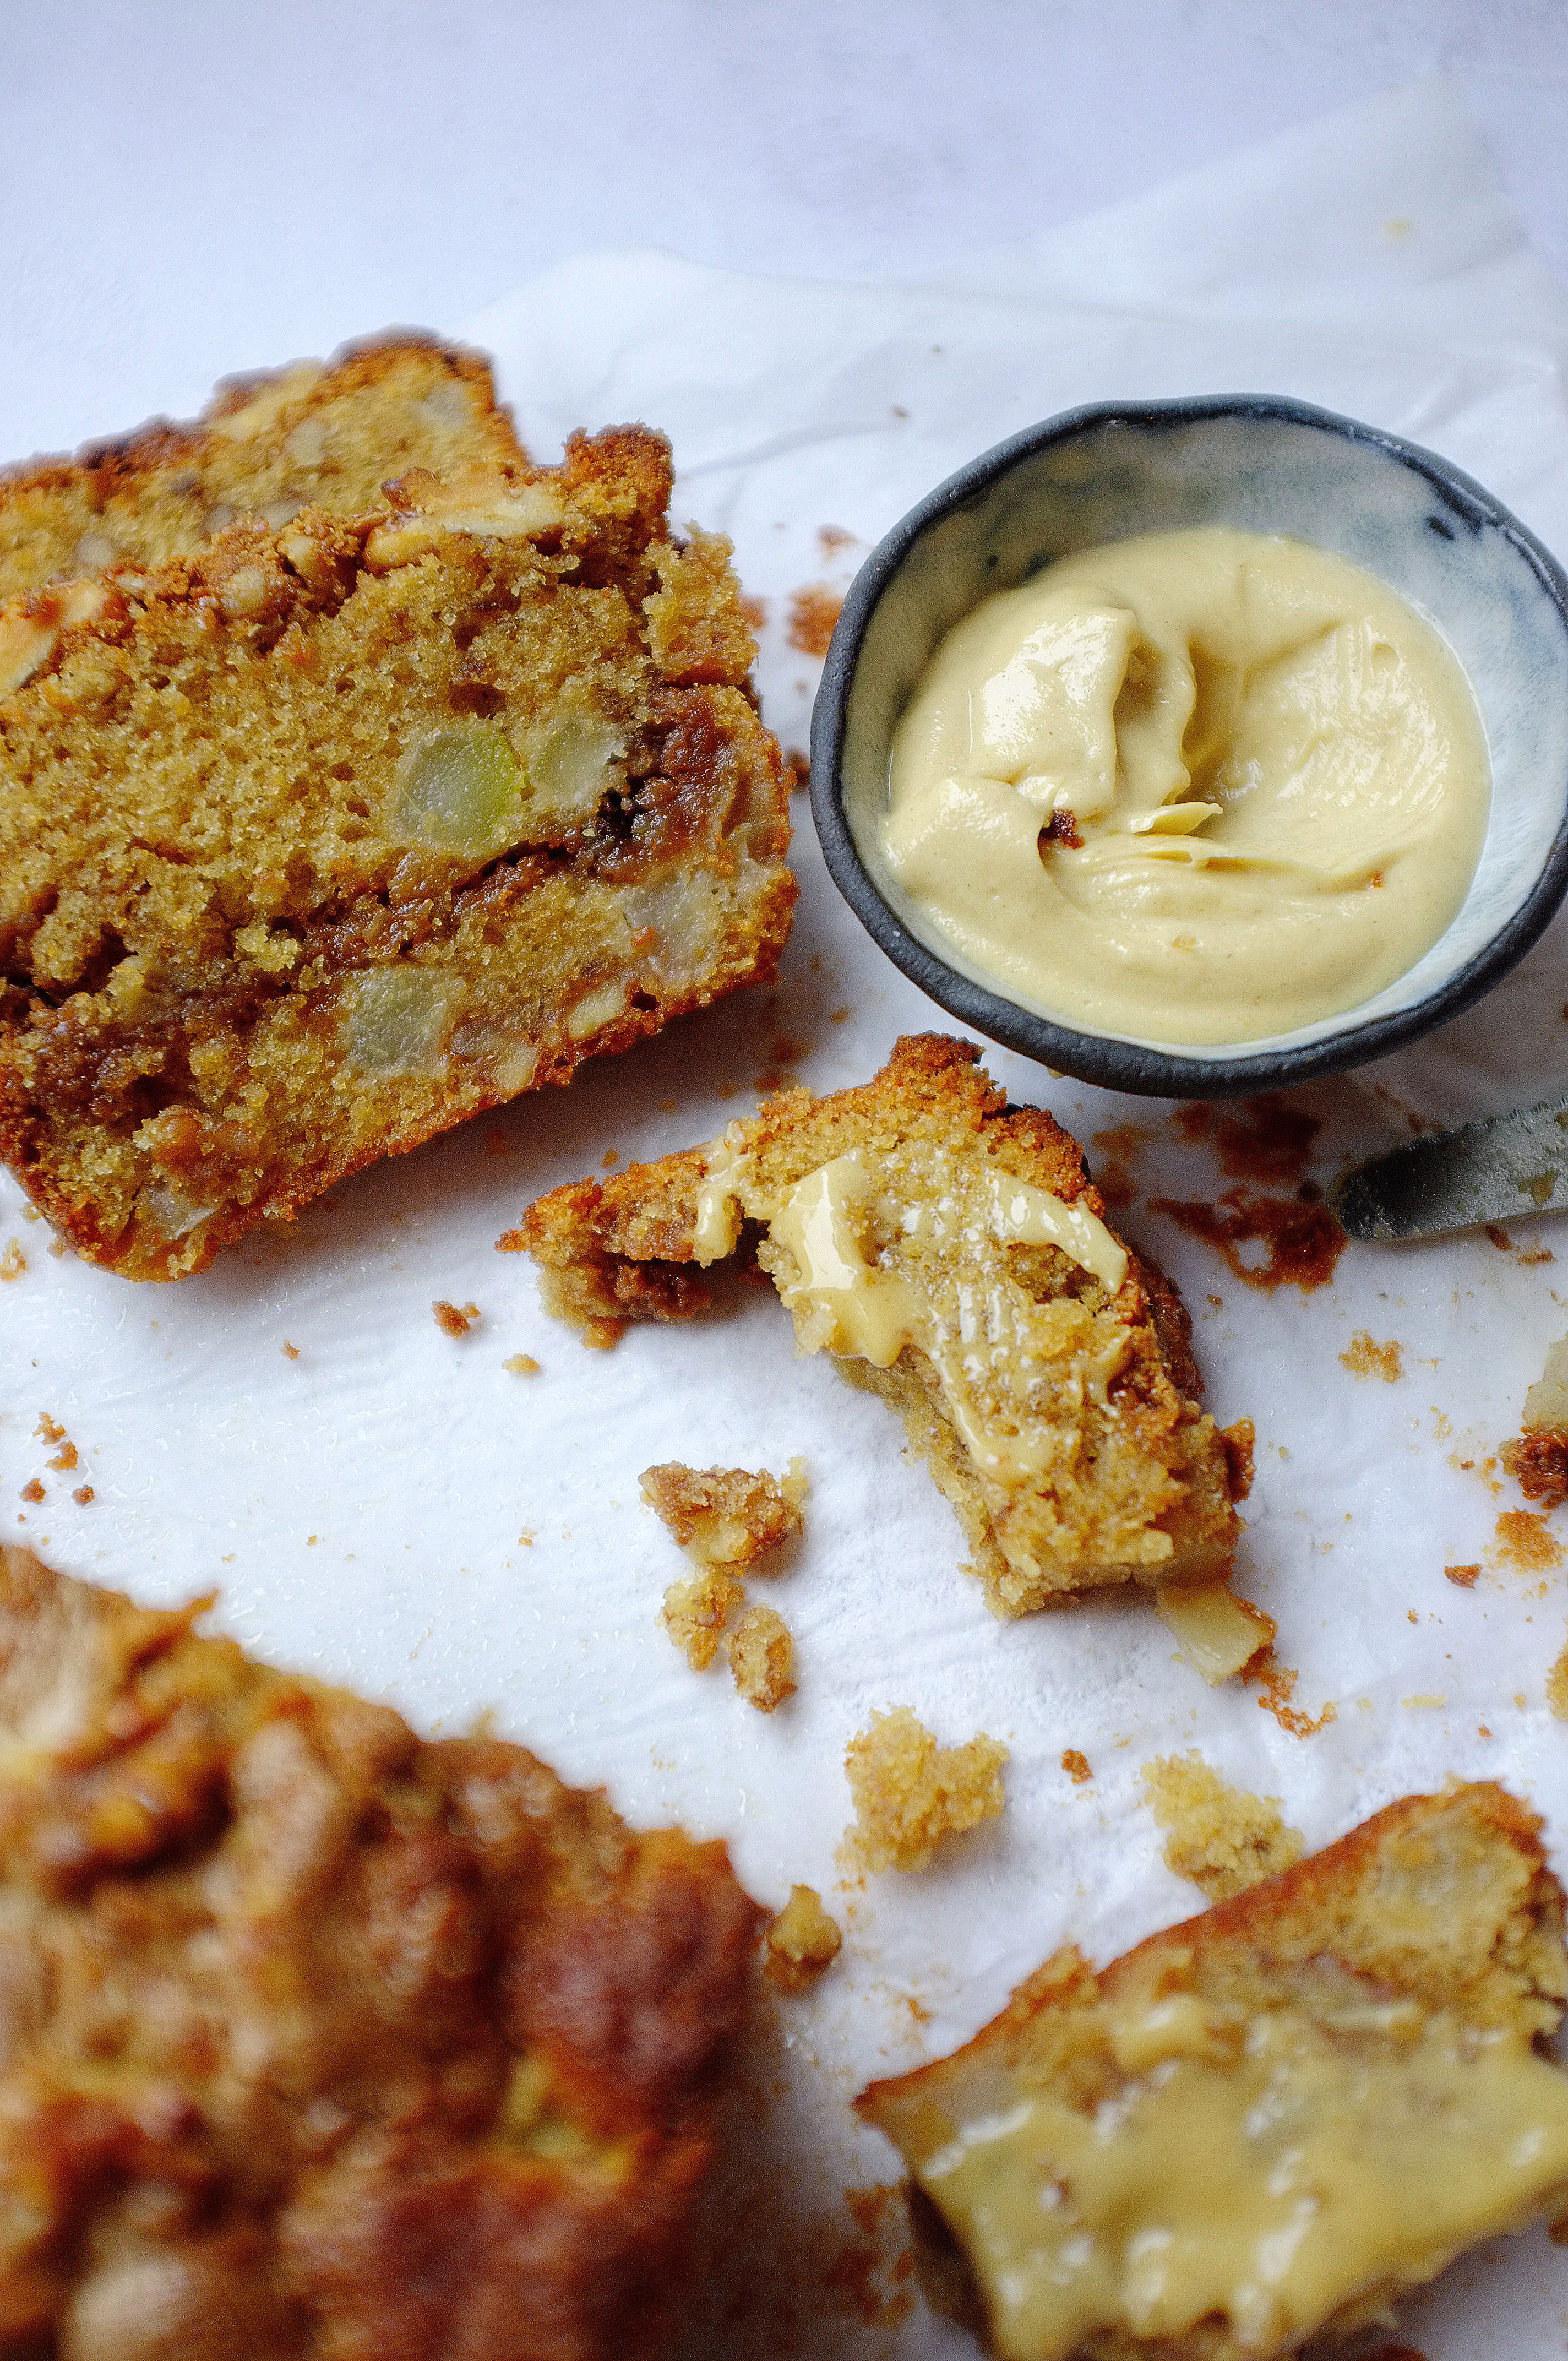
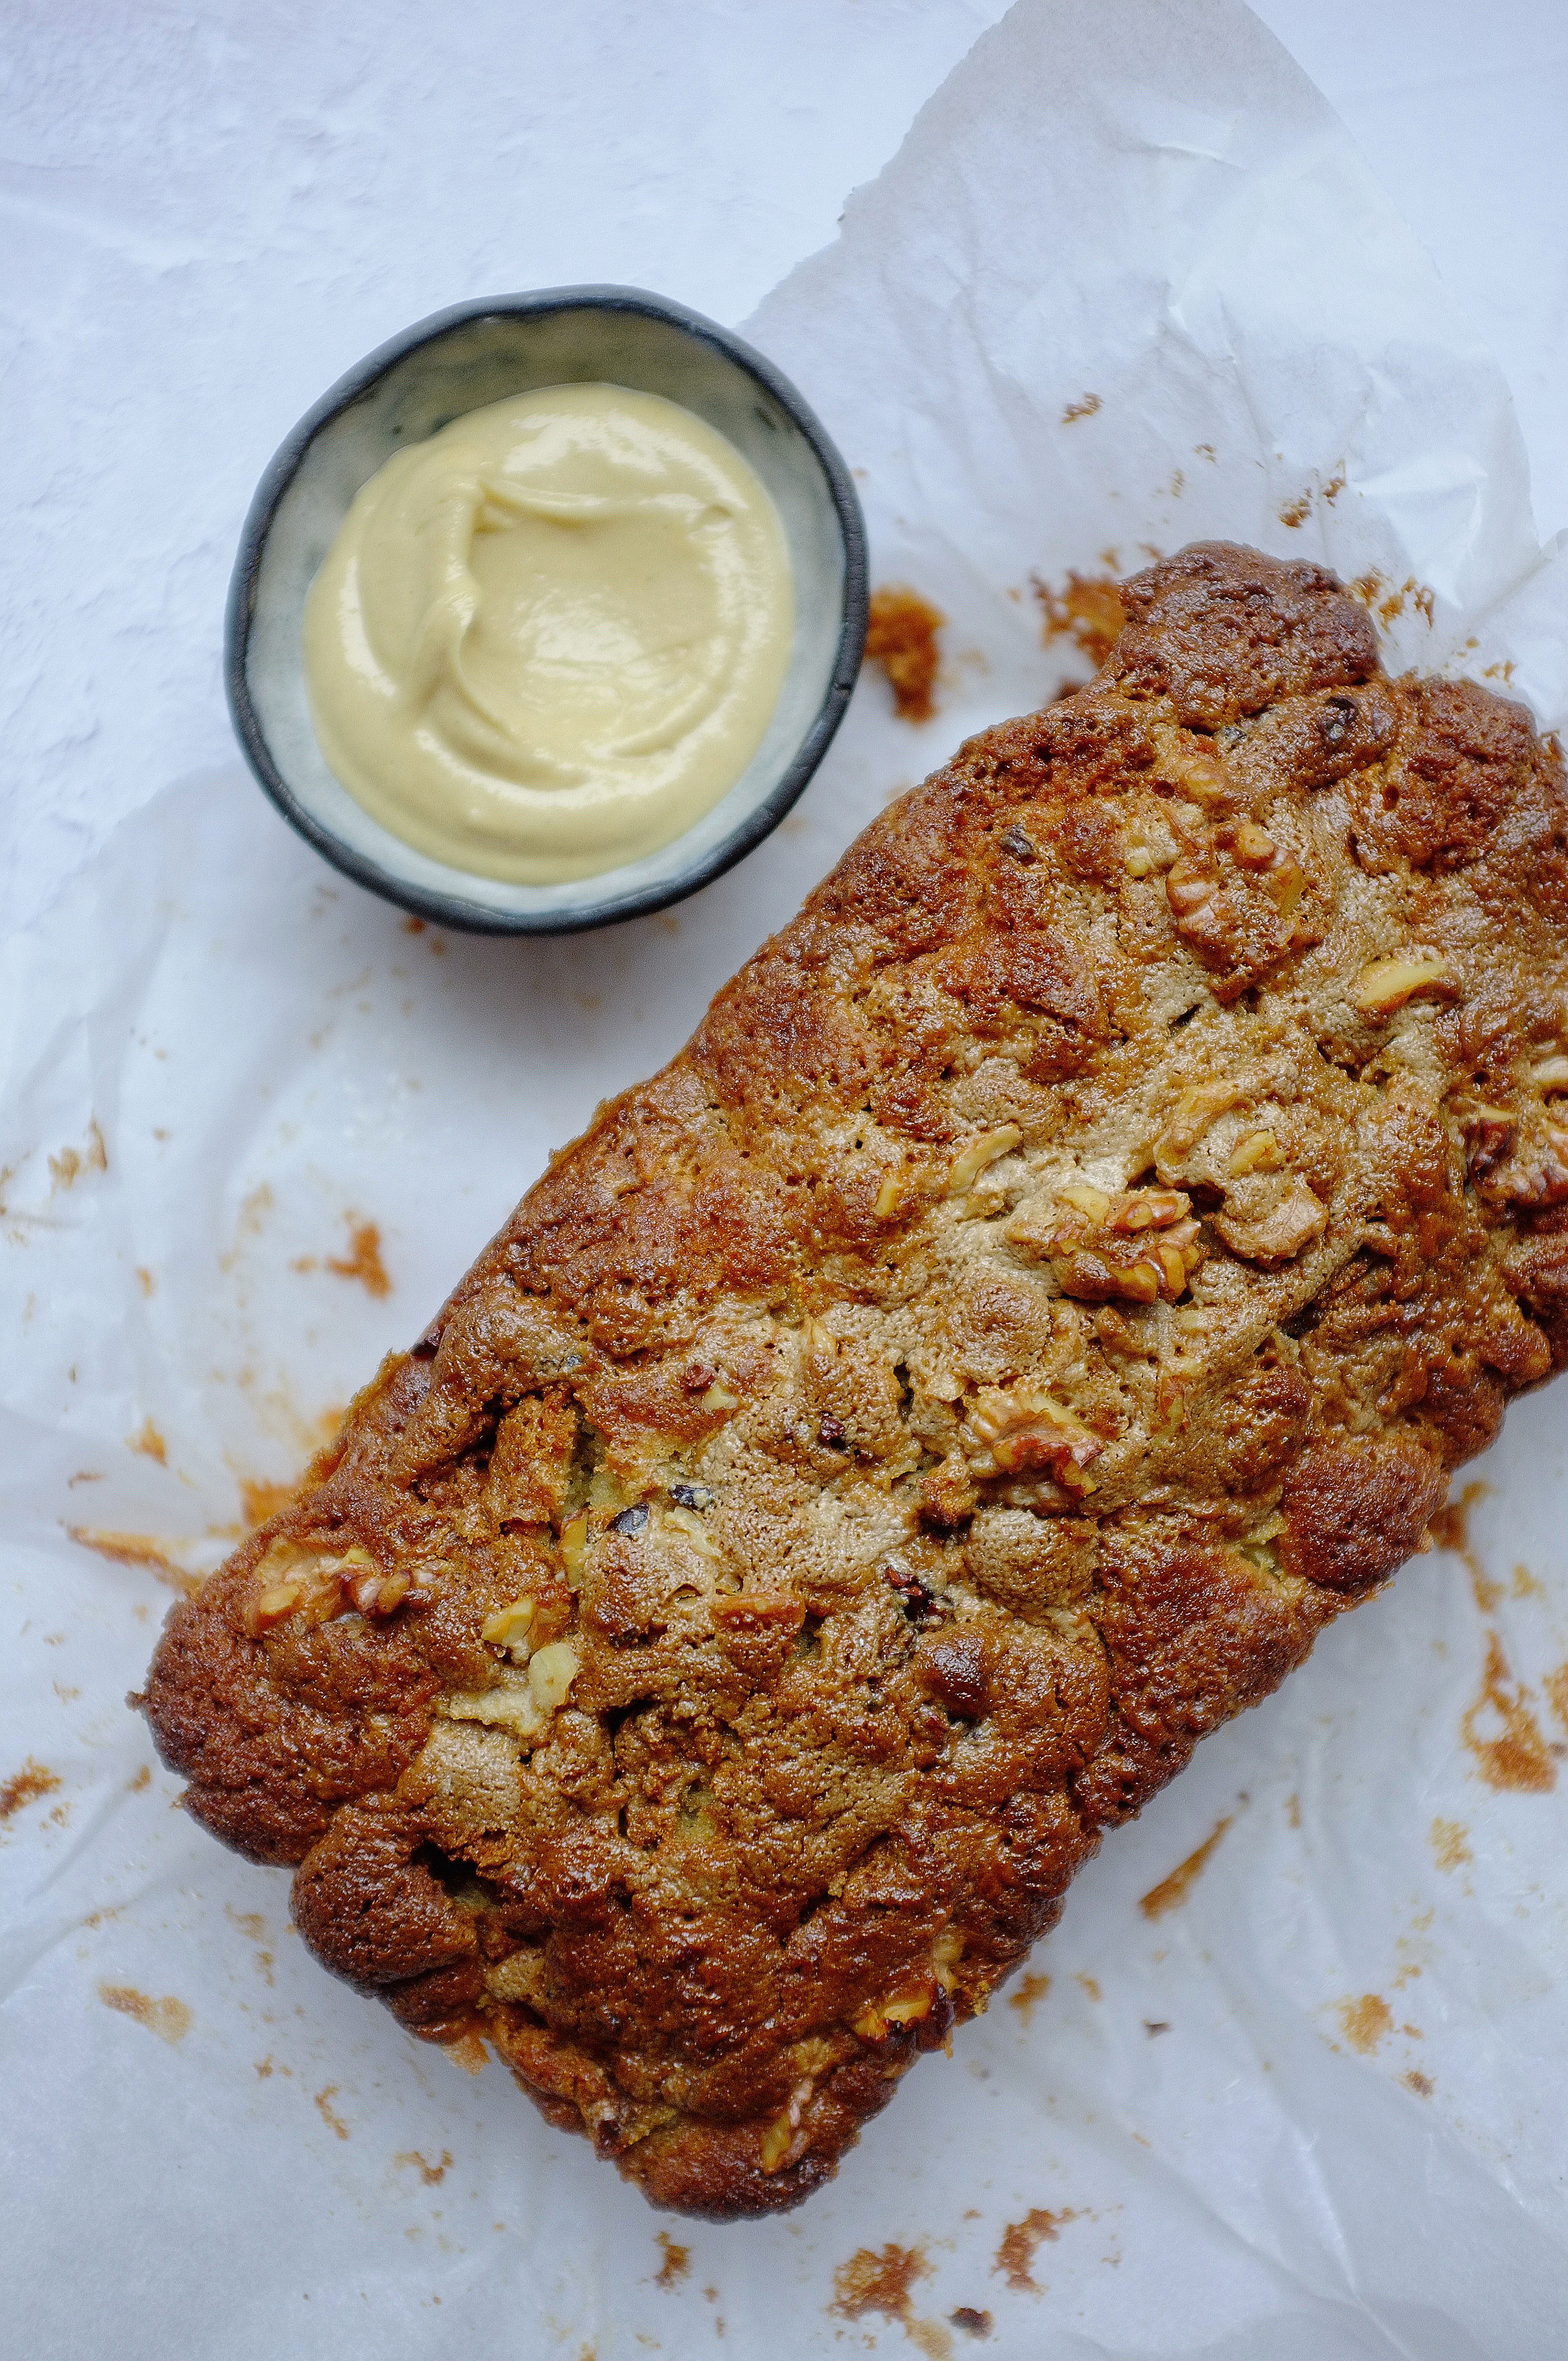
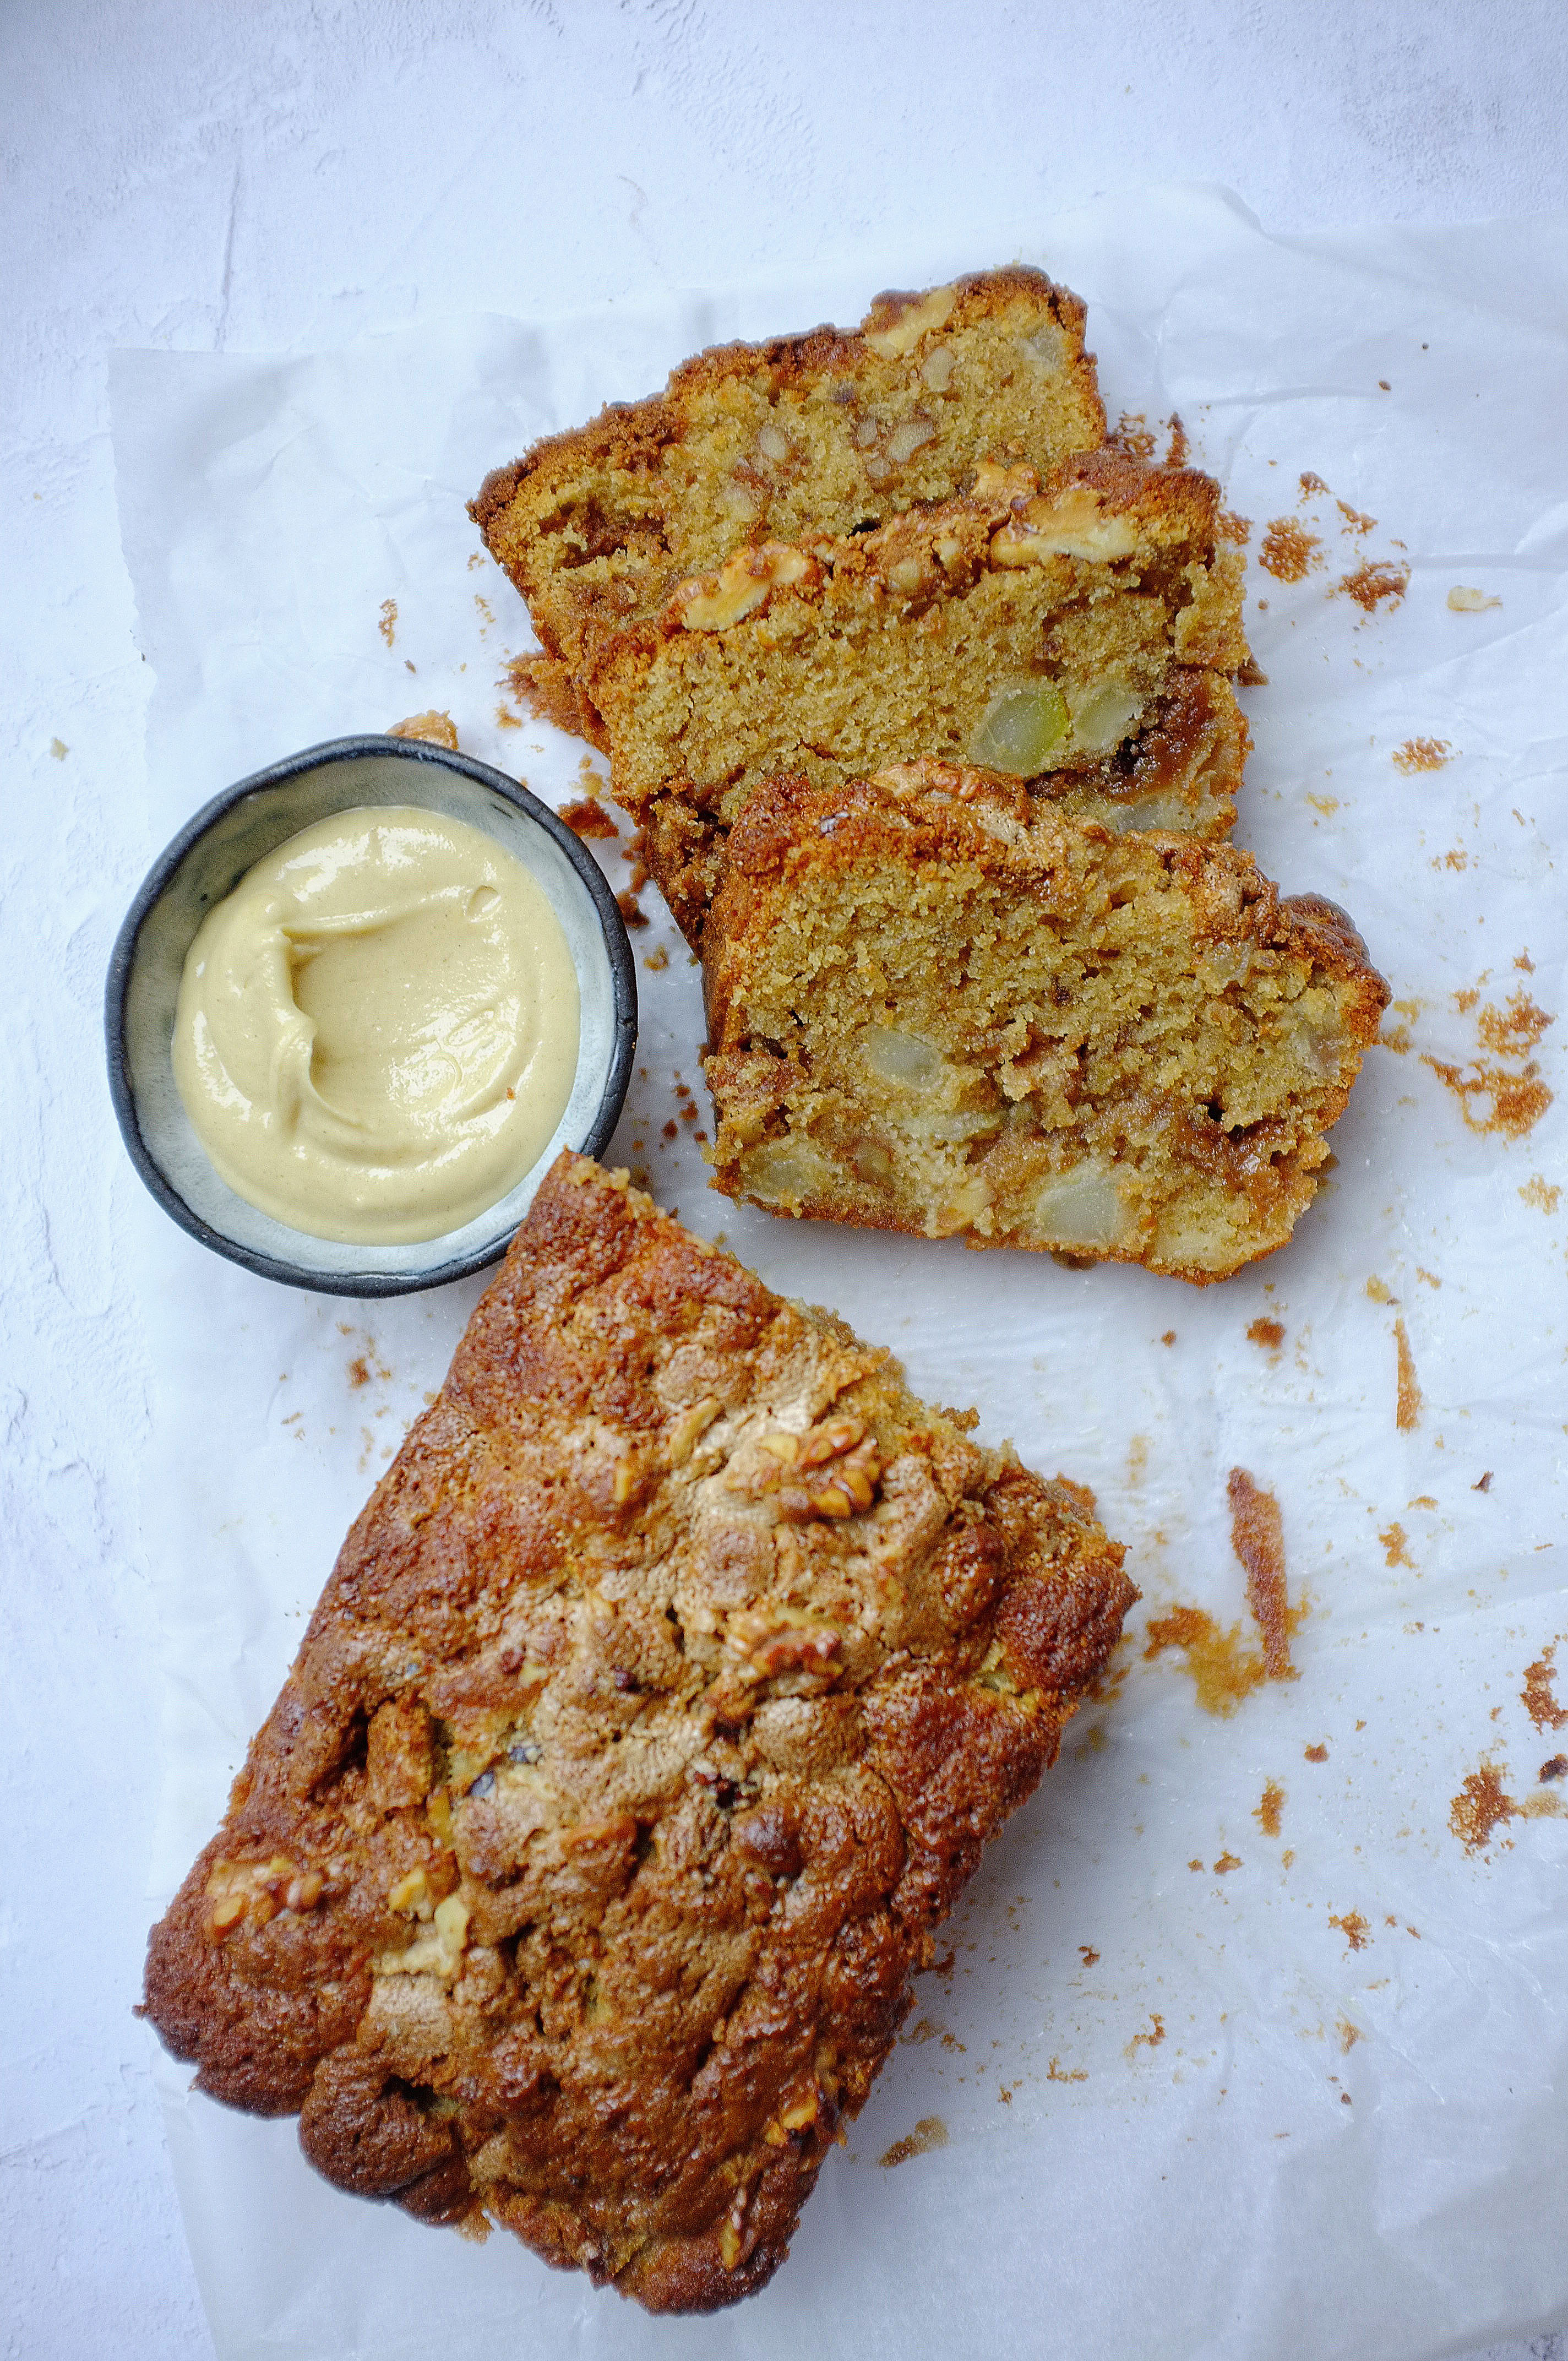
You can’t go wrong with banana and peanut butter, and as there are lots of families at home at the moment, I thought I’d  post a recipe which delivers on that flavour combination but is super simple to make and portion. I’ve added brown butter to the batter but you could just melt it normally, and feel free to substitute the spelt flour with plain (although spelt is actually all I could find in my local supermarket and works well in this recipe).

Ingredients (makes 10-12 good sized cake bars in a 7×10 inch tin)

  • 150g butter
  • 2 eggs
  • 4 medium sized bananas (or 3 large), very ripe and roughly mashed up
  • 75g Greek yoghurt, full fat
  • 130g light brown soft sugar
  • 225g spelt flour
  • 1tsp ground cinnamon
  • 1/2tsp ground mixed spice
  • 1 1/2tsp baking powder
  • pinch salt

Peanut Buttercream

  • 115g smooth peanut butter
  • 115g softened butter
  • 200g icing sugar
  • pinch salt

Extras

  • Handful of salted peanuts, roughly chopped
  • Extra cinnamon, for sprinkling

Method

  1. Preheat the oven to 170c. Grease and line a 7×10 inch high sided baking tin.
  2. Place the butter in a saucepan and gently melt, then turn up the heat and let it brown until it foams and smells nutty. Set aside to cool a little.
  3. In a large bowl, mix together the eggs, mashed banana, yoghurt and sugar. Once the butter is lukewarm stir that in too. Briefly whisk the spelt flour, baking powder, spices and salt together in a separate bowl then add to the wet ingredients. Stir until just combined then pour the batter into the prepared tin.
  4. Bake the cake for 25-35 minutes or until a skewer comes out clean when inserted. Leave to cool completely in the tin.
  5. While the cake is cooling, make the peanut buttercream. To do this place the butter and peanut butter in a large bowl (or bowl of a stand mixer with paddle attachment) and mix with electric beaters (or the paddle attachment) until well combined and slightly whipped. Add the icing sugar and salt and briefly stir with a wooden spoon (to prevent a cloud of icing sugar), then return to beating on a high speed until you have a light and fluffy consistency.
  6. To assemble, take the cooled cake out of the tin and roughly ripple the buttercream all over the top. Sprinkle with chopped peanuts and a little cinnamon. Slice up and serve.
Advertisement

Coffee Halva, Pear and Walnut Loaf Cake with Salted Tahini Butter

Cakes

It’s no secret that I love anything laden with sesame, so was thrilled when Sesame Kingdom sent me some of their delicious coffee halva, halva spread and tahini. I’m going to incorporate each of the products into a bake, and thought I’d start off with the halva, which I’ve used in brownies, ice cream and chocolate cakes before. I thought this time it made sense to try it out with some seasonal fruit and nuts and it works really well in this understated loaf format (especially warm, thickly sliced and smothered in salted tahini butter!).

Ingredients

  • 175g soft unsalted butter
  • 100g light brown soft sugar
  • 75g golden caster sugar
  • 3 eggs
  • 2tbsp instant coffee, dissolved in 2tbsp just-boiled water
  • 175g self raising flour
  • pinch salt
  • 75g walnuts
  • 2 Conference pears, peeled and diced
  • 150g coffee halva, mine was by Sesame Kingdom (plain would work too)

For the tahini butter

  • 75g butter
  • 75g tahini
  • large pinch salt

Method

  1. Preheat the oven to 170c. Grease and line a large loaf tin. 
  2. Place the butter and both sugars in a large bowl (or bowl of a stand mixer with paddle attachment) and cream together until pale and fluffy. Add in the eggs one at a time, beating well between each addition and adding a small amount of the flour if the mix looks like it may curdle. 
  3. Fold in the remaining flour, salt and coffee using a large metal spoon. Add 2/3 of the walnuts and pear pieces and fold again. Scrape half of the batter into the tin then sprinkle over half of the halva. Add the remaining batter then top with the last of the halva, walnuts and pear pieces.
  4. Bake for 34-40 minutes or until a skewer comes out clean when inserted.
  5. Beat the butter, salt and tahini together until light. Serve the loaf warm with a generous helping of tahini butter.


Autumn Hedgerow Celebration Cake (Apple, Blackberry & Salted Caramel)

Cakes

As someone who is perpetually cold I favour the summer months weather-wise, but when it comes to food seasons, Autumn is the winner for me. Root vegetables, roasts, comforting one-pot dinners and baked fruits, sugared and spiced; you can’t beat them. With this in mind and as an ode to the season and the produce that comes with it, I’ve created a hedgerow-themed celebration cake. Made up of spiced sponges studded with Bramley apple pieces, a tart blackberry compote and smooth salted caramel Swiss meringue buttercream- it’s a bit of a project bake, but so worth the effort.

Ingredients

For the cakes

  • 250g golden syrup
  • 190g unsalted butter
  • 175g light brown soft sugar
  • 375g self raising flour
  • 1 1/2 tsp bicarbonate of soda
  • 1 1/2 tsp ground cinnamon
  • 1 1/2 tsp ground ginger
  • 1tsp mixed spice
  • large pinch salt
  • 3 eggs
  • 260ml semi-skimmed milk
  • 1 very large Bramley apple, peeled, cored and diced
  • 1tsp corn flour

For the blackberry compote

  • 450g fresh blackberries
  • zest and juice 1 lemon
  • 5-6tbsp caster sugar

For the Swiss meringue buttercream (I’d only attempt this with electric whisk/beaters!)

  • 150g caster sugar, 50g butter, 100ml double cream, salt (this is for the caramel which is added to a Swiss meringue buttercream base)
  • 4 egg whites
  • 225g caster sugar
  • 275g unsalted butter, very soft (but not greasy)

To decorate

  • fresh blackberries, hazelnuts, apple crisps, rosemary sprigs

Method

  1. Grease and line two 8 inch cake tins. Preheat the oven to 170c.
  2. Start off by making the cakes. To do this place the syrup, butter and light brown soft sugar in a saucepan and melt over a medium heat. Set aside to cool a little.
  3. In a mixing bowl, stir together the flour, spices, salt and bicarbonate of soda, then make a well in the middle. Break the eggs into a jug and add the milk, then stir together with a fork and add into the well, along with the melted butter mixture. Whisk everything together with a hand whisk until just combined.
  4. Toss the apple pieces in corn flour and fold in, then distribute the batter between the two cake tins. Bake for 30-40 minutes or until a skewer comes out clean when inserted. Once baked let the cakes cool completely in the tins.
  5. Meanwhile, make the blackberry compote by placing the blackberries, lemon juice and zest and sugar in a saucepan set over a medium heat. Cook, stirring often until thickened and jammy. Set aside to cool.
  6. For the buttercream, start off by making a salted caramel sauce.To do this put the sugar in a heavy bottom saucepan and set it over a low heat. Wait until the sugar has all melted (swirl the pan to encourage it to do so but don’t stir!) then up the heat and allow it to reach a deep golden brown. When it gets to this stage, add the butter and stir (it will spit a little), then add the cream and stir again for a couple more minutes until slightly thickened. Remove from the heat and once cool enough to taste add salt to your liking. Set aside to cool completely.
  7. While the caramel is cooling, place the egg whites and caster sugar in a saucepan and whisk together (just a hand whisk will do here). Keep stirring over a medium heat until the mixture is hot to the touch and the sugar has dissolved, then transfer to a large bowl (or bowl of a stand mixer with whisk attachment) and whisk until it’s completely cool and will hold a stiff peak.
  8. Now continue to whisk, adding a heaped tablespoon of the butter every few seconds. Whisk until it’s all come together and is thick and glossy, then add 3-4 heaped tablespoons of your cooled caramel (add a little more or less to taste). Don’t worry if the mix looks curdled at any point, whisking will bring it back together with time. Once it’s ready you can start assembling the cake.
  9. Remove the cakes from the tins. If they’re domed at all, even off the tops, then slice each sponge in half, leaving you with 4 even layers. Place the first layer on your serving plate. Pile half the buttercream into a piping bag and pipe around the edge of the first layer twice (leaving a roughly 1.5 inch wall of buttercream). Fill this with a third of the blackberry compote then repeat the process until all the sponges are used up.
  10. Use the remaining buttercream to cover the whole cake, semi-naked style. Decorate as desired- I like rustic/natural decorations but the world is your oyster!

Spiced Fig Cake with Brown Butter Caramel Sauce

Cakes

Jammy baked figs, warming spices and a slightly nutty, salty-sweet sauce; it’s seasonal bakes like this which make the transition from Summer to Autumn that bit easier (even when the rain is unrelenting, my holiday a distant memory and the sky an ominous shade of purple-grey).

Ingredients

Brown butter caramel

  • 75g butter
  • 200g caster sugar
  • 100ml double cream
  • good pinch salt

Spiced fig cake (makes one 8 inch cake)

  • 175g soft unsalted butter
  • 100g light brown soft sugar
  • 75g caster sugar
  • 3 eggs
  • zest 1 lemon
  • 3tbsp milk
  • 175g self raising flour
  • 1tsp ground cinnamon
  • 1tsp mixed spice
  • 1/2tsp ground cardamom
  • 1/4tsp freshly ground black pepper
  • pinch salt
  • 6-8 figs
  • 1tbsp demerara sugar

Method

  1. Start by making the caramel. Place the butter in a pan and melt down over a low heat. Once melted, increase the heat and foam until browned. Pour into a bowl and leave to cool.
  2. Tip the caster sugar into a heavy bottomed pan and heat gently, swirling occasionally (but not stirring) until it melts. Increase the heat until the caramel reaches a deep golden brown, then add the browned butter and stir (take care, it will spit a little). Once the butter is well incorporated add the cream and stir. Cook for a further couple of minutes until slightly thickened, then add the salt to taste.
  3. Preheat the oven to 170c and grease/line an 8 inch baking tin. Place the butter and sugars in a large bowl (or bowl of a stand mixer with paddle attachment) and cream until light and fluffy. Add the eggs in one at a time, beating well between each addition (add a little of the flour here if the mix looks like it might curdle). Mix in the lemon zest and milk.
  4. Add the flour, spices and salt to the bowl and fold in with a large metal spoon. Dice 2/3 of the figs and fold those into the mixture too, then scrape it all into the prepared tin. Slice the remaining figs into 6ths and arrange on top of the cake, then sprinkle over the demerara sugar.
  5. Bake for 30-35 minutes or until a skewer comes out clean when inserted.
  6. Once baked, leave the cake to cool in the tin for 10 minutes, then remove and transfer to a wire rack. You can serve this cold or warm (I prefer the latter), but either way, warm up the caramel just before serving and drizzle all over the cake slices.

Enjoy!

Cardamom Carrot Cake with Honeyed Rose Cream and Figs

Cakes, Uncategorized

At last we approach fig season- one of my absolute favourite fruits, and so synonymous with Middle Eastern cuisine that it would be wrong to incorporate them into a bake which didn’t boast nuts, heady spices or sweet floral flavours; of course this cake contains all three, making it one of my favourite recipes I’ve posted on here to date. It’s not too sweet, nor is the icing too heavy, just a well balanced, flavoursome bake with flavours which work beautifully together. I hope you enjoy.

Ingredients

For the cakes

  • 100g chopped dried figs
  • zest and juice 1 orange
  • 2-3tbsp rose water
  • 250g butter, cubed
  • 200g caster sugar
  • 50g soft light brown sugar
  • 4 eggs
  • 400g grated carrot
  • 225g plain flour
  • 1tsp bicarbonate of soda
  • 2tsp baking powder
  • large pinch salt
  • 1 1/2 tsp cinnamon
  • 2 heaped tsp ground cardamom
  • 1tsp mixed spice
  • 100g pistachios, roughly chopped

For the icing

  • 300ml double cream
  • 200g cream cheese
  • 3tbsp honey
  • 2-3tbsp rose water

Optional

  • 50g chopped pistachios
  • 1tbsp dried rose petals
  • 4-5 figs

Method

  1. Preheat the oven to 180c. Grease and line two 7 inch cake tins.
  2. Roughly chop the figs and discard the stalks. Tip into a bowl and add the orange juice and rose water. Leave to soak until required.
  3. In a large bowl (or bowl of a stand mixer with paddle attachment) cream together the butter and both sugars until pale and thick. Add in the eggs one at a time, beating well between each addition (add a small amount of the flour with each egg to prevent curdling).
  4. Stir through the grated carrot and soaked figs (along with any juice the figs haven’t absorbed). Mix together the dry ingredients and pistachios and fold through the batter until no streaks of flour remain.
  5. Split the batter between the prepared tins and level off. Bake for 25-35 minutes or until a skewer comes out clean when inserted.
  6. Let the cakes sit in the tins for 10 minutes, then turn out onto a wire rack and leave to cool completely.
  7. Meanwhile, place the cream, cream cheese, honey and rose water in a large bowl (or bowl of a stand mixer with whisk attachment) and whisk until pipe-able. Adjust the levels of sweetness and rose flavour to taste.
  8. Once the cakes have cooled down, slice them in half horizontally, leaving you with 4  equal layers. Pile the rose and honey cream into a piping bag with round nozzle. Place the first layer onto a serving plate and pipe little mounds all over the surface, then top with the next layer. Repeat until all the cream mixture is used up, then sprinkle rose petals and pistachios over the top and arrange the figs in an attractive way, if using.

Classic Chocolate Fudge Cake (Gluten Free)

Cakes, Uncategorized

I can never understand why gluten free options are, not always but so often, dry, dense and disappointing. I’m not a coeliac myself and am not a fan of demonising gluten, however, if you are genuinely unable to enjoy it then I’m a firm believer that there should and can be delicious alternatives! This cake is the first of many gluten free versions of classic baking staples I’m planning, and seriously, it’s so moreish it brings a tear to my eye (deeply melodramatic but you get the message).

Ingredients

For the cakes (makes one 7-8 inch sandwich cake)

  • 200g ground almonds
  • 1tsp bicarbonate of soda
  • generous pinch salt
  • 175ml boiling water
  • 2tsp instant coffee
  • 80g cocoa powder
  • 300g golden caster sugar
  • 5 eggs
  • 225ml vegetable oil

For the ganache 

  • 300ml double cream
  • 200g 70% dark chocolate
  • 100g mik chocolate

Method

  1. Preheat the oven to 180c. Grease and line two 7-8 inch cake tins.
  2. Stir the almonds, bicarbonate of soda and salt together in a small bowl. Mix the cocoa, coffee and boiling water together in a jug until smooth and set aside.
  3. Beat the eggs, oil and sugar in a large mixing bowl (or in a stand mixer with paddle attachment) until pale and thick.
  4. Add the cocoa mix and continue whisking until you have a fairly liquid cake batter with no streaks. Add the almond mixture down the side of the bowl and fold in gently.
  5. Split the batter between the two tins and bake for 35-45 minutes until a skewer comes out with only a few moist crumbs attached.
  6. While the cake is baking, make the ganache. Finely chop the chocolate and pop it in a heatproof bowl. Meanwhile, pour the cream into a saucepan and set over a medium heat. When it reaches scalding point (just before a simmer), take off the heat and pour directly over the chocolate. Let it sit for a couple of minutes, then stir to create a smooth, glossy ganache. Allow this to cool and thicken to a spreadable consistency (15 minutes in the fridge once cooled to room temperature helps achieve this).
  7. Once the cakes are baked leave to cool in the tins for 10 minutes before transferring to a wire rack.
  8. To assemble your cake, level off your cakes if necessary, then fill and cover with ganache.

Enjoy!

Sticky Ginger Cake with Labneh Icing and Blood Orange Syrup

Cakes

As much as I love a stacked sponge showstopper, sandwiched with buttercream and impeccably preened, there’s something deeply comforting about a single layered wedge of cake, rustically finished with dollops of tangy icing and a bit of fruit. This cake undoubtedly falls into the comfort category, and it’s now one of my favourites; ginger cake itself feels nostalgic to me*, but the slightly tangy labneh icing and citrus syrup topping make this one feel a little more modern.

*I don’t know why, I have no emotive family story to share about a recipe passed down through a long line of bakers- my Granny used to feed me M&S sandwich cakes straight from the freezer. I’ll bank that as character building.

Ingredients

For the labneh icing

  • 500ml Greek yoghurt
  • 3tbsp icing sugar
  • 1tsp vanilla extract

For the cake

  • 250g self-raising flour
  • 2tsp ground ginger
  • 1tsp ground cinnamon
  • 1tsp bicarbonate of soda
  • pinch salt
  • 175g golden syrup
  • 3tbsp ginger syrup (from a stem ginger jar)
  • 125g butter
  • 4 balls stem ginger, diced
  • 125g light soft brown sugar
  • 2 eggs
  • 250ml milk

For the blood orange compote

  • 90ml blood-orange juice
  • 50g caster sugar
  • 2tbsp water
  • 1 vanilla pod
  • 2 additional blood oranges

Method

  1. Line a sieve with a muslin cloth and sit over a large bowl. Scrape the yoghurt into the sieve and loosely tie the muslin around it. Leave this in the fridge overnight for the liquid in the yoghurt to drain (this will leave you with a thickened mixture- labneh).
  2. Preheat the oven to 180c. Grease and line a high sided 9inch cake tin.
  3. Stir together the flour, ginger, cinnamon, bicarbonate of soda and salt in a large bowl. In a saucepan melt together the golden syrup, ginger syrup, butter, diced stem ginger and sugar. Bring to the boil for a minute then make a well in the dry ingredients and add the melted mixture. Stir together to eliminate any lumps then whisk the eggs and milk in a jug and add those in too and beat once more.
  4. Tip the mixture into the prepared tin and bake for 50-60 minutes or until a skewer comes out clean when inserted.
  5. Leave the cake to cool completely in the tin.
  6. Meanwhile, make the blood orange syrup. To do this simply place the juice, sugar and water in a small saucepan and gently heat until the sugar has dissolved. At this stage split the vanilla pod and add in, then simmer for 3-4 minutes or until syrupy. Set aside to cool a little, then slice the 2 blood oranges into rounds, discarding the pith and skin. Add the slices into the syrup and stir. Leave to cool completely.
  7. Tip the strained yoghurt into a bowl and add the vanilla extract. Sift in the icing sugar and stir everything together until smooth.
  8. To assemble the cake, turn it out of the tin and roughly cover with the sweet labneh. Just before serving, arrange the blood orange slices on top and drizzle the syrup over.

Enjoy!

Salted Chocolate Cake with Coffee Mascarpone & Hazelnut Praline Caramel

Cakes

I made this cake last weekend for my Dad’s birthday and it went down a storm. Granted, the flavours aren’t subtle and it’s not for the faint hearted (which neatly mirrors my Dad’s personality actually), but the punchy combination of bitter coffee, nutty hazelnut, rich but surprisingly light chocolate sponge and salted milk chocolate ganache just work (duh- that amount of cream, sugar, salt and chocolate is always going to be delicious).

Ingredients (serves 12-14)

For the hazelnut praline caramel

  • 100g blanched hazelnuts, toasted
  • 100g caster sugar
  • 100ml double cream
  • Generous pinch sea salt

For the sponges

  • 375g plain flour
  • 300g caster sugar
  • 85g cocoa powder
  • 2tsp baking powder
  • 2tsp bicarbonate of soda
  • large pinch sea salt
  • 3 eggs
  • 325ml milk
  • 175ml vegetable oil
  • 2tsp vanilla extract
  • 100g dark chocolate
  • 325ml just boiled water
  • 2tsp instant coffee

For the salted milk chocolate ganache

  • 200g milk chocolate
  • 75g dark chocolate
  • 275ml double cream
  • Generous pinch sea salt

For the coffee mascarpone filling

  • 2tbsp instant coffee
  • 2tbsp caster sugar
  • 200g mascarpone
  • 100ml double cream

  1. Start off by making the hazelnut praline caramel.To do this simply place the caster sugar in a heavy bottom pan over a medium heat and swirl the pan until it melts. Once melted, up the heat until the sugar reaches a deep golden brown. At this stage add the toasted hazelnuts, stir to coat then tip onto a baking paper lined baking tray. Leave to set hard, then blitz into a paste. Set aside. Pour the cream into a saucepan and gently heat. Once the cream is gently simmering add in the praline paste and stir to create a caramel. Cook down for a few minutes until thickened, then set aside to cool.
  2. Preheat the oven to 170c. Grease and line two 8 inch baking tins. Melt the dark chocolate in a heatproof bowl set over a pan of simmering water (or in the microwave in short stints, stirring often). Set aside.
  3. In a large bowl stir together the flour, caster sugar, cocoa powder, baking powder, bicarbonate of soda and salt. In a jug, lightly whisk the eggs, milk, vegetable oil and vanilla extract. Make a well in the dry ingredients and pour the contents of the jug into it. Stir the wet and dry ingredients together until well combined then add the melted chocolate and stir again (I just use a balloon whisk for this- nothing electric is required as you don’t need to incorporate much air).
  4. Pour your just boiled water over the instant coffee granules and once they’ve dissolved, gradually add to the chocolate batter, stirring gently with your whisk as you go. The final cake batter will be very thin but don’t worry, it bakes beautifully.
  5. Split the mix evenly between the prepared tins and bake for 45-55 minutes (until a skewer comes out clean with a few moist crumbs attached). Once baked leave to cool completely in the tins.
  6. While the cakes are cooling make the ganache. Chop the chocolate into small pieces and place in a heatproof bowl. Heat the cream in a saucepan until it meets scalding point then pour over the chocolate. Allow the cream to melt the chocolate for a few minutes then stir until smooth and glossy. Add salt to taste then set aside to cool.
  7. For the coffee mascarpone crush the coffee into a fine powder then just whisk together all the ingredients until smooth.
  8. When all the elements are cool you’re ready to assemble the cake. Your cakes will probably have a domed top, so trim these off then divide each one into two even layers (leaving you with 4 layers overall).
  9. Scrape the hazelnut praline caramel into a piping bag. Split the mascarpone into thirds. Spread one third of the mascarpone over the first sponge layer then pipe over a third of the caramel in a zigzag (so that each slice will have some caramel inside!). Repeat this step until you’ve used up the sponges, then rustically cover the whole cake in the thickened ganache.
  10. Garnish with edible dried flower petals.

Mocha Banana Bread (Vegan)

Cakes, Uncategorized

This vegan banana bread is perfect if you’re after maximum taste pay off in exchange for minimal effort; the method calls for just a mixing bowl and hand whisk and you’ll have it in the oven in less than 10 minutes. I add chunks of dark chocolate and a shot of espresso to my banana bread as it adds a great depth of flavour and slight bittersweet finish, but feel free to omit these (if you’re weird and don’t like my two favourite things).

Ingredients

  • 125ml vegetable oil
  • 100ml dairy free yoghurt (I used Alpro plain)
  • 100ml nut milk (I used almond)
  • 3 very ripe bananas (roughly mashed) plus 1 extra banana (halved down the middle)
  • 2tbsp instant coffee granules dissolved in 2tbsp boiling water
  • 75g light brown soft sugar
  • 75g caster sugar
  • 225g plain flour
  • 1tsp baking power
  • 1tsp bicarbonate of soda
  • generous pinch of salt
  • 150g 70% dark chocolate

Method

  1. Preheat the oven to 180c. Line a large loaf tin with greaseproof paper.
  2. Place the oil, yoghurt, milk, mashed banana, both sugars and coffee in a bowl and whisk together. Now add in the flour, baking powder, bicarbonate of soda and salt and whisk again until you have a smooth batter. Roughly chop 100g of the dark chocolate and stir that in, reserving the rest. Scrape the batter into the prepared tin and arrange the banana halves on top.
  3. Bake for 50-55 minutes or until well risen, springy and golden. Once baked, leave to cool in the tin, then melt the remaining dark chocolate and drizzle over the top.

Enjoy!

Sticky Date Pudding with Masala Chai Inspired Toffee Sauce

Cakes, Uncategorized

This striking but deeply comforting dessert is perfect for Christmas if you’re after something a little bit different to your bog standard figgy pudding; it’s essentially a twist on the nostalgic sticky toffee pud, but is lifted with ginger, cinnamon, black pepper and orange then drenched in a sauce which I’ve infused with classic chai spices (black peppercorn, cardamom, cinnamon, anise, cloves and fennel seeds). I’m going to be serving this up on Christmas day with vanilla ice cream (though it would be amazing with a rose or pistachio variety!).

Ingredients

  • 225g butter
  • 225g soft dark brown sugar
  • 70g black treacle
  • 135g golden syrup
  • 200g pitted dates, roughly chopped
  • 200ml boiling water
  • 100ml milk
  • 350g plain flour
  • 2tsp bicarbonate of soda
  • 2tsp ground ginger
  • 1tsp ground cinnamon
  • 1/2 tsp ground black pepper
  • zest 1 orange
  • 2 eggs

For the sauce

  • 100g dark brown sugar
  • 75g butter
  • 50ml maple syrup
  • 125ml double cream
  • 1 cinnamon stick
  • 1 star anise
  • 2 cloves
  • 1/2tsp mixed spice
  • 5 black peppercorns
  • pinch fennel seeds
  • 4 green cardamom pods, cracked
  • pinch sea salt

Method

  1. Preheat the oven to 170c. Grease your bundt tin generously with butter then coat with plain flour, tipping out any excess.
  2. Before starting on the pudding mix, infuse the cream for the toffee sauce. To do this pour the cream into a small saucepan and add the cinnamon stick, star anise, cloves, mixed spice, peppercorns, fennel seeds and cardamom pods. Heat gently until just boiling then set aside until required.
  3. Place the dates in a small bowl then pour over the boiling water. While the dates are soaking, melt the butter, sugar, treacle and syrup in a large saucepan. Once the contents of the pan have melted add the milk, orange zest, soaked dates and water. Stir together until well combined. Set aside to cool a little.
  4. Sift the plain flour, bicarbonate of soda, ginger, cinnamon and black pepper into a large mixing bowl. Make a well in the middle and break in the eggs. Briefly mix the eggs to break them up then gradually add the contents of the saucepan. Stir together with a wooden spoon until you have a smooth, lump-free batter.
  5. Pour the batter into the prepared tin (ensuring that you leave a 1.5 inch gap at the top of the tin for rising) and bake for 40-50 minutes (or until a skewer comes out with a few moist crumbs attached when inserted).
  6. While the pudding is cooking, finish the sauce. To do this simply place the sugar, butter and maple in a small saucepan and melt together until gently bubbling, then remove from the heat and strain in the flavoured cream and salt.
  7. Serve the pudding warm with a generous helping of sauce and vanilla ice cream.

Merry Christmas!