Rhubarb, Cardamom and White Chocolate Frangipane Tart

Pastry, Uncategorized

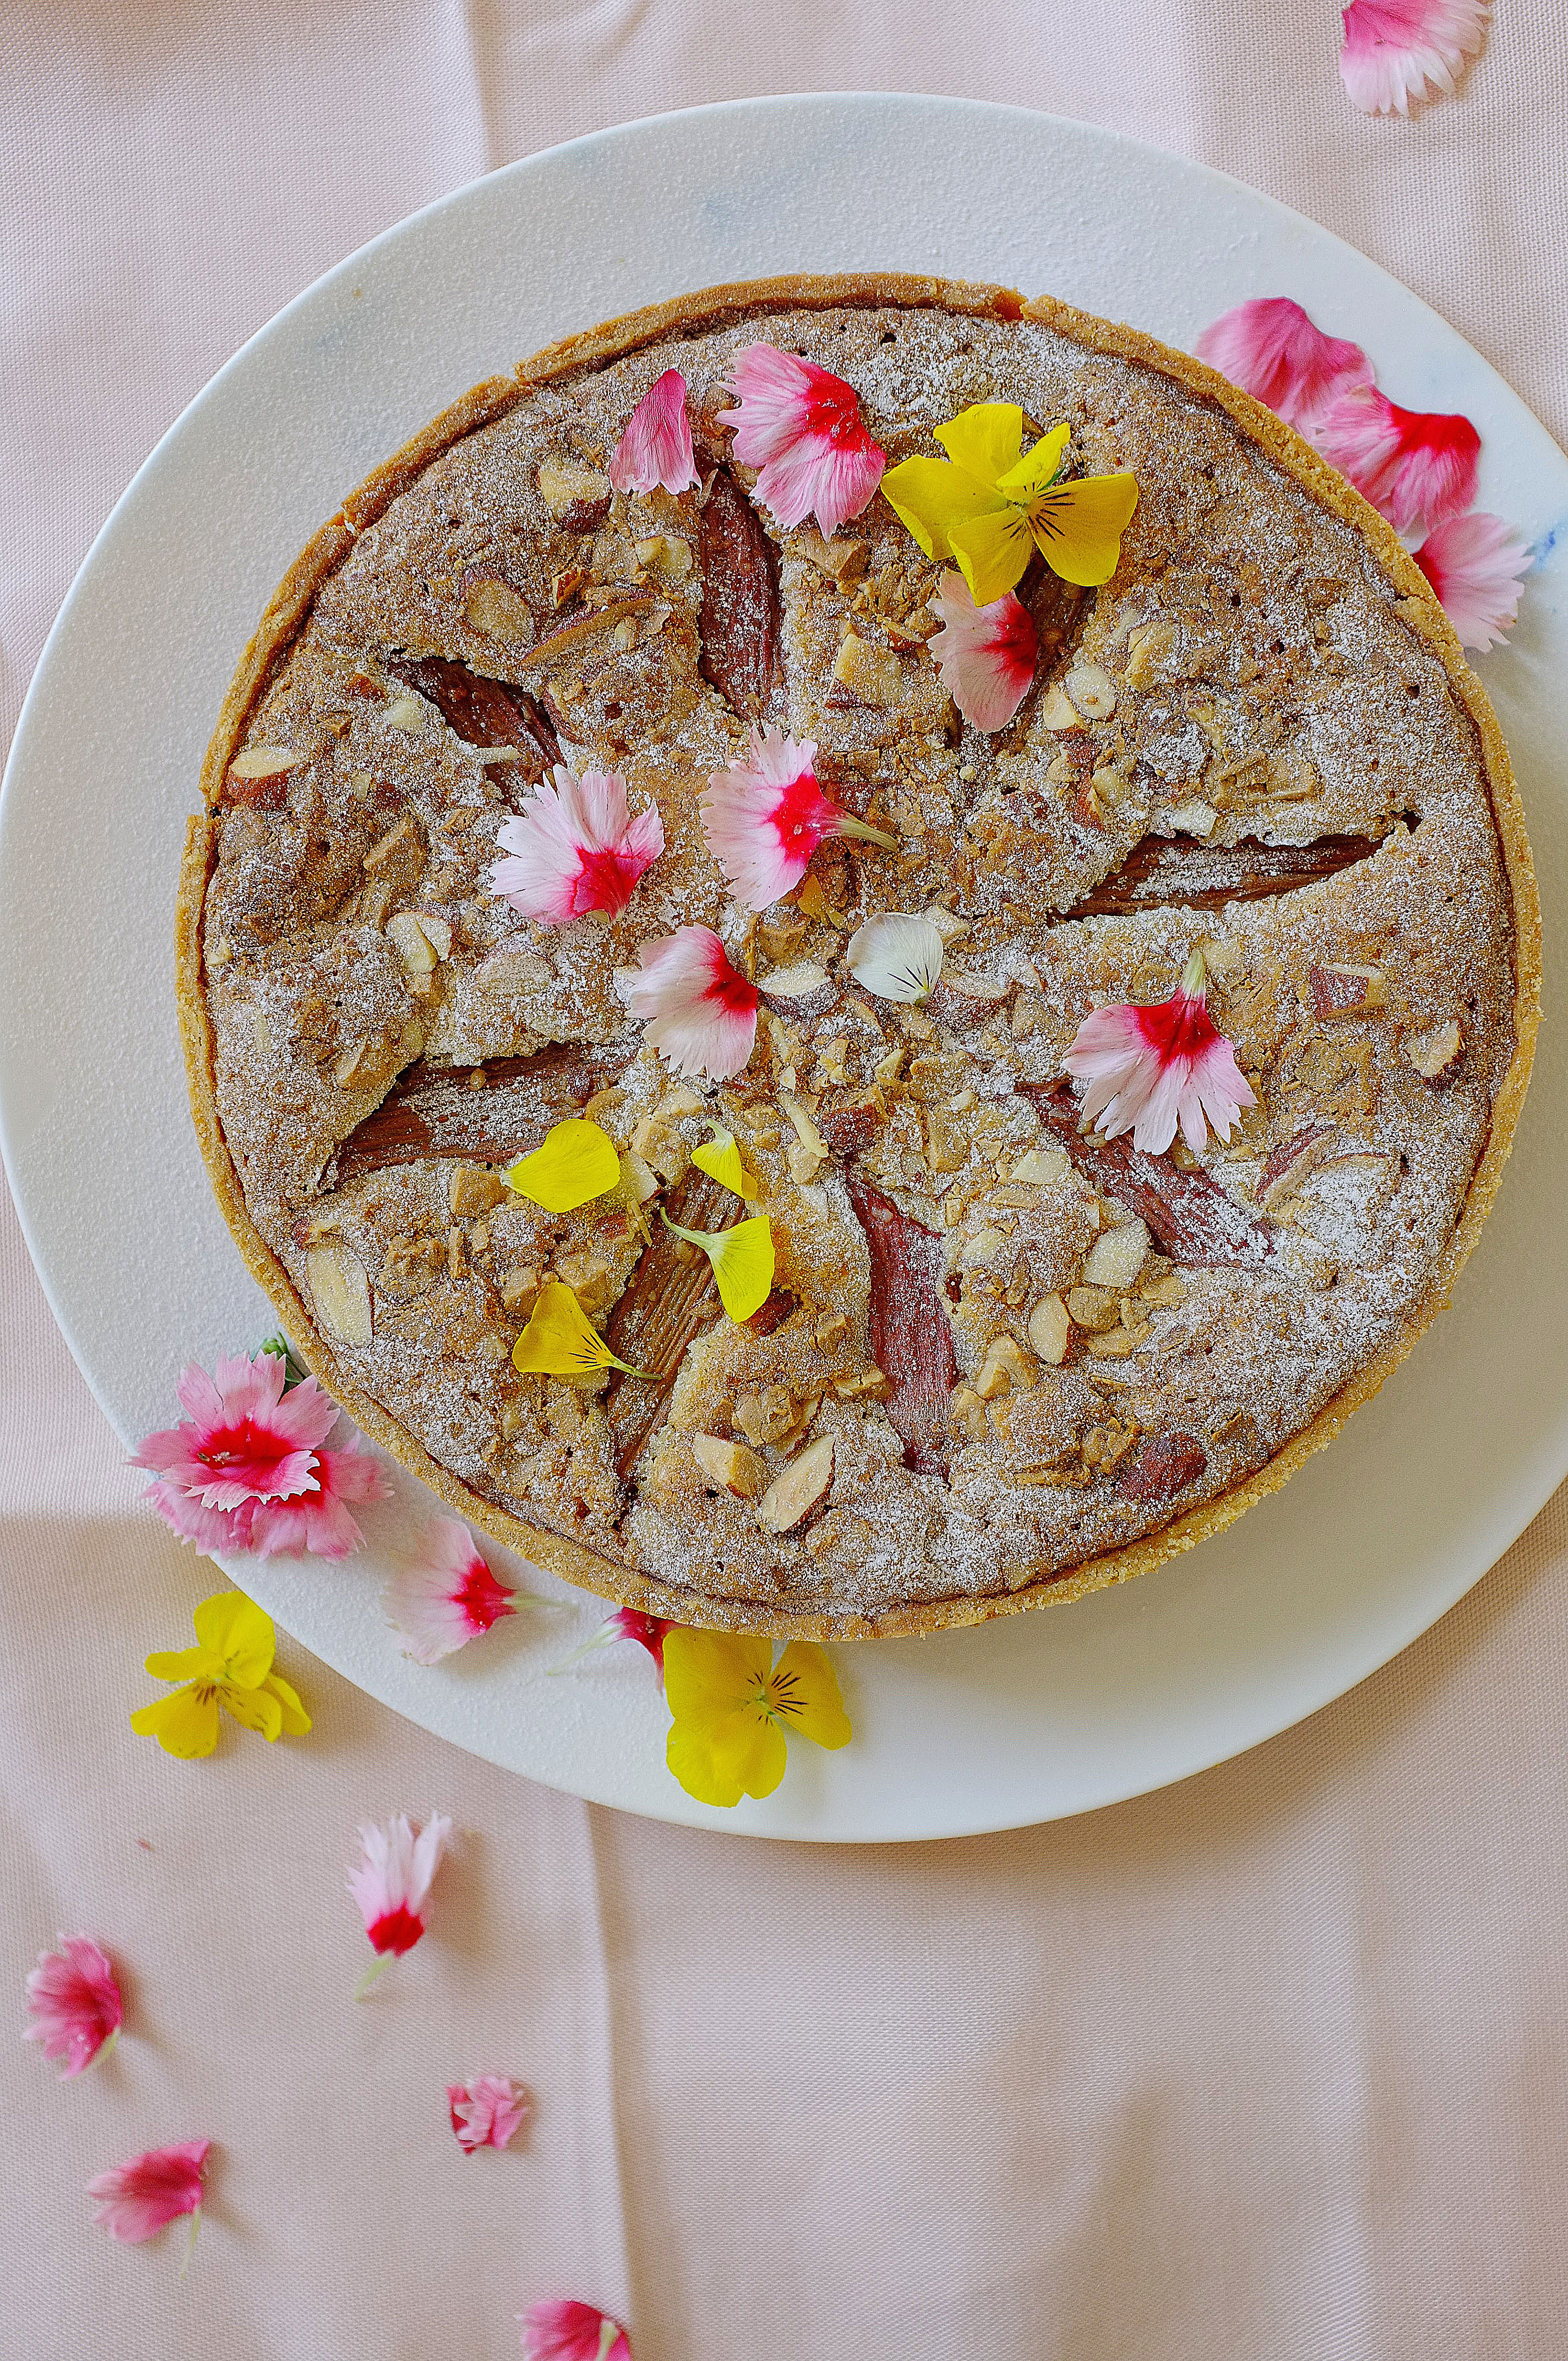
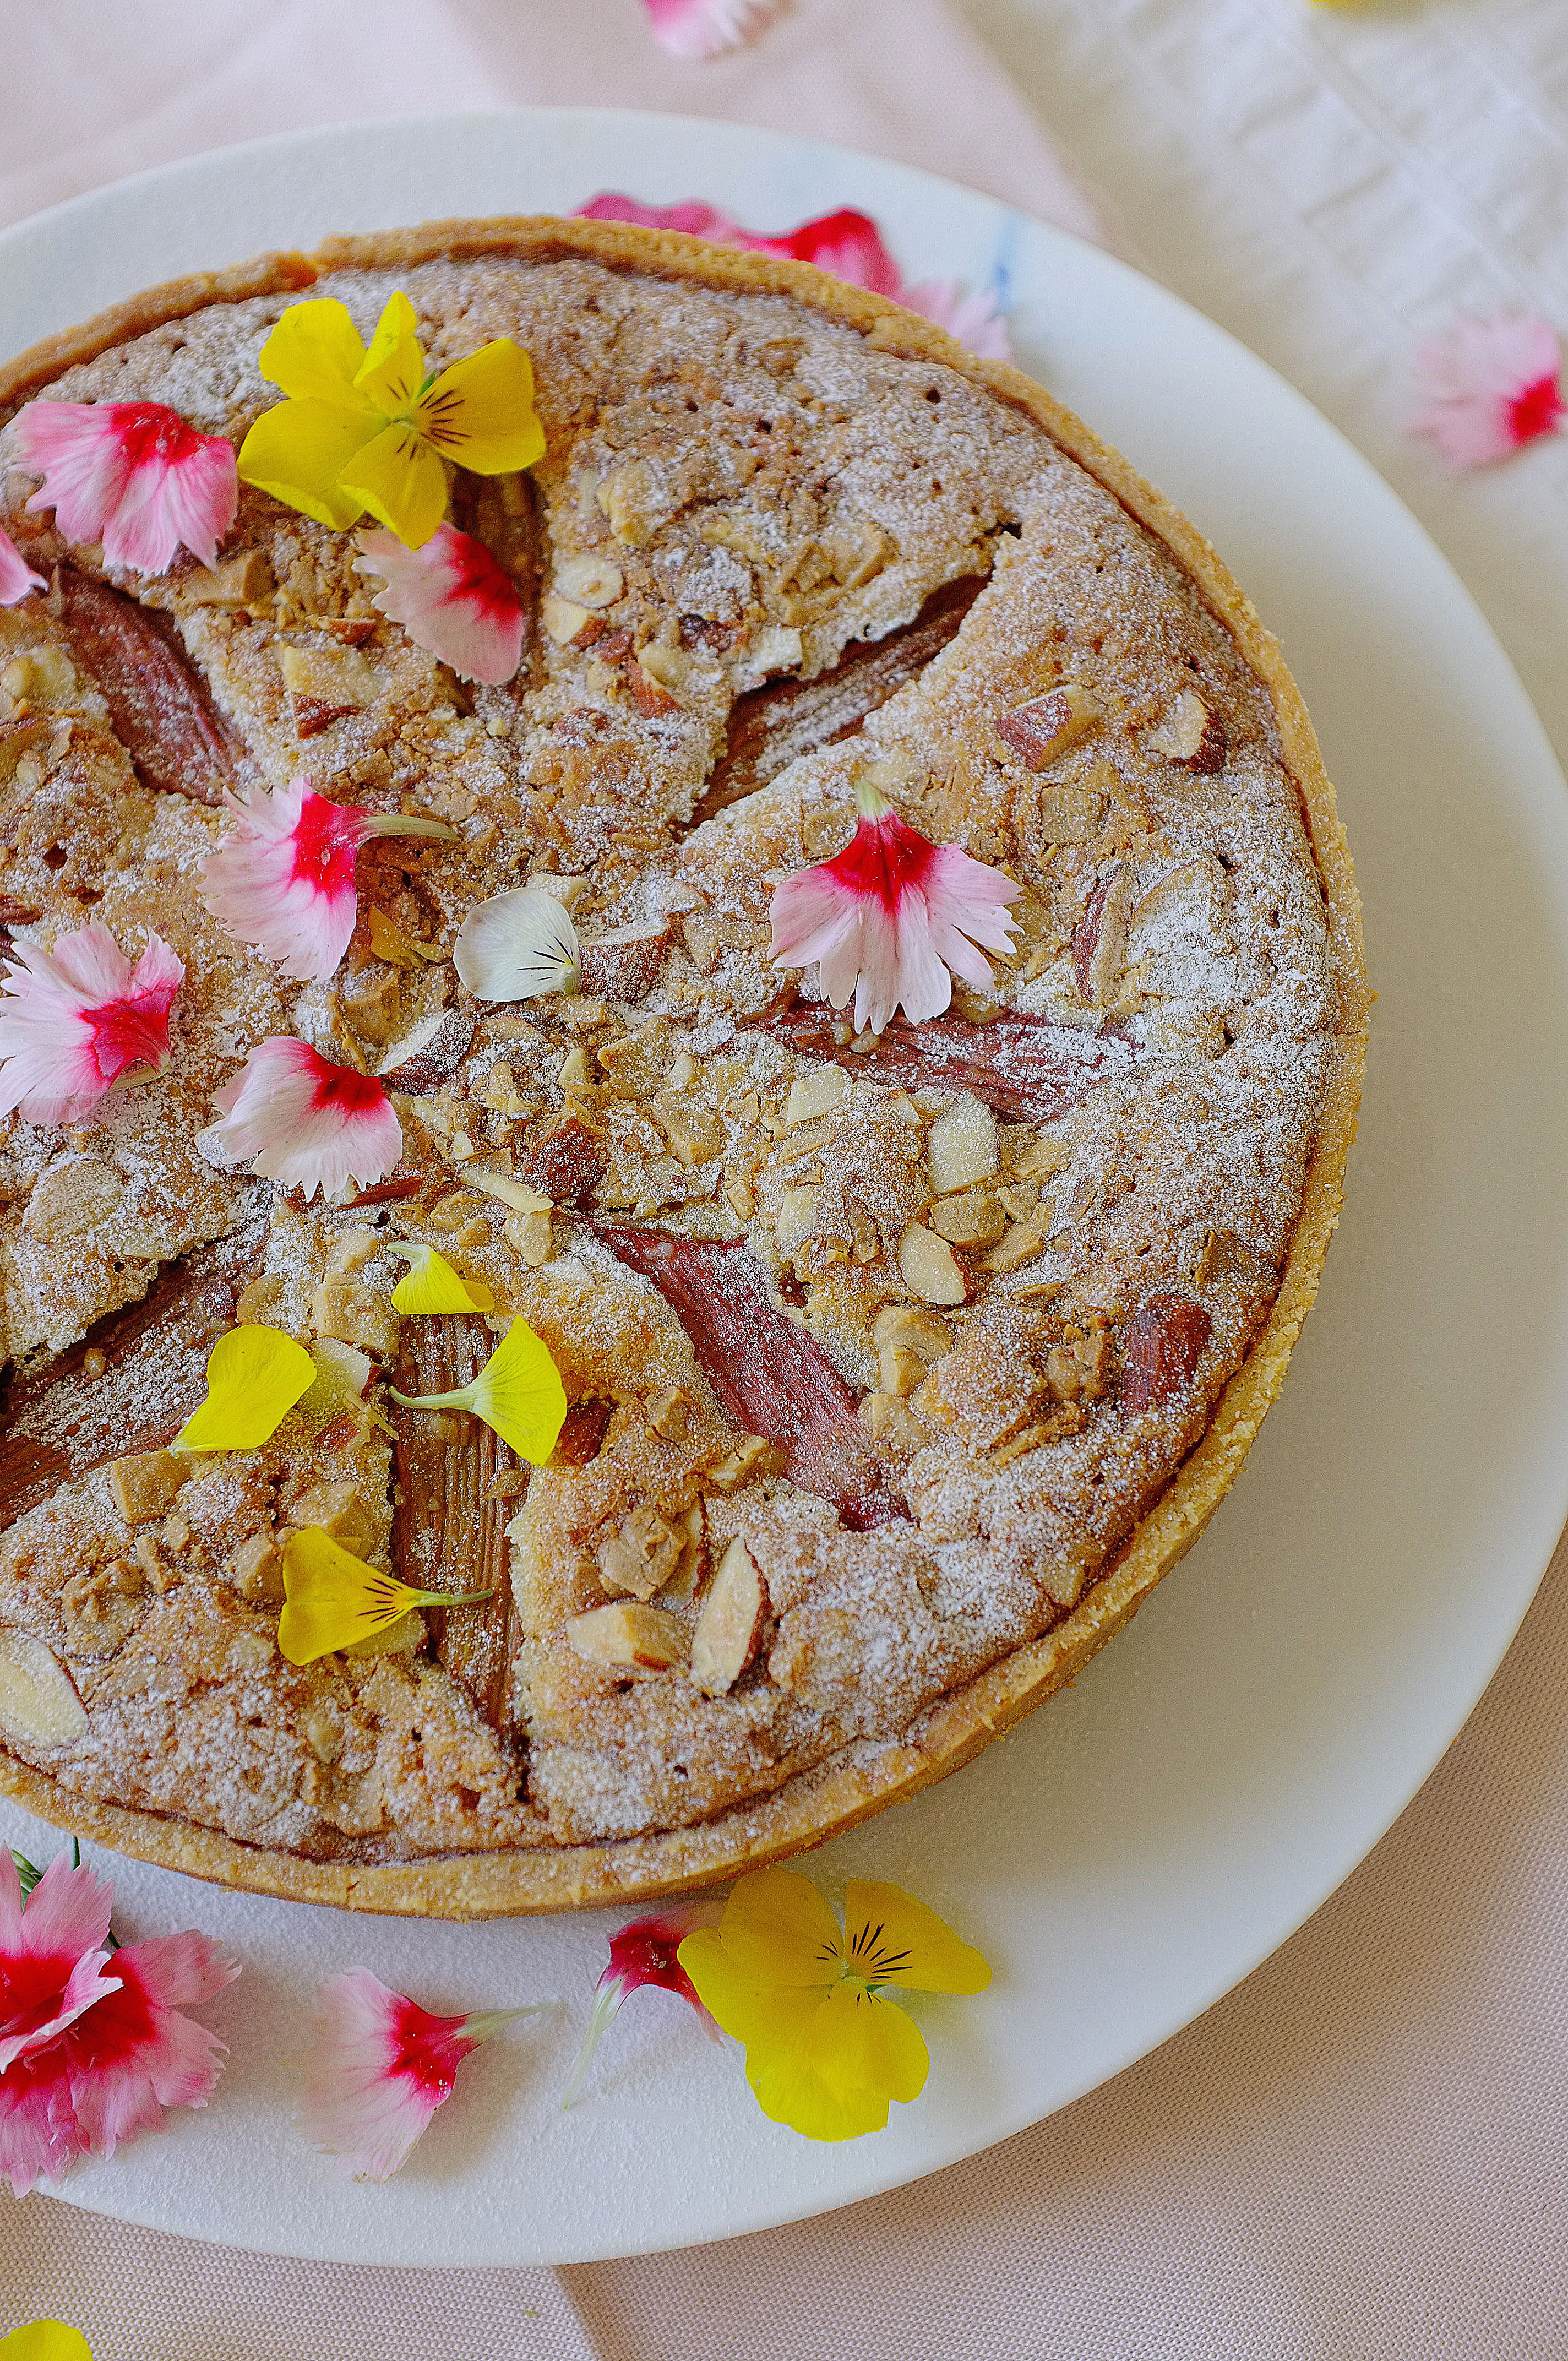
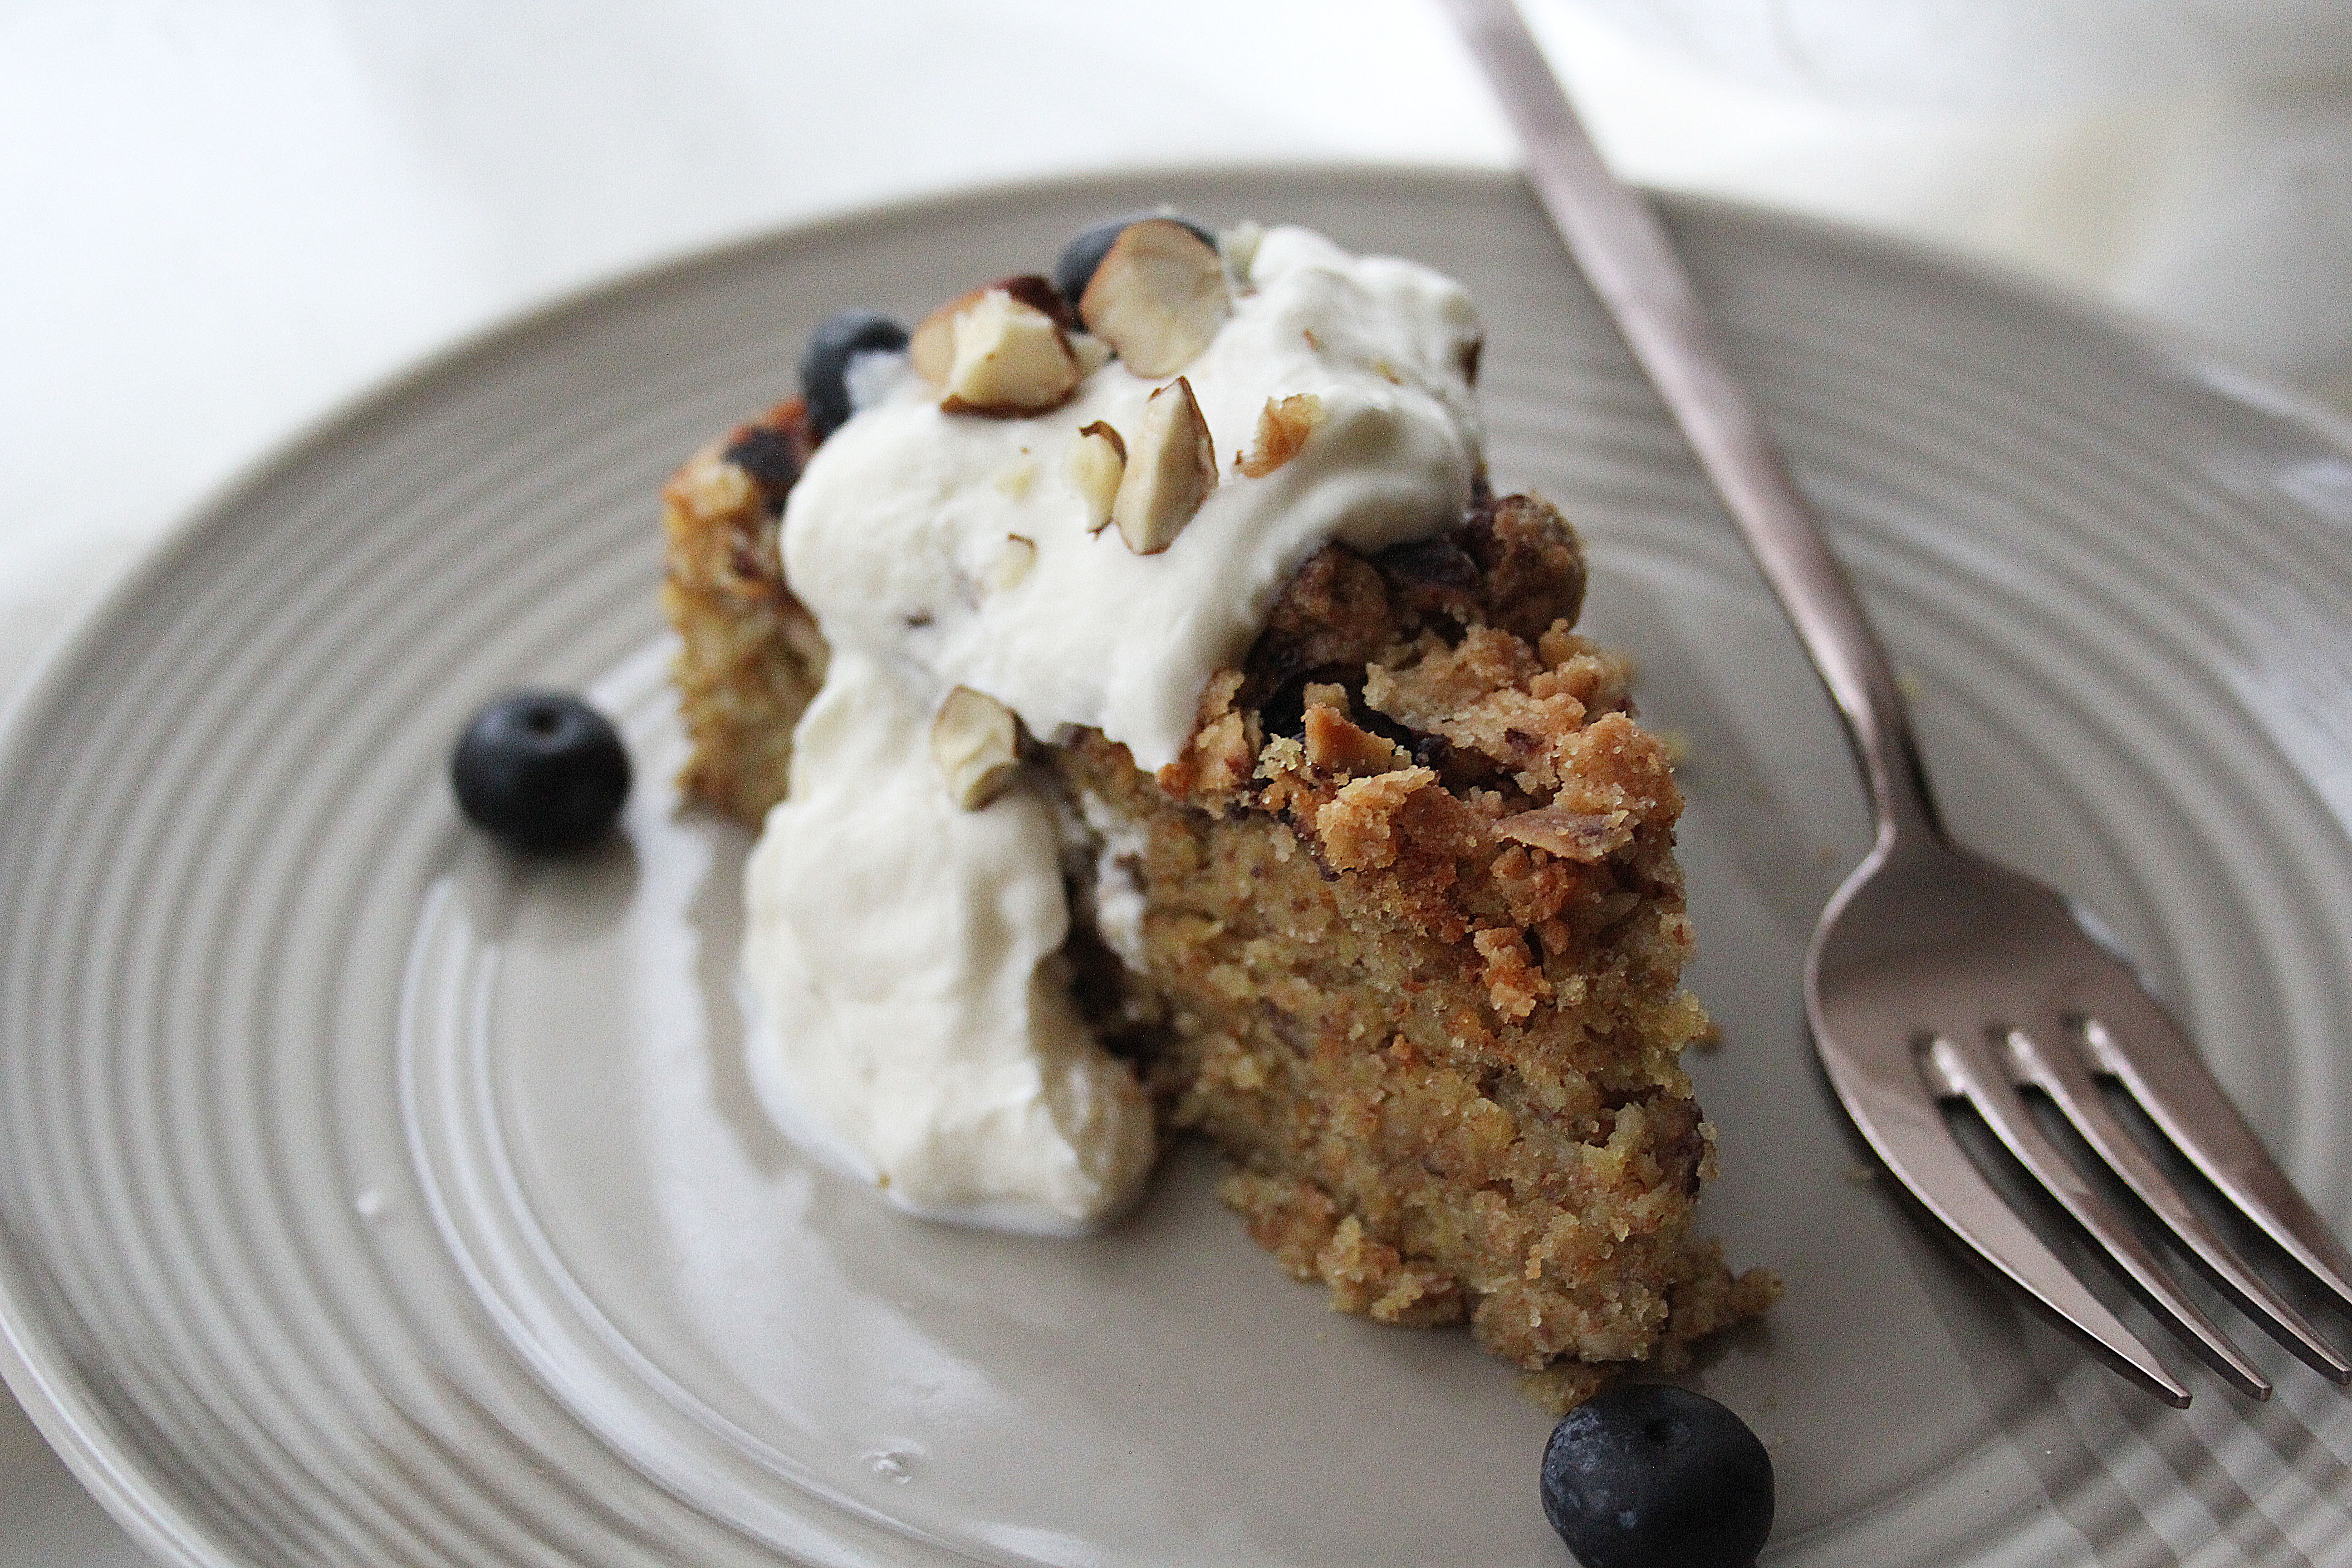
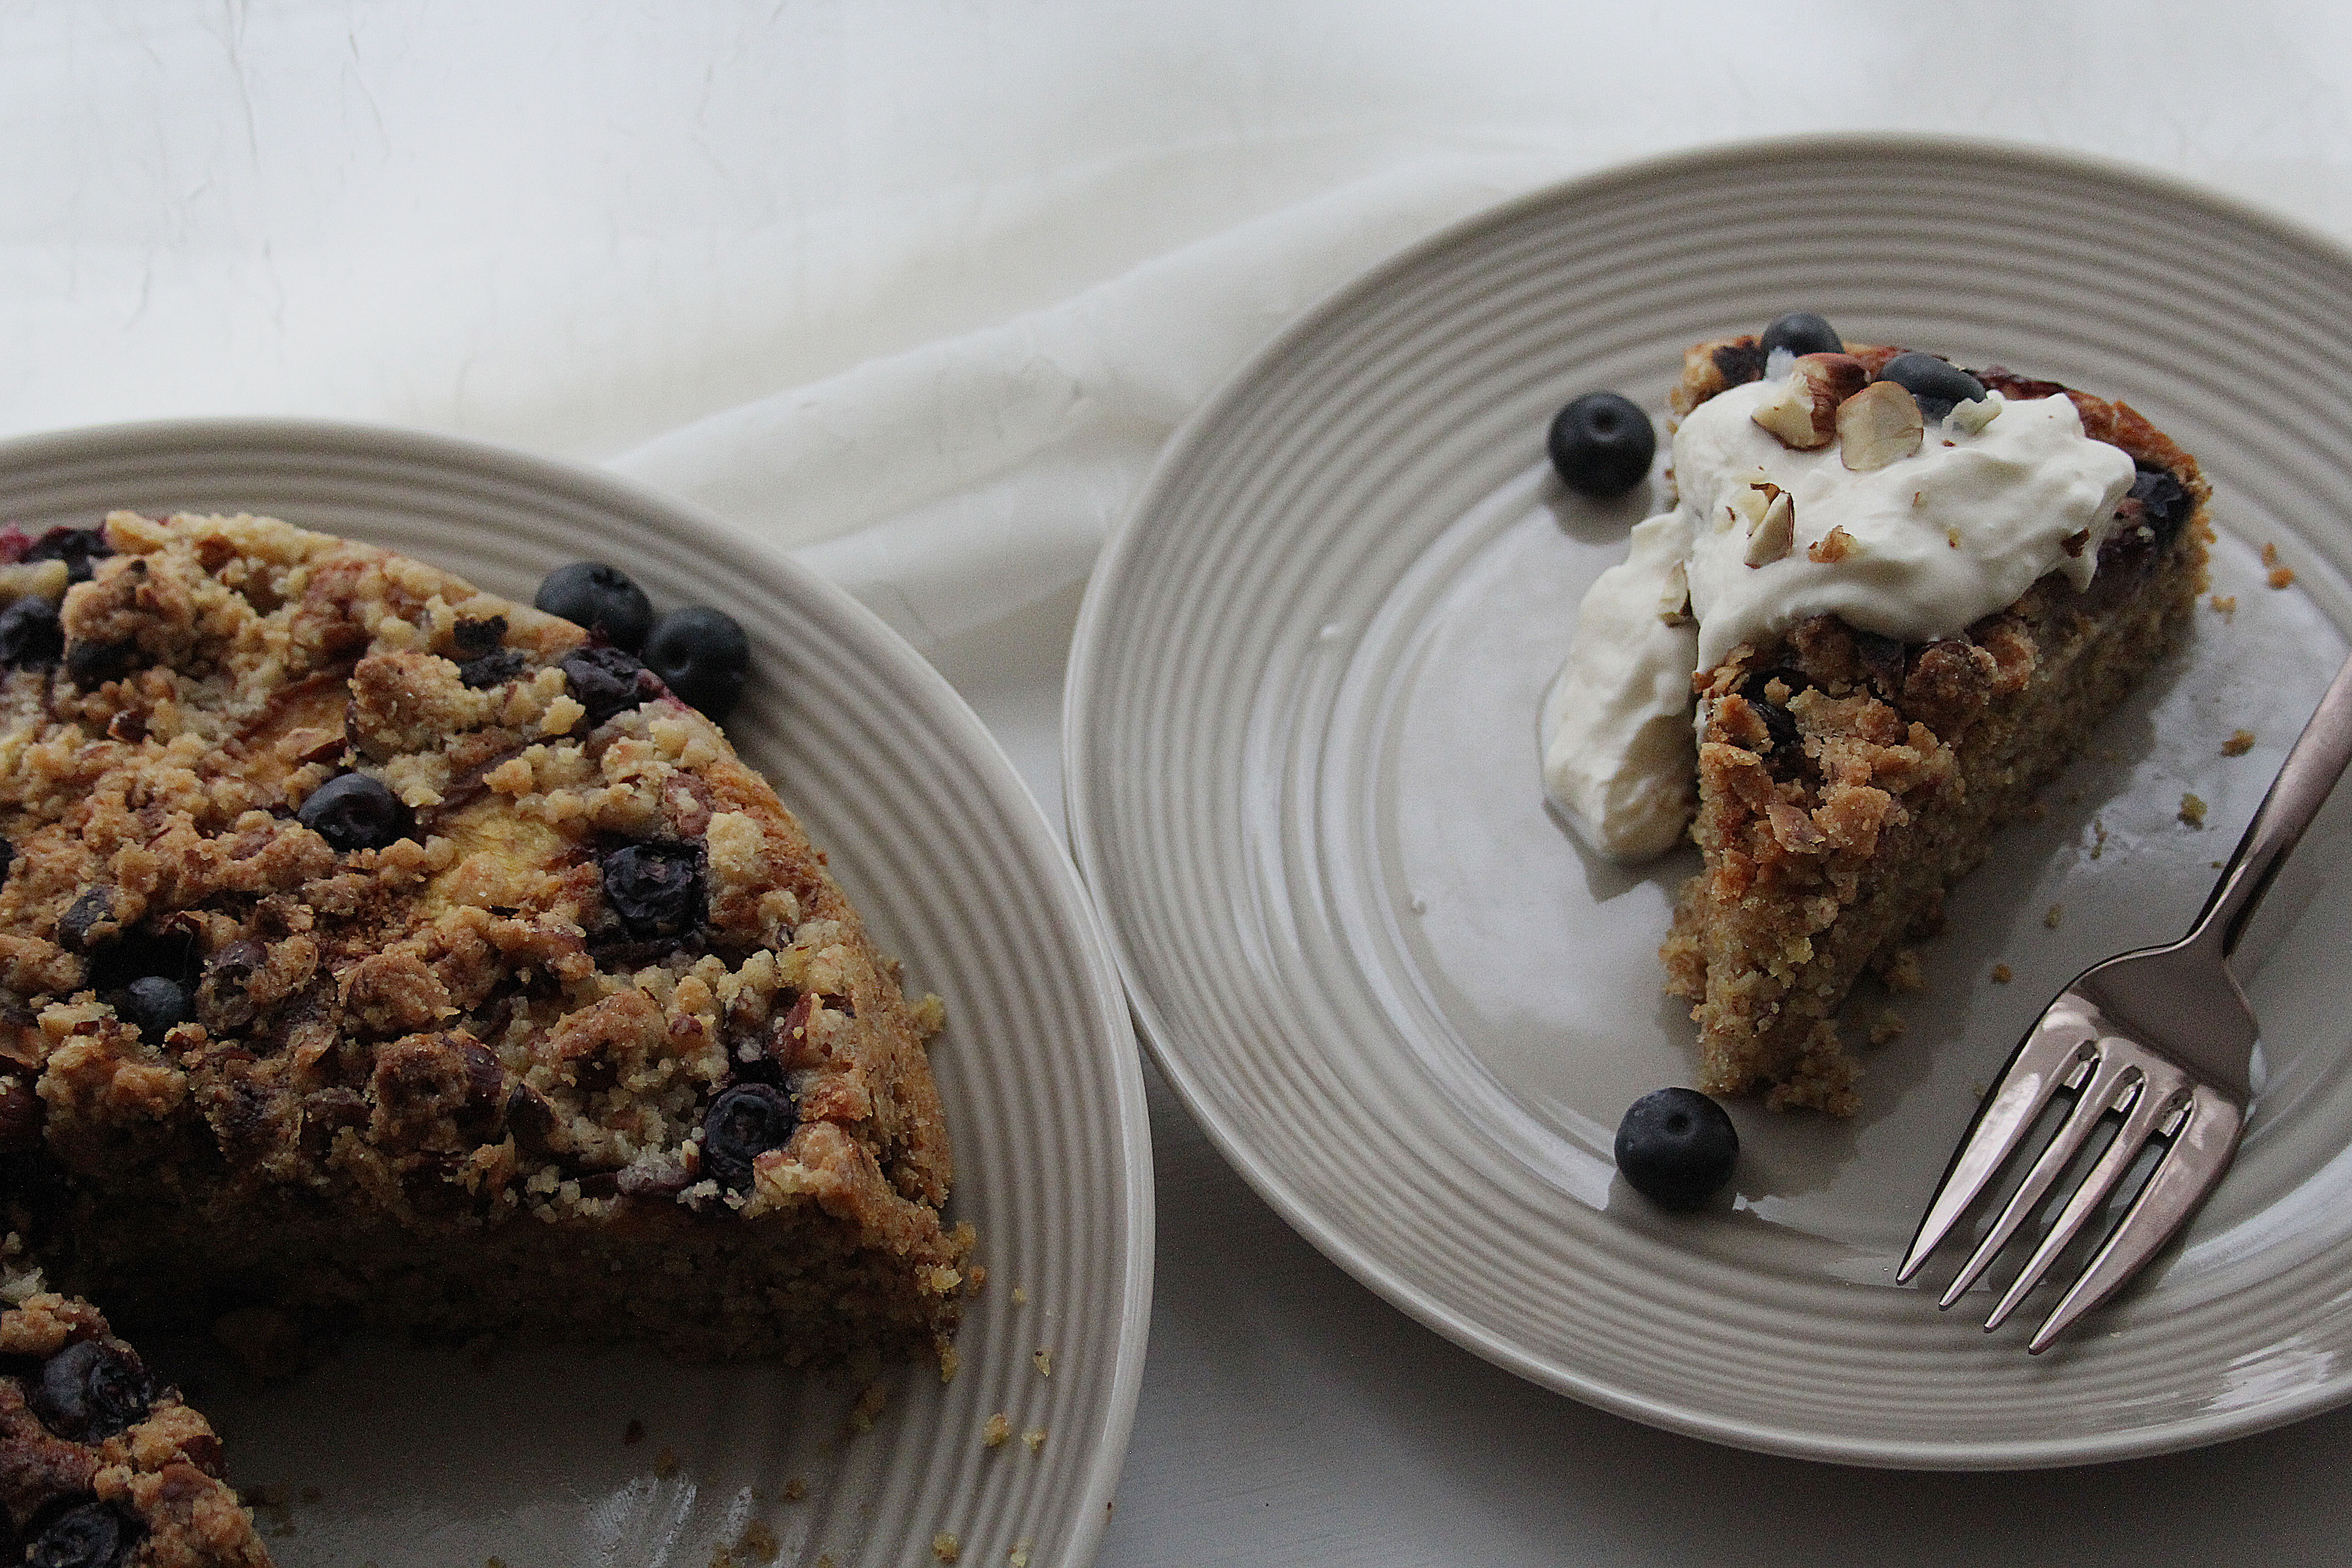
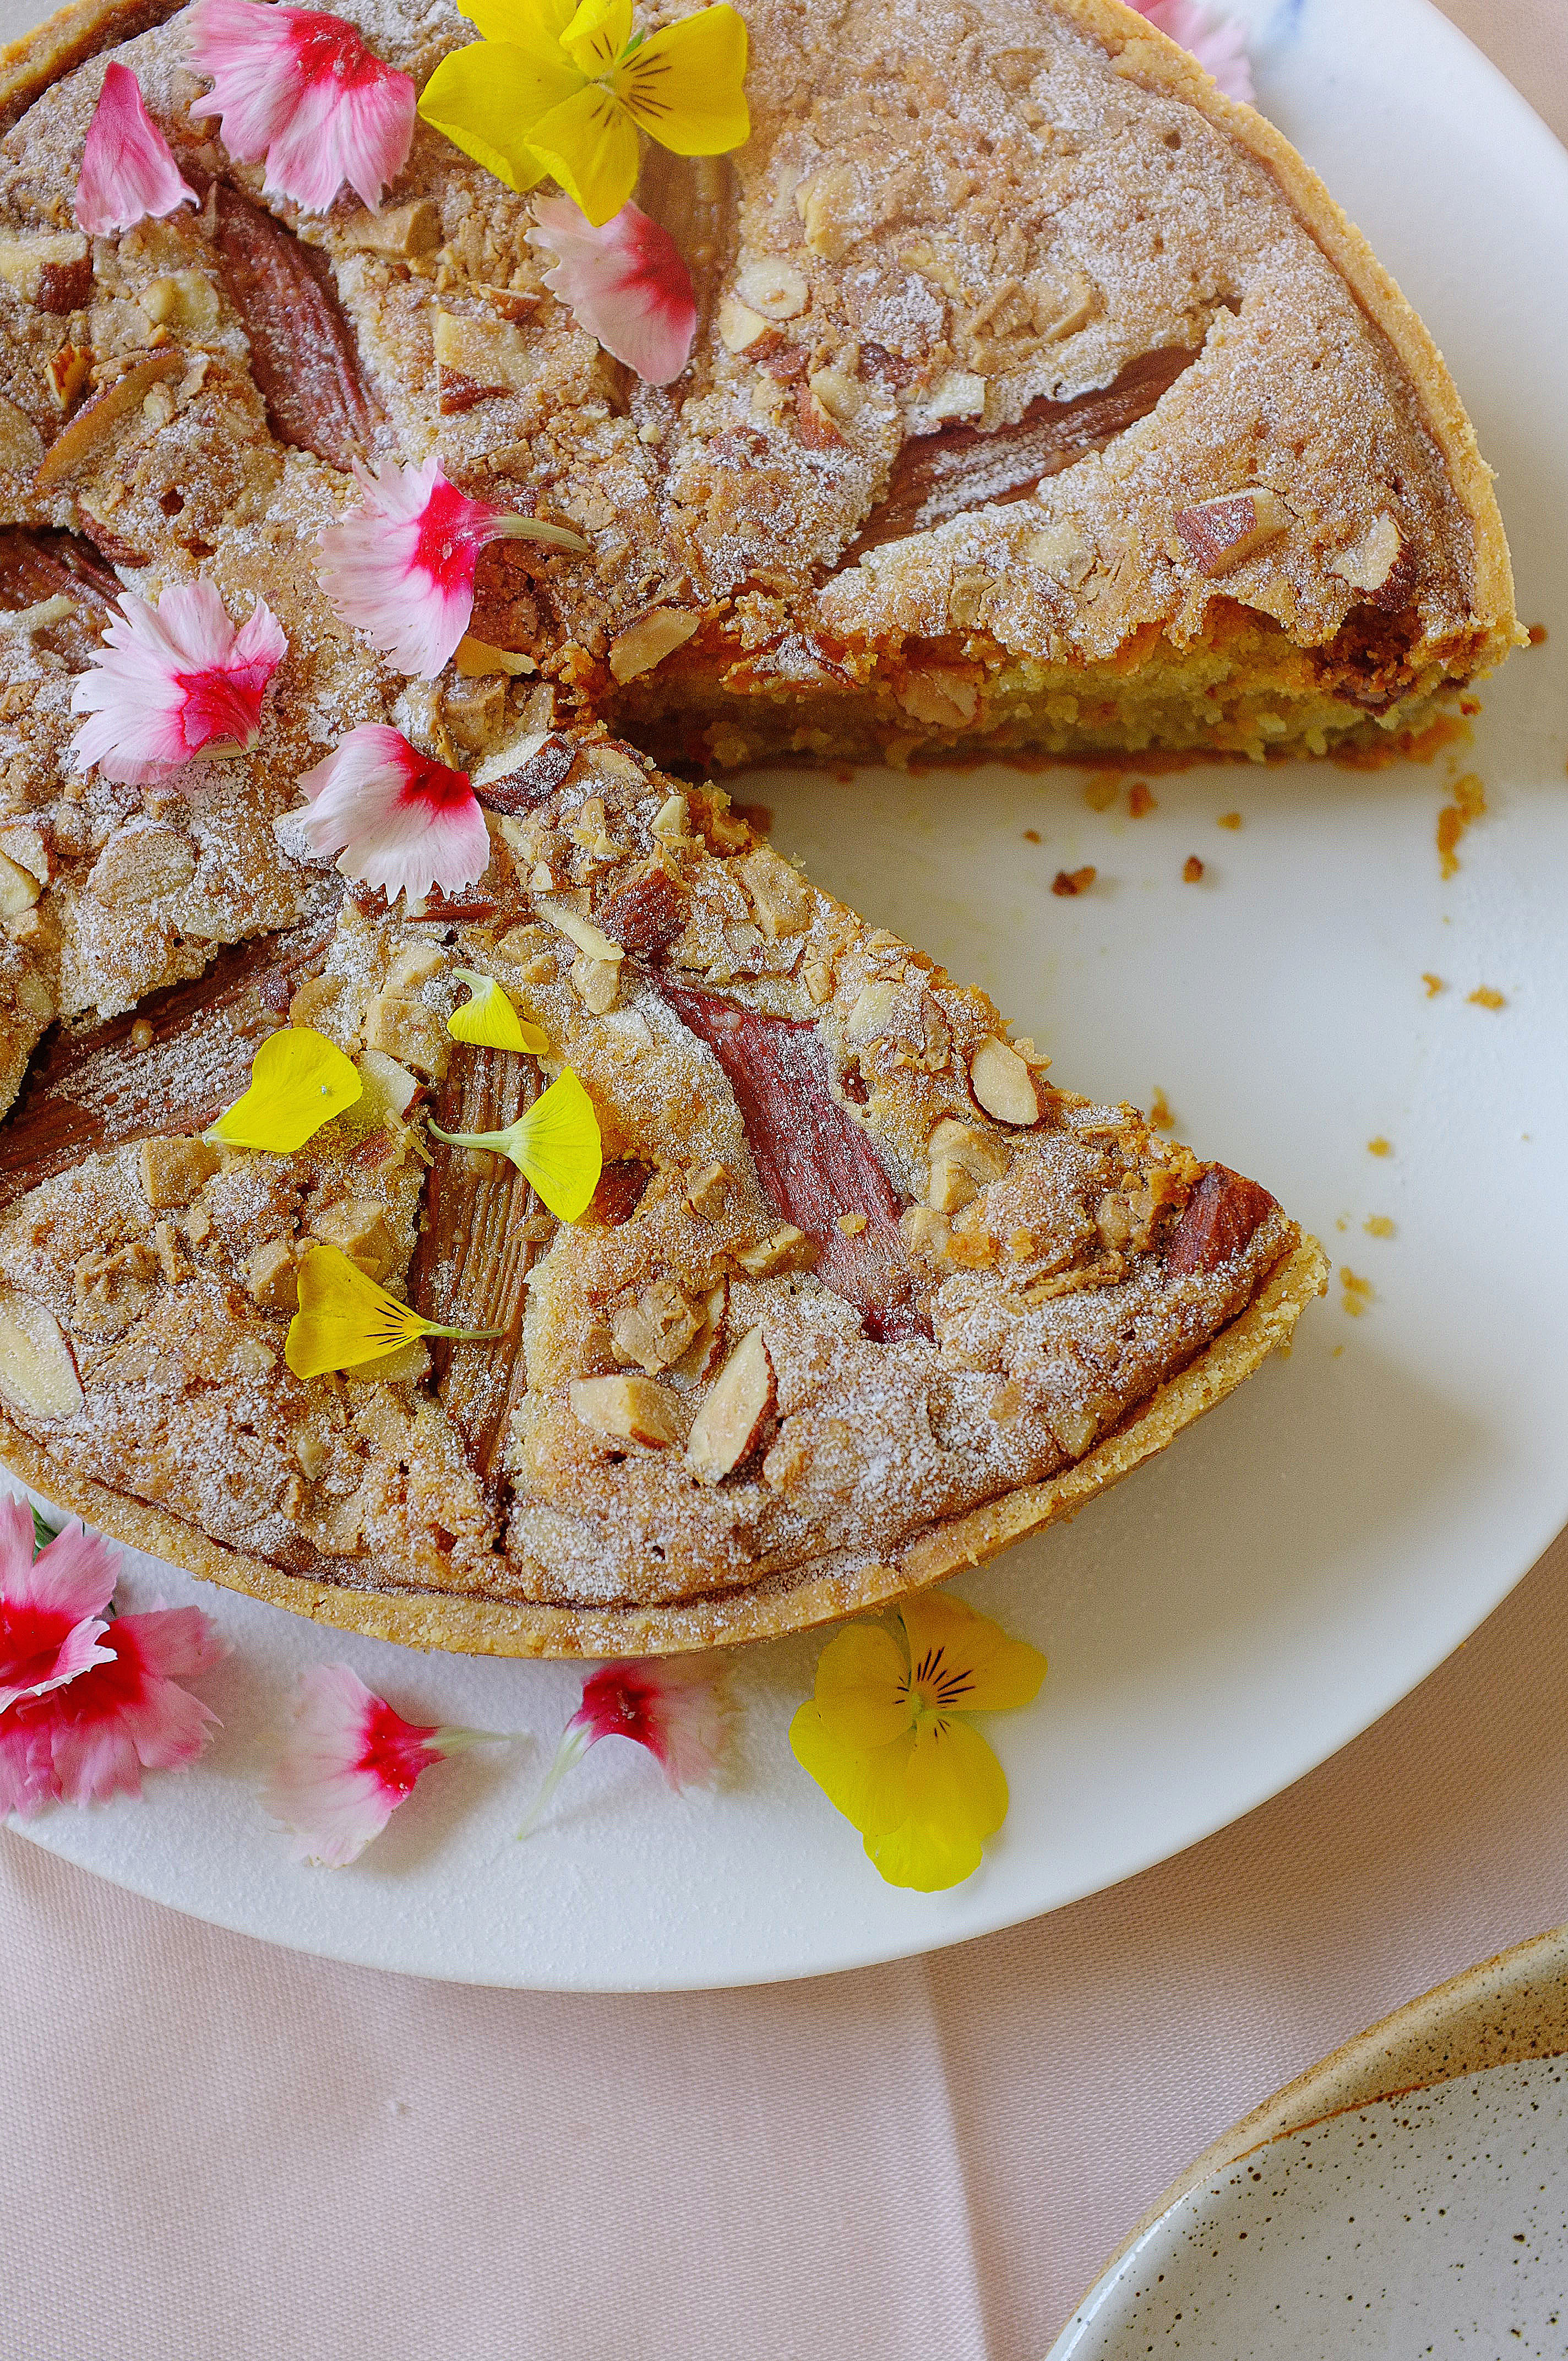
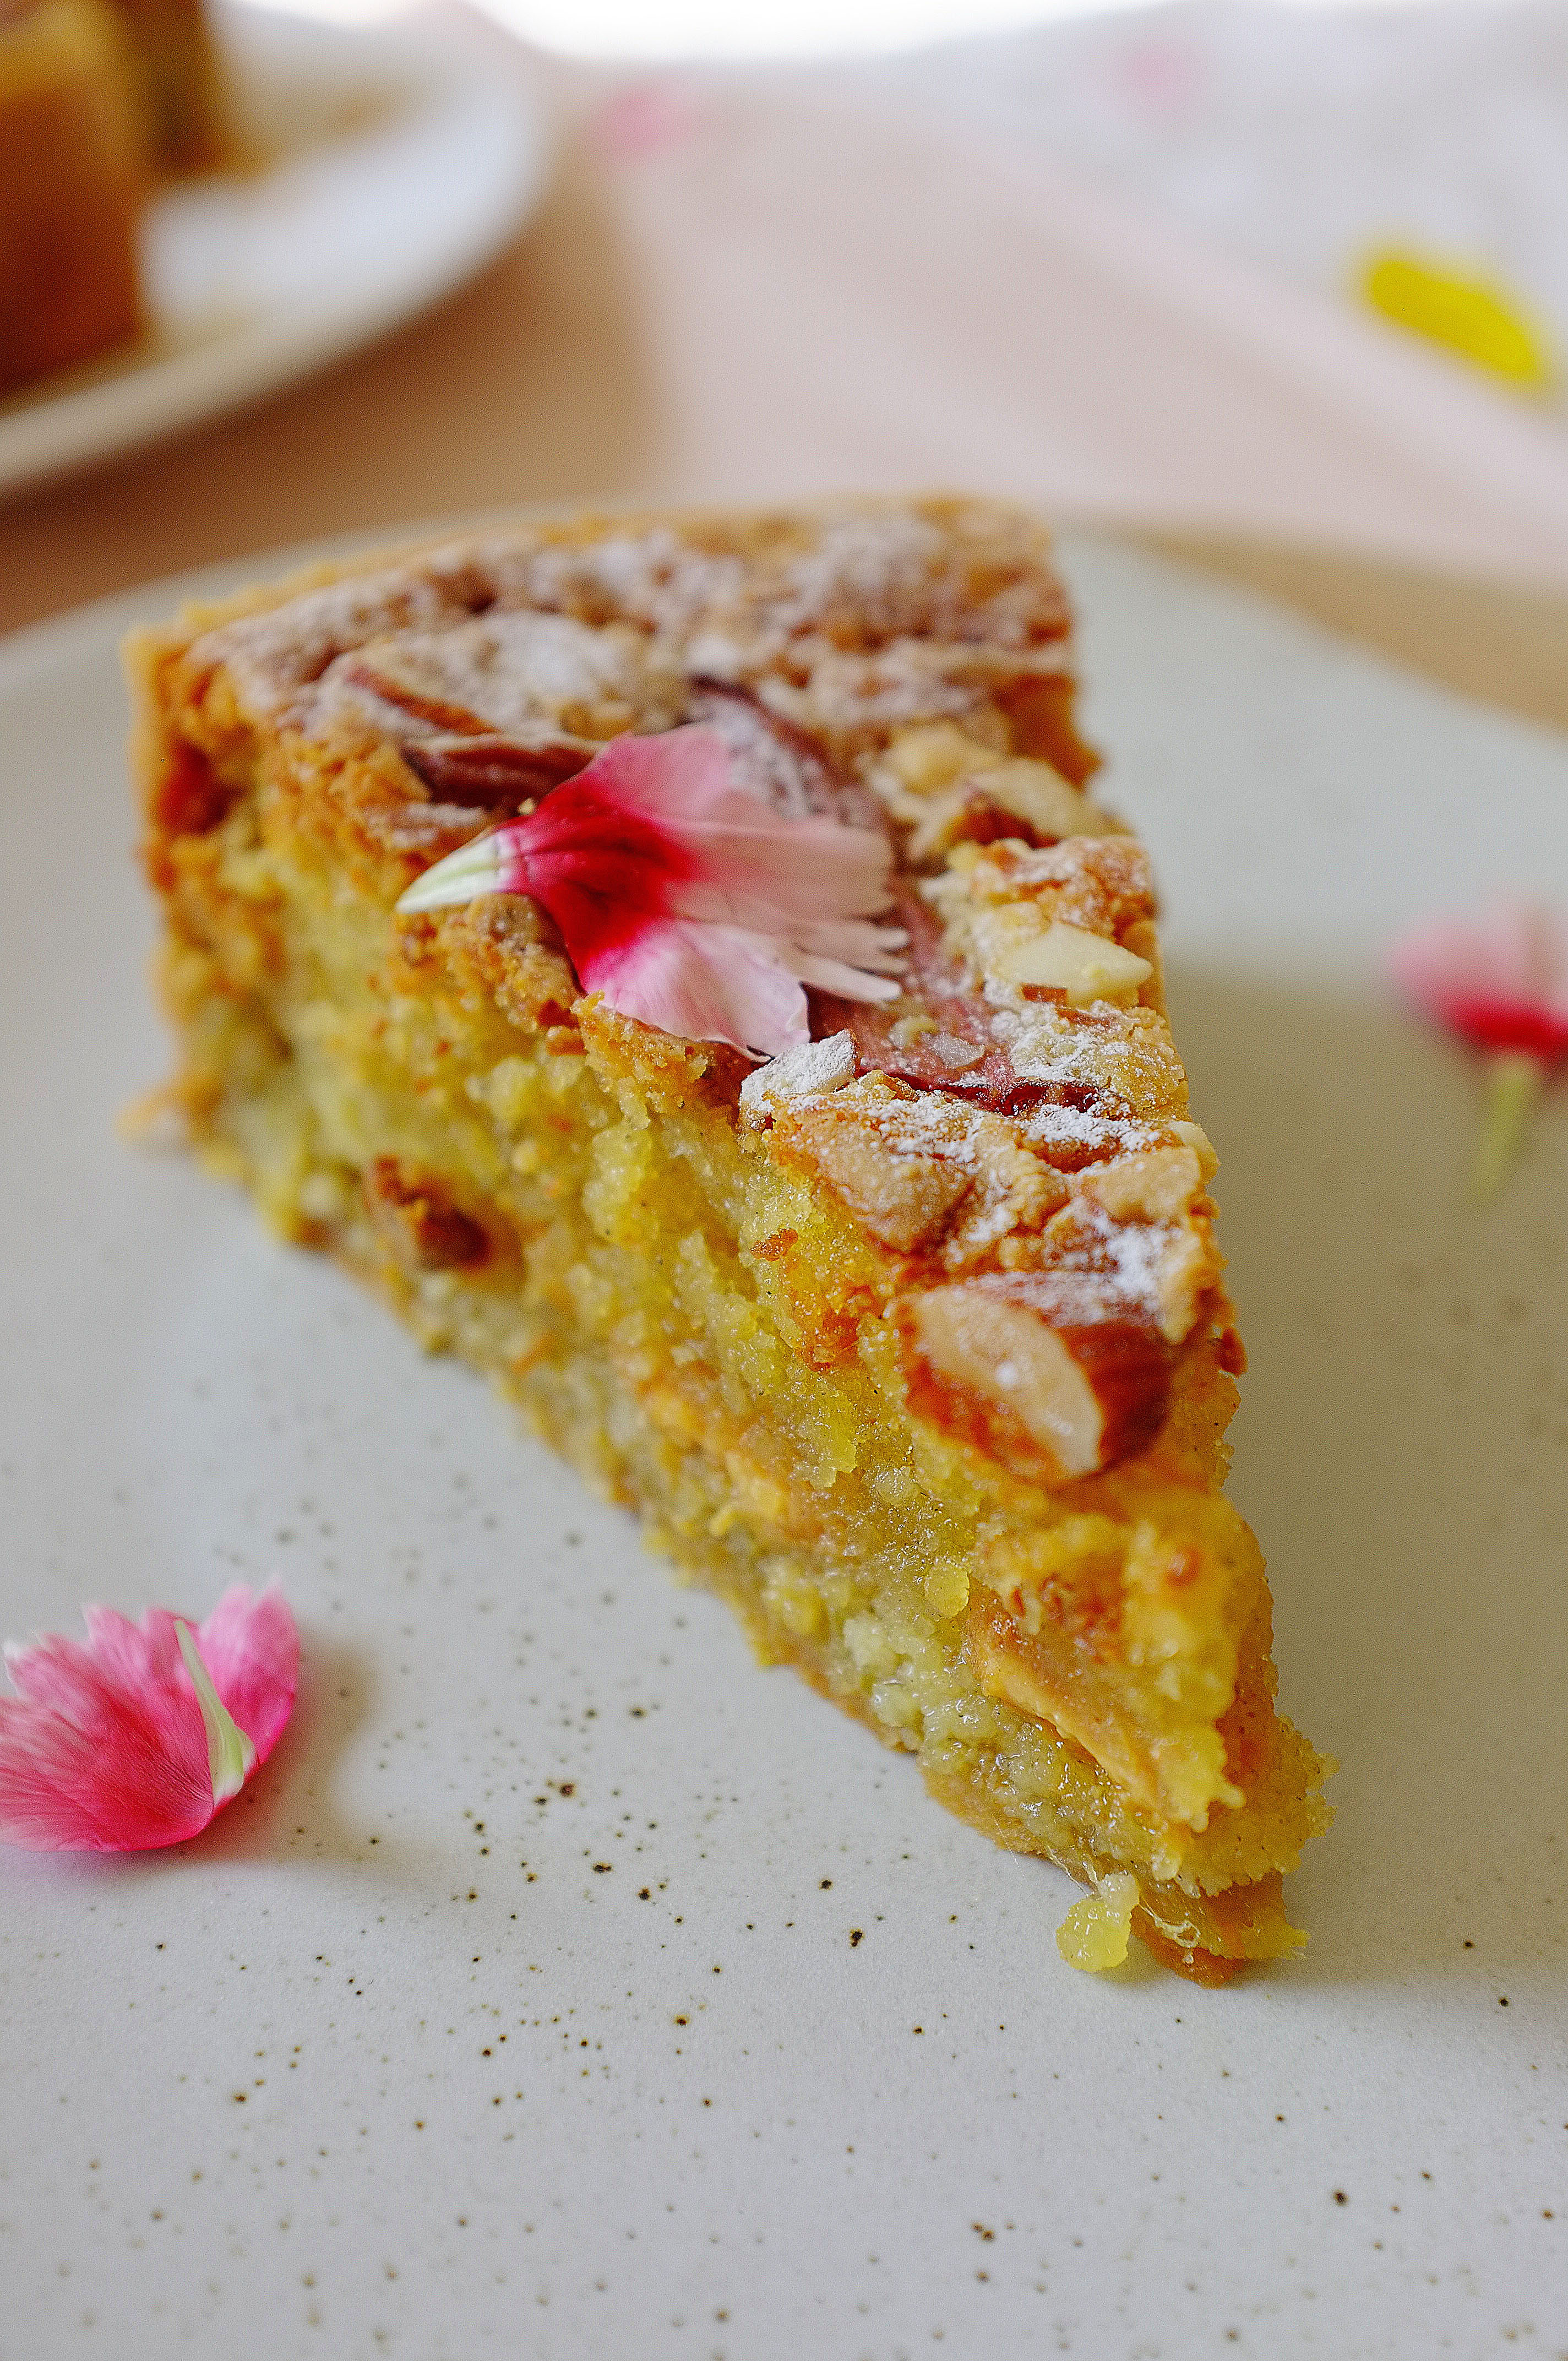
Tart rhubarb and sweet white chocolate is a delicious flavour pairing, and one I will keep returning to for the duration of the rhubarb season. In this bake I’ve applied the combination to a classic frangipane tart, using rhubarb compote in place of jam, and a filling studded with chocolate chunks and flavoured with cardamom. It’s a winner, and in my opinion, better than the standard strawberry variety (controversial).

Ingredients (enough for one 7.5 inch wide/ roughly 2 inch deep tart tin- serves 8)

For the pastry (there will be some leftover which will freeze well)

  • 250g plain flour
  • 140g unsalted butter
  • pinch salt
  • 30g caster sugar
  • 2 egg yolks

For the rhubarb filling

  • 400g rhubarb, sliced into 2 inch batons
  • juice and zest 1 orange
  • 30g caster sugar

For the almond frangipane

  • 120g soft unsalted butter
  • 120g caster sugar
  • 2 large eggs
  • 120g ground almonds
  • 1tsp ground cardamom
  • 100g white chocolate, roughly chopped
  • 30g roughly chopped almonds

Method

  1. Start off by making the pastry. Place the flour, butter, sugar and salt in a food processor and pulse until it resembles breadcrumbs. At this stage add the egg yolks  and pulse again until the mix comes together in large lumps (alternatively, rub the butter into the flour, salt and sugar using your fingertips then stir in the yolks using a cutlery knife). Tip the dough out and shape into a disc using your hands. Wrap in cling film and chill for 20 minutes.
  2. While the pastry is chilling start on the rhubarb compote filling. To do this simply put 300g of the rhubarb (reserve the other batons for the top of the tart), the orange juice and zest in a saucepan along with the caster sugar. Heat gently, stirring often, until the rhubarb has broken down and reduced to a thick compote consistency. Set aside to cool.
  3. Lightly grease an 7.5 (or 8) inch straight sided tart tin. Retrieve your pastry from the fridge and roll out to around 3mm thick and line the tin, pushing it right into the corners and trimming any excess. Prick the base all over with a fork and chill for 20 minutes or until firm. Preheat the oven to 190c.
  4. Line the pastry case with baking paper and fill with baking beans. Bake for 15-20 minutes or until the walls of the pastry are cooked and supporting themselves. Remove the beans and baking paper and return to the oven until the base is crisp and cooked through (about 10 minutes). Set aside to cool.
  5. While the pastry is baking, toss the reserved rhubarb batons in 1tbsp caster sugar and place on a tray- bake for 10 minutes.
  6. Now it’s time to make the frangipane. To do this simply cream together the butter and sugar until pale, light and fluffy, then add in the eggs one at a time, beating well between each addition. Finally, tip in the cardamom, salt and almonds and briefly mix once more until combined. Reduce the oven temperature to 170c.
  7. Now it’s time to assemble the tart. Spread the rhubarb compote over the base in one even layer, then add half the frangipane and sprinkle over half the chopped white chocolate pieces. Add the remaining frangipane and top with the rest of the white chocolate, chopped almonds and roasted rhubarb batons.
  8. Bake for 35-40 minutes or until golden brown and cooked through. Serve hot or cold.

Advertisement

Rhubarb & Caramelised White Chocolate Choux Nuts

Pastry

Crisp choux pastry, sharp roast rhubarb with a hint of vanilla, and butterscotch-sweet caramelised white chocolate cream; a delicious combination you’ve got to try, and a great way to celebrate seasonal British produce (and millennial pink… *sigh*).

Ingredients (makes 10-12)

For the choux

  • 85g unsalted butter
  • 220ml water
  • 100g plain flour
  • 3 eggs
  • pinch of salt

For the filling

  • 250g white chocolate (make sure it’s at least 30% cacao)
  • 300ml double cream
  • Pinch salt
  • 4 thick stems rhubarb
  • 3tbsp caster sugar
  • 2 vanilla pods or 1tsp vanilla extract
  • Juice and zest 1 lemon

For the topping

  • 100g icing sugar
  • Enough of the rhubarb syrup (leftover from roasting the rhubarb) to create an icing with a drizzle-consistency
  • Dried rose petals (optional)
  • Candied rhubarb ribbons (optional) (I make these by creating ribbons of rhubarb with a peeler, which I then simmer in a simple 2 parts sugar: 1 part water syrup for 5 minutes before draining off any excess liquid and cooking at 160c for 10-15 minutes, or until dried out, on a lined baking tray)

Method

  1. To make the choux put the water, butter and salt in a saucepan set over a medium heat (do not let it boil at this stage). Meanwhile, sieve the flour to remove any lumps. When the butter has melted into the water, increase the heat and bring to a rolling boil, then tip in the flour and stir vigorously until you have a smooth paste-like mix which comes away from the edges of the pan. Continue to stir for another minute to cook out the rawness of the flour, then tip into a clean bowl and close cover with cling film (this eggless stage is known as a ‘panade’). Leave to cool to room temperature.
  2. Preheat the oven to 190c. Line 2 large baking trays with greaseproof paper.
  3. Once the panade has cooled it’s time to add the eggs; whisk in a jug to break them up then very gradually add into the panade while beating with electric beaters. Stop adding the egg (you might have a little leftover) when the smooth, lump-free mixture reluctantly drops off the end of a spoon. Pile the choux mix into a piping bag, fitted with a large round nozzle.
  4. Pipe 10-12 doughnut shapes onto the prepared baking trays, leaving room for expansion. Bake the choux for 20-25 minutes or until crisp and golden, then skewer each one and return to the oven for around 10 minutes or until the middles have completely dried out. Set aside to cool and reduce the oven temperature to 180c.
  5. Slice the rhubarb into batons and toss in the caster sugar, lemon juice and zest and vanilla. Roast for 10-15 minutes in a high sided baking tray until the pieces are tender but still retain their shape. Set aside to cool and reduce the oven temperature to 120c.
  6. Chop up the white chocolate and scatter on a lined baking tray in an even layer. Place in the oven to allow the chocolate to melt for 10 minutes, then stir/turn and return to the oven for another 10 minutes. Repeat this step 2-3 more times until the chocolate reaches a deep golden colour, then scrape into a bowl and mix in a splash of cream to loosen the consistency (it can get a little grainy at this stage so pass through a sieve if necessary). Leave to cool.
  7. Once the white chocolate has cooled, place in a bowl (or bowl of a stand mixer with whisk attachment) and add in the cream and salt. Whisk until pipe-able.
  8. Slice the cooled choux nuts in half horizontally and pipe in a generous helping of caramelised white chocolate cream. Slice the roast rhubarb pieces thinly and arrange these on top of the cream, then pop the choux lid on top.
  9. For the pink icing, pour the cooking syrup from the rhubarb tray into the icing sugar and mix to create a smooth drizzle-like consistency (add in a little water if you don’t have enough syrup). Spoon this over the filled choux-nuts and garnish with edible petals and rhubarb ribbons.
Enjoy!

Sticky Ginger Cake with Labneh Icing and Blood Orange Syrup

Cakes

As much as I love a stacked sponge showstopper, sandwiched with buttercream and impeccably preened, there’s something deeply comforting about a single layered wedge of cake, rustically finished with dollops of tangy icing and a bit of fruit. This cake undoubtedly falls into the comfort category, and it’s now one of my favourites; ginger cake itself feels nostalgic to me*, but the slightly tangy labneh icing and citrus syrup topping make this one feel a little more modern.

*I don’t know why, I have no emotive family story to share about a recipe passed down through a long line of bakers- my Granny used to feed me M&S sandwich cakes straight from the freezer. I’ll bank that as character building.

Ingredients

For the labneh icing

  • 500ml Greek yoghurt
  • 3tbsp icing sugar
  • 1tsp vanilla extract

For the cake

  • 250g self-raising flour
  • 2tsp ground ginger
  • 1tsp ground cinnamon
  • 1tsp bicarbonate of soda
  • pinch salt
  • 175g golden syrup
  • 3tbsp ginger syrup (from a stem ginger jar)
  • 125g butter
  • 4 balls stem ginger, diced
  • 125g light soft brown sugar
  • 2 eggs
  • 250ml milk

For the blood orange compote

  • 90ml blood-orange juice
  • 50g caster sugar
  • 2tbsp water
  • 1 vanilla pod
  • 2 additional blood oranges

Method

  1. Line a sieve with a muslin cloth and sit over a large bowl. Scrape the yoghurt into the sieve and loosely tie the muslin around it. Leave this in the fridge overnight for the liquid in the yoghurt to drain (this will leave you with a thickened mixture- labneh).
  2. Preheat the oven to 180c. Grease and line a high sided 9inch cake tin.
  3. Stir together the flour, ginger, cinnamon, bicarbonate of soda and salt in a large bowl. In a saucepan melt together the golden syrup, ginger syrup, butter, diced stem ginger and sugar. Bring to the boil for a minute then make a well in the dry ingredients and add the melted mixture. Stir together to eliminate any lumps then whisk the eggs and milk in a jug and add those in too and beat once more.
  4. Tip the mixture into the prepared tin and bake for 50-60 minutes or until a skewer comes out clean when inserted.
  5. Leave the cake to cool completely in the tin.
  6. Meanwhile, make the blood orange syrup. To do this simply place the juice, sugar and water in a small saucepan and gently heat until the sugar has dissolved. At this stage split the vanilla pod and add in, then simmer for 3-4 minutes or until syrupy. Set aside to cool a little, then slice the 2 blood oranges into rounds, discarding the pith and skin. Add the slices into the syrup and stir. Leave to cool completely.
  7. Tip the strained yoghurt into a bowl and add the vanilla extract. Sift in the icing sugar and stir everything together until smooth.
  8. To assemble the cake, turn it out of the tin and roughly cover with the sweet labneh. Just before serving, arrange the blood orange slices on top and drizzle the syrup over.

Enjoy!

Orange, Cardamom and White Chocolate Shortbread

Biscuits, Uncategorized

These buttery shortbreads, dipped in white chocolate and flavoured with warming cardamom and citrus, have got me feeling (dare I say it) pretty festive. The format might be a bit retro but there’s something comforting and nostalgic about bedding in with a batch of homemade biscuits and a cup of builder’s tea at this time of year. Give them a try for a quick and easy twist on a classic.

Ingredients (makes 20-24 biscuits)

  • 225g soft butter
  • 100g caster sugar
  • zest 1 orange
  • 150g plain flour
  • 1 1/2 tsp ground cardamom
  • 75g rye flour
  • 100g cornflour
  • Pinch of salt
  • 100g white chocolate
  • 50g pistachios, finely chopped (optional)

Method

  1. Place the butter, sugar and orange zest in a large bowl (or bowl of a stand mixer with paddle attachment) and beat until very light and fluffy. Add in the flours, salt and ground cardamom and beat briefly until the flour is just incorporated and the mix starts to come together in large clumps (it’s important not to over-mix here as beating for too long could result in a tough biscuit which isn’t buttery and short!).
  2. Bring the mix together with your hands and roll out on a floured surface to about 1cm thick. Stamp out biscuits using a cookie cutter (or just slice the dough into squares with a knife) and line up on a lined baking tray. Chill for at least 30 minutes, or until firm. Preheat the oven to 180c.
  3. Once your biscuits have firmed up, bake for 12-15 minutes or until the edges are golden. Leave to cool on a wire rack.
  4. Melt the white chocolate in a heatproof bowl set over a saucepan of simmering water (or melt in the microwave at 30 second increments, stirring between each) then dip each biscuit in, about half way up. Place the dipped biscuits on a piece of greaseproof paper for the chocolate to set and sprinkle with pistachios.

Enjoy!

Craquelin Choux Buns with Honeyed Walnuts, Mascarpone and Orange

Pastry, Uncategorized

A couple of months ago I bought, then promptly forgot about, some delicious pine honey which I intended to use as the central flavour in a pastry-based recipe. Now that it’s been retrieved from the depths of my cupboard it has well and truly fulfilled that destiny in these crisp craquelin choux buns. Simply filled with honeyed orange mascarpone and walnuts (also baked in the honey and a little salt) these make for a delicious treat, but served alongside honey butterscotch sauce and they’re next level- perfect for a fancy Autumnal dessert.

Ingredients

For the craquelin top

  • 55g unsalted butter, cubed, at room temperature
  • 65g soft light brown sugar
  • 65g plain flour

For the choux

  • 85g butter
  • 220ml water
  • 100g plain flour
  • 3 eggs (plus 1 extra for glazing)
  • pinch of salt

For the filling

  • 300g mascarpone
  • 200ml double cream
  • 2tbsp (heaped) good quality honey (I used Greek Pine Honey)
  • Zest of 2 oranges

For the honeyed walnuts

  • 100g walnuts
  • 2tbsp (heaped) good quality honey (as before)
  • good pinch salt

For the sauce (optional)

  • 75ml honey
  • Juice 1/2 orange
  • 25g butter
  • 100ml double cream
  • Generous pinch salt

Method

  1. Start off by making the craquelin topping (when baked, this forms a crispy sweet layer). To do this simply mix the butter, sugar and flour in a large bowl (or in the bowl of a stand mixer with paddle attachment on a slow speed) until it starts to form large lumps, then bring it together with your hands. Place the dough on a large piece of baking paper, top with another piece of baking paper, and roll out to about 3mm thick. Pop this onto a tray and leave in the freezer to solidify.
  2. To make the choux, put the water, butter and salt in a saucepan set over a medium heat (do not let it boil at this stage). Meanwhile, sieve the flour to remove any lumps. When the butter has melted into the water, increase the heat and bring to a rolling boil, then tip in the flour and stir vigorously until you have a smooth paste-like mix which comes away from the edges of the pan. Continue to stir for another minute to cook out the rawness of the flour, then tip into a clean bowl and close cover with cling film (this eggless stage is known as a ‘panade’). Leave to cool to room temperature.
  3. Preheat the oven to 190c. Line 2 large baking trays with greaseproof paper.
  4. Once the panade has cooled it’s time to add the eggs; whisk in a jug to break them up then very gradually add into the panade while beating with electric beaters. Stop adding the egg (you might have a little leftover) when the smooth, lump-free mixture reluctantly drops off the end of a spoon. Pile the choux mix into a piping bag, fitted with a large round nozzle.
  5. Pipe rounds of about 4cm wide onto the prepared baking trays, leaving plenty of room for expansion. Whisk the remaining egg in a bowl and brush a small amount onto each mound, smoothing down the tip. Take your craquelin sheet and stamp out 3cm circles. Place one on top of each choux mound (the egg will help secure it in place). Bake the choux for around 35 minutes, then skewer a small hole in each bun and return to the oven for a further 5 minutes, to dry out the middles. Once baked, they should be crisp and golden brown with a crackled appearance on top. Cool while you make the other elements.
  6. Toss the walnuts in the honey and salt and spread out on a baking tray. Cook for around 10 minutes or until caramelised then set aside to cool. Once cooled, roughly chop.
  7. For the filling, just whisk together the mascarpone, cream, honey and orange zest until light and smooth. Pile into a piping bag. Finally, for the sauce heat the honey and orange juice in a saucepan and simmer for a couple of minutes, add in the butter and stir until it’s melted, then add the cream and salt. Keep gently simmering, stirring occasionally, until slightly thicker (a few minutes should be fine), then set aside.
  8. To assemble the choux buns, slice each one in half and pipe some mascarpone cream into the base. Top with a sprinkling of walnuts and a little sauce, then place the lid on. Serve with some extra sauce.

Enjoy!

Pistachio and Lemon Cake with Raspberry and Rose Cream

Cakes

Bloom and Wild have just released a beautiful range of bouquets for Autumn/Winter, in collaboration with infamous London department store, Liberty. Each bouquet has been artfully designed to reflect some of the most coveted prints in the Liberty archive, from the vintage look 1910 Elysian Day, to the vibrant 60s Ciara. This week marks 5 years of letterbox flowers from Bloom & Wild, and to mark the occasion they asked me to create a very special birthday cake which encapsulates the style of the Bloom and Wild X Liberty collection.

To make this celebratory cake really striking, I’ve decorated it with meadowy blooms and wild greenery from the Rachel Deluxe bouquet, which is inspired by a 1988 Liberty print. To keep things simple but delicious, the sponge I’ve developed is light and zesty, with a hum of pistachio. For the filling I’ve gone with a raspberry and rose cream, in part because the bouquet boasts stunning quicksand roses but also because British raspberries are nearing the end of their season, so we need to make the most of them while we can. To apply the flowers, I trimmed and sealed the stems, then arranged them in as natural a way as possible, staying true to the print. I hope you all like what I came up with and enjoy the recipe- it’s perfect for late summer celebrations!

Ingredients

For the sponges

  • 350g soft unsalted butter
  • 325g golden caster sugar
  • Zest 2 lemons
  • 6 eggs
  • 200g ground pistachios (just blitz 200g shelled pistachios in a food processor until fine)
  • 150g plain flour
  • 2tsp baking powder
  • Pinch salt

For the rose and raspberry cream

  • 400g double cream
  • 200g mascarpone
  • 2-3tbsp rose water (add this in small amounts, tasting between each addition)
  • 2-3tbsp icing sugar (to taste)
  • 200g fresh raspberries, lightly crushed with a fork

To finish (optional)

  • Bloom and Wild Rachael bouquet, or pistachios and crystallised rose petals

Method

  1. Preheat the oven to 170c. Grease and line two 7 inch cake tins.
  2. Place the butter, sugar and lemon zest in a large bowl (or bowl of a stand mixer) and beat until very light, pale and fluffy (this can take about 10 minutes). Add in the eggs, one at a time, beating well between each addition (add a little bit of the flour with each egg if you’re worried about curdling). Once all the eggs are well incorporated, add the rest of the flour, ground pistachios, salt and baking powder and fold in using a large metal spoon.
  3. Once you have a light, lump free cake batter, split between the two tins and level off the tops. Bake for 35-45 minutes or until a skewer comes out clean when inserted.
  4. Once baked, leave the cakes to cool in the tins for 10 minutes, then remove and place on a wire rack to cool completely.
  5. While the cakes are cooling make the filling. To do this simply whisk together the cream, icing sugar, mascarpone and rose water until spreadable. Take 2/3 of this filling and ripple through the raspberries. Put the remaining 1/3 to the side (this is for coating the outside of the cake).
  6. When you cakes are completely cool, slice in half horizontally so that you have four even layers. Place the first layer on your serving plate and spread over 1/3 of the raspberry cream, then repeat until you’ve stacked all four.
  7. Take the remaining rose cream and spread a very thin layer over the cake to seal in any crumbs. Chill for 10 minutes to firm up a little, then cover with the last bit of rose cream (use a palette knife or cake scraper to do this). This stage is optional, you can leave the sides bare if you like.
  8. To finish the cake, arrange fresh flowers all over the top (ensuring that you seal any ends and remove them from the cake before consumption!). Alternatively, decorate with lemon zest, pistachios and rose petals.

Enjoy!


Triple Chocolate Rye, Walnut and Espresso Cookies

Biscuits

I’ve tweaked and tested this recipe at least four times over the past month *woe is me*, and am at last at the point where I’m completely happy with the outcome. Technique-wise I’ve actually harked back to one of my original cookie recipes which I posted about four years ago- it’s so simple and calls for a good old mixing bowl and wooden spoon, but delivers that chewy, crinkly texture which just can’t be rivalled. In terms of ingredients I’ve used a combination of rye and plain flour, three types of chocolate (duh), walnuts and a good dose of espresso; the resulting flavour is well balanced and borderline addictive, so proceed with caution (not actually, definitely give them a go).

Ingredients

  • 150g plain flour
  • 125g rye flour
  • 1tsp bicarbonate of soda
  • Pinch salt
  • 1tbsp instant coffee (ground to a very fine powder)
  • 150g unsalted butter
  • 150g dark brown soft sugar
  • 150g golden caster sugar
  • 1 egg plus 1 egg yolk
  • 75g walnuts, coarsely chopped
  • 100g dark chocolate, coarsely chopped
  • 100g milk chocolate, coarsely chopped
  • 100g white chocolate, coarsely chopped

Method

  1. Preheat the oven to 180c. Line two large trays with baking paper.
  2. Place the plain flour, rye flour, bicarbonate of soda and salt in a large bowl and roughly mix together with a wooden spoon. Add the instant coffee, butter and sugars to a saucepan and gently melt over a medium heat, stirring occasionally.
  3. Once the ingredients have melted together, set aside to cool slightly then add in the egg and egg yolk and whisk briefly to combine.
  4. Pour the wet ingredients into the dry and mix together with a wooden spoon to form a soft cookie dough. Tip in the chocolate and walnuts into the bowl and mix to evenly distribute them through the dough. Chill the dough for at least 1 hour.
  5. Using an ice cream scoop, form balls of cookie dough and line onto the baking trays (leaving lots of space for spreading). You will need to do this in batches (unless you have a huge oven and lots of trays!).
  6. Bake the cookies for 10-12 minutes then set aside. They will be very soft when you get them out of the oven, but don’t worry, they’ll set up a little. Leave to cool and serve.

Enjoy!

Brown Butter, Pecan and White Chocolate Brownies (GF)

Chocolate, Uncategorized

If you do one thing this weekend, make these brownies; with brown butter delivering a deep nutty flavour, pecans adding a welcome crunch and dark brown sugar leaving you with a molasses hit, they 100% deliver on flavour and texture and are perhaps the most delicious brownies I’ve made to date (drops mic) (cringes).

Ingredients (makes 9-12 brownies)

  • 250g butter, cubed
  • 250g dark chocolate
  • 100g dark brown soft sugar
  • 100g golden caster sugar
  • 3 eggs, plus 1 egg yolk
  • large pinch sea salt
  • 100g gluten free plain flour (I used Doves Farm)
  • 100g chopped pecans
  • 75g chopped white chocolate
  • 75g chopped milk chocolate

Method (makes 9-12 brownies, depending on how hungry you are)

1) Preheat the oven to 180c. Grease and line a 22x22cm brownie tray.

2) Place the cubed butter in a saucepan and melt over a medium heat. Once completely melted, up the heat and allow the butter to foam until it smells nutty and reaches a deep golden colour. At this stage, remove from the heat and add in the chopped dark chocolate. Let it sit for a couple of minutes then stir briefly to create a smooth glossy mix. Set aside to cool a little.

3) While the chocolate mixture cools, place the sugars, salt, eggs and egg yolk in a stand mixer (or in a large bowl) and beat until very light and voluminous (it will pretty much double in size). This stage is well worth the effort- it will give you that classic cracked top.

4) Once the egg mixture is ready, pour the chocolate mix down the side of the bowl and fold in using a large metal spoon. Add the gluten free flour and do the same until you have a smooth, lump free batter. Now add the chocolate chunks and pecans and stir through to evenly distribute.

5) Tip the mix into the prepared tin and level off. Bake for 25-30 minutes.

6) When it’s ready, the brownie will have a flaky crisp top but will still be gooey and moist on the inside. Set aside to cool (completely) in the tin then remove, slice up and serve.


Dark Chocolate and Salted Tahini Cookies

Biscuits

Tahini, a thick sesame paste commonly used in Middle Eastern cooking, is my go to ingredient for when I want to  add a deep, nutty and slightly bitter flavour to a dish. I don’t usually think of incorporating tahini into my baking (for some unknown reason), and more often than not I’ll just pop it into baba ganoush, add it into a yoghurt dressing or drizzle it neat over slow cooked lamb and roasted roots to balance out a sweet date syrup glaze. This being said, yesterday I fancied making some cookies (someone put a stop to my wild and spontaneous lifestyle please…) and decided to bring tahini into the mix alongside sea salt and rich dark chocolate- the major players in my cookie game. The resulting cookies are absolutely delicious with a good balance of sweet, savoury, nutty and salty flavours; one hundred percent give the recipe a go, it’s a real winner.

Ingredients

  • 115g tahini
  • 110g unsalted butter
  • 125g caster sugar
  • 150g dark brown soft sugar
  • 2 eggs
  • 1tsp bicarbonate of soda
  • 2tsp sea salt
  • 300g plain flour
  • 300g coarsely chopped dark chocolate, plus 50g extra for decoration (optional)
  • 2tbsp toasted sesame seeds (optional)

Method

  1. Preheat the oven to 180c. Line 3 large baking trays with greaseproof paper.
  2. Place the butter, tahini and both sugars in a large bowl (or bowl of a stand mixer) and beat until light and fluffy. Add in the eggs one at a time, beating well between each addition. If the mix curdles or you’re worried about curdling, add 2tbsp of the flour with each egg.
  3. Once the eggs are well incorporated add the bicarbonate of soda, salt and flour then mix to combine. Finally, add in the coarsely chopped chocolate and very briefly mix once more just to distribute through the dough.
  4. Pop the dough in the fridge for half an hour to firm up a little, then line even balls onto the prepared trays leaving room for spreading (I like to use an ice cream scoop for this). Bake for 12-15 minutes or until the edges of the cookies are turning a light golden colour but the middles are still very soft (they will firm up during cooling).
  5. To finish the cookies melt the additional dark chocolate and drizzle over the tops, then sprinkle with toasted sesame seeds.

Enjoy!

Peach and Blueberry Hazelnut Crumble Cake

Cakes, Uncategorized

Peach puree and ground hazelnuts run through this cake batter, giving it a distinctly fruity flavour and very moist crumb. I love the added nuttiness wholemeal flour brings to the end result too and think it works really well served with a tangy creme fraiche and drizzle of local honey.

Ingredients (serves 10-12):

For the crumble topping:

  • 100g plain flour
  • 50g caster sugar
  • 85g hazelnuts, chopped
  • 75g butter, melted

For the cake:

  • zest 1 lemon
  • 225g soft butter
  • 175g caster sugar
  • 3 eggs
  • 400g ripe peaches, blitzed into a chunky puree
  • 200g wholemeal self raising flour
  • 1tsp baking powder
  • pinch salt
  • 100g finely chopped hazelnuts
  • 1 peach, finely sliced
  • large handful blueberries

To serve:

  • dollop creme fraiche or greek yoghurt
  • drizzle of honey

Method:

  1. Preheat the oven to 160c (325f/gas mark 3). Grease and line a 9inch spring form cake tin.
  2. Before you worry about the cake batter, make the crumble topping. To do this simply stir together the flour, sugar, hazelnuts and butter until you have a rough crumbly consistency. Set aside for later.
  3. Now it’s time for the cake. In a large bowl (or bowl of a stand mixer with paddle attachment) cream together the butter, sugar and lemon zest until light and fluffy. Whisk the pureed peaches and eggs in a jug and add to the creamed mixture in three additions, beating well between each. The mixture may curdle so add a small amount of flour occasionally to bring it back (don’t worry too much about this, the batter comes together nicely in the end and the cake is always moist and delicious!).
  4. Once the eggs and peaches have been incorporated into the butter and sugar, fold in the remaining flour, blitzed hazelnuts, baking powder and salt. Scrape the mix into the prepared cake tin and level out. Arrange the peach slices on top in a pattern then sprinkle over the blueberries and hazelnut crumble.
  5. Bake for 1 hour or until a skewer comes out clean with just a few moist crumbs attached. Serve with creme fraiche.

Enjoy!