Coffee Halva, Pear and Walnut Loaf Cake with Salted Tahini Butter

Cakes

It’s no secret that I love anything laden with sesame, so was thrilled when Sesame Kingdom sent me some of their delicious coffee halva, halva spread and tahini. I’m going to incorporate each of the products into a bake, and thought I’d start off with the halva, which I’ve used in brownies, ice cream and chocolate cakes before. I thought this time it made sense to try it out with some seasonal fruit and nuts and it works really well in this understated loaf format (especially warm, thickly sliced and smothered in salted tahini butter!).

Ingredients

  • 175g soft unsalted butter
  • 100g light brown soft sugar
  • 75g golden caster sugar
  • 3 eggs
  • 2tbsp instant coffee, dissolved in 2tbsp just-boiled water
  • 175g self raising flour
  • pinch salt
  • 75g walnuts
  • 2 Conference pears, peeled and diced
  • 150g coffee halva, mine was by Sesame Kingdom (plain would work too)

For the tahini butter

  • 75g butter
  • 75g tahini
  • large pinch salt

Method

  1. Preheat the oven to 170c. Grease and line a large loaf tin. 
  2. Place the butter and both sugars in a large bowl (or bowl of a stand mixer with paddle attachment) and cream together until pale and fluffy. Add in the eggs one at a time, beating well between each addition and adding a small amount of the flour if the mix looks like it may curdle. 
  3. Fold in the remaining flour, salt and coffee using a large metal spoon. Add 2/3 of the walnuts and pear pieces and fold again. Scrape half of the batter into the tin then sprinkle over half of the halva. Add the remaining batter then top with the last of the halva, walnuts and pear pieces.
  4. Bake for 34-40 minutes or until a skewer comes out clean when inserted.
  5. Beat the butter, salt and tahini together until light. Serve the loaf warm with a generous helping of tahini butter.


Advertisement

Classic Chocolate Fudge Cake (Gluten Free)

Cakes, Uncategorized

I can never understand why gluten free options are, not always but so often, dry, dense and disappointing. I’m not a coeliac myself and am not a fan of demonising gluten, however, if you are genuinely unable to enjoy it then I’m a firm believer that there should and can be delicious alternatives! This cake is the first of many gluten free versions of classic baking staples I’m planning, and seriously, it’s so moreish it brings a tear to my eye (deeply melodramatic but you get the message).

Ingredients

For the cakes (makes one 7-8 inch sandwich cake)

  • 200g ground almonds
  • 1tsp bicarbonate of soda
  • generous pinch salt
  • 175ml boiling water
  • 2tsp instant coffee
  • 80g cocoa powder
  • 300g golden caster sugar
  • 5 eggs
  • 225ml vegetable oil

For the ganache 

  • 300ml double cream
  • 200g 70% dark chocolate
  • 100g mik chocolate

Method

  1. Preheat the oven to 180c. Grease and line two 7-8 inch cake tins.
  2. Stir the almonds, bicarbonate of soda and salt together in a small bowl. Mix the cocoa, coffee and boiling water together in a jug until smooth and set aside.
  3. Beat the eggs, oil and sugar in a large mixing bowl (or in a stand mixer with paddle attachment) until pale and thick.
  4. Add the cocoa mix and continue whisking until you have a fairly liquid cake batter with no streaks. Add the almond mixture down the side of the bowl and fold in gently.
  5. Split the batter between the two tins and bake for 35-45 minutes until a skewer comes out with only a few moist crumbs attached.
  6. While the cake is baking, make the ganache. Finely chop the chocolate and pop it in a heatproof bowl. Meanwhile, pour the cream into a saucepan and set over a medium heat. When it reaches scalding point (just before a simmer), take off the heat and pour directly over the chocolate. Let it sit for a couple of minutes, then stir to create a smooth, glossy ganache. Allow this to cool and thicken to a spreadable consistency (15 minutes in the fridge once cooled to room temperature helps achieve this).
  7. Once the cakes are baked leave to cool in the tins for 10 minutes before transferring to a wire rack.
  8. To assemble your cake, level off your cakes if necessary, then fill and cover with ganache.

Enjoy!

Salted Chocolate Cake with Coffee Mascarpone & Hazelnut Praline Caramel

Cakes

I made this cake last weekend for my Dad’s birthday and it went down a storm. Granted, the flavours aren’t subtle and it’s not for the faint hearted (which neatly mirrors my Dad’s personality actually), but the punchy combination of bitter coffee, nutty hazelnut, rich but surprisingly light chocolate sponge and salted milk chocolate ganache just work (duh- that amount of cream, sugar, salt and chocolate is always going to be delicious).

Ingredients (serves 12-14)

For the hazelnut praline caramel

  • 100g blanched hazelnuts, toasted
  • 100g caster sugar
  • 100ml double cream
  • Generous pinch sea salt

For the sponges

  • 375g plain flour
  • 300g caster sugar
  • 85g cocoa powder
  • 2tsp baking powder
  • 2tsp bicarbonate of soda
  • large pinch sea salt
  • 3 eggs
  • 325ml milk
  • 175ml vegetable oil
  • 2tsp vanilla extract
  • 100g dark chocolate
  • 325ml just boiled water
  • 2tsp instant coffee

For the salted milk chocolate ganache

  • 200g milk chocolate
  • 75g dark chocolate
  • 275ml double cream
  • Generous pinch sea salt

For the coffee mascarpone filling

  • 2tbsp instant coffee
  • 2tbsp caster sugar
  • 200g mascarpone
  • 100ml double cream

  1. Start off by making the hazelnut praline caramel.To do this simply place the caster sugar in a heavy bottom pan over a medium heat and swirl the pan until it melts. Once melted, up the heat until the sugar reaches a deep golden brown. At this stage add the toasted hazelnuts, stir to coat then tip onto a baking paper lined baking tray. Leave to set hard, then blitz into a paste. Set aside. Pour the cream into a saucepan and gently heat. Once the cream is gently simmering add in the praline paste and stir to create a caramel. Cook down for a few minutes until thickened, then set aside to cool.
  2. Preheat the oven to 170c. Grease and line two 8 inch baking tins. Melt the dark chocolate in a heatproof bowl set over a pan of simmering water (or in the microwave in short stints, stirring often). Set aside.
  3. In a large bowl stir together the flour, caster sugar, cocoa powder, baking powder, bicarbonate of soda and salt. In a jug, lightly whisk the eggs, milk, vegetable oil and vanilla extract. Make a well in the dry ingredients and pour the contents of the jug into it. Stir the wet and dry ingredients together until well combined then add the melted chocolate and stir again (I just use a balloon whisk for this- nothing electric is required as you don’t need to incorporate much air).
  4. Pour your just boiled water over the instant coffee granules and once they’ve dissolved, gradually add to the chocolate batter, stirring gently with your whisk as you go. The final cake batter will be very thin but don’t worry, it bakes beautifully.
  5. Split the mix evenly between the prepared tins and bake for 45-55 minutes (until a skewer comes out clean with a few moist crumbs attached). Once baked leave to cool completely in the tins.
  6. While the cakes are cooling make the ganache. Chop the chocolate into small pieces and place in a heatproof bowl. Heat the cream in a saucepan until it meets scalding point then pour over the chocolate. Allow the cream to melt the chocolate for a few minutes then stir until smooth and glossy. Add salt to taste then set aside to cool.
  7. For the coffee mascarpone crush the coffee into a fine powder then just whisk together all the ingredients until smooth.
  8. When all the elements are cool you’re ready to assemble the cake. Your cakes will probably have a domed top, so trim these off then divide each one into two even layers (leaving you with 4 layers overall).
  9. Scrape the hazelnut praline caramel into a piping bag. Split the mascarpone into thirds. Spread one third of the mascarpone over the first sponge layer then pipe over a third of the caramel in a zigzag (so that each slice will have some caramel inside!). Repeat this step until you’ve used up the sponges, then rustically cover the whole cake in the thickened ganache.
  10. Garnish with edible dried flower petals.

Pumpkin and Pecan Brown Butter Cake with Bourbon Caramel Icing

Cakes

Make the most of squash season with an ode to the Autumn months; made up of heavily spiced pumpkin and brown butter layers, smooth bourbon-laced caramel cream cheese icing and a slightly salty crunch of pecan brittle, this cake is absolutely delicious and marries together some of my favourite flavours.

Ingredients (serves 10-12)

For the bourbon caramel

  • 200g caster sugar
  • 50ml water
  • 100ml double cream
  • 1-2tbsp bourbon ( spiced rum would also work, or feel free to omit the alcohol)
  • pinch sea salt

For the cake

  • 250g butter, cubed
  • 4 eggs
  • 200g caster sugar
  • 50g soft light brown sugar
  • 225g plain flour
  • 1tsp bicarbonate of soda
  • 2tsp baking powder
  • large pinch salt
  • 1tsp ground ginger
  • 1tsp cinnamon
  • 1tsp ground cardamom
  • 1tsp mixed spice
  • 450g grated pumpkin (alternatively, you could use carrot or squash)
  • 75g sultanas
  • zest 1 lemon
  • 100g pecans, roughly chopped

For the icing

  • 250g mascarpone
  • 250g full fat cream cheese
  • the bourbon caramel

For decoration (optional)

  • pecan praline (to make this melt 100g caster sugar in a pan until golden, then add 75g pecans, stir to coat and set on a piece of baking paper- once set, crush up)
  • thyme sprigs

Method

  1. Start off by making the caramel. To do this place the water and sugar in a saucepan set over a gentle heat; do not stir, but swirl the pan occasionally to encourage the sugar to dissolve. Once the sugar has dissolved and you have a clear syrup, increase the heat and boil until it turns golden brown. At this stage add the double cream and stir, then pour in the bourbon and stir again. Continue to stir on the heat for another couple of minutes, then set aside and add the salt to taste. Leave to cool completely.
  2. Preheat the oven to 170c. Grease and line two 8 inch cake tins with baking paper. Place the butter in a saucepan and leave to melt and bubble until it starts to brown and smell nutty. Set aside to cool.
  3. Once the butter has cooled put it in a large bowl (or bowl of a stand mixer with paddle attachment) along with the sugars and egg and mix until pale and thick (about 5 minutes). Beat in the flour, bicarbonate of soda, salt, baking powder and spices and stir until just combined. Stir through the pumpkin, sultanas, lemon zest and pecans. Split the batter between the cake tins and bake for 30-40 minutes or until a skewer comes out clean when inserted.
  4. Leave the cakes to cool completely in the tins. Meanwhile, make the icing by simply whisking together the mascarpone, cream cheese and caramel until smooth. Pile into a piping bag fitted with a round nozzle.
  5. Once the cakes are completely cool, remove from the tins and slice in half horizontally (leaving you with 4 layers). Pipe the icing in little mounds over the whole surface area of the first layer, then stack up the remaining layers, repeating the piping as you go. Decorate the top with pecan praline and thyme.

Enjoy!

Blackberry, Hazelnut and Lavender Honey Celebration Cake

Cakes, Uncategorized

This cake, decorated with whimsical blooms from the Eloise bouquet by Bloom and Wild, is made up of four layers of moist hazelnut sponge soaked in lavender honey syrup, filled with a fresh blackberry compote and covered in delicately flavoured lavender mascarpone cream. The bouquet is inspired by a summer meadow, so it seemed only right to pick out some of my favourite ingredients the British countryside has to offer for this recipe; together the balance of nutty, floral and fruity flavours are delicious. Try this one out in August/September for a really special seasonal centre piece.

Ingredients

For the lavender honey syrup (this is used to soak the sponges and flavour the mascarpone icing)

  • 100ml runny honey
  • 75ml water
  • 4 sprigs fresh lavender or 1tbsp dried lavender

For the blackberry compote

  • 400g fresh blackberries
  • 3tbsp runny honey
  • Zest and juice 1 lemon

For the hazelnut sponges

  • 350g soft unsalted butter
  • 325g light brown soft sugar
  • 6 eggs
  • 200g ground hazelnuts (to make these just blitz 200g blanched hazelnuts in a food processor until fine)
  • 150g plain flour
  • 2tsp baking powder
  • Pinch salt

For the lavender mascarpone cream

  • 3-4tbsp of the lavender honey
  • 350ml double cream
  • 300ml mascarpone

To garnish (optional)

  • The Eloise bouquet by Bloom and Wild
  • Fresh blackberries
  • Crushed and toasted hazelnuts

Method

  1. Start by making the lavender honey (to give it time to develop in flavour). To do this just place the honey, water and lavender (whichever sort you’re using) in a saucepan and gently heat until the honey has dissolved into the water. Once this has happened, simmer for 2 minutes then set aside and leave to infuse until required
  2. Now make the blackberry compote by gently heating the blackberries, honey, lemon zest and juice in a saucepan. Stir occasionally, until the blackberries release their juices and reduce down to form a compote consistency. Set aside to cool.
  3. Preheat the oven to 180c. Grease and line two 8 inch cake tins.
  4. Place the softened butter and sugar in a large bowl (or bowl of a stand mixer) and beat until very light and fluffy (about 5 minutes). Add the eggs, one at a time, beating very well between each addition (add a tablespoon of the flour each time to prevent curdling). Once all the eggs are well incorporated, fold in the ground hazelnuts, remaining flour, baking powder and salt with a large metal spoon.
  5. Divide the mix between the prepared tins and level the tops. Bake for 35-40 minutes (or until well risen and a skewer comes out clean when inserted). Once baked, prick the surfaces of the cakes with a fork and spoon over 3-4tbsp of the lavender honey syrup, then leave to cool completely in the tins.
  6. While the cakes are cooling, make the lavender mascarpone cream. Put all the ingredients in a large bowl (or bowl of a stand mixer) and whisk until thick and spreadable. Scrape half the mixture into a piping bag. Now you’re ready to assemble the cake (providing all your elements are completely cool!).
  7. To put the cake together, slice the sponges in half horizontally (so you have four even layers). Place the first layer down on your chosen plate and pipe a thick ring of mascarpone cream around the edge, then fill the middle with one third of the blackberry compote and repeat this until you’ve stacked up all four layers. With the remaining mascarpone cream, cover the cake and smooth with a palette knife. Decorate with blooms from the Eloise bouquet or freestyle with hazelnuts, fresh blackberries and lavender.

Enjoy!

Gooseberry and Lemon Cake with Elderflower Mascarpone

Cakes, Uncategorized

Light, buttery sponge flavoured with lemon, tart pockets of soft, juicy gooseberries, and a generous swirl of elderflower mascarpone make up this simple summer cake and ode to the British countryside.

Ingredients

  • 225g butter, softened
  • 225g caster sugar
  • zest 2 lemons
  • 1tsp vanilla extract
  • 4 eggs
  • 225g self raising flour
  • 75g ground almonds
  • 1tsp baking powder
  • 250g gooseberries (blueberries, blackberries or raspberries would also work well)
  • 200g mascarpone
  • 3tbsp elderflower cordial
  • 1tbsp honey

Method

  1. Preheat the oven to 180c. Grease and line a 9 inch cake tin.
  2. Place the butter, sugar, lemon zest and vanilla in a large bowl (or bowl of a stand mixer with paddle attachment) and beat until very light, pale and fluffy. Add the eggs, one at a time, beating well between each addition. Add a little flour if you’re worried about curdling.
  3. Once all the eggs are well incorporated, fold in the flour, ground almonds and baking powder. Trim the tops and stalks of the gooseberries then fold them through the cake batter.
  4. Scrape the cake batter into the prepared tin and level off the top. Bake for 35-40 minutes or until the cake is springy and golden (or until a skewer comes out clean when inserted). Once baked, leave the cake to cool completely in the tin.
  5. Meanwhile, whisk together the mascarpone, elderflower and honey. When the cake is cool, swirl the mascarpone over the cake and decorate with fresh flowers.

Enjoy!

Blood Orange and Ginger Celebration Cake

Cakes

This ode to the fruits of winter will brighten any grey day with it’s sticky layers of spiced sponge, fresh ginger mascarpone cream and smooth blood orange curd. Decorate with pomegranate seeds, candied blood orange slices and chopped pistachios for a welcome explosion of colour during these colder months.

Ingredients

For the cake

  • 250g golden syrup
  • 3 tbsp ginger syrup
  • 190g butter
  • 3-4 lumps stem ginger, diced
  • 175g dark brown soft sugar
  • zest 1 orange
  • 375g self-raising flour
  • 2tsp ground ginger
  • 1tsp ground cinnamon
  • 1 1/2 tsp bicarbonate of soda
  • a pinch of salt
  • 3 eggs
  • 260ml milk

For the blood orange curd

  • juice and zest 2 blood oranges
  • juice and zest 1 lemon
  • 2 eggs
  • 2 egg yolks
  • 100g caster sugar
  • 100g butter, cubed

For the ginger mascarpone cream

  • 1tbsp icing sugar
  • 1tbsp ginger syrup
  • 300ml double cream
  • 250g mascarpone

Garnish ideas (optional)

  • pomegranate seeds
  • chopped pistachios
  • candied orange slices
  • shards of tuile or ginger biscuit

Method

  1. Start off with the ginger cake. Grease and line two 7 inch cake tins and preheat the oven to 180c.
  2. Place the golden syrup, ginger syrup, butter, diced stem ginger, dark brown sugar and orange zest in a saucepan and melt over a low/medium heat. Once the ingredients are melted bring to the boil and leave to bubble for about a minute, then set aside to cool a little.
  3. Meanwhile, in a large bowl stir together the flour, ginger, cinnamon, bicarbonate of soda and salt. Make a large well in the centre and tip in the melted butter mixture. Whisk the wet and dry ingredients together until smooth and flour lump free. In a jug whisk the eggs and milk together with a fork and add those into the mixing bowl. Whisk once more to combine then split the batter between the prepared cake tins.
  4. Bake for 30-35 minutes or until a skewer comes out clean when inserted.
  5. While the cakes are baking make the blood orange curd. To do this simply place the blood orange zest and juice, lemon zest and juice, eggs and egg yolks and caster sugar into a heatproof bowl. Whisk together to combine then set over a pan of simmering water (without the water touching the bowl). Add the butter cubes one at a time, constantly whisking. Once all the butter has been added and is melted, continue to whisk until the curd has thickened to a coating consistency (this will take between 5-10 minutes). Once the curd is ready, set aside to cool in a clean bowl with cling film flat across the surface (this will prevent a skin from forming).
  6. When the cakes are ready leave them to cool completely in the tins. Once cool, even the tops off if necessary then slice each horizontally (so you are left with 4 even cake layers).
  7. Now make the mascarpone cream; tip the double cream, icing sugar, ginger syrup and mascarpone into a bowl (or bowl of a stand mixer) and whisk until thickened and smooth.
  8. Once all your components are cool it’s time to assemble the cake. Place one layer on your chosen serving plate and pipe dots of mascarpone cream around the edge then fill the centre with blood orange curd. Repeat until you’ve used up the cake layers and decorate the top as desired.


Enjoy!

Rhubarb and Ginger Cake with Cardamom Creme Fraiche

Cakes

It’s hardly surprising that a combination of some of my very favourite ingredients (brilliant pink forced rhubarb, fiery stem ginger and warming cardamom) have married together to form my perfect cake (aside from fudgy, rich chocolate cake- that space in my heart will never be replaced). The recipe is super easy and the result is a moist, fruity bake packed full of flavour. Serve up with pistachio praline and additional poached rhubarb to brighten up the miserable grey that is January…

Ingredients (serves 8-12)

For the cake

  • 250g self-raising flour
  • 2tsp ground ginger
  • 1tsp ground cinnamon
  • 1tsp bicarbonate of soda
  • pinch salt
  • 175g golden syrup
  • 3tbsp ginger syrup (from a stem ginger jar)
  • 125g butter
  • 4 balls stem ginger, diced
  • 125g dark soft brown sugar
  • 2 eggs
  • 250ml milk
  • 200g forced rhubarb

For the cardamom creme fraiche

  • 300ml creme fraiche
  • 10 cardamom pods, seeds removed and ground to a fine powder
  • 1tbsp icing sugar

Optional extras

  • poached rhubarb pieces (just pop 125ml water and 125g caster sugar in a saucepan and heat to melt the sugar- once it’s dissolved, bring to the boil and add 200g sliced rhubarb. Remove from the heat and leave for 5 minutes or until the rhubarb is tender but not mushy, then drain and use as desired)
  • pistachio praline (put 100g caster sugar in a heavy bottom pan and leave it to melt, swirling occasionally. Once completely melted add in 100g pistachios and swirl until the syrup has reached a deep golden colour. Scrape onto some greaseproof paper to set hard then break into a mixer, blitz and use as desired)

Method

  1. Preheat the oven to 180c. Grease and line a 20cm cake tin.
  2. Stir together the flour, ginger, cinnamon, bicarbonate of soda and salt in a large bowl. In a saucepan melt together the golden syrup, ginger syrup, butter, diced stem ginger and sugar. Bring to the boil for a minute then make a well in the dry ingredients and add the melted mixture. Stir together to eliminate any lumps then whisk the eggs and milk in a jug and add those in too and beat once more.
  3. Slice the rhubarb into 2 inch lengths and stir through, then tip the batter into the prepared tin (the mix is quite loose but don’t worry, it bakes beautifully and the rhubarb levels out within the cake during baking and doesn’t end up sinking to the bottom!)
  4. Bake for 1 hour- 1 hour 10 minutes or until the cake has reached a deep golden colour and a skewer comes out clean when inserted (it’s quite a long cooking time but this is necessary as there is a fair amount of liquid in the fruit- if the cake starts colouring a little too much before it’s cooked through, just cover it in foil for the remaining cooking time).
  5. While the cake is baking make the cardamom creme fraiche topping. To do this simply whisk together the creme fraiche, ground cardamom and icing sugar.
  6. Once your cake is baked, allow it to cool completely in the tin before removing it and presenting it on your chosen plate. Dollop on the creme fraiche just before serving and decorate with rhubarb and pistachios. I like to be quite free with this presentation but you can make yours more refined if you like.

Enjoy!

Orange, Parsnip and Ginger Cake

Cakes

Don’t be put off by the inclusion of parsnips in this recipe; they’re deliciously sweet root vegetables which work in the same way as carrots when baked alongside nuts, sugar and spice. I’ve filled and topped this cake with refreshing ginger mascarpone which acts as the perfect contrast to the spiced walnut, parsnip and orange sponge.

Ingredients

For the cake:

  • 4 eggs
  • 200g caster sugar
  • 50g light brown soft sugar
  • 300ml sunflower oil
  • 225g plain flour
  • 2tsp baking powder
  • 1 1/2 tsp bicarbonate of soda
  • large pinch salt
  • 2tsp ground ginger
  • 1tsp cinnamon
  • 1/2 grated nutmeg (fresh)
  • 450g grated parsnip
  • 100g sultanas
  • zest 2 oranges
  • 175g chopped walnuts

For the ginger mascarpone:

  • 450g mascarpone
  • 3tbsp ginger syrup
  • 2-3tbsp icing sugar
  • 100ml double cream

For decoration:

  • 3 stem ginger balls, diced
  • 50g chopped and toasted walnuts
  • a little caramel sauce (optional)

Method

  1. Preheat the oven to 180c. Grease and line two 8 inch cake tins.
  2. Place the eggs, sugars and oil in a large bowl (or bowl of a stand mixer) and beat until pale and thick. Stir together the plain flour, baking powder, bicarbonate of soda, salt, ginger, cinnamon and nutmeg in another bowl then add to the egg mixture and beat briefly to throughly combine. Stir in the grated parsnip, sultanas, orange zest and walnuts.
  3. Split the cake batter evenly between the two prepared tins and level off. Bake for 45-55 minutes or until a skewer comes out clean when inserted. Once baked, leave the cakes to cool in the tins.
  4. While the cakes are cooling, make the ginger mascarpone. To do this simply whisk together all the ingredients until smooth.
  5. To assemble the cake spread a generous layer of ginger mascarpone over the first sponge, sandwich on the second then spread over the remaining mascarpone. Top with stem ginger pieces, chopped walnuts and caramel sauce, if you like.

Enjoy!

Sticky Fig Cake with Pistachio Praline

Cakes, Uncategorized

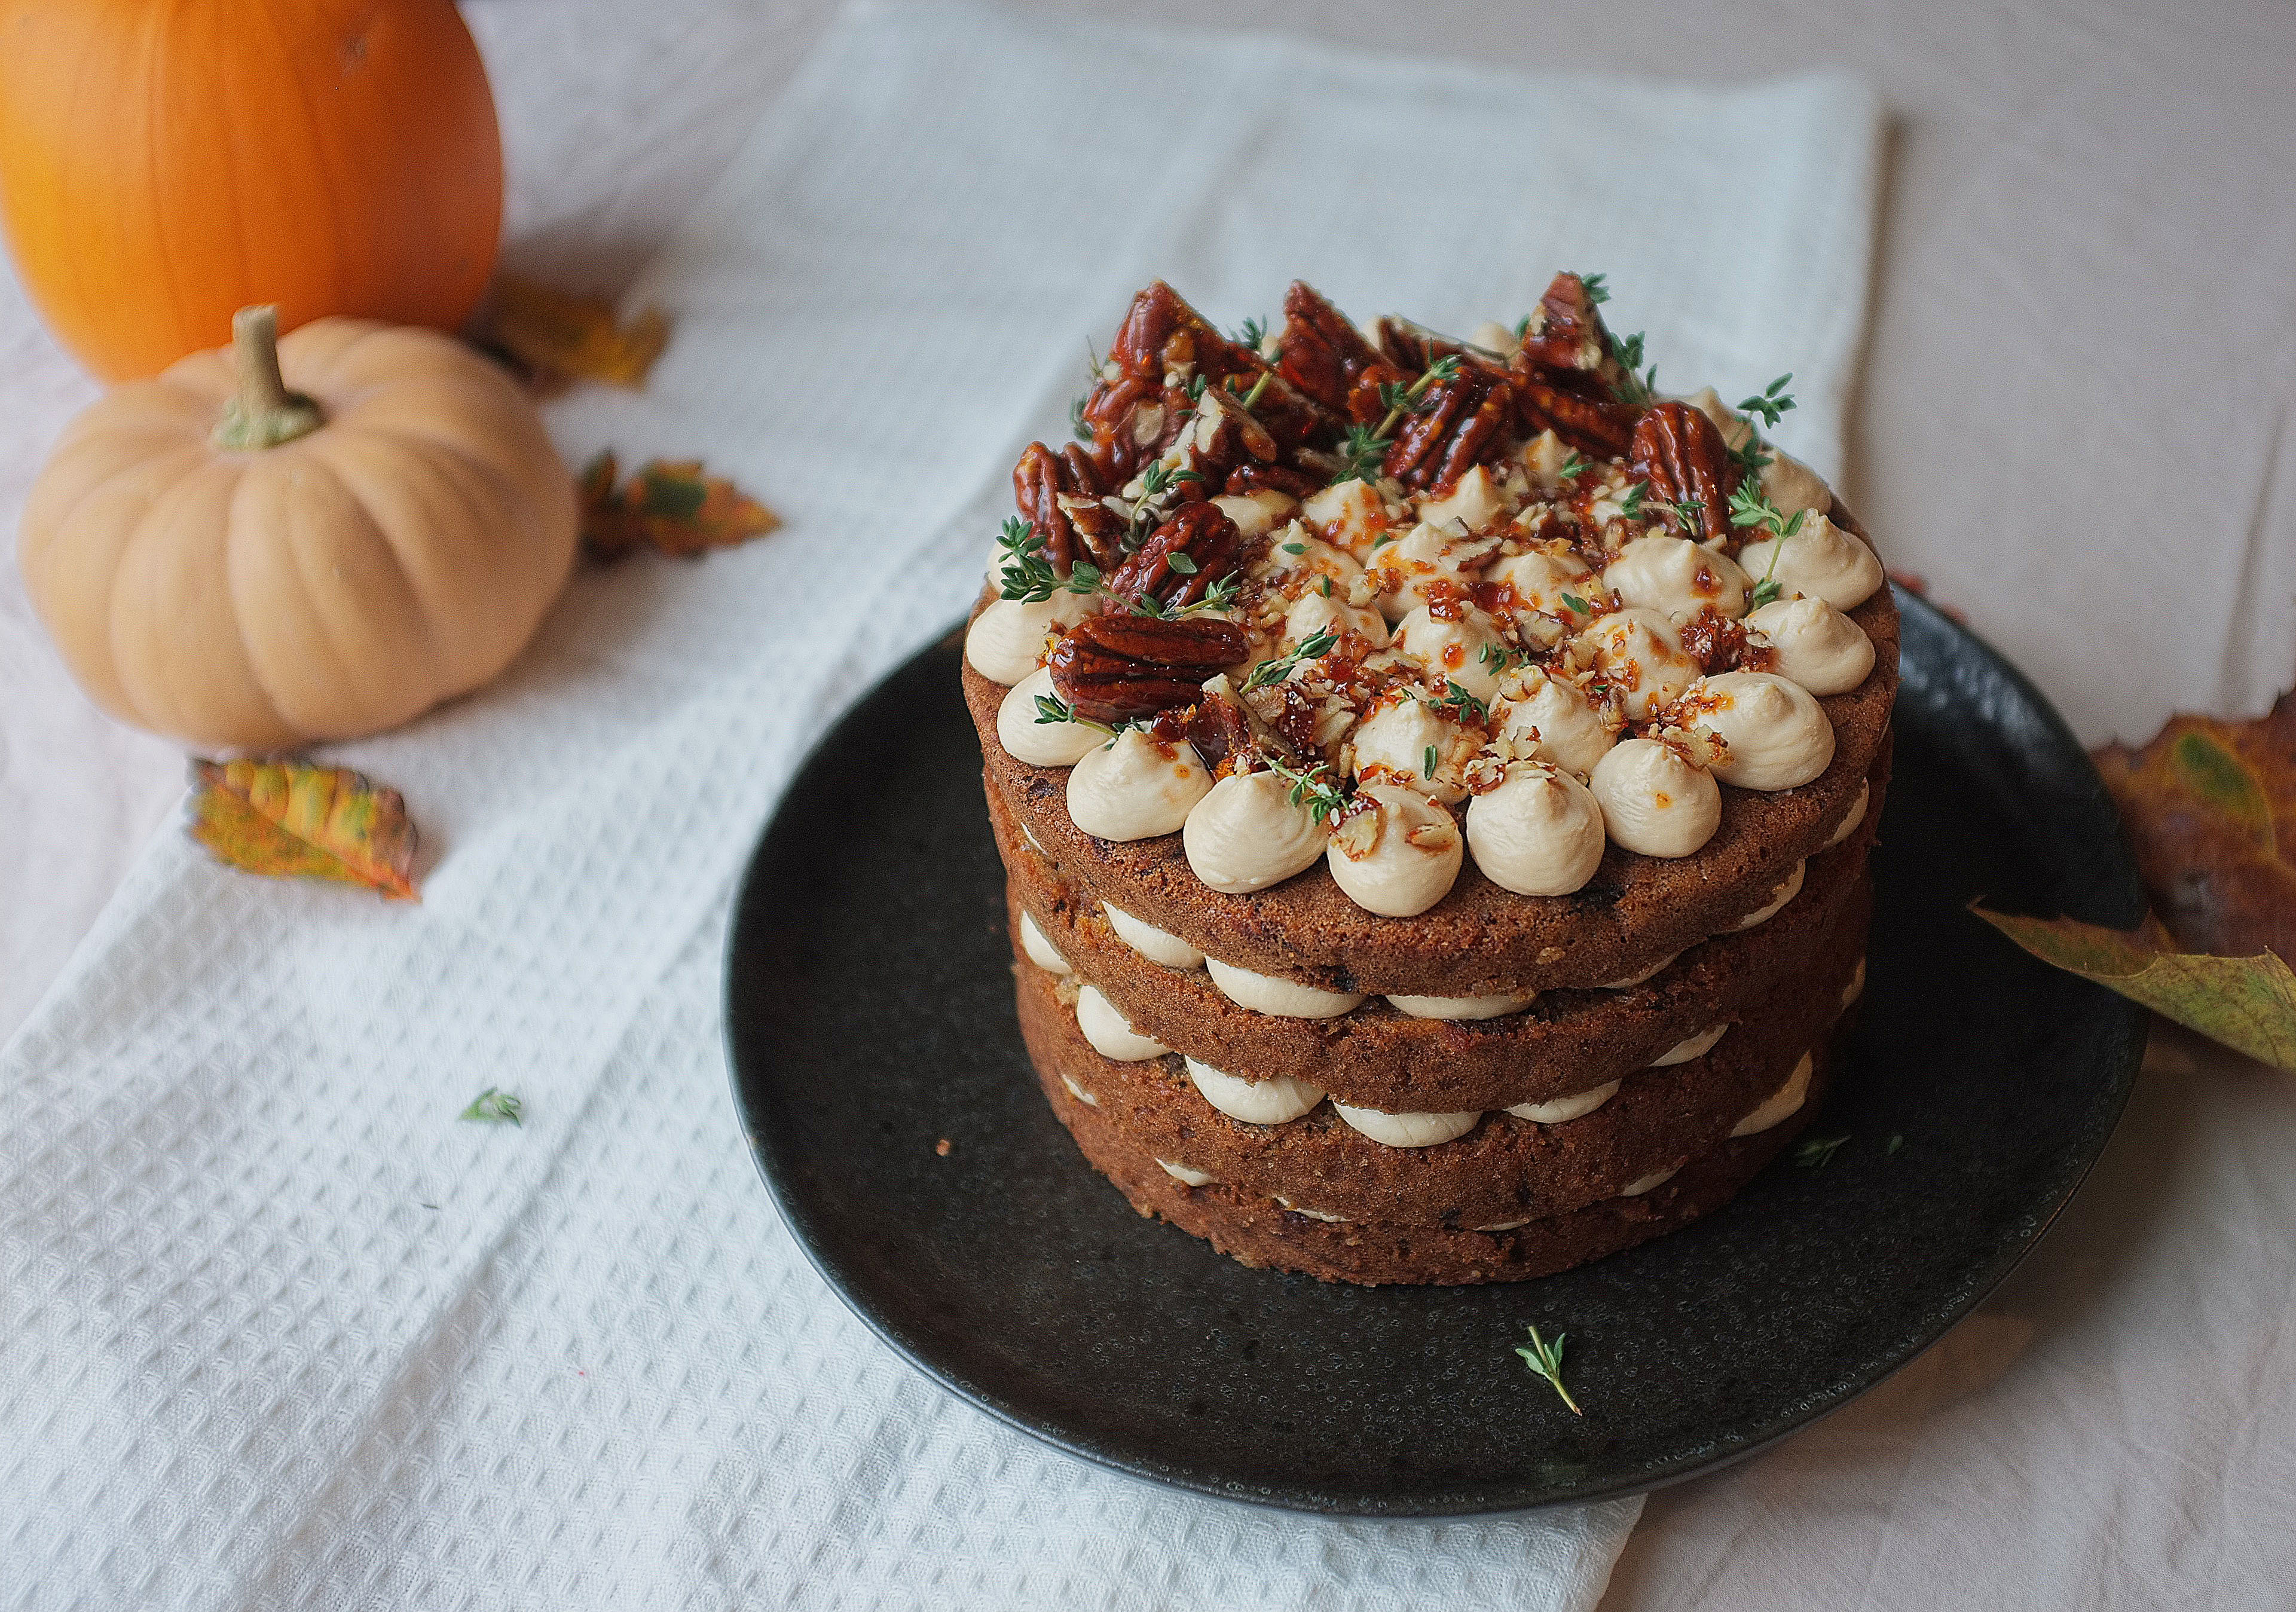
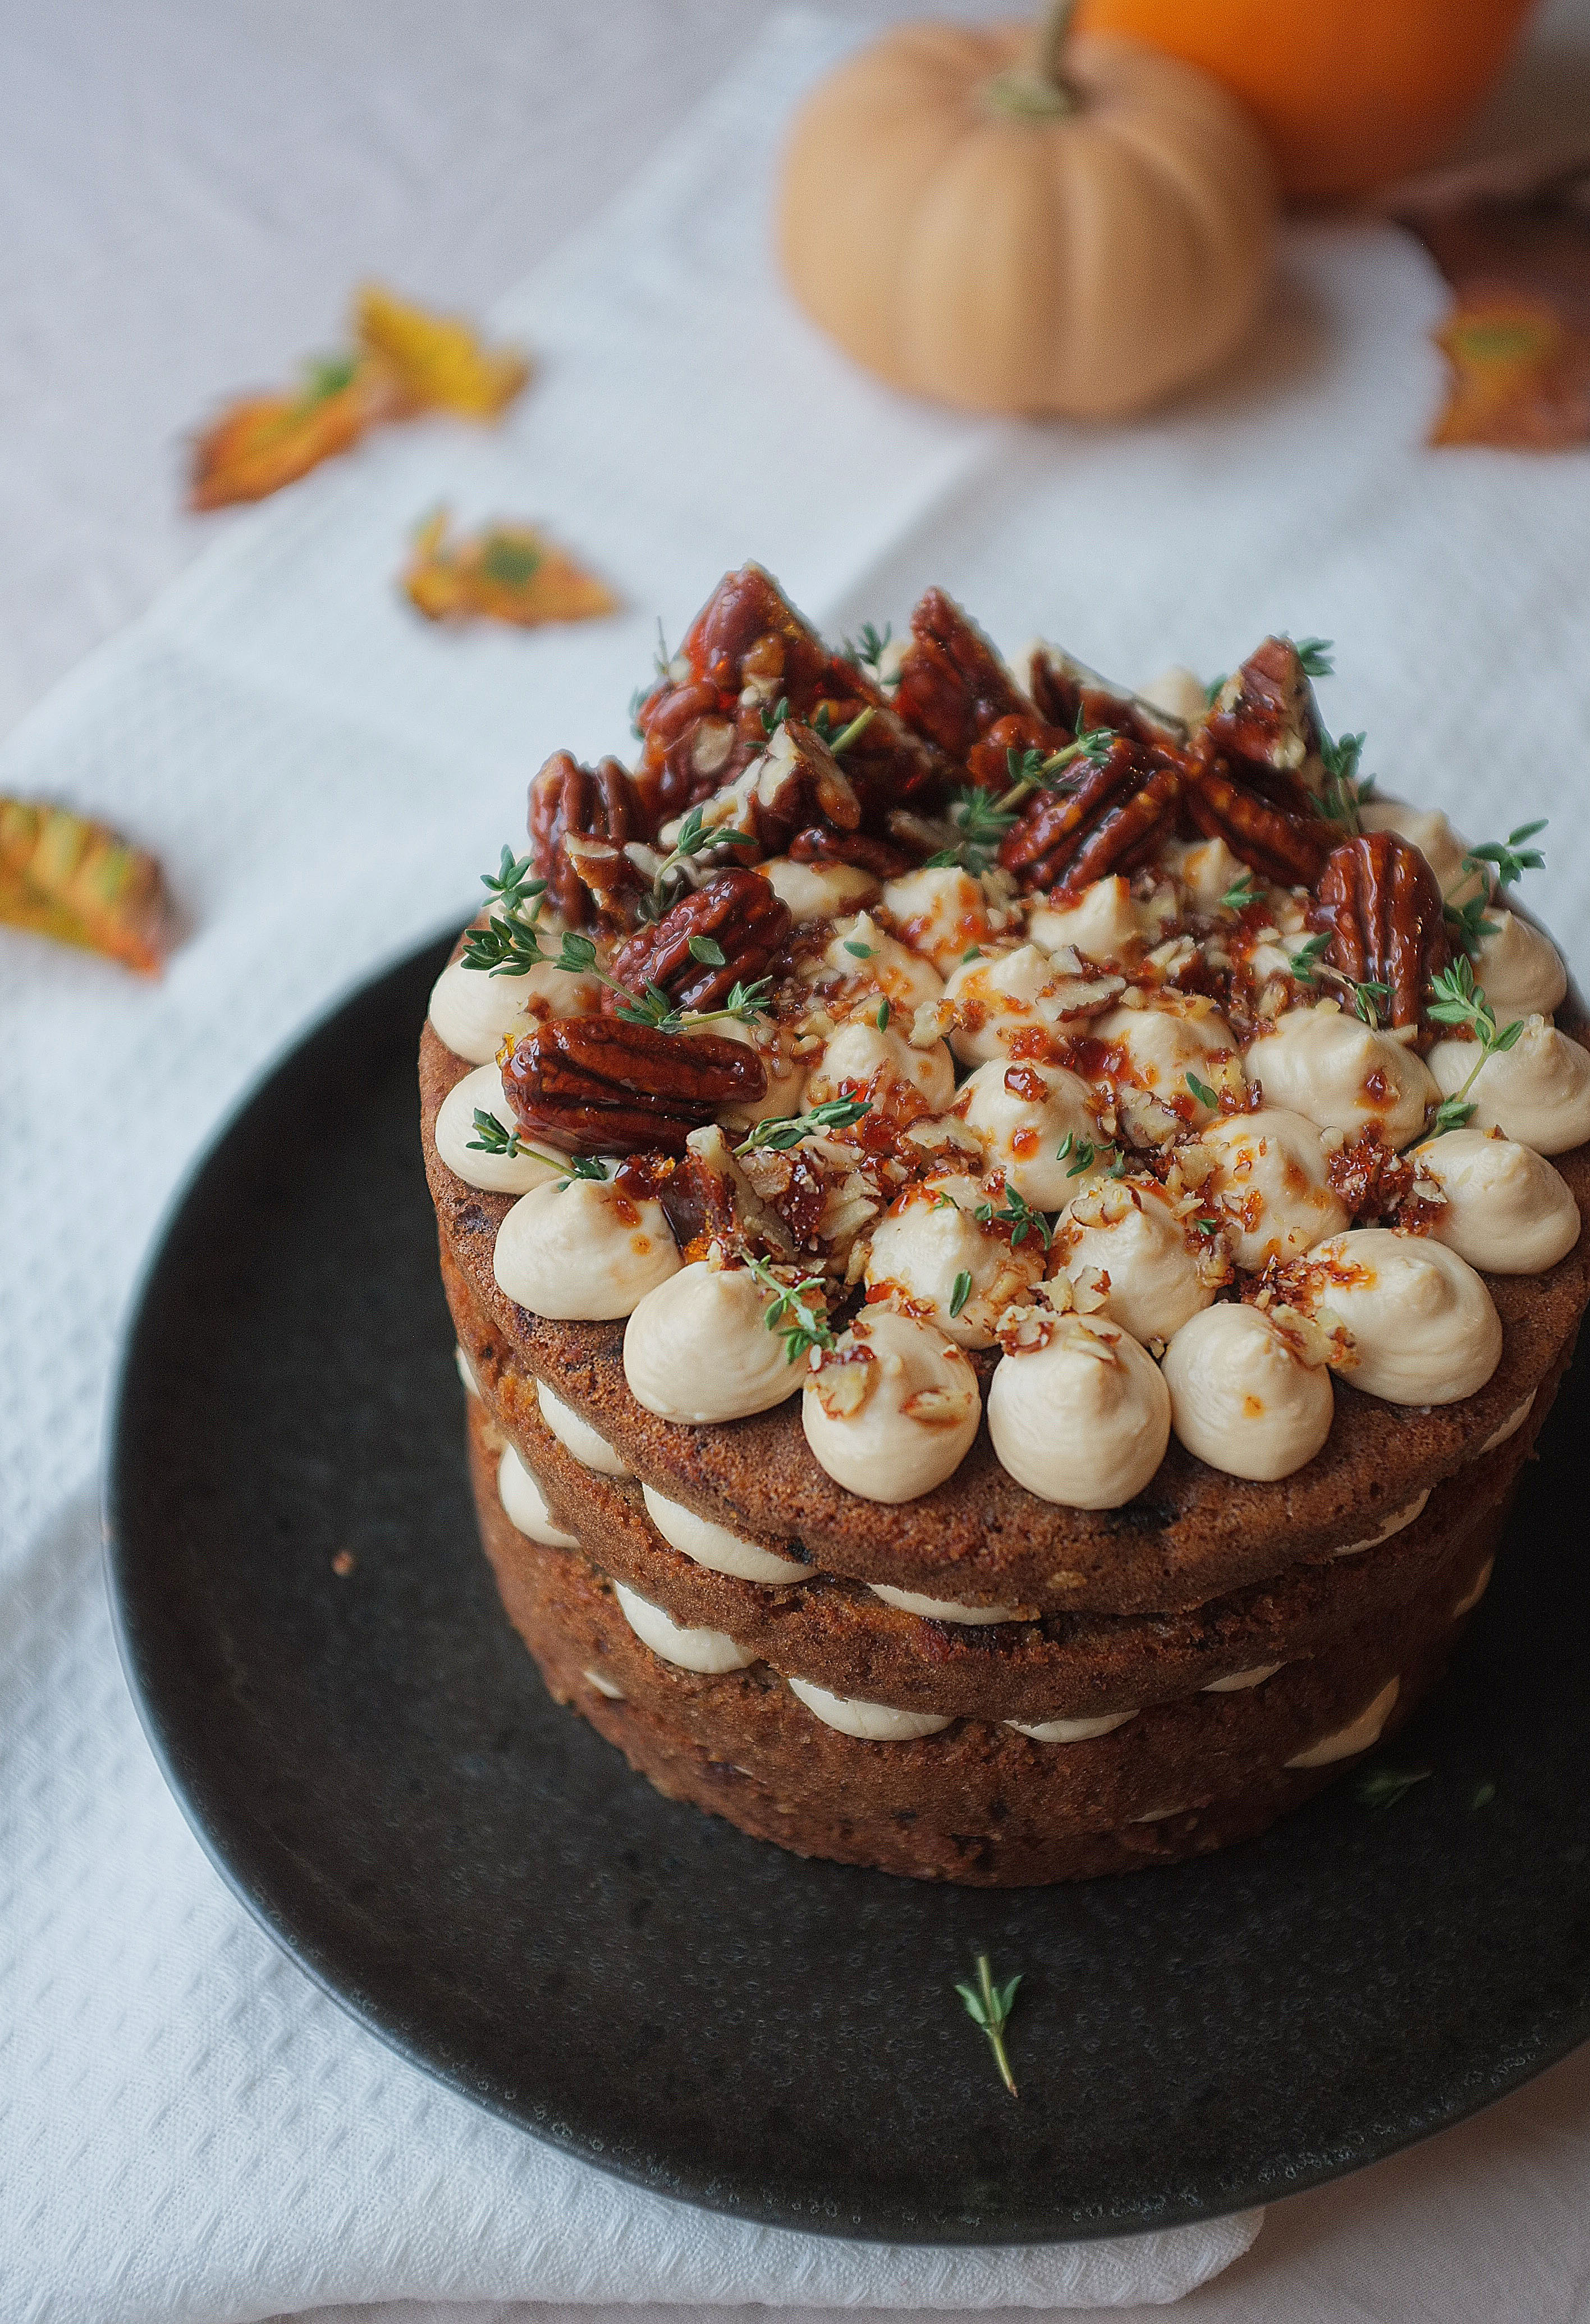
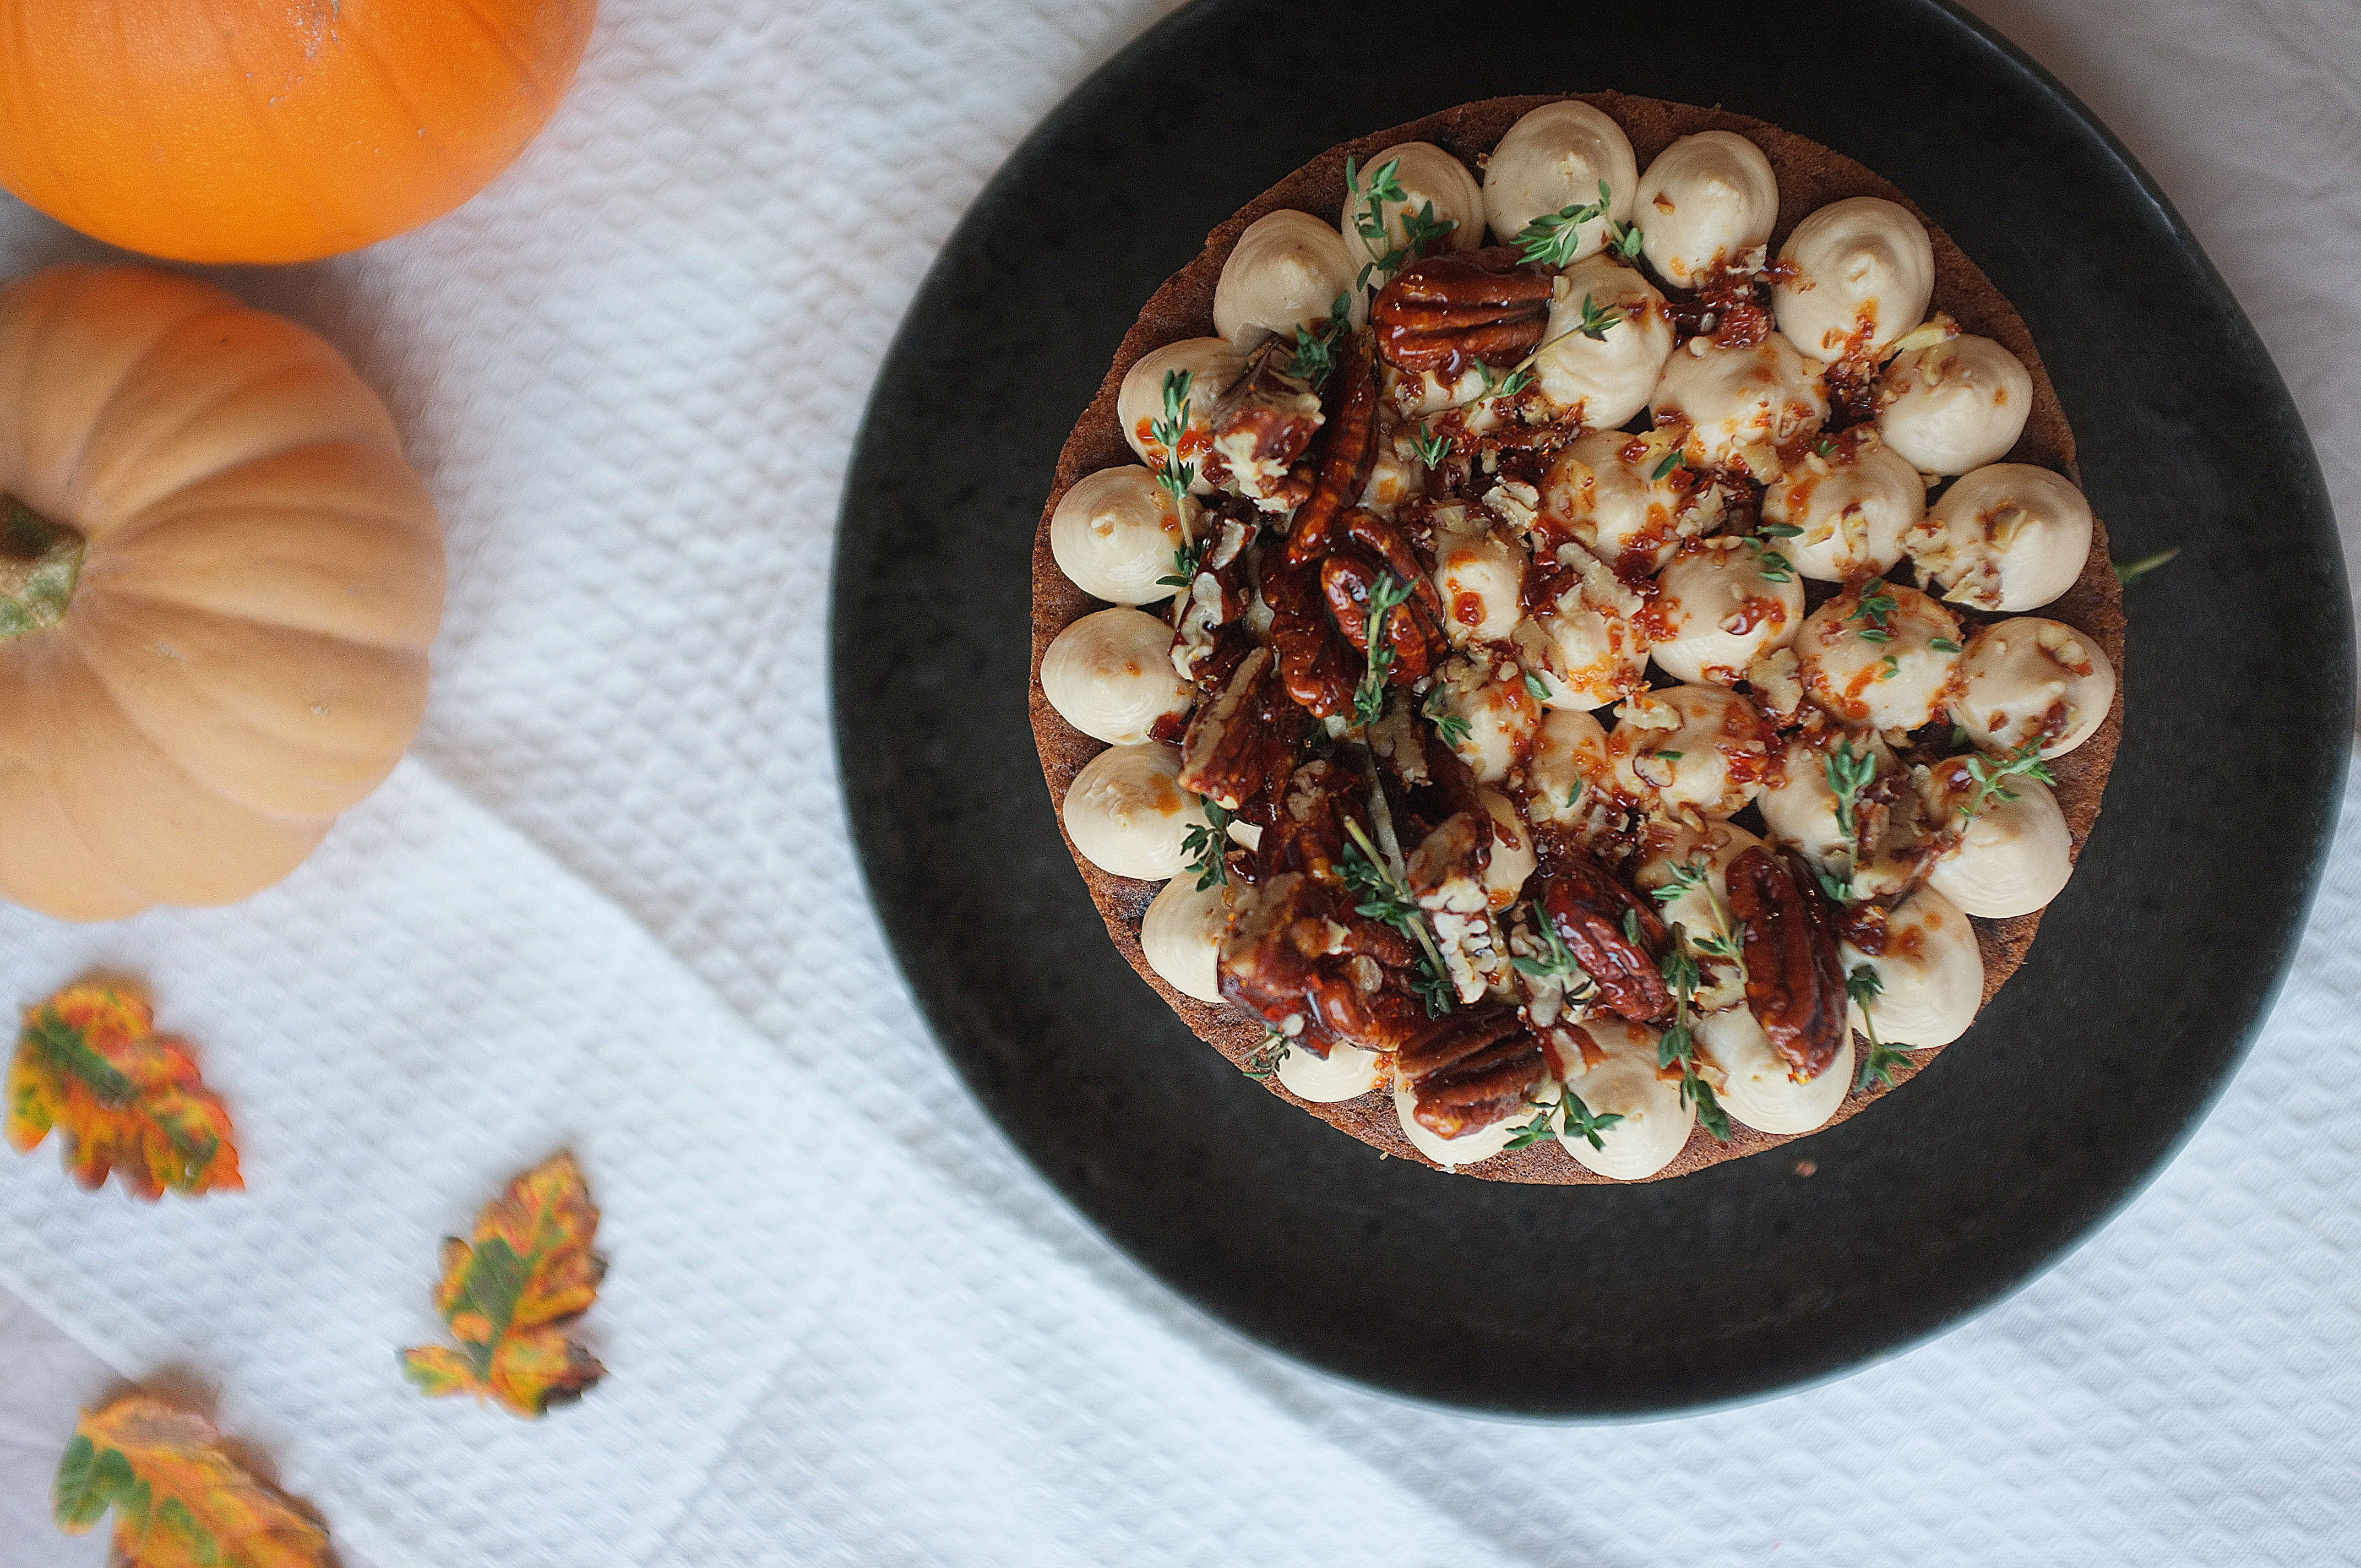
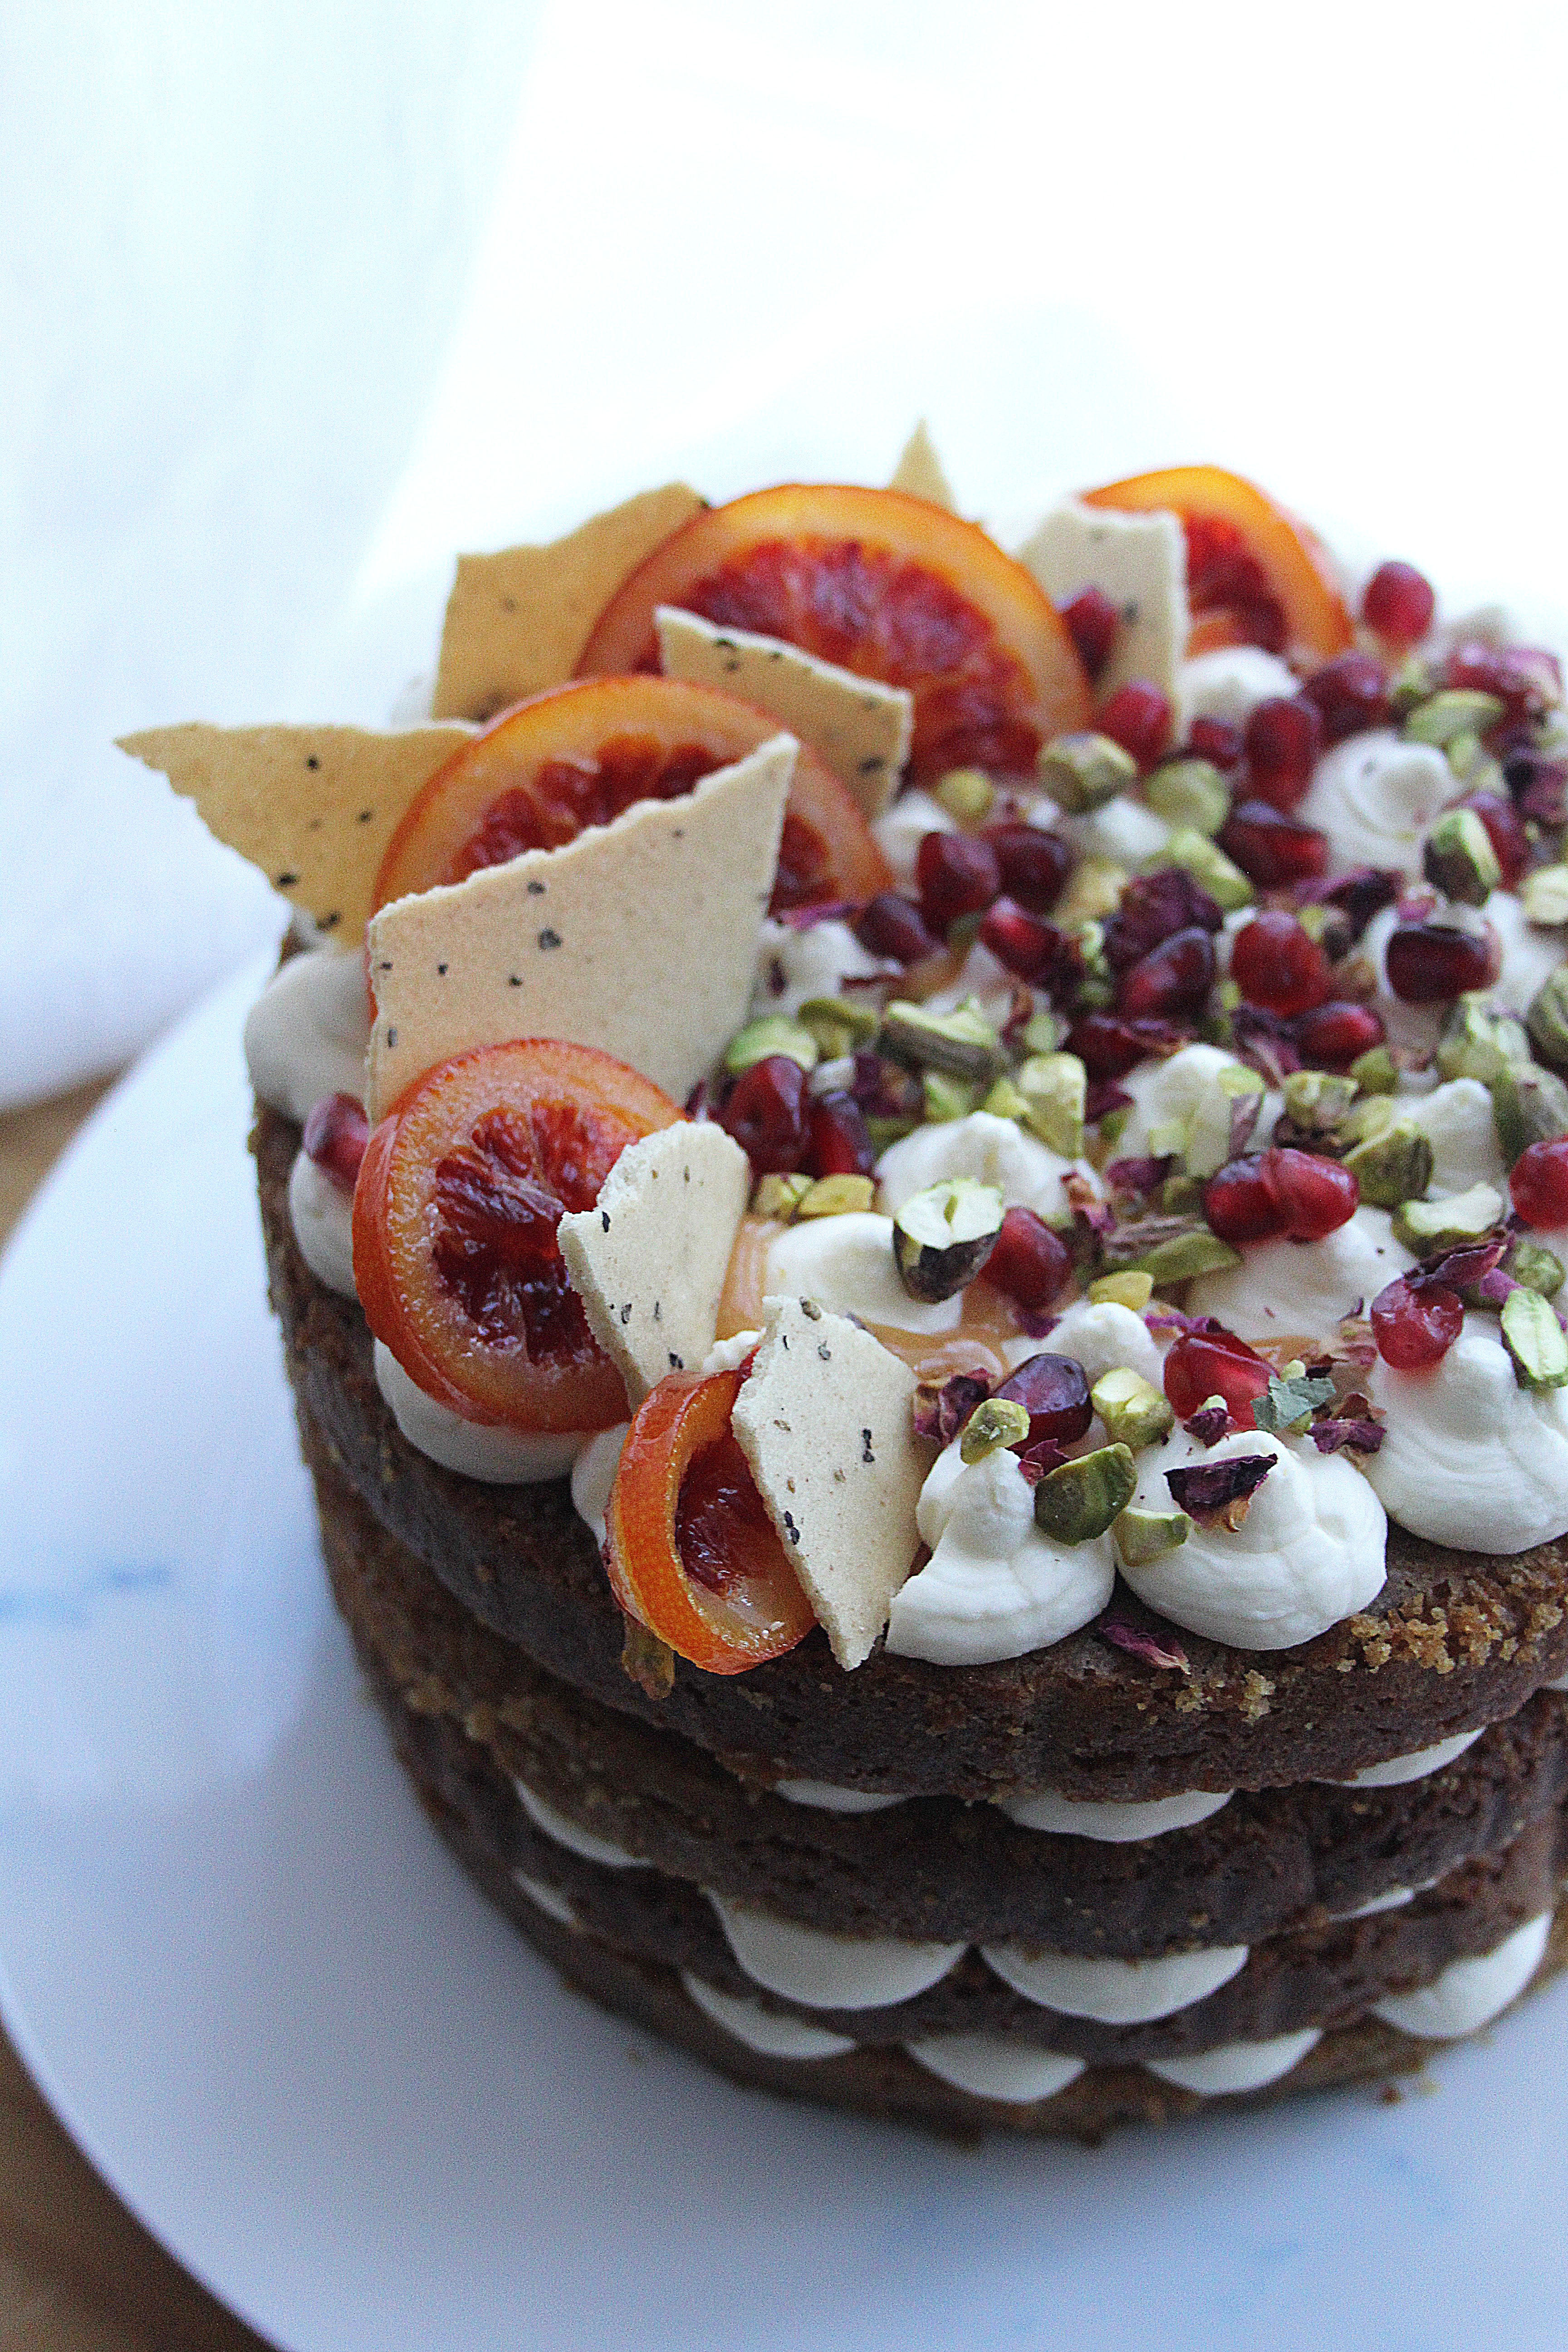
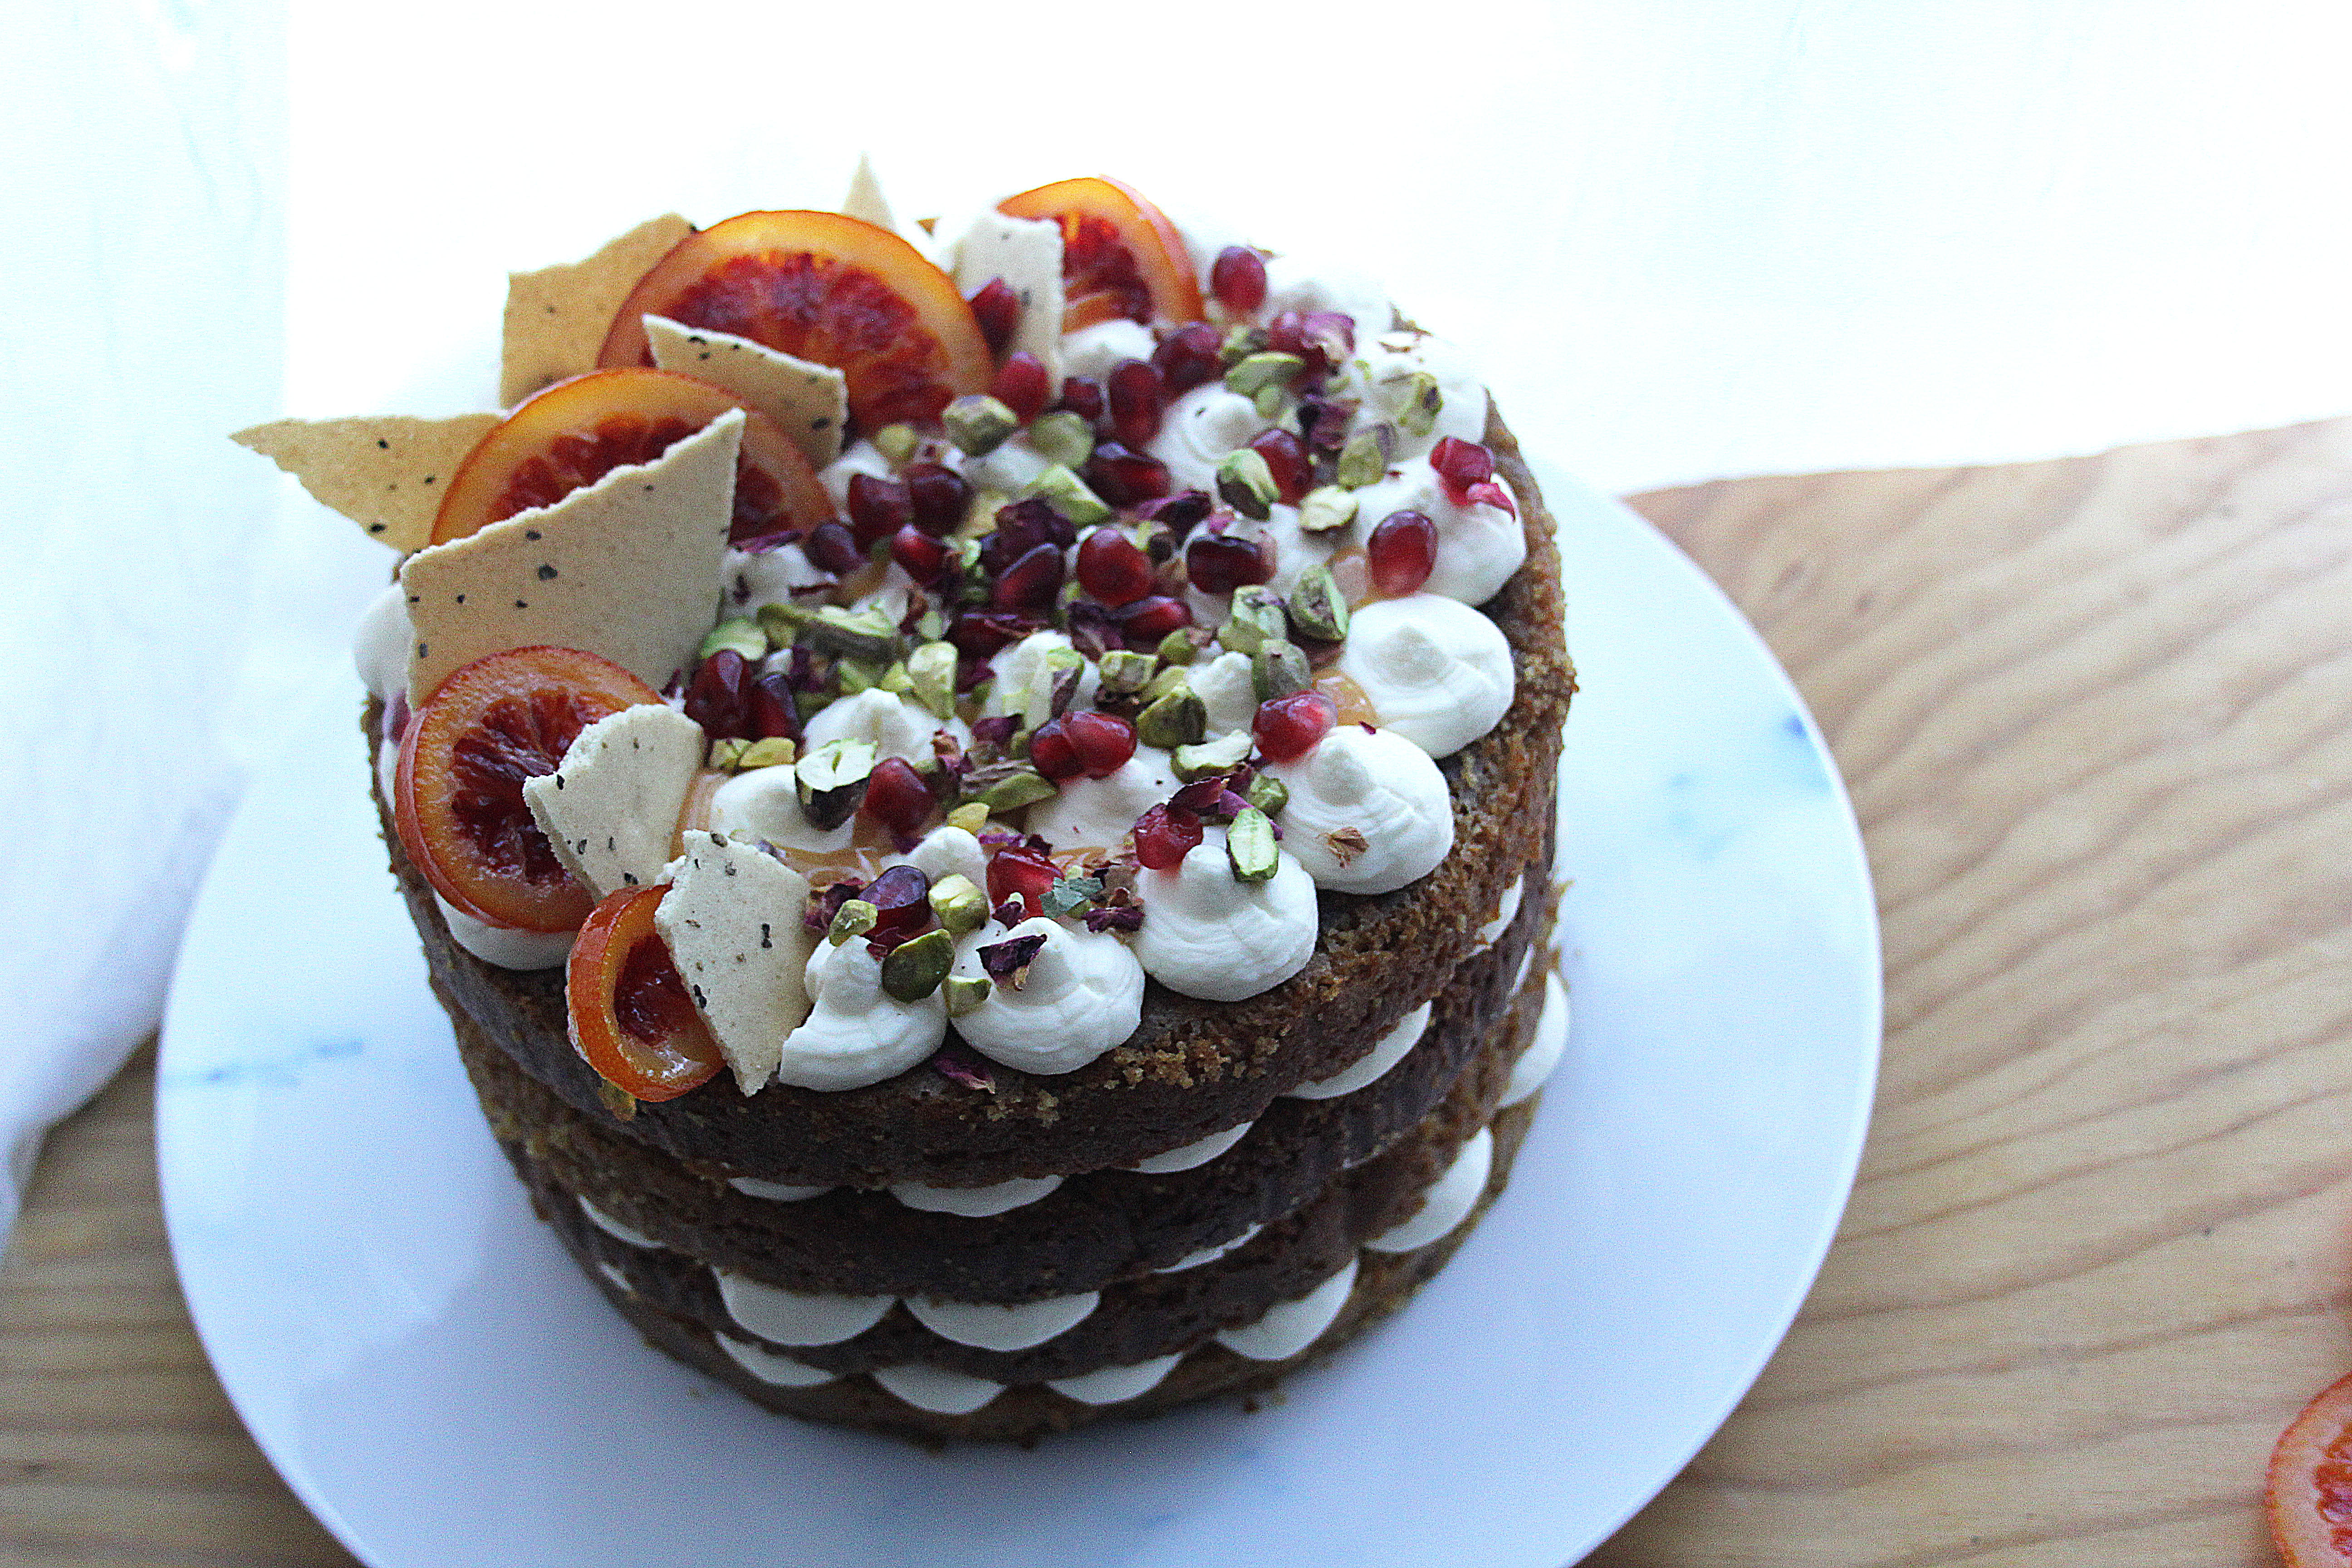
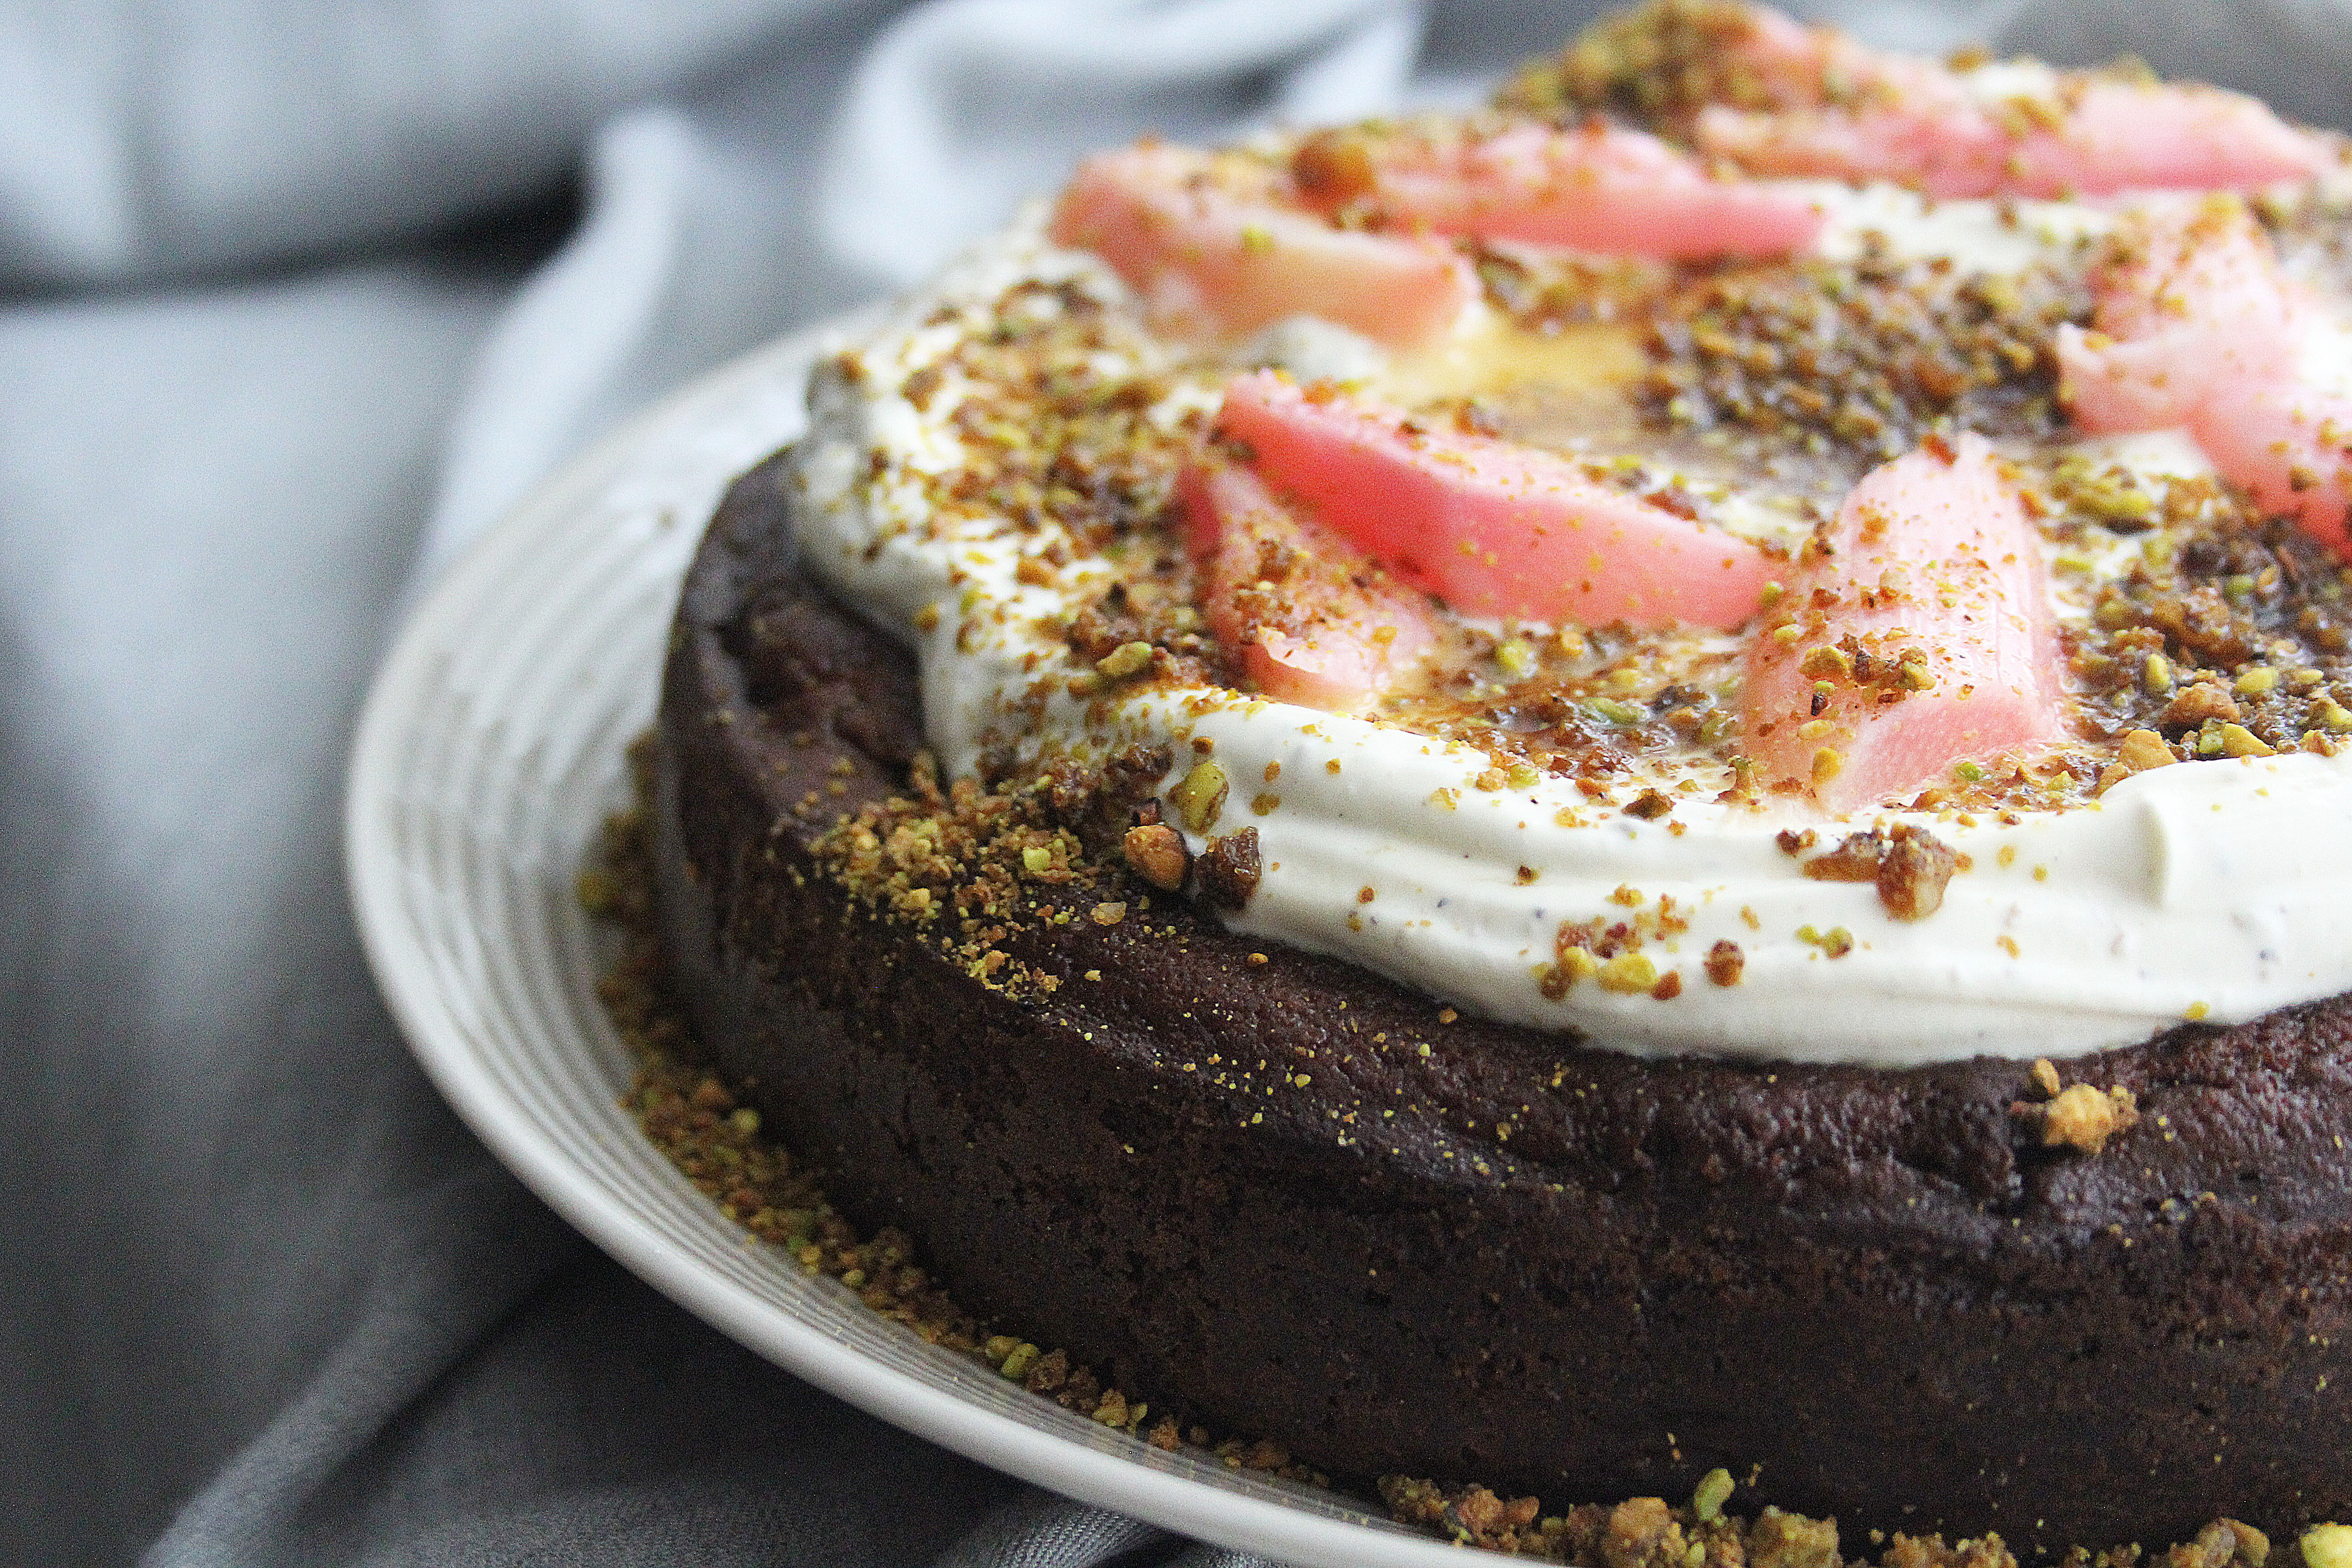
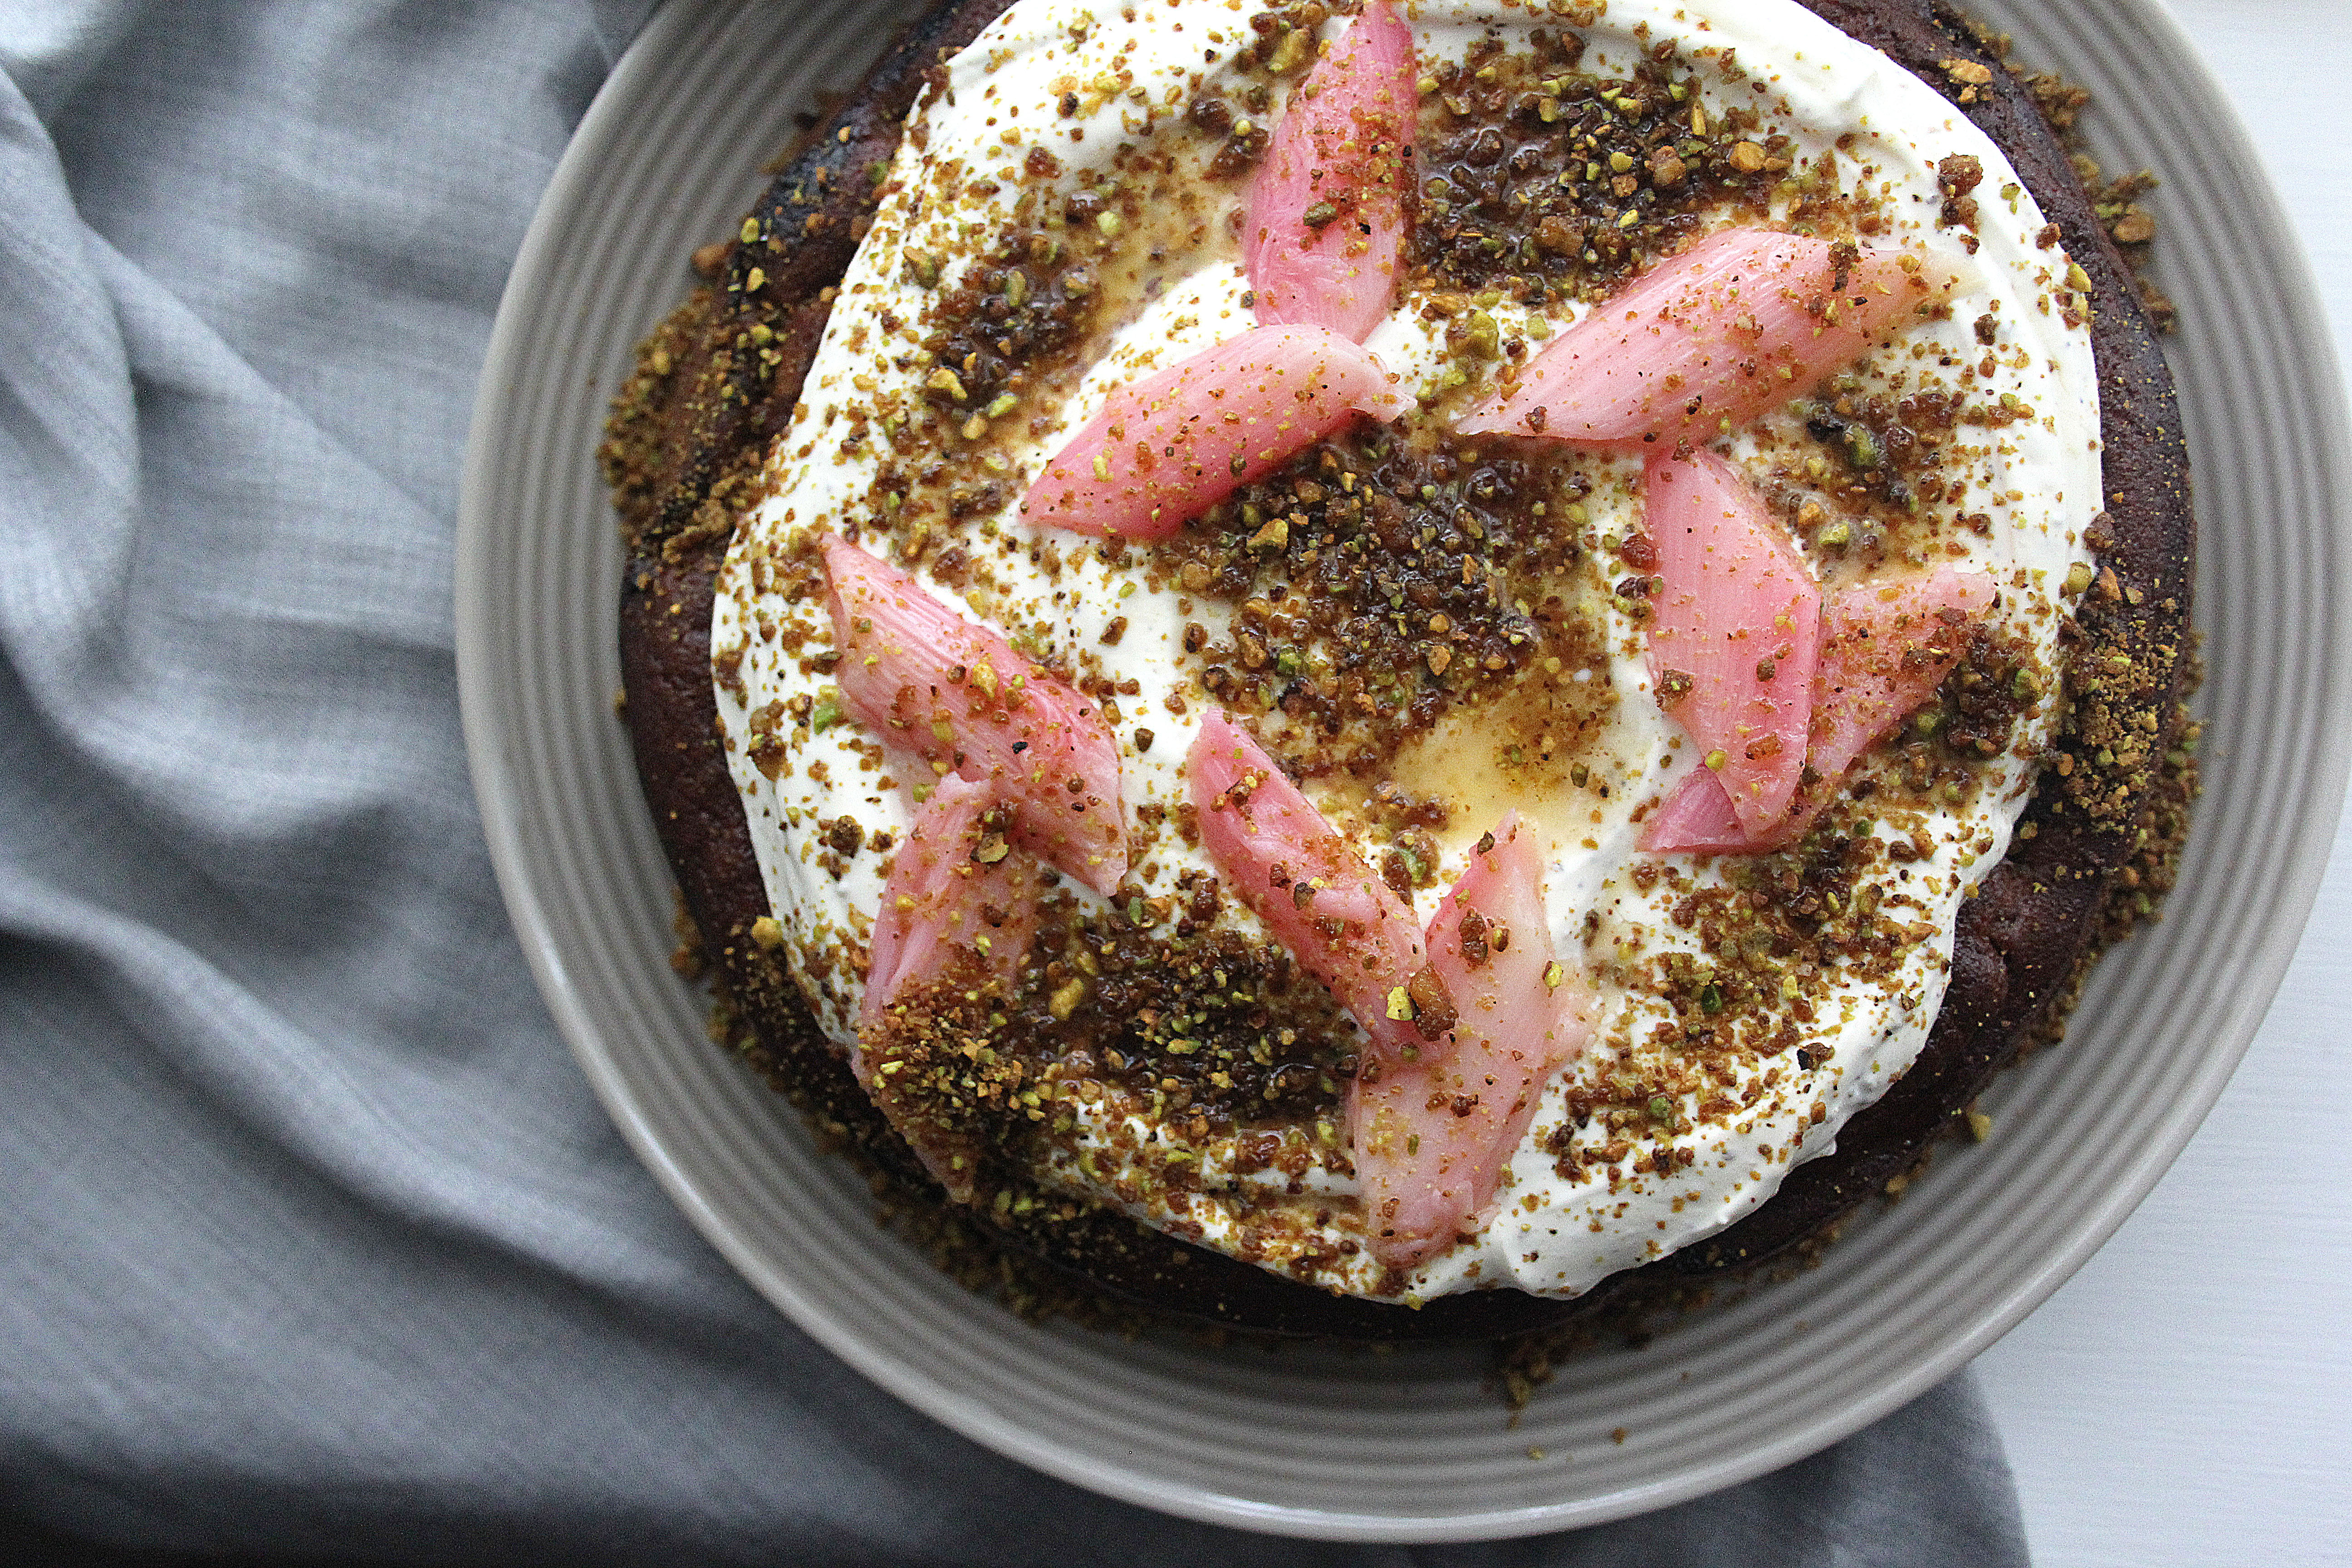
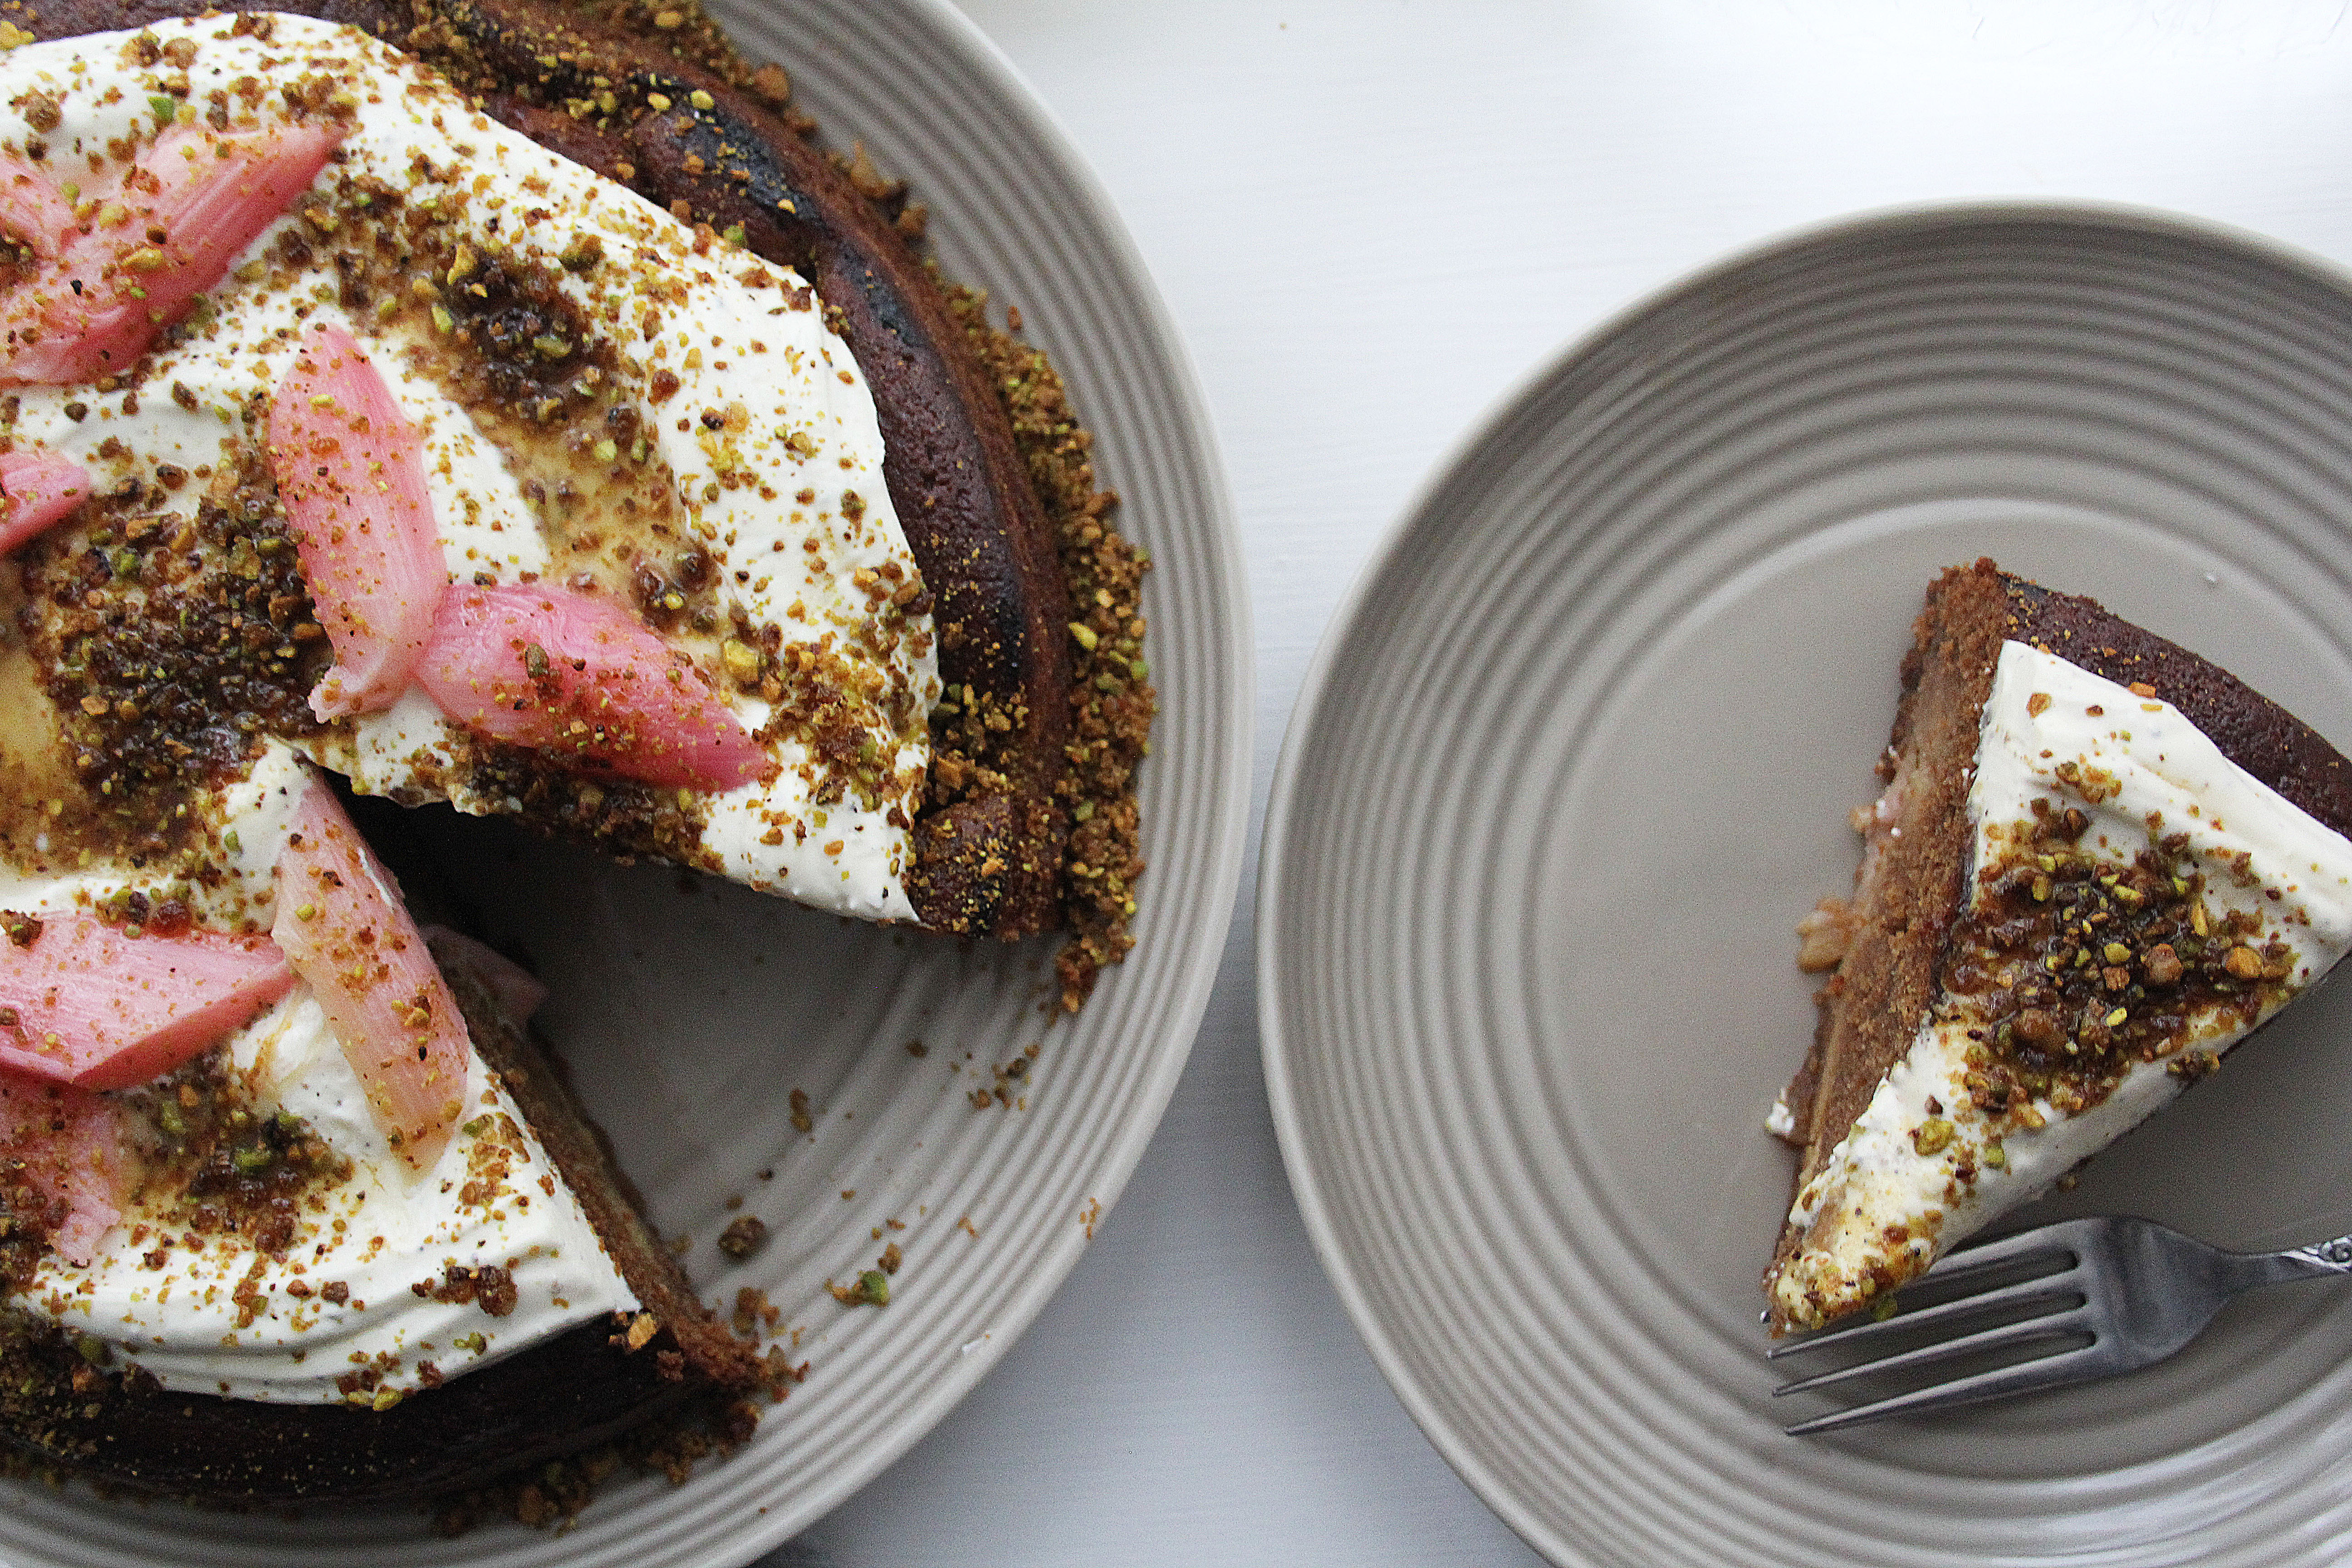
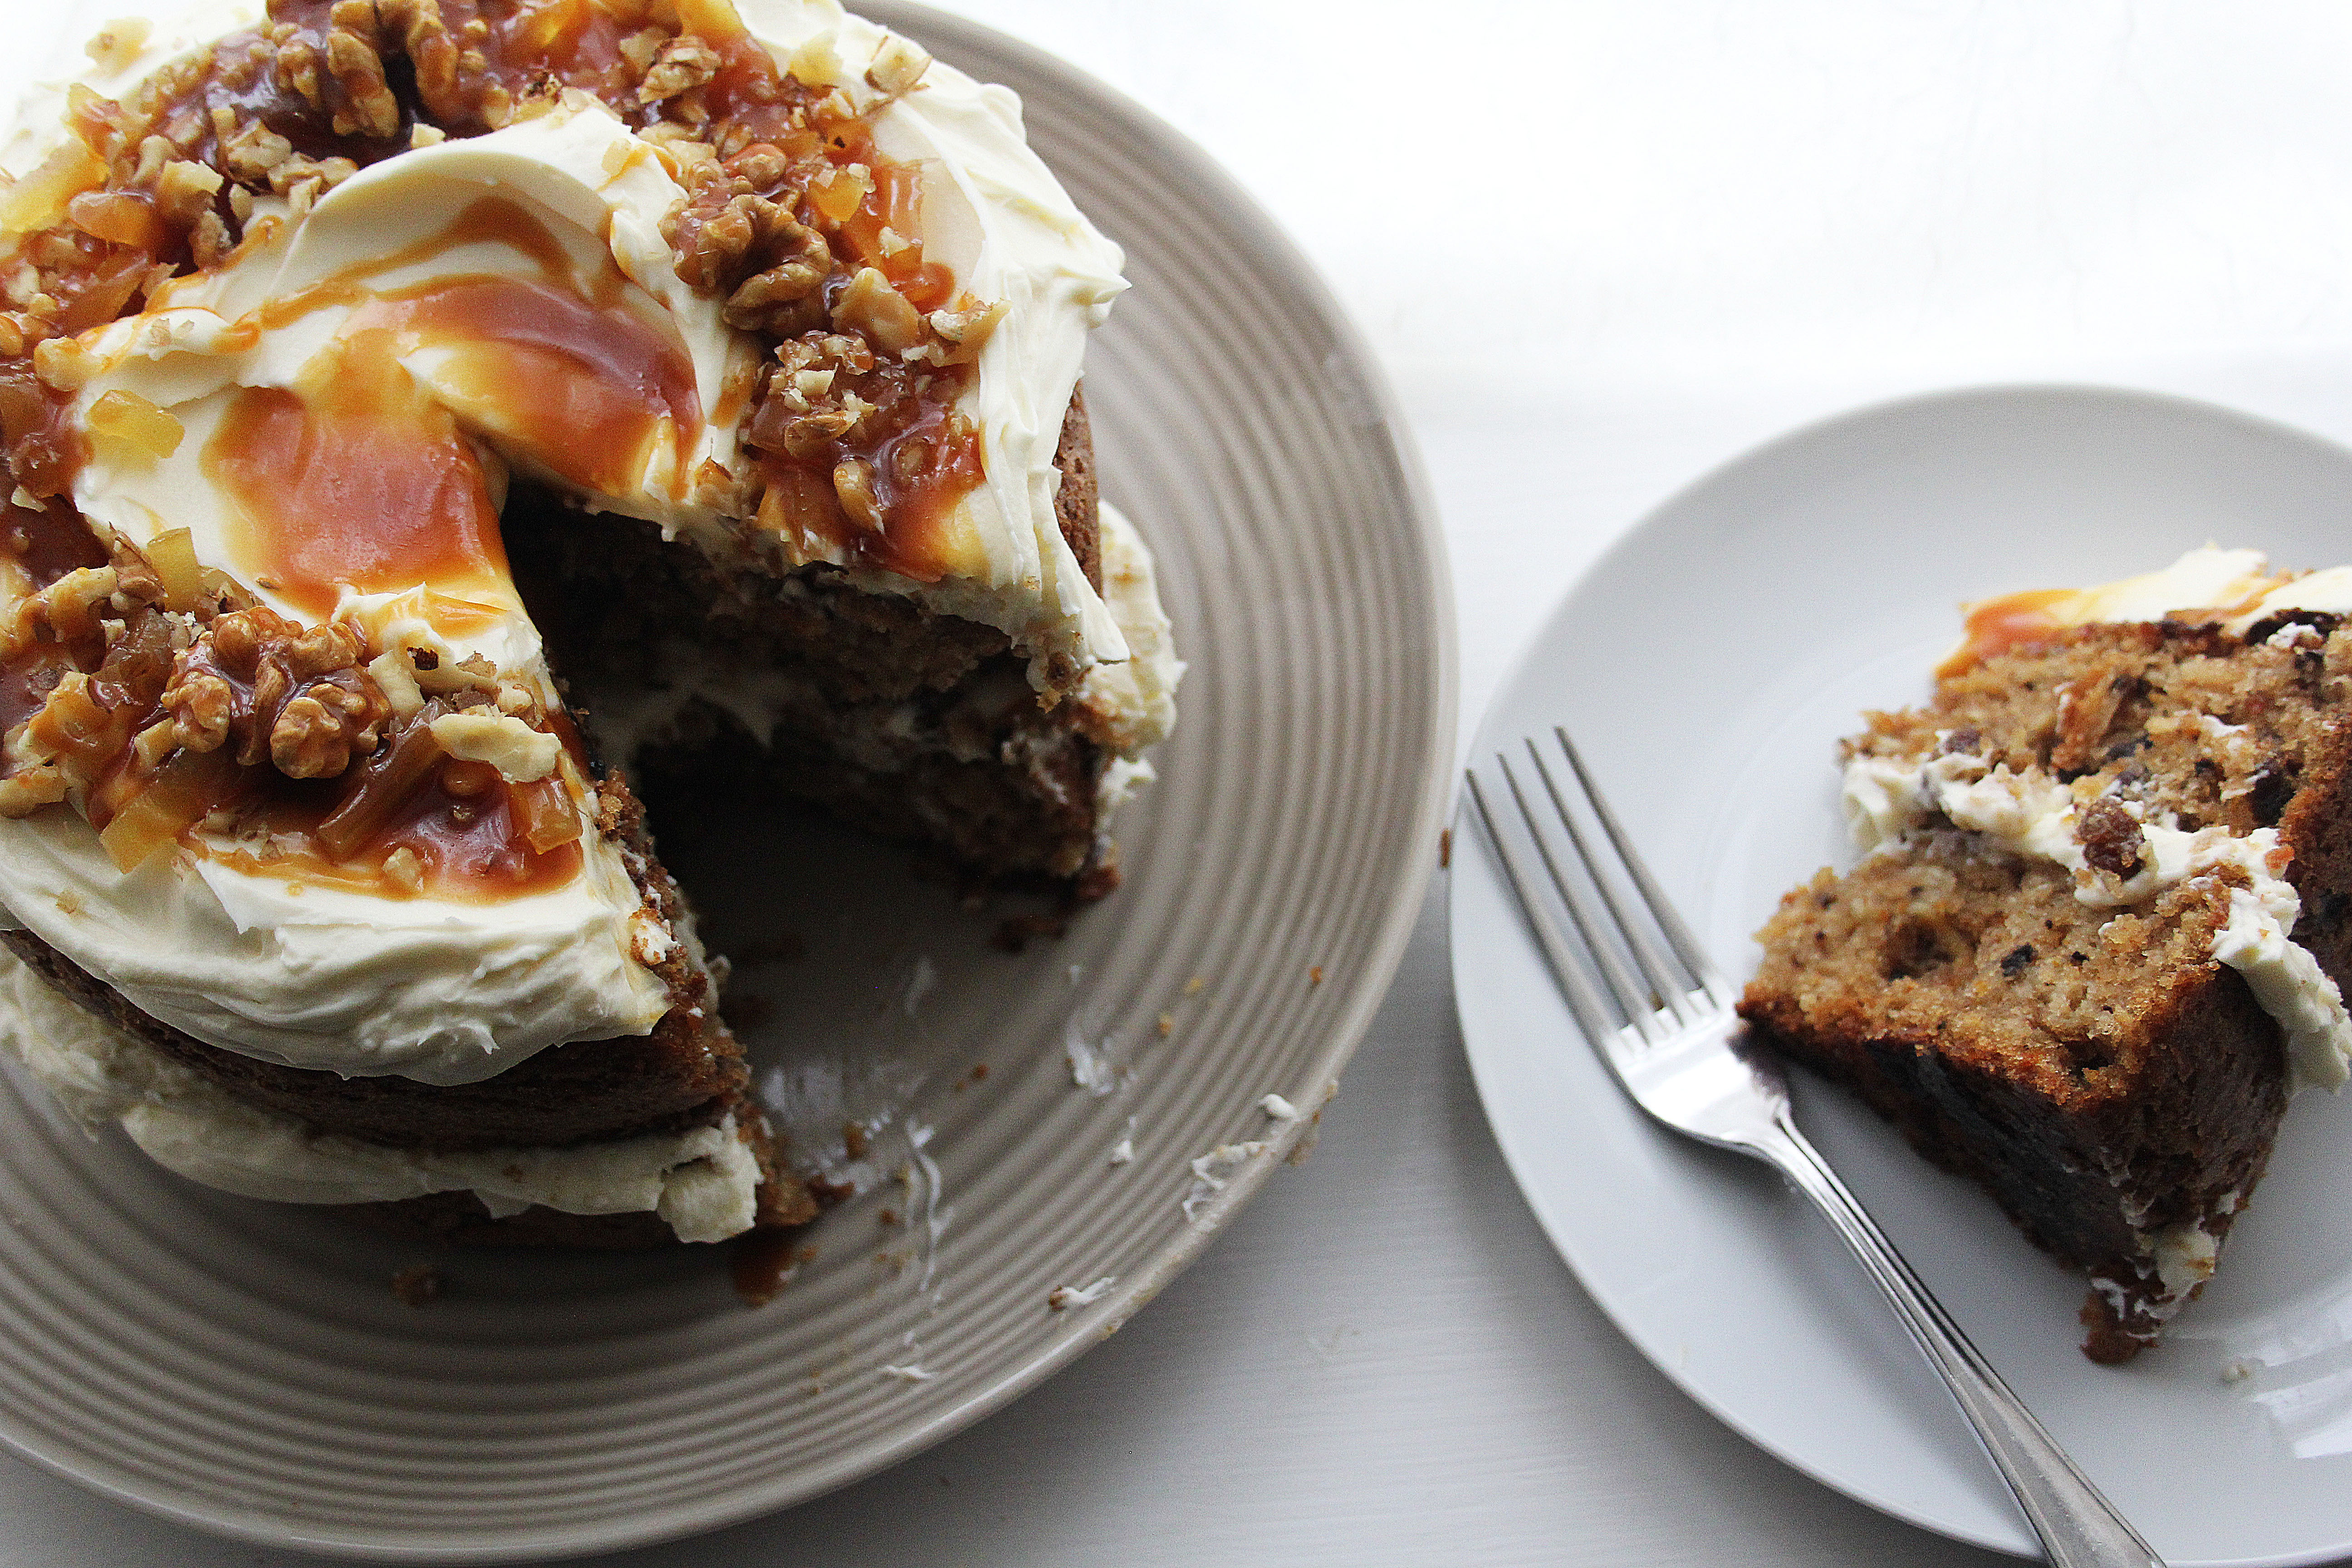
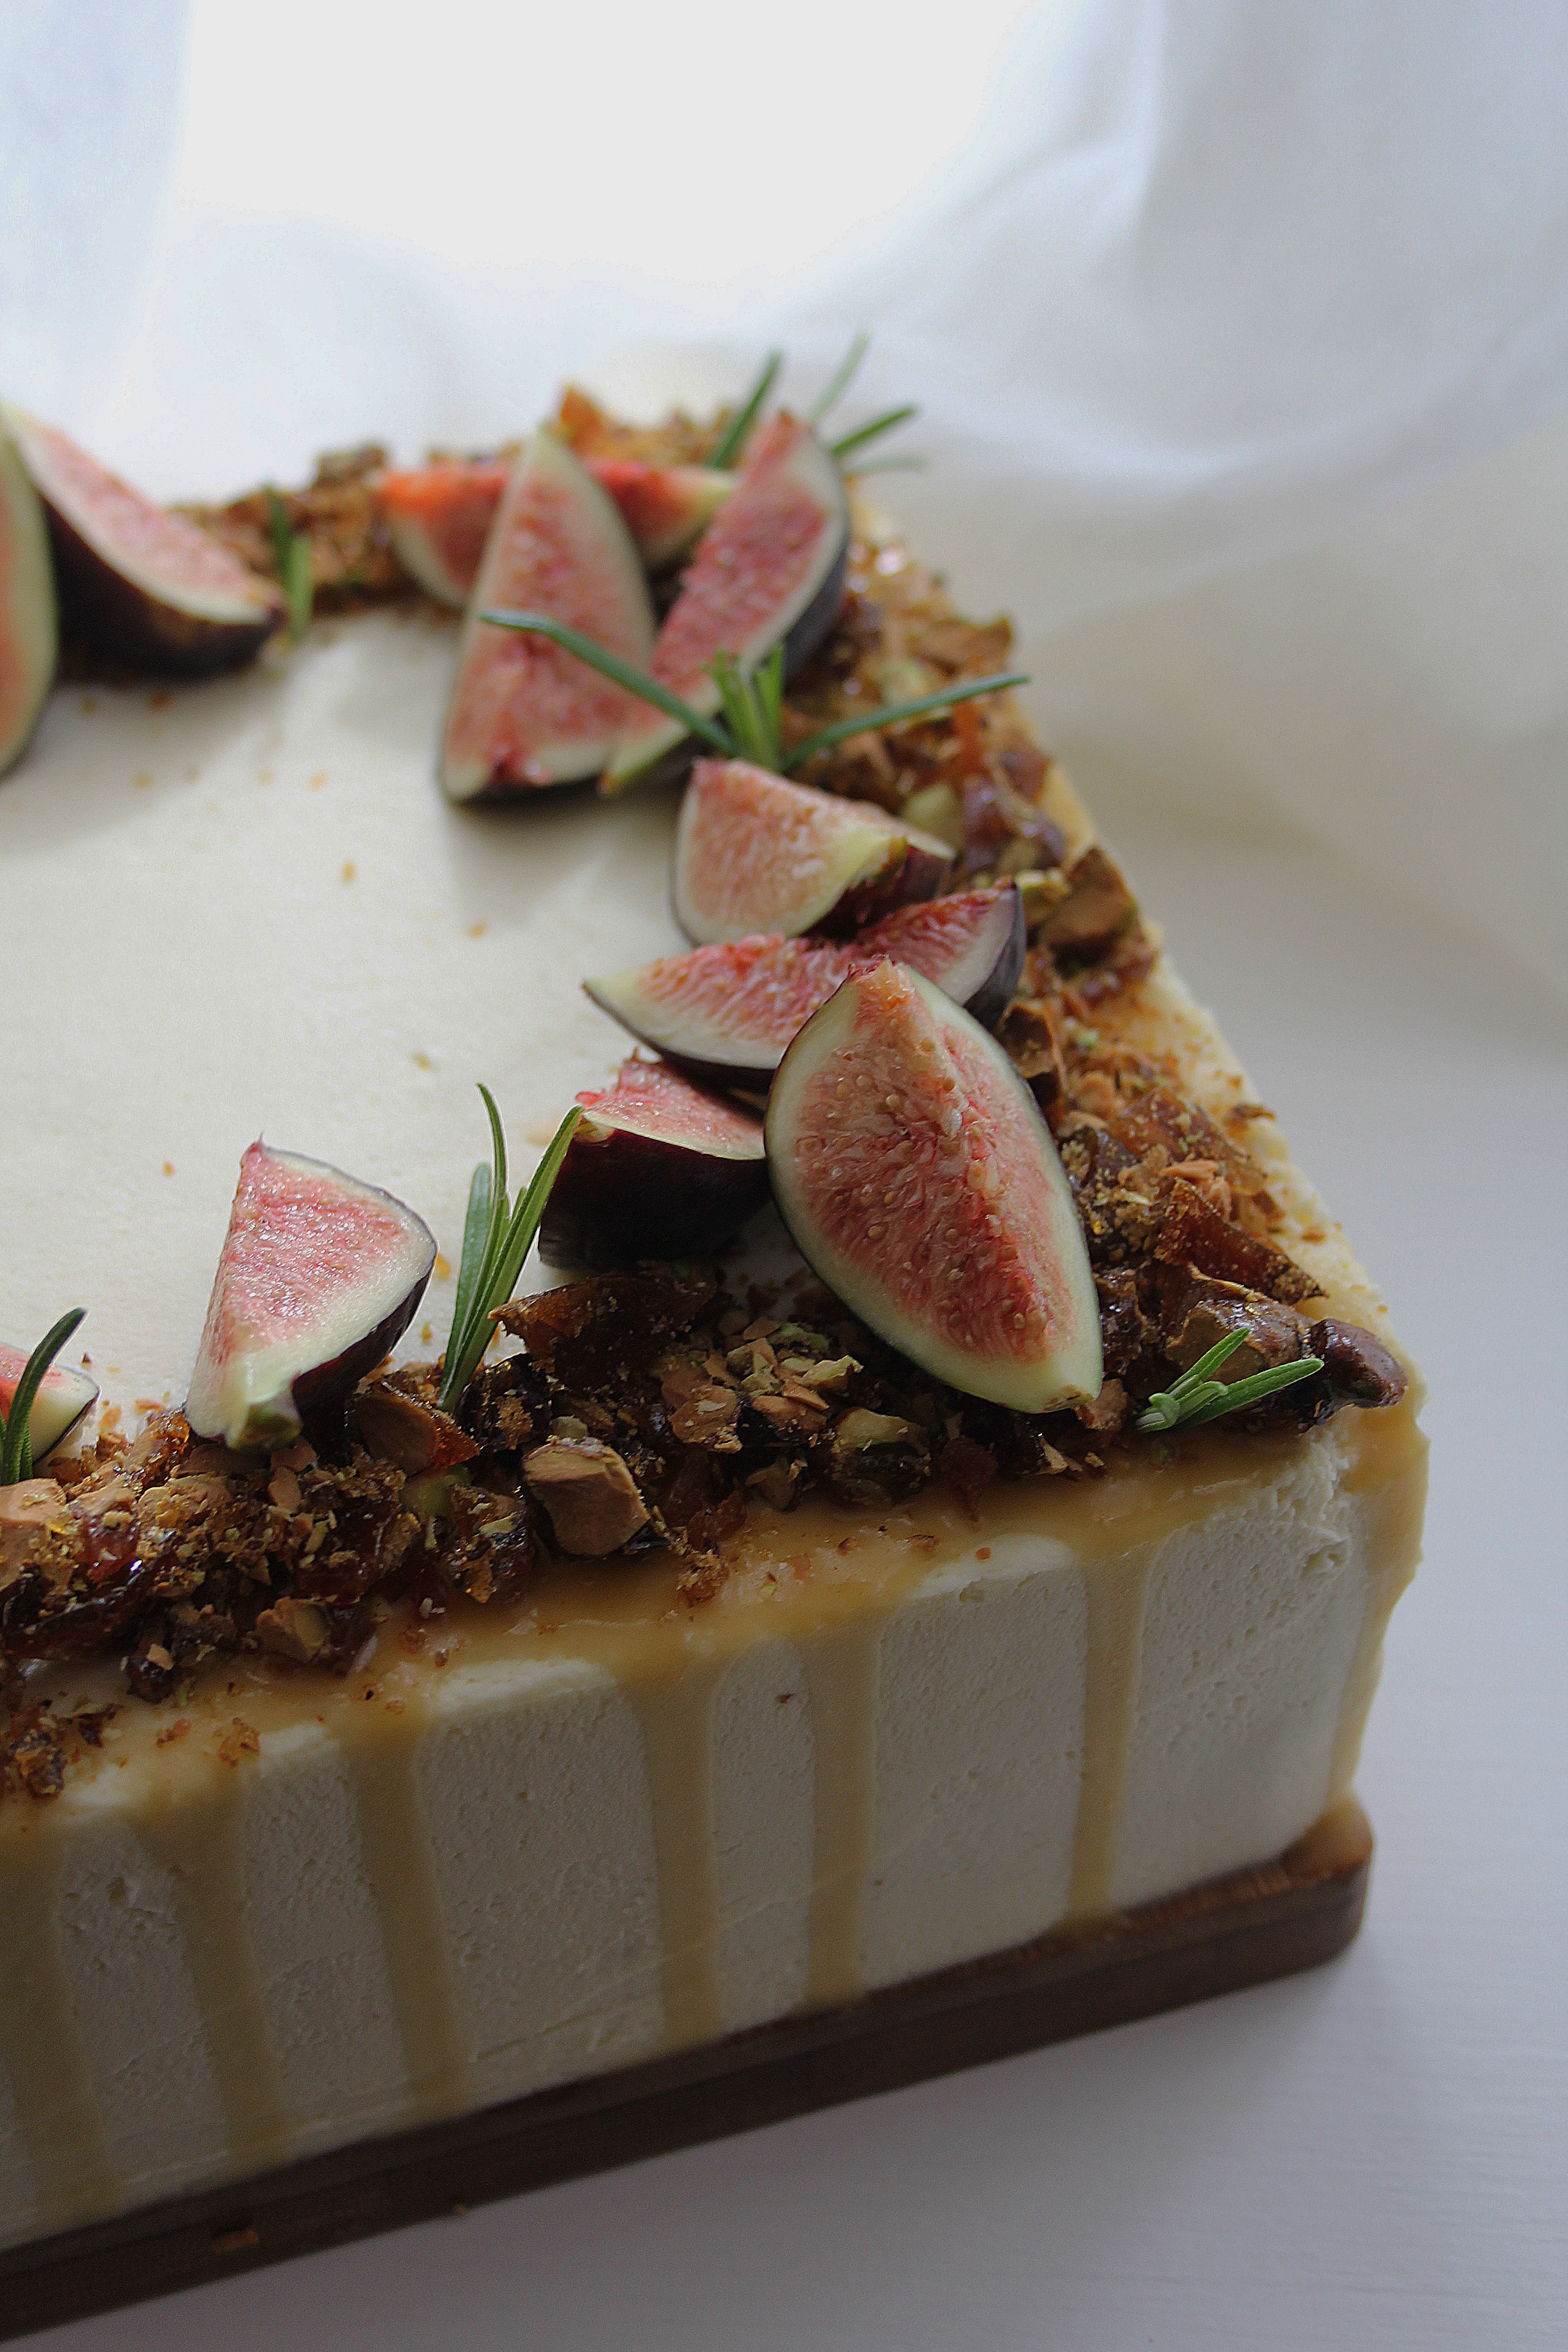
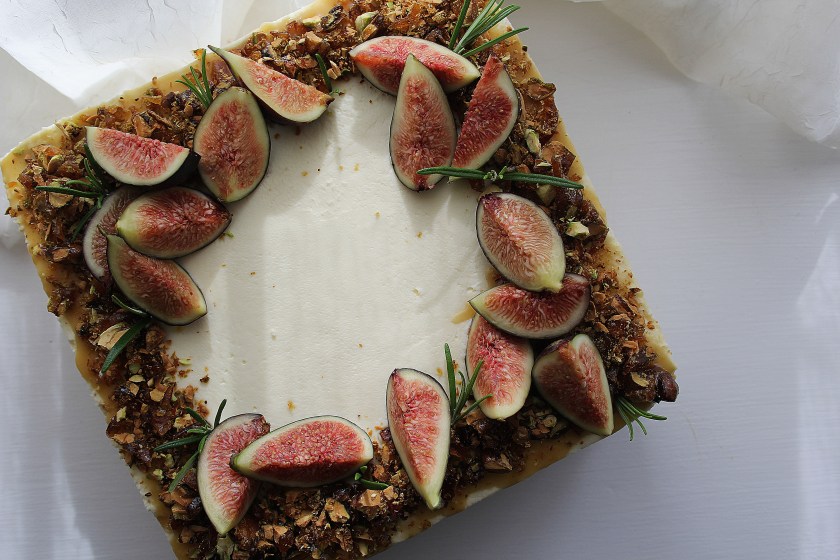
Ripe, pink fleshed figs are one of my very favourite fruits and pair brilliantly with so many other ingredients, from goats cheese and honey to cured hams and walnuts. In this cake I have used dried figs soaked in tea ( a method commonly used with dates to make sticky toffee pudding) to flavour the spiced sponge, then added a salty sweetness with the caramel drizzle and finished it off with a tangy mascarpone cheese icing, earthy pistachio praline and slices of fresh fig. Though the finished cake makes for a really beautiful centre piece, you could also enjoy it as a warm pudding with the salted caramel and a big scoop of vanilla ice cream.

Ingredients

For the sponge:

  • 300g dried figs, chopped
  • 325ml hot black tea
  • 185g soft butter
  • 275g light brown soft sugar
  • 1tsp vanilla extract
  • 4 eggs
  • 375g self raising flour
  • 1 1/2 tsp bicarbonate of soda
  • 1tsp ground cinnamon
  • pinch black pepper
  • pinch salt

For the salted caramel (this is a sort of cheats caramel- a bit like butterscotch sauce):

  • 50g butter
  • 50g golden syrup
  • 50g light brown soft sugar
  • 50ml double cream
  • pinch sea salt

For the pistachio praline:

  • 150g caster sugar
  • 200g shelled pistachios

For the mascarpone icing:

  • 200g mascarpone
  • 300ml double cream
  • 3-4tbsp icing sugar

Toppings (optional)

  • fresh figs and herbs

Method

  1. Preheat the oven to 170c fan (325F/ gas mark 3). Grease and line a deep square tin (around 22x22cm).
  2. Place the chopped dry figs in a bowl or jug and pour over the hot tea. Leave to infuse while you start making the cake batter.
  3. In a large bowl (or bowl of a stand mixer with paddle attachment) cream together the butter and sugar along with the vanilla until light and fluffy. Add in the eggs one at a time, beating well between each addition.
  4. Once the eggs are incorporated, sift in the flour, bicarbonate of soda, spices and salt. Fold until the batter is smooth and all the ingredients are well combined then tip in your soaked figs (along with the tea) and fold once more.
  5. Tip the mixture into the prepared tin and level off. Bake for 45-50 minutes or until a skewer comes out clean with just a few moist crumbs attached when inserted.
  6. While your cake is baking, make the salted caramel. To do this simply pop the butter, syrup, sugar and cream in a saucepan and melt together. Once melted bring to the boil and let it bubble for a couple of minutes, then remove from the heat, add the salt to taste and leave to cool.
  7. Next, make the pistachio praline topping. Line a tray with greaseproof paper and put the sugar and pistachios in a heavy bottom pan. Heat gently until the sugar starts melting. Swirl the pan occasionally to coat the pistachios and prevent burning. Once the sugar has completely melted increase the heat and turn the pistachios with a wooden spoon until the caramel reaches a deep golden colour, then tip onto the prepared tray and leave to set hard.
  8. Lastly, make the mascarpone icing. In a large bowl (or bowl of a stand mixer with whisk attachment) whisk together the mascarpone, cream and icing sugar until you have a spreadable (but not overly whipped) consistency.
  9. Once your cake is baked, prick lots of holes all over the surface and pour on about 2/3 of the salted caramel, allowing it to sink into the sponge. Leave to cool in the tin.
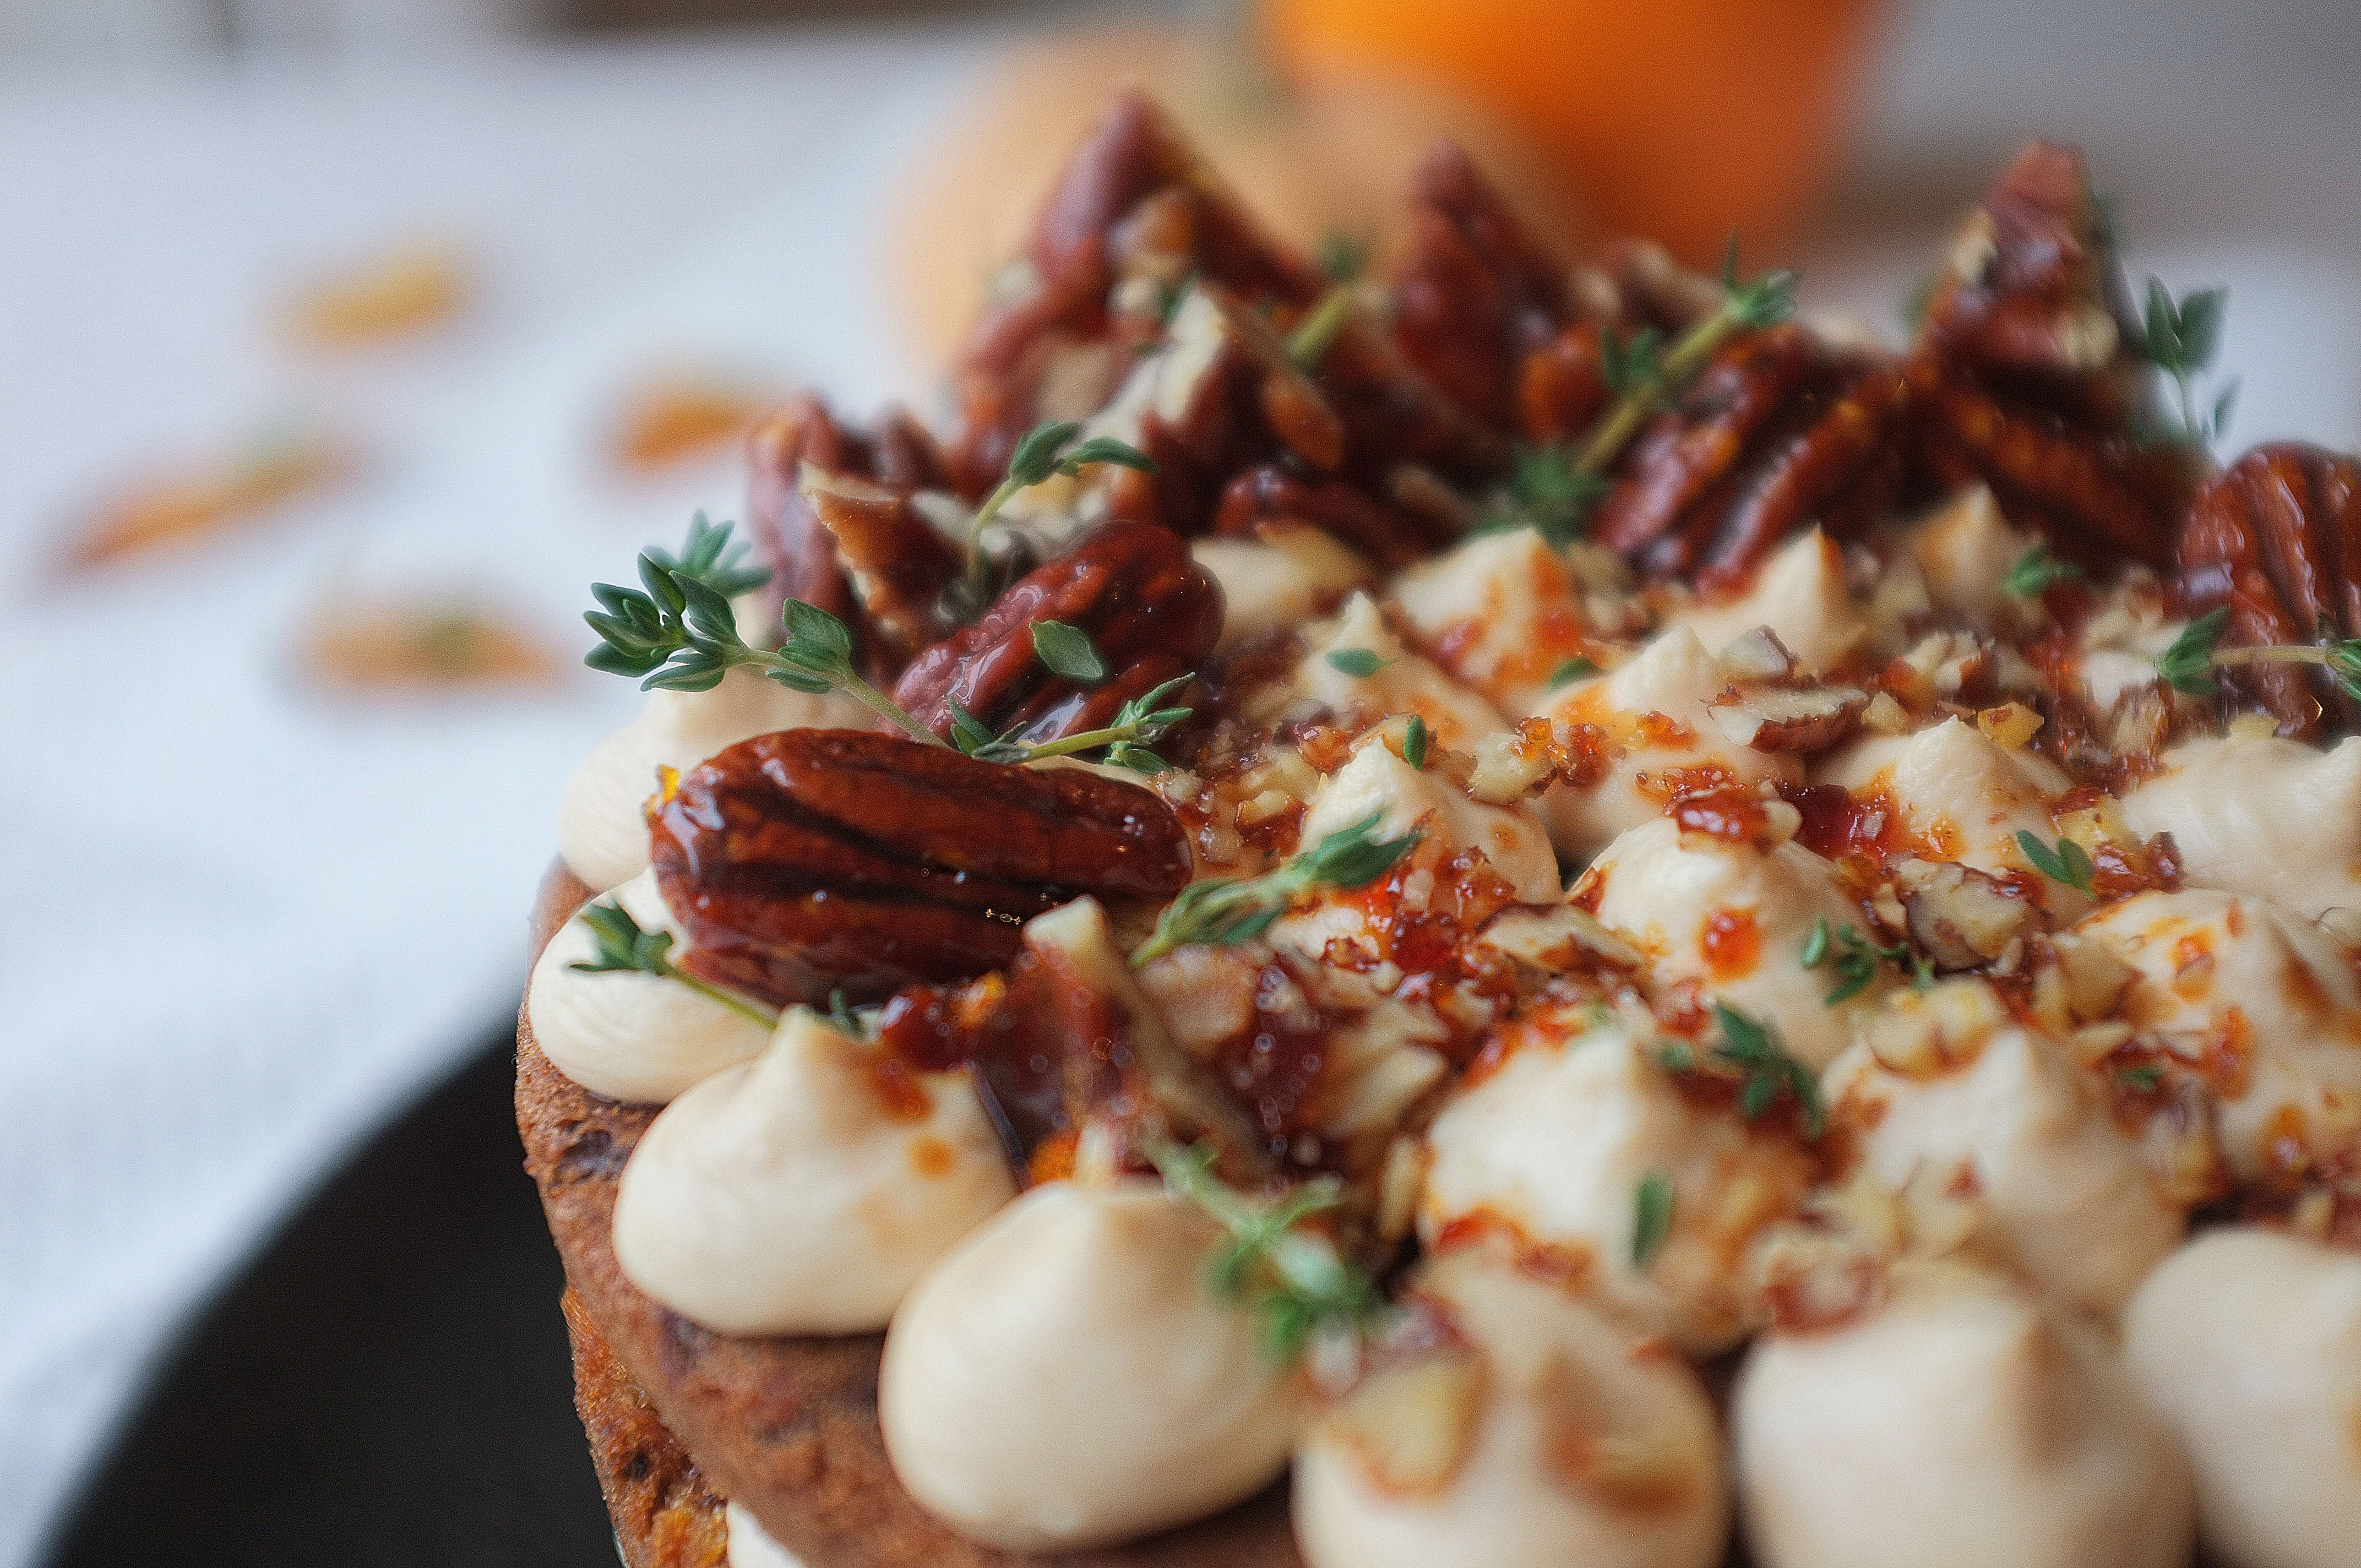
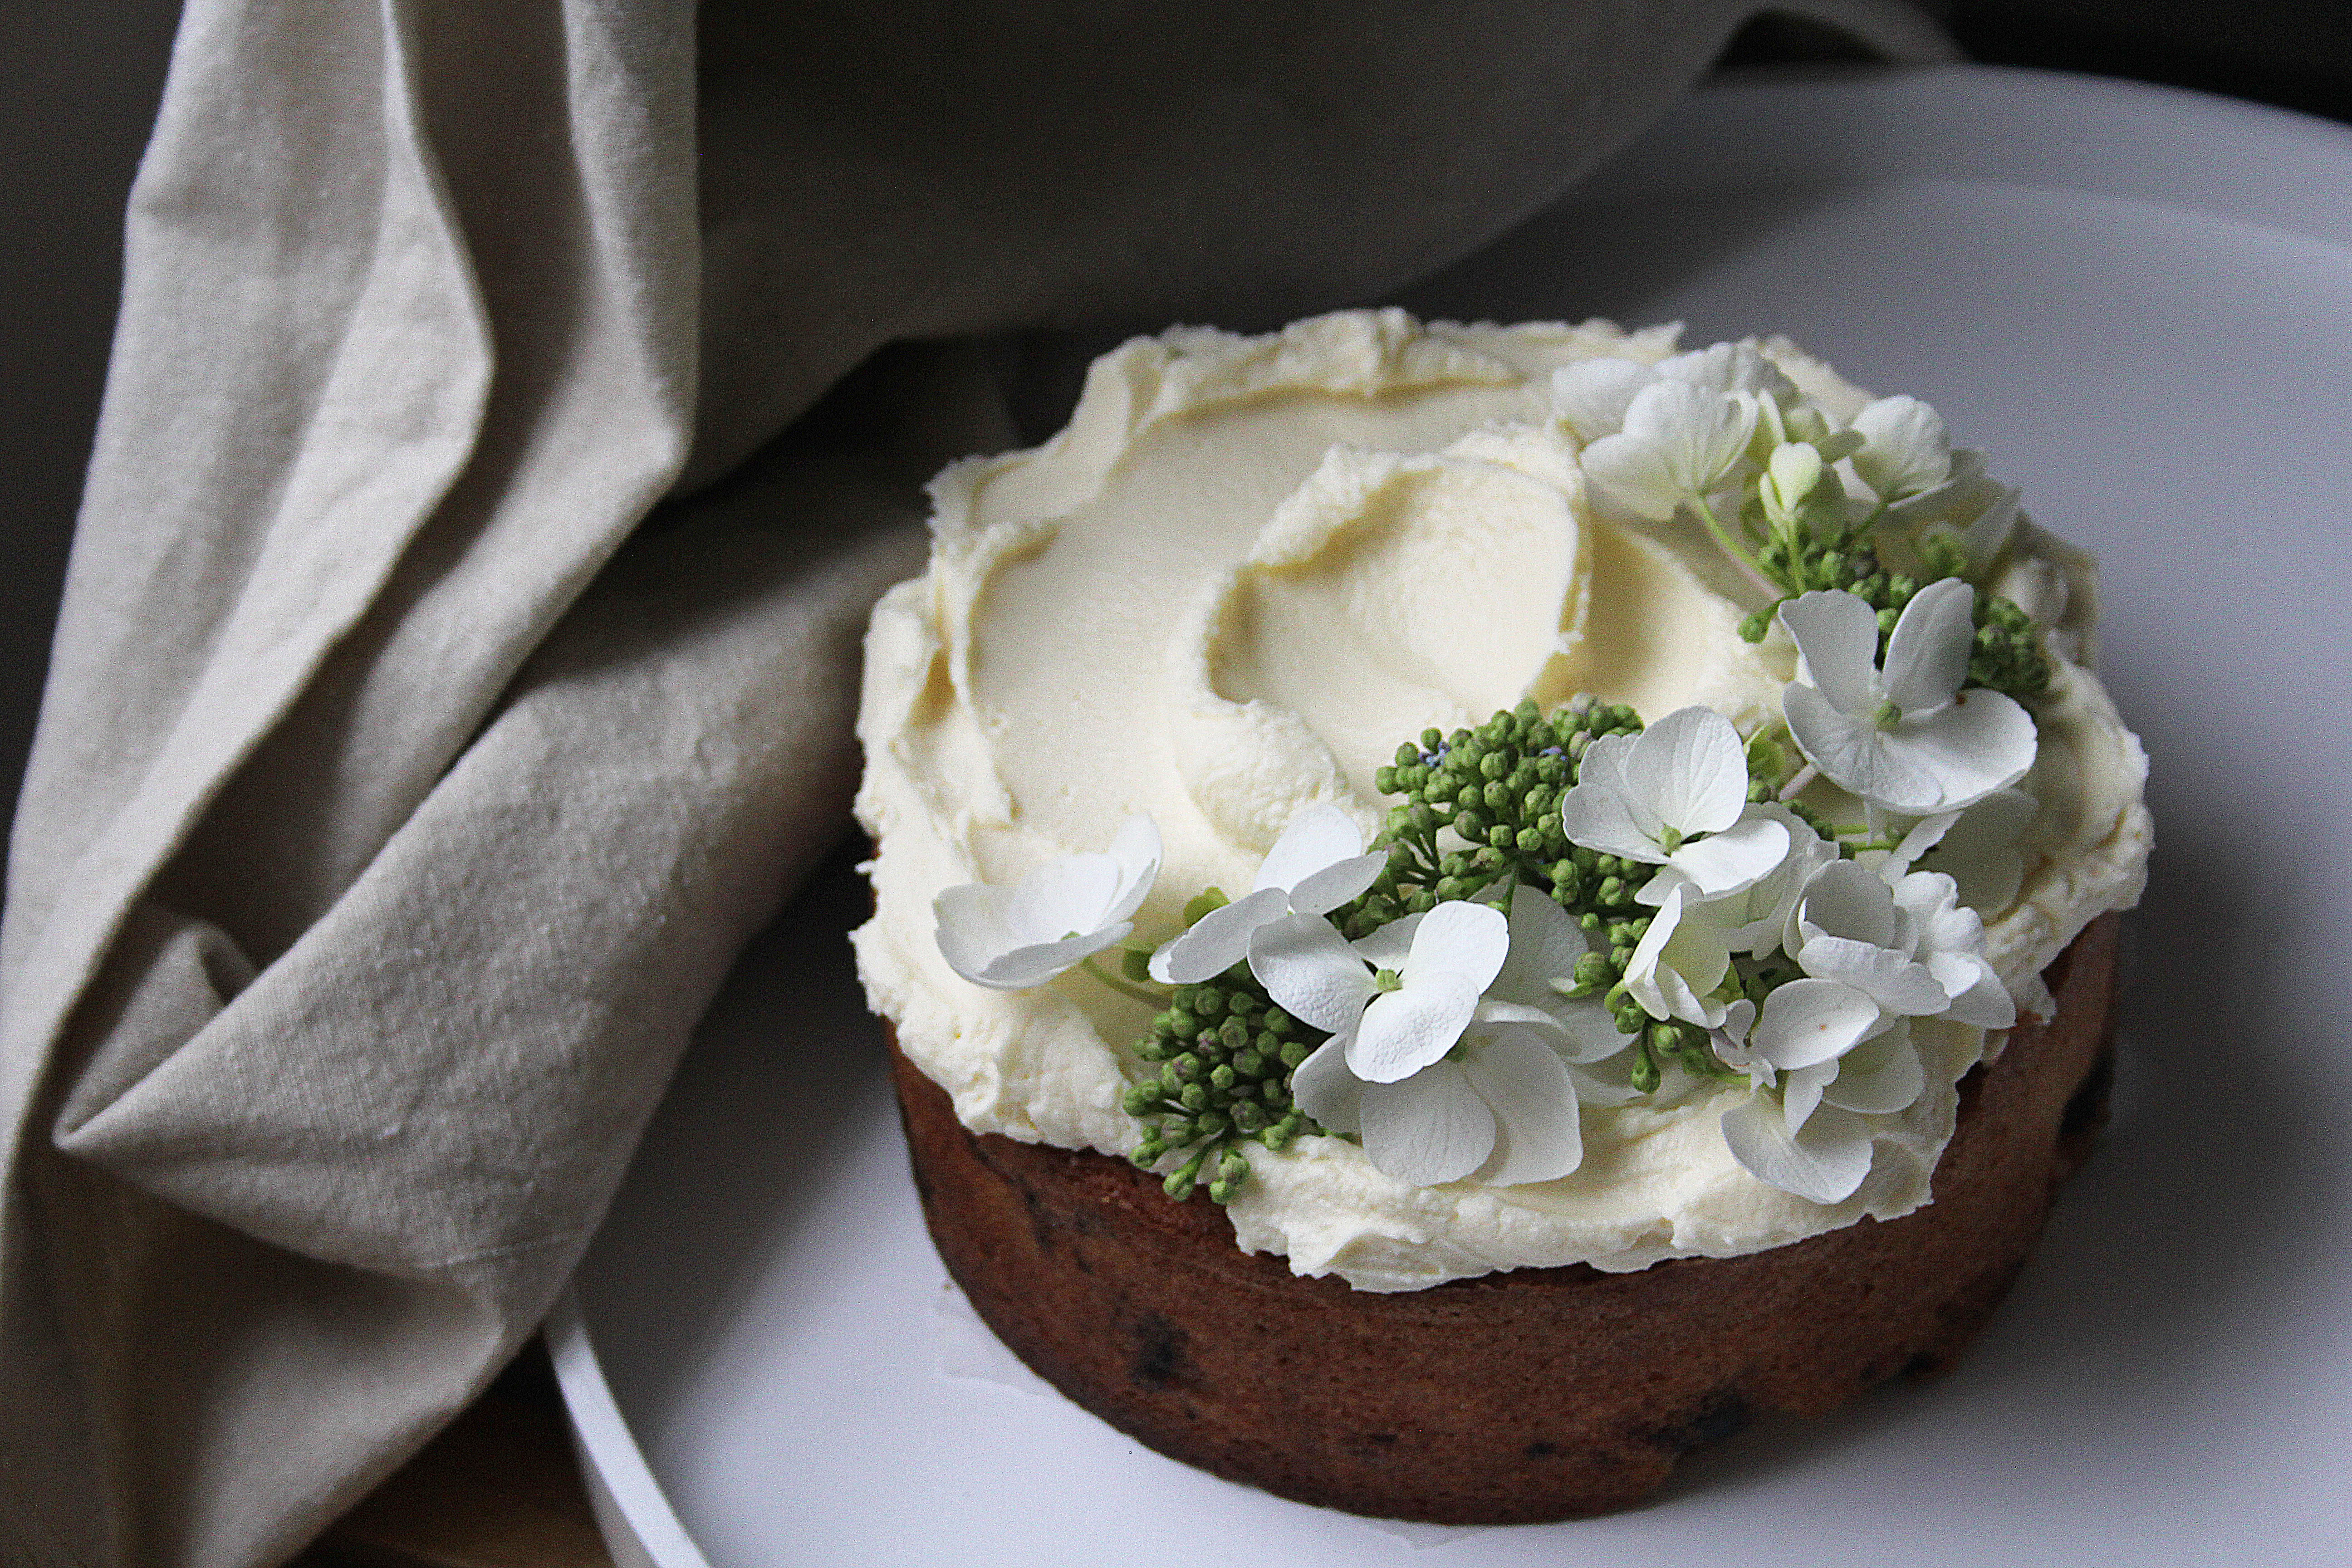
  10. When your cake is completely cool you’re ready to decorate. Spread the mascarpone icing in an even layer all over the top and sides (or just the top if you like, it’s up to you!) and smooth with a palette knife. Use the remaining cooled caramel to drizzle down the sides then crush up the praline and sprinkle around the edges. Arrange the fresh fig slices on top and add some woody herbs (such as rosemary) for colour.

Enjoy!