Burnt Butter Caramel and Raspberry Brownies

Chocolate, Uncategorized

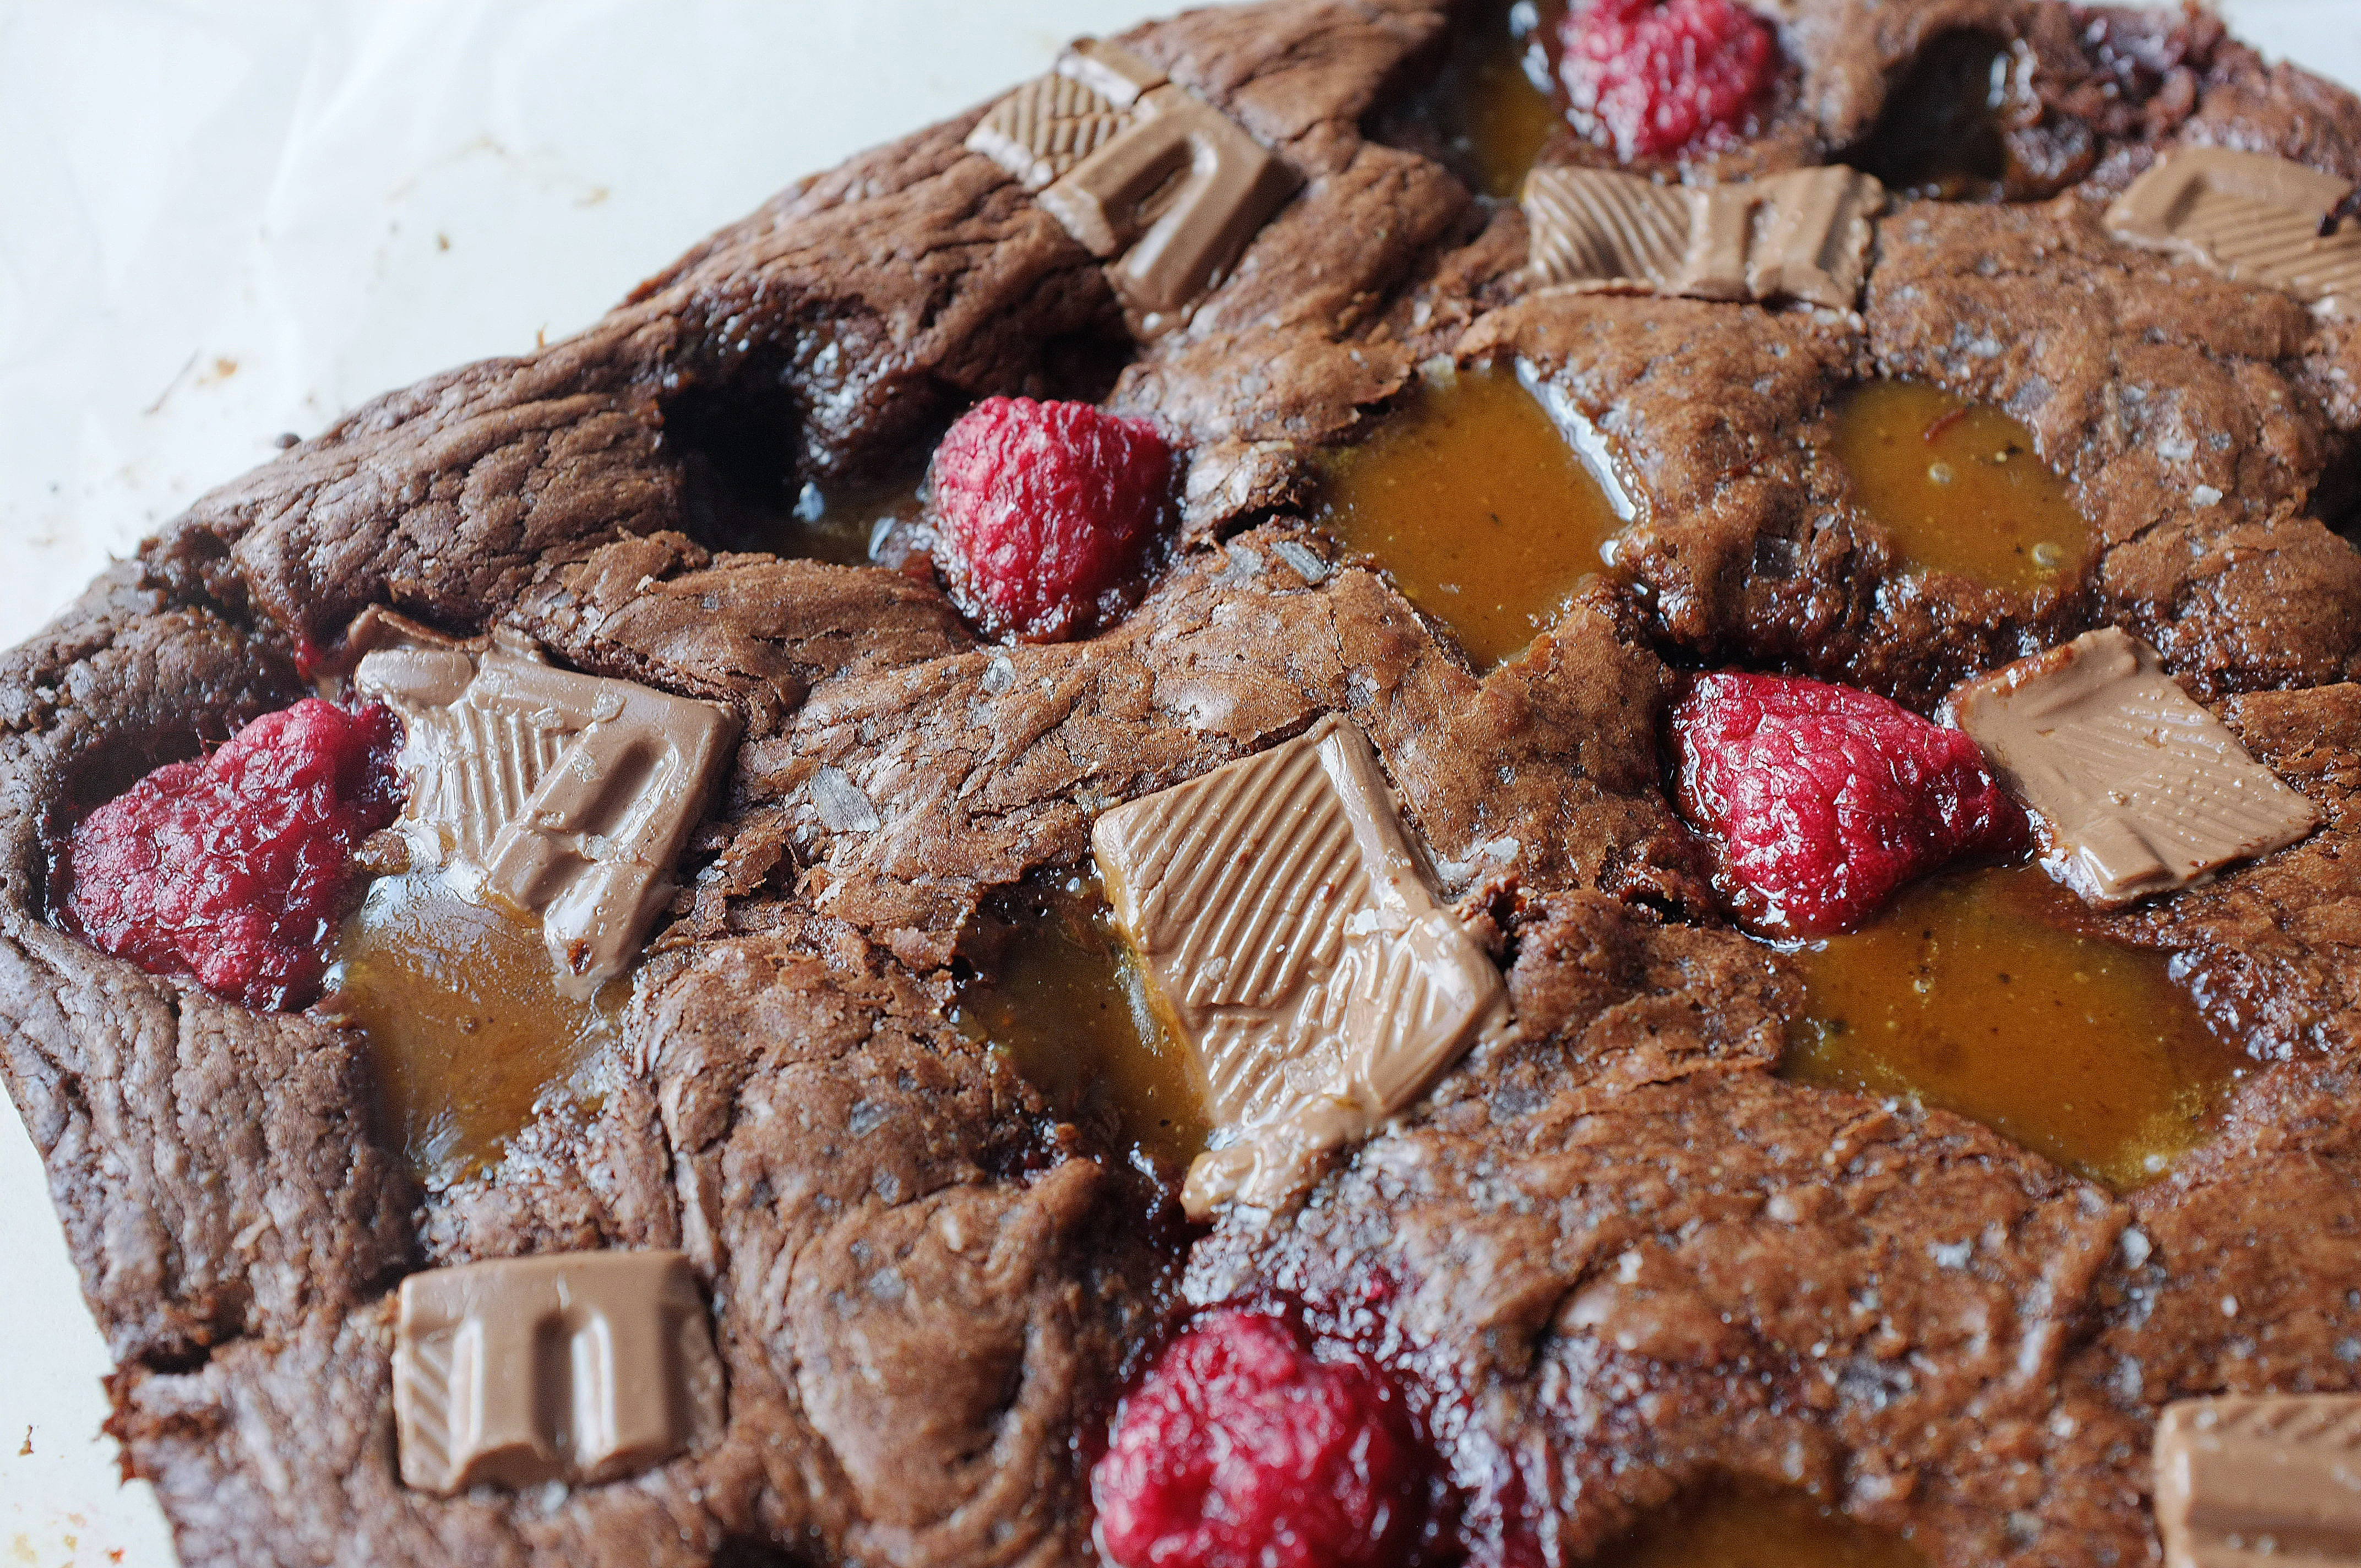
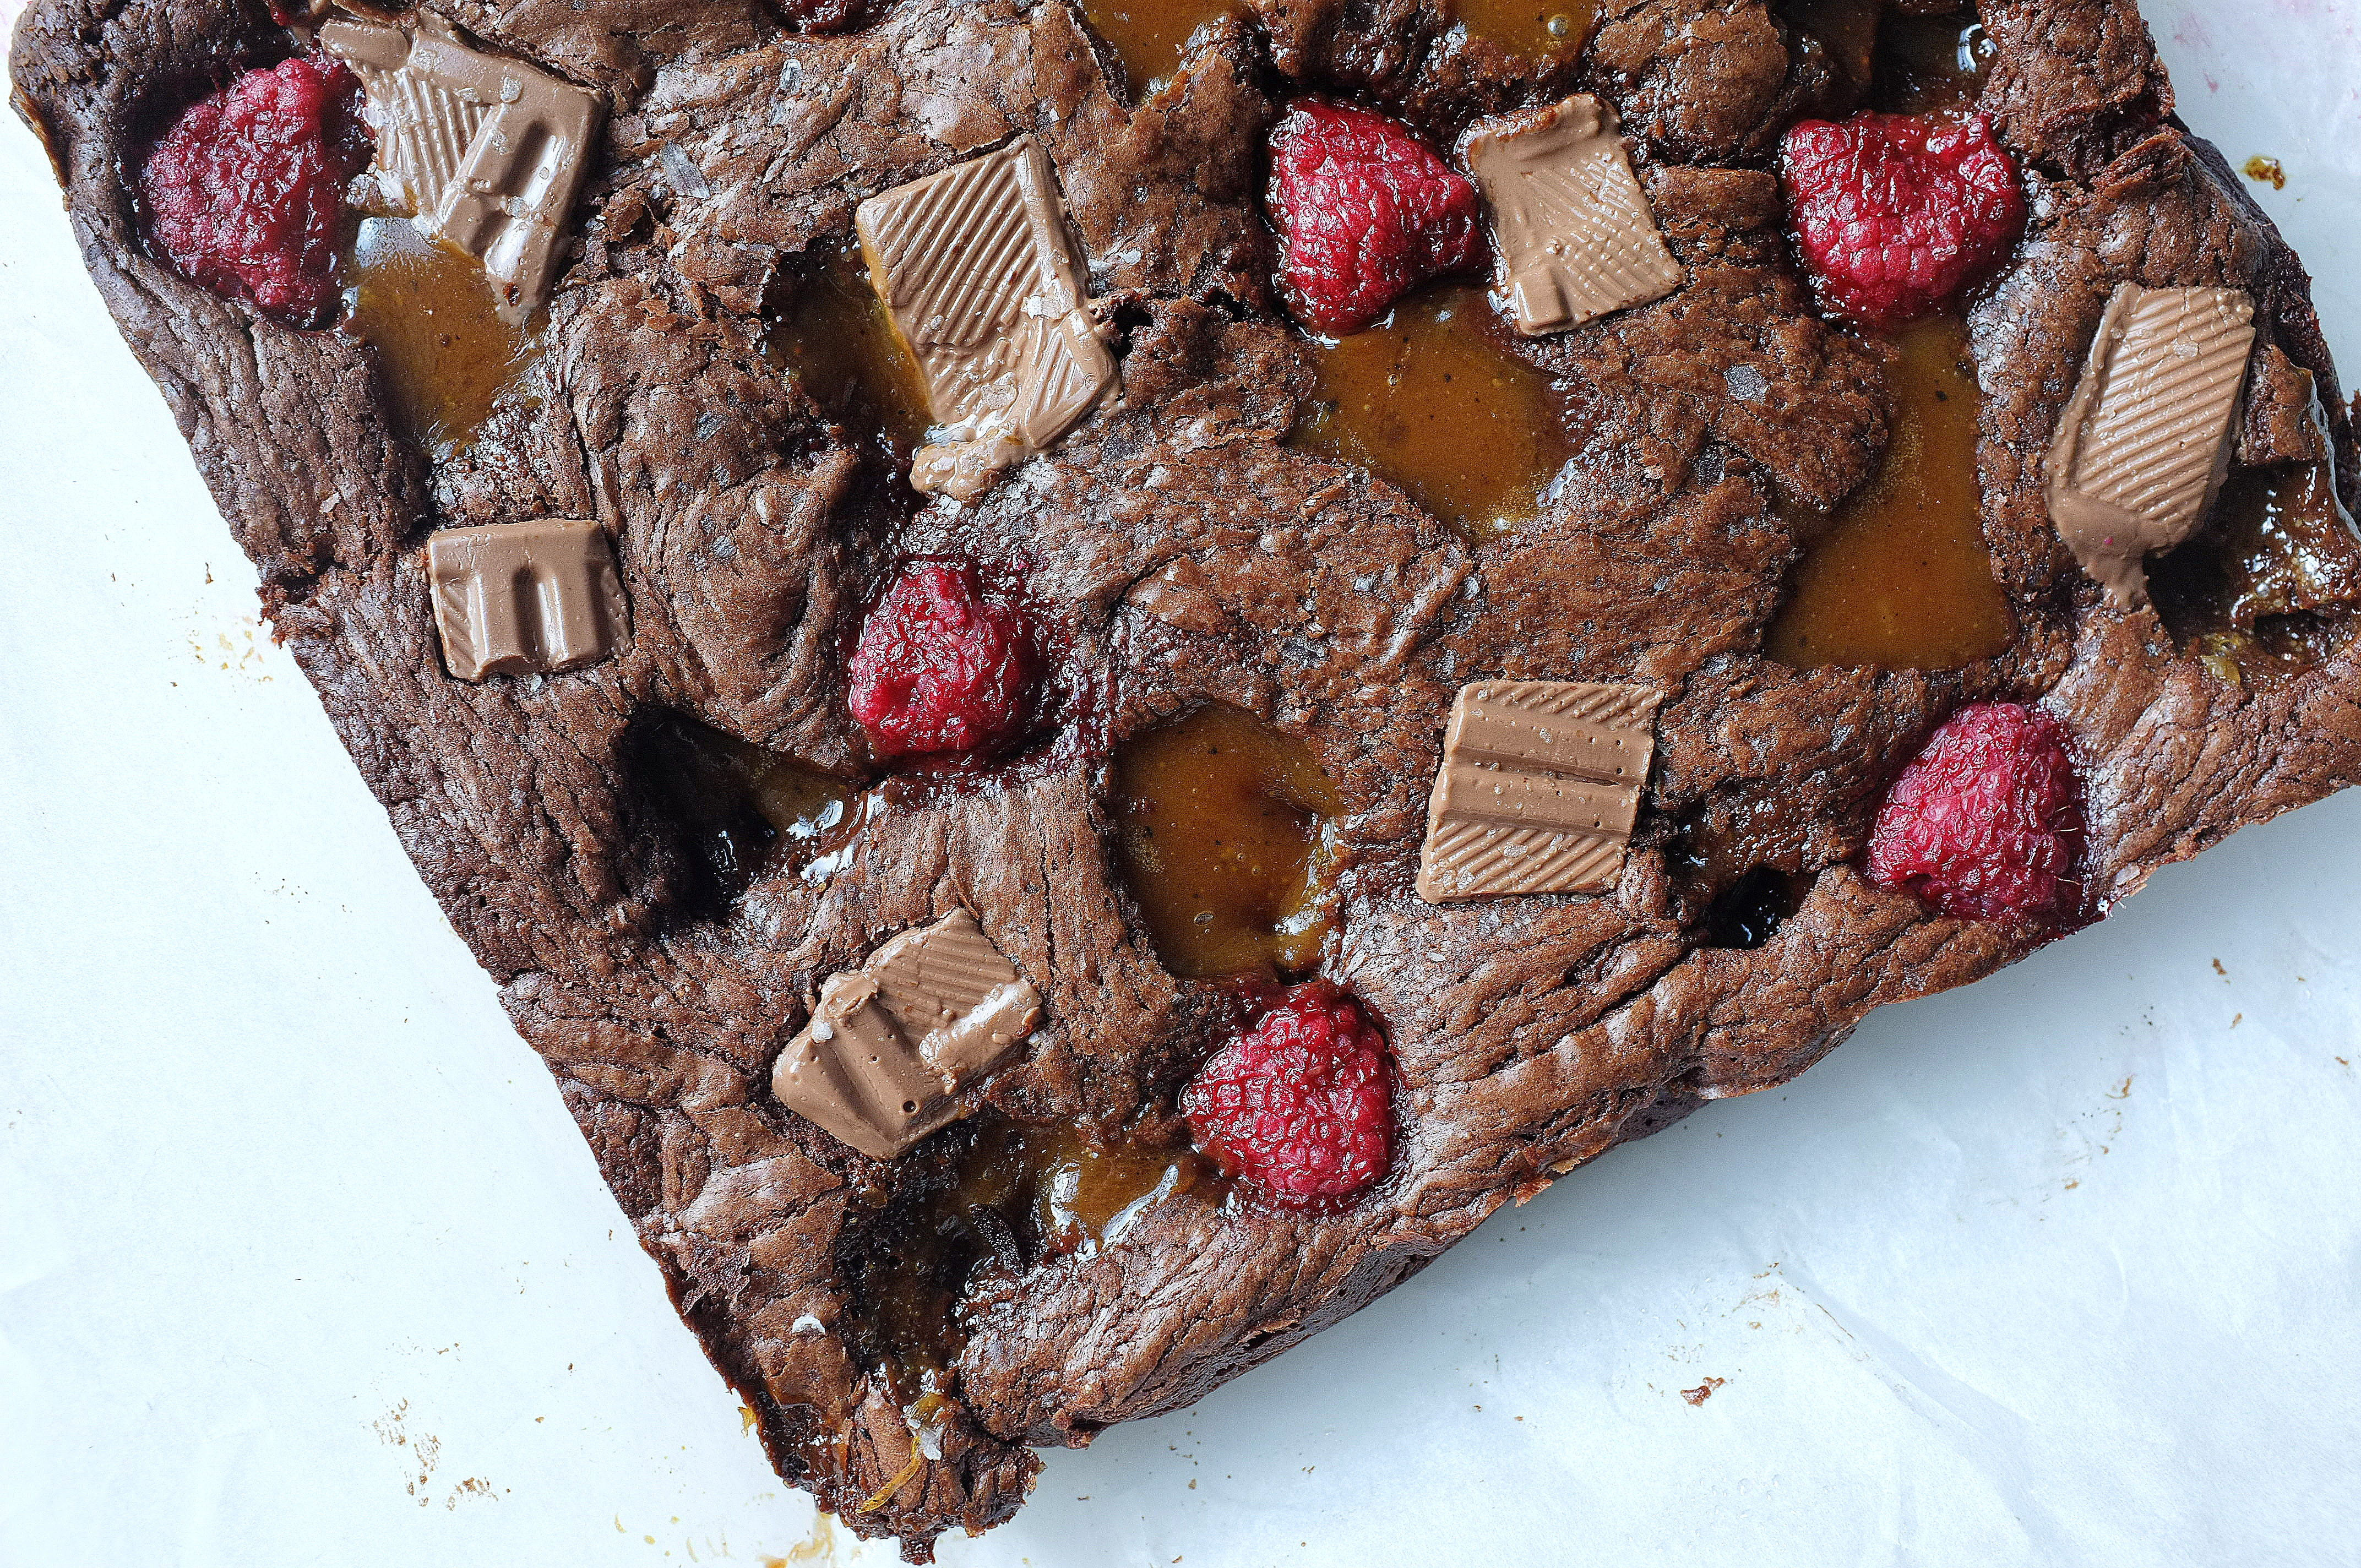
Another iteration of my all-time favourite bake, this time with fresh raspberries offset by oozing pockets of burnt butter caramel (inspired by Chin Chin Lab’s burnt butter caramel nitro ice cream). Brownies might not seem like the obvious thing to make mid-summer, but as these are studded with some token summer berries and can therefore be deemed seasonal, you should probably make them.

Ingredients

For the caramel

  • 100g caster sugar
  • 50g butter
  • 60ml double cream
  • Pinch salt

For the brownie

  • 250g butter
  • 150g 80% dark chocolate
  • 100g 70% dark chocolate
  • 3 eggs, 1 egg yolk
  • 100g light brown soft sugar, 75g caster sugar
  • Generous pinch salt
  • 100g rye flour
  • 100g good quality milk chocolate, roughly chopped
  • 250g fresh raspberries

Method

  1. Start off by making the caramel. To do this place the sugar in a saucepan and heat gently. Meanwhile, place the butter in a small pan and melt until just past browned (it should be foaming and have little brown specks in the bottom), then take off the heat.
  2. At this point the sugar will have started to dissolve. Swirl the pan until the sugar melts entirely, then allow it to reach a deep golden brown colour. Now add in the burnt butter and cream, stirring until it comes together. Remove from the heat and add the salt. Pour the caramel into a baking paper-lined container and leave to firm up for around half an hour. Preheat the oven to 180c and line a brownie tin with baking paper.
  3. While the caramel is setting, make the brownie batter. Roughly chop the dark chocolate and tip into a heatproof bowl. Place the butter in a saucepan and heat gently until melted. Up the heat and brown until foaming (as before), then pour directly over the chocolate. Let it sit for a moment, then stir to create a smooth glossy mixture.
  4. Meanwhile, place the eggs and egg yolk, both sugars and salt in a large bowl (or bowl of a stand mixer with paddle attachment) and beat until pale and voluminous.
  5. Pour the chocolate down the side of the bowl and fold in, then add the flour and fold again.
  6. Chop the set caramel into rough pieces and set aside. Scape half the brownie batter into the lined tin and level out. Evenly distribute half the caramel pieces, chocolate chunks and raspberries then scrape over the remaining chocolate. Repeat the process with the caramel, chocolate and raspberries then bake for 25-35 minutes or until crisp and flaky on top but still fudgy (with a slight wobble) in the middle.
  7. Leave to cool completely in the tin then slice up an serve.

Advertisement

Rhubarb & Caramelised White Chocolate Choux Nuts

Pastry

Crisp choux pastry, sharp roast rhubarb with a hint of vanilla, and butterscotch-sweet caramelised white chocolate cream; a delicious combination you’ve got to try, and a great way to celebrate seasonal British produce (and millennial pink… *sigh*).

Ingredients (makes 10-12)

For the choux

  • 85g unsalted butter
  • 220ml water
  • 100g plain flour
  • 3 eggs
  • pinch of salt

For the filling

  • 250g white chocolate (make sure it’s at least 30% cacao)
  • 300ml double cream
  • Pinch salt
  • 4 thick stems rhubarb
  • 3tbsp caster sugar
  • 2 vanilla pods or 1tsp vanilla extract
  • Juice and zest 1 lemon

For the topping

  • 100g icing sugar
  • Enough of the rhubarb syrup (leftover from roasting the rhubarb) to create an icing with a drizzle-consistency
  • Dried rose petals (optional)
  • Candied rhubarb ribbons (optional) (I make these by creating ribbons of rhubarb with a peeler, which I then simmer in a simple 2 parts sugar: 1 part water syrup for 5 minutes before draining off any excess liquid and cooking at 160c for 10-15 minutes, or until dried out, on a lined baking tray)

Method

  1. To make the choux put the water, butter and salt in a saucepan set over a medium heat (do not let it boil at this stage). Meanwhile, sieve the flour to remove any lumps. When the butter has melted into the water, increase the heat and bring to a rolling boil, then tip in the flour and stir vigorously until you have a smooth paste-like mix which comes away from the edges of the pan. Continue to stir for another minute to cook out the rawness of the flour, then tip into a clean bowl and close cover with cling film (this eggless stage is known as a ‘panade’). Leave to cool to room temperature.
  2. Preheat the oven to 190c. Line 2 large baking trays with greaseproof paper.
  3. Once the panade has cooled it’s time to add the eggs; whisk in a jug to break them up then very gradually add into the panade while beating with electric beaters. Stop adding the egg (you might have a little leftover) when the smooth, lump-free mixture reluctantly drops off the end of a spoon. Pile the choux mix into a piping bag, fitted with a large round nozzle.
  4. Pipe 10-12 doughnut shapes onto the prepared baking trays, leaving room for expansion. Bake the choux for 20-25 minutes or until crisp and golden, then skewer each one and return to the oven for around 10 minutes or until the middles have completely dried out. Set aside to cool and reduce the oven temperature to 180c.
  5. Slice the rhubarb into batons and toss in the caster sugar, lemon juice and zest and vanilla. Roast for 10-15 minutes in a high sided baking tray until the pieces are tender but still retain their shape. Set aside to cool and reduce the oven temperature to 120c.
  6. Chop up the white chocolate and scatter on a lined baking tray in an even layer. Place in the oven to allow the chocolate to melt for 10 minutes, then stir/turn and return to the oven for another 10 minutes. Repeat this step 2-3 more times until the chocolate reaches a deep golden colour, then scrape into a bowl and mix in a splash of cream to loosen the consistency (it can get a little grainy at this stage so pass through a sieve if necessary). Leave to cool.
  7. Once the white chocolate has cooled, place in a bowl (or bowl of a stand mixer with whisk attachment) and add in the cream and salt. Whisk until pipe-able.
  8. Slice the cooled choux nuts in half horizontally and pipe in a generous helping of caramelised white chocolate cream. Slice the roast rhubarb pieces thinly and arrange these on top of the cream, then pop the choux lid on top.
  9. For the pink icing, pour the cooking syrup from the rhubarb tray into the icing sugar and mix to create a smooth drizzle-like consistency (add in a little water if you don’t have enough syrup). Spoon this over the filled choux-nuts and garnish with edible petals and rhubarb ribbons.
Enjoy!

Salted Chocolate Cake with Coffee Mascarpone & Hazelnut Praline Caramel

Cakes

I made this cake last weekend for my Dad’s birthday and it went down a storm. Granted, the flavours aren’t subtle and it’s not for the faint hearted (which neatly mirrors my Dad’s personality actually), but the punchy combination of bitter coffee, nutty hazelnut, rich but surprisingly light chocolate sponge and salted milk chocolate ganache just work (duh- that amount of cream, sugar, salt and chocolate is always going to be delicious).

Ingredients (serves 12-14)

For the hazelnut praline caramel

  • 100g blanched hazelnuts, toasted
  • 100g caster sugar
  • 100ml double cream
  • Generous pinch sea salt

For the sponges

  • 375g plain flour
  • 300g caster sugar
  • 85g cocoa powder
  • 2tsp baking powder
  • 2tsp bicarbonate of soda
  • large pinch sea salt
  • 3 eggs
  • 325ml milk
  • 175ml vegetable oil
  • 2tsp vanilla extract
  • 100g dark chocolate
  • 325ml just boiled water
  • 2tsp instant coffee

For the salted milk chocolate ganache

  • 200g milk chocolate
  • 75g dark chocolate
  • 275ml double cream
  • Generous pinch sea salt

For the coffee mascarpone filling

  • 2tbsp instant coffee
  • 2tbsp caster sugar
  • 200g mascarpone
  • 100ml double cream

  1. Start off by making the hazelnut praline caramel.To do this simply place the caster sugar in a heavy bottom pan over a medium heat and swirl the pan until it melts. Once melted, up the heat until the sugar reaches a deep golden brown. At this stage add the toasted hazelnuts, stir to coat then tip onto a baking paper lined baking tray. Leave to set hard, then blitz into a paste. Set aside. Pour the cream into a saucepan and gently heat. Once the cream is gently simmering add in the praline paste and stir to create a caramel. Cook down for a few minutes until thickened, then set aside to cool.
  2. Preheat the oven to 170c. Grease and line two 8 inch baking tins. Melt the dark chocolate in a heatproof bowl set over a pan of simmering water (or in the microwave in short stints, stirring often). Set aside.
  3. In a large bowl stir together the flour, caster sugar, cocoa powder, baking powder, bicarbonate of soda and salt. In a jug, lightly whisk the eggs, milk, vegetable oil and vanilla extract. Make a well in the dry ingredients and pour the contents of the jug into it. Stir the wet and dry ingredients together until well combined then add the melted chocolate and stir again (I just use a balloon whisk for this- nothing electric is required as you don’t need to incorporate much air).
  4. Pour your just boiled water over the instant coffee granules and once they’ve dissolved, gradually add to the chocolate batter, stirring gently with your whisk as you go. The final cake batter will be very thin but don’t worry, it bakes beautifully.
  5. Split the mix evenly between the prepared tins and bake for 45-55 minutes (until a skewer comes out clean with a few moist crumbs attached). Once baked leave to cool completely in the tins.
  6. While the cakes are cooling make the ganache. Chop the chocolate into small pieces and place in a heatproof bowl. Heat the cream in a saucepan until it meets scalding point then pour over the chocolate. Allow the cream to melt the chocolate for a few minutes then stir until smooth and glossy. Add salt to taste then set aside to cool.
  7. For the coffee mascarpone crush the coffee into a fine powder then just whisk together all the ingredients until smooth.
  8. When all the elements are cool you’re ready to assemble the cake. Your cakes will probably have a domed top, so trim these off then divide each one into two even layers (leaving you with 4 layers overall).
  9. Scrape the hazelnut praline caramel into a piping bag. Split the mascarpone into thirds. Spread one third of the mascarpone over the first sponge layer then pipe over a third of the caramel in a zigzag (so that each slice will have some caramel inside!). Repeat this step until you’ve used up the sponges, then rustically cover the whole cake in the thickened ganache.
  10. Garnish with edible dried flower petals.

Mocha Banana Bread (Vegan)

Cakes, Uncategorized

This vegan banana bread is perfect if you’re after maximum taste pay off in exchange for minimal effort; the method calls for just a mixing bowl and hand whisk and you’ll have it in the oven in less than 10 minutes. I add chunks of dark chocolate and a shot of espresso to my banana bread as it adds a great depth of flavour and slight bittersweet finish, but feel free to omit these (if you’re weird and don’t like my two favourite things).

Ingredients

  • 125ml vegetable oil
  • 100ml dairy free yoghurt (I used Alpro plain)
  • 100ml nut milk (I used almond)
  • 3 very ripe bananas (roughly mashed) plus 1 extra banana (halved down the middle)
  • 2tbsp instant coffee granules dissolved in 2tbsp boiling water
  • 75g light brown soft sugar
  • 75g caster sugar
  • 225g plain flour
  • 1tsp baking power
  • 1tsp bicarbonate of soda
  • generous pinch of salt
  • 150g 70% dark chocolate

Method

  1. Preheat the oven to 180c. Line a large loaf tin with greaseproof paper.
  2. Place the oil, yoghurt, milk, mashed banana, both sugars and coffee in a bowl and whisk together. Now add in the flour, baking powder, bicarbonate of soda and salt and whisk again until you have a smooth batter. Roughly chop 100g of the dark chocolate and stir that in, reserving the rest. Scrape the batter into the prepared tin and arrange the banana halves on top.
  3. Bake for 50-55 minutes or until well risen, springy and golden. Once baked, leave to cool in the tin, then melt the remaining dark chocolate and drizzle over the top.

Enjoy!

Spiced Christmas Buns with Cranberry and White Chocolate

Bread, Uncategorized

In the words of Jez (Peep Show reference, sorry if you don’t watch it), ‘I am a Christmassist’. I love everything associated this time of year; heady spices, mulled anything, twinkling lights, the smell of fir, infinite chocolate, roll necks and nostalgic films. With that in mind, I’ve got lots of festive recipes lined up for December, kicking off with these spiced buns, packed full of orange-soaked fruit and white chocolate- delicious warm from the oven with a strong coffee.

Ingredients

For the dough

  • 75g butter, plus extra for greasing
  • 220ml milk
  • 50g caster sugar
  • 1tsp sea salt
  • 500g strong white bread flour
  • 2 sachets fast action dried yeast (14g)
  • 2 eggs (1 for the dough and 1 for glazing)

For the filling

  • 75g dried cranberries, roughly chopped
  • 50g sultanas, roughly chopped
  • Zest and juice 2 oranges
  • 125g butter, softened
  • 125g dark brown soft sugar
  • 1tsp ground cinnamon
  • 1tsp ground ginger
  • 1/2 tsp mixed spice
  • 100g white chocolate, roughly chopped

For the topping

  • The reserved orange juice, plus 3tbsp caster sugar
  • A few extra cranberries, roughly chopped (optional)
  • 75g white chocolate, melted (optional)

Method

  1. Start off by making the dough. Put the butter and milk into a saucepan and very gently heat until the butter melts, then set aside until lukewarm. Stir together the sugar, salt, yeast and flour in a large bowl (or bowl of a stand mixer with dough hook attached) then make a well and add in the lukewarm milk/butter and one of the eggs. Mix the wet ingredients into the dry, first using a wooden spoon to bring everything together, then using your hands to form a soft dough (alternatively, do this by setting your dough hook to a low speed).
  2. Once you have a soft dough, turn it out onto a very lightly floured surface and knead for about 10 minutes (or just keep the dough in your stand mixer bowl and increase the speed of your dough hook for 6-8 minutes) or until your dough is smooth, stretchy and elastic.
  3. Now tip the dough into an oiled bowl, cover with oiled cling film and leave to prove for about an hour and a half, or until doubled in size.
  4. For the bun filling, place the cranberries, sultanas, orange zest and orange juice in a bowl and leave to soak for half an hour. Meanwhile, beat together the butter, sugar, cinnamon, ginger and mixed spice until smooth. Grease a high sided 20x30cm rectangular tin or 25x25cm square tin and line with greaseproof paper.
  5. Once the dough has proved, tip out onto a lightly floured surface and roll into a rectangle, about 5mm thick. Spread the cinnamon butter mixture across the surface of the rectangle in an even layer, ensuring that you go all the way to the edges. Now strain the orange juice away from the dried fruits into a saucepan (save this for later). Sprinkle the fruits over the cinnamon butter then lastly distribute the chopped white chocolate.
  6. Now, with the long side facing you, roll the rectangle up like a roulade. Slice into 12 even slices if you’re using a rectangular tin (about 2cm wide) or 9 even slices if you’re using a square (about 2.5cm wide). Arrange the pieces, swirl side up, in the prepared tin and cover with a piece of lightly oiled cling film. Leave to prove for 30-40 minutes or until well risen and springy (before this prove there will be little gaps between the buns, but they should be just touching when ready to bake). Preheat the oven to 180c.
  7. Once risen, whisk the remaining egg and brush all over the tops of the buns. Bake for 40-45 minutes or until golden and cooked through. Meanwhile, place the reserved orange juice and caster sugar in a saucepan and heat gently, until the sugar dissolves and the mixture is syrupy. When the buns are baked, brush the syrup all over the tops, then drizzle on the white chocolate and finish with chopped cranberries, if you like.

Pecan Pie Cheesecake with Brown Butter Pastry and a Caramel Core

Uncategorized

I’m under no illusion that this bake is a bit of a project and should probably come with a health warning, but I can honestly say that the the result it delivers is well worth the effort and extra 4539 calories (joking about the calories… although probably not far off). I’ve gone for a brown butter rye pastry in place of a biscuit base here, which might sound controversial (maverick), but it matches up to the nutty pecan topping really well and acts as a great textural contrast to the smooth, caramel-cored cheesecake filling. Give it a go, but be warned, it’s been described as ‘like crack’ by my eloquent taste-testers (who aren’t and never have been ‘on crack’, for the record).

Ingredients

For the base

  • 150g butter
  • 175g plain flour
  • 75g rye flour
  • 1tsp cinnamon
  • 50g icing sugar
  • 2 egg yolks
  • 2tbsp milk

For the caramel core

  • 100g caster sugar
  • 25ml water
  • 50ml double cream
  • pinch sea salt
  • 2tbsp rum or bourbon (optional)

For the filling

  • 600g full fat cream cheese
  • 150g caster sugar
  • 2tbsp corn flour
  • 2 eggs
  • 180ml soured cream
  • pinch salt

For the topping

  • 1 egg
  • 50g dark brown soft sugar
  • 3tbsp golden syrup or honey
  • 1tbsp butter, melted
  • 1tbsp plain flour
  • 100g pecan halves, lightly toasted

Method

  1. Start off by browning the butter for the pastry. To do this simply melt it in a pan until it’s gently foaming, smells nutty and is a light golden brown colour. At this stage pour the butter in a heatproof bowl and pop in the fridge or freezer to set hard.
  2. While the butter is firming up, make the caramel core. Place the sugar and water in a pan and gently heat until the sugar has completely dissolved and you are left with a clear syrup, then increase the heat and boil until it reaches a deep golden brown. Add in the cream (be careful as it will spit!) and stir for a further two minutes on the heat, then remove from the heat and add the salt and rum to taste. Set aside until needed.
  3. Back to the pastry; once your butter has firmed up, chop into cubes and tip into a food processor along with the flours, cinnamon and sugar. Pulse until it resembles breadcrumbs, then add in the milk and egg yolks. Pulse again a few times until the mix comes together in large lumps, then tip out onto your work surface and shape into a disc. Wrap in cling film and chill for 10 minutes. Preheat the oven to 180c. Grease a 2.5inch tall/ 8inch wide spring form cake tin with butter and place a disc of greaseproof paper in the base.
  4. Roll out the pastry to about 3mm thick on a floured work surface then line the prepared tin, pushing the pastry into the corners as you go (I actually find it easier to cut out a circle of pastry for the base and 2 long rectangles for the walls when I’m using a cake tin for pies and tarts- just make sure you blend the joins between the pieces together and don’t leave any gaps). Trim away any excess from the top of the tin, prick a fork all over the base (not all the way through) to prevent air bubbles, then chill for 10 minutes, or until very firm. If you like you can cut out some leaves for decoration at this stage.
  5. Once firm, line the pastry case with baking paper and fill with baking beans (ensuring that they come all the way to the top of the walls), then blind bake for about 15 minutes, or until the walls are supporting themselves. At this stage, remove the paper and beans and return to the oven for another 10-15 minutes, or until the pastry is cooked through and golden. Set aside. Reduce the oven temperature to 120c.
  6. For the cheesecake filling simply whisk together the cream cheese, sugar and corn flour until smooth, then add in the eggs one at a time, beating well between each addition. Lastly, whisk in the soured cream and salt. Tip half of this mixture into the pastry case then drizzle over the caramel. Top with the remaining cheesecake mix (this should come to about an inch below the rim of the pastry case). Bake for 50-55 minutes, or until the middle retains a little wobble. Set aside and allow to settle and cool down slightly. Increase the oven temperature to 170c.
  7. While the cheesecake is baking, mix together all the topping ingredients, except the pecans,until smooth. Once your cheesecake has cooled to a point where it’s no longer hot to the touch, arrange the pecan halves across the surface, then pour over the syrupy mixture. Return to the oven for 10-15 minutes until the topping has thickened slightly. Set aside to cool then chill to set up for at least 4 hours (ideally overnight). When you’re ready to serve, run a knife around the edge of the tin and gently release the cheesecake, then slice up and enjoy!

Orange, Cardamom and White Chocolate Shortbread

Biscuits, Uncategorized

These buttery shortbreads, dipped in white chocolate and flavoured with warming cardamom and citrus, have got me feeling (dare I say it) pretty festive. The format might be a bit retro but there’s something comforting and nostalgic about bedding in with a batch of homemade biscuits and a cup of builder’s tea at this time of year. Give them a try for a quick and easy twist on a classic.

Ingredients (makes 20-24 biscuits)

  • 225g soft butter
  • 100g caster sugar
  • zest 1 orange
  • 150g plain flour
  • 1 1/2 tsp ground cardamom
  • 75g rye flour
  • 100g cornflour
  • Pinch of salt
  • 100g white chocolate
  • 50g pistachios, finely chopped (optional)

Method

  1. Place the butter, sugar and orange zest in a large bowl (or bowl of a stand mixer with paddle attachment) and beat until very light and fluffy. Add in the flours, salt and ground cardamom and beat briefly until the flour is just incorporated and the mix starts to come together in large clumps (it’s important not to over-mix here as beating for too long could result in a tough biscuit which isn’t buttery and short!).
  2. Bring the mix together with your hands and roll out on a floured surface to about 1cm thick. Stamp out biscuits using a cookie cutter (or just slice the dough into squares with a knife) and line up on a lined baking tray. Chill for at least 30 minutes, or until firm. Preheat the oven to 180c.
  3. Once your biscuits have firmed up, bake for 12-15 minutes or until the edges are golden. Leave to cool on a wire rack.
  4. Melt the white chocolate in a heatproof bowl set over a saucepan of simmering water (or melt in the microwave at 30 second increments, stirring between each) then dip each biscuit in, about half way up. Place the dipped biscuits on a piece of greaseproof paper for the chocolate to set and sprinkle with pistachios.

Enjoy!

Craquelin Choux Buns with Honeyed Walnuts, Mascarpone and Orange

Pastry, Uncategorized

A couple of months ago I bought, then promptly forgot about, some delicious pine honey which I intended to use as the central flavour in a pastry-based recipe. Now that it’s been retrieved from the depths of my cupboard it has well and truly fulfilled that destiny in these crisp craquelin choux buns. Simply filled with honeyed orange mascarpone and walnuts (also baked in the honey and a little salt) these make for a delicious treat, but served alongside honey butterscotch sauce and they’re next level- perfect for a fancy Autumnal dessert.

Ingredients

For the craquelin top

  • 55g unsalted butter, cubed, at room temperature
  • 65g soft light brown sugar
  • 65g plain flour

For the choux

  • 85g butter
  • 220ml water
  • 100g plain flour
  • 3 eggs (plus 1 extra for glazing)
  • pinch of salt

For the filling

  • 300g mascarpone
  • 200ml double cream
  • 2tbsp (heaped) good quality honey (I used Greek Pine Honey)
  • Zest of 2 oranges

For the honeyed walnuts

  • 100g walnuts
  • 2tbsp (heaped) good quality honey (as before)
  • good pinch salt

For the sauce (optional)

  • 75ml honey
  • Juice 1/2 orange
  • 25g butter
  • 100ml double cream
  • Generous pinch salt

Method

  1. Start off by making the craquelin topping (when baked, this forms a crispy sweet layer). To do this simply mix the butter, sugar and flour in a large bowl (or in the bowl of a stand mixer with paddle attachment on a slow speed) until it starts to form large lumps, then bring it together with your hands. Place the dough on a large piece of baking paper, top with another piece of baking paper, and roll out to about 3mm thick. Pop this onto a tray and leave in the freezer to solidify.
  2. To make the choux, put the water, butter and salt in a saucepan set over a medium heat (do not let it boil at this stage). Meanwhile, sieve the flour to remove any lumps. When the butter has melted into the water, increase the heat and bring to a rolling boil, then tip in the flour and stir vigorously until you have a smooth paste-like mix which comes away from the edges of the pan. Continue to stir for another minute to cook out the rawness of the flour, then tip into a clean bowl and close cover with cling film (this eggless stage is known as a ‘panade’). Leave to cool to room temperature.
  3. Preheat the oven to 190c. Line 2 large baking trays with greaseproof paper.
  4. Once the panade has cooled it’s time to add the eggs; whisk in a jug to break them up then very gradually add into the panade while beating with electric beaters. Stop adding the egg (you might have a little leftover) when the smooth, lump-free mixture reluctantly drops off the end of a spoon. Pile the choux mix into a piping bag, fitted with a large round nozzle.
  5. Pipe rounds of about 4cm wide onto the prepared baking trays, leaving plenty of room for expansion. Whisk the remaining egg in a bowl and brush a small amount onto each mound, smoothing down the tip. Take your craquelin sheet and stamp out 3cm circles. Place one on top of each choux mound (the egg will help secure it in place). Bake the choux for around 35 minutes, then skewer a small hole in each bun and return to the oven for a further 5 minutes, to dry out the middles. Once baked, they should be crisp and golden brown with a crackled appearance on top. Cool while you make the other elements.
  6. Toss the walnuts in the honey and salt and spread out on a baking tray. Cook for around 10 minutes or until caramelised then set aside to cool. Once cooled, roughly chop.
  7. For the filling, just whisk together the mascarpone, cream, honey and orange zest until light and smooth. Pile into a piping bag. Finally, for the sauce heat the honey and orange juice in a saucepan and simmer for a couple of minutes, add in the butter and stir until it’s melted, then add the cream and salt. Keep gently simmering, stirring occasionally, until slightly thicker (a few minutes should be fine), then set aside.
  8. To assemble the choux buns, slice each one in half and pipe some mascarpone cream into the base. Top with a sprinkling of walnuts and a little sauce, then place the lid on. Serve with some extra sauce.

Enjoy!

Blackberry, Hazelnut and Lavender Honey Celebration Cake

Cakes, Uncategorized

This cake, decorated with whimsical blooms from the Eloise bouquet by Bloom and Wild, is made up of four layers of moist hazelnut sponge soaked in lavender honey syrup, filled with a fresh blackberry compote and covered in delicately flavoured lavender mascarpone cream. The bouquet is inspired by a summer meadow, so it seemed only right to pick out some of my favourite ingredients the British countryside has to offer for this recipe; together the balance of nutty, floral and fruity flavours are delicious. Try this one out in August/September for a really special seasonal centre piece.

Ingredients

For the lavender honey syrup (this is used to soak the sponges and flavour the mascarpone icing)

  • 100ml runny honey
  • 75ml water
  • 4 sprigs fresh lavender or 1tbsp dried lavender

For the blackberry compote

  • 400g fresh blackberries
  • 3tbsp runny honey
  • Zest and juice 1 lemon

For the hazelnut sponges

  • 350g soft unsalted butter
  • 325g light brown soft sugar
  • 6 eggs
  • 200g ground hazelnuts (to make these just blitz 200g blanched hazelnuts in a food processor until fine)
  • 150g plain flour
  • 2tsp baking powder
  • Pinch salt

For the lavender mascarpone cream

  • 3-4tbsp of the lavender honey
  • 350ml double cream
  • 300ml mascarpone

To garnish (optional)

  • The Eloise bouquet by Bloom and Wild
  • Fresh blackberries
  • Crushed and toasted hazelnuts

Method

  1. Start by making the lavender honey (to give it time to develop in flavour). To do this just place the honey, water and lavender (whichever sort you’re using) in a saucepan and gently heat until the honey has dissolved into the water. Once this has happened, simmer for 2 minutes then set aside and leave to infuse until required
  2. Now make the blackberry compote by gently heating the blackberries, honey, lemon zest and juice in a saucepan. Stir occasionally, until the blackberries release their juices and reduce down to form a compote consistency. Set aside to cool.
  3. Preheat the oven to 180c. Grease and line two 8 inch cake tins.
  4. Place the softened butter and sugar in a large bowl (or bowl of a stand mixer) and beat until very light and fluffy (about 5 minutes). Add the eggs, one at a time, beating very well between each addition (add a tablespoon of the flour each time to prevent curdling). Once all the eggs are well incorporated, fold in the ground hazelnuts, remaining flour, baking powder and salt with a large metal spoon.
  5. Divide the mix between the prepared tins and level the tops. Bake for 35-40 minutes (or until well risen and a skewer comes out clean when inserted). Once baked, prick the surfaces of the cakes with a fork and spoon over 3-4tbsp of the lavender honey syrup, then leave to cool completely in the tins.
  6. While the cakes are cooling, make the lavender mascarpone cream. Put all the ingredients in a large bowl (or bowl of a stand mixer) and whisk until thick and spreadable. Scrape half the mixture into a piping bag. Now you’re ready to assemble the cake (providing all your elements are completely cool!).
  7. To put the cake together, slice the sponges in half horizontally (so you have four even layers). Place the first layer down on your chosen plate and pipe a thick ring of mascarpone cream around the edge, then fill the middle with one third of the blackberry compote and repeat this until you’ve stacked up all four layers. With the remaining mascarpone cream, cover the cake and smooth with a palette knife. Decorate with blooms from the Eloise bouquet or freestyle with hazelnuts, fresh blackberries and lavender.

Enjoy!

Gooseberry and Lemon Cake with Elderflower Mascarpone

Cakes, Uncategorized

Light, buttery sponge flavoured with lemon, tart pockets of soft, juicy gooseberries, and a generous swirl of elderflower mascarpone make up this simple summer cake and ode to the British countryside.

Ingredients

  • 225g butter, softened
  • 225g caster sugar
  • zest 2 lemons
  • 1tsp vanilla extract
  • 4 eggs
  • 225g self raising flour
  • 75g ground almonds
  • 1tsp baking powder
  • 250g gooseberries (blueberries, blackberries or raspberries would also work well)
  • 200g mascarpone
  • 3tbsp elderflower cordial
  • 1tbsp honey

Method

  1. Preheat the oven to 180c. Grease and line a 9 inch cake tin.
  2. Place the butter, sugar, lemon zest and vanilla in a large bowl (or bowl of a stand mixer with paddle attachment) and beat until very light, pale and fluffy. Add the eggs, one at a time, beating well between each addition. Add a little flour if you’re worried about curdling.
  3. Once all the eggs are well incorporated, fold in the flour, ground almonds and baking powder. Trim the tops and stalks of the gooseberries then fold them through the cake batter.
  4. Scrape the cake batter into the prepared tin and level off the top. Bake for 35-40 minutes or until the cake is springy and golden (or until a skewer comes out clean when inserted). Once baked, leave the cake to cool completely in the tin.
  5. Meanwhile, whisk together the mascarpone, elderflower and honey. When the cake is cool, swirl the mascarpone over the cake and decorate with fresh flowers.

Enjoy!