Cherry Molasses, Pistachio and White Chocolate Buns

Uncategorized

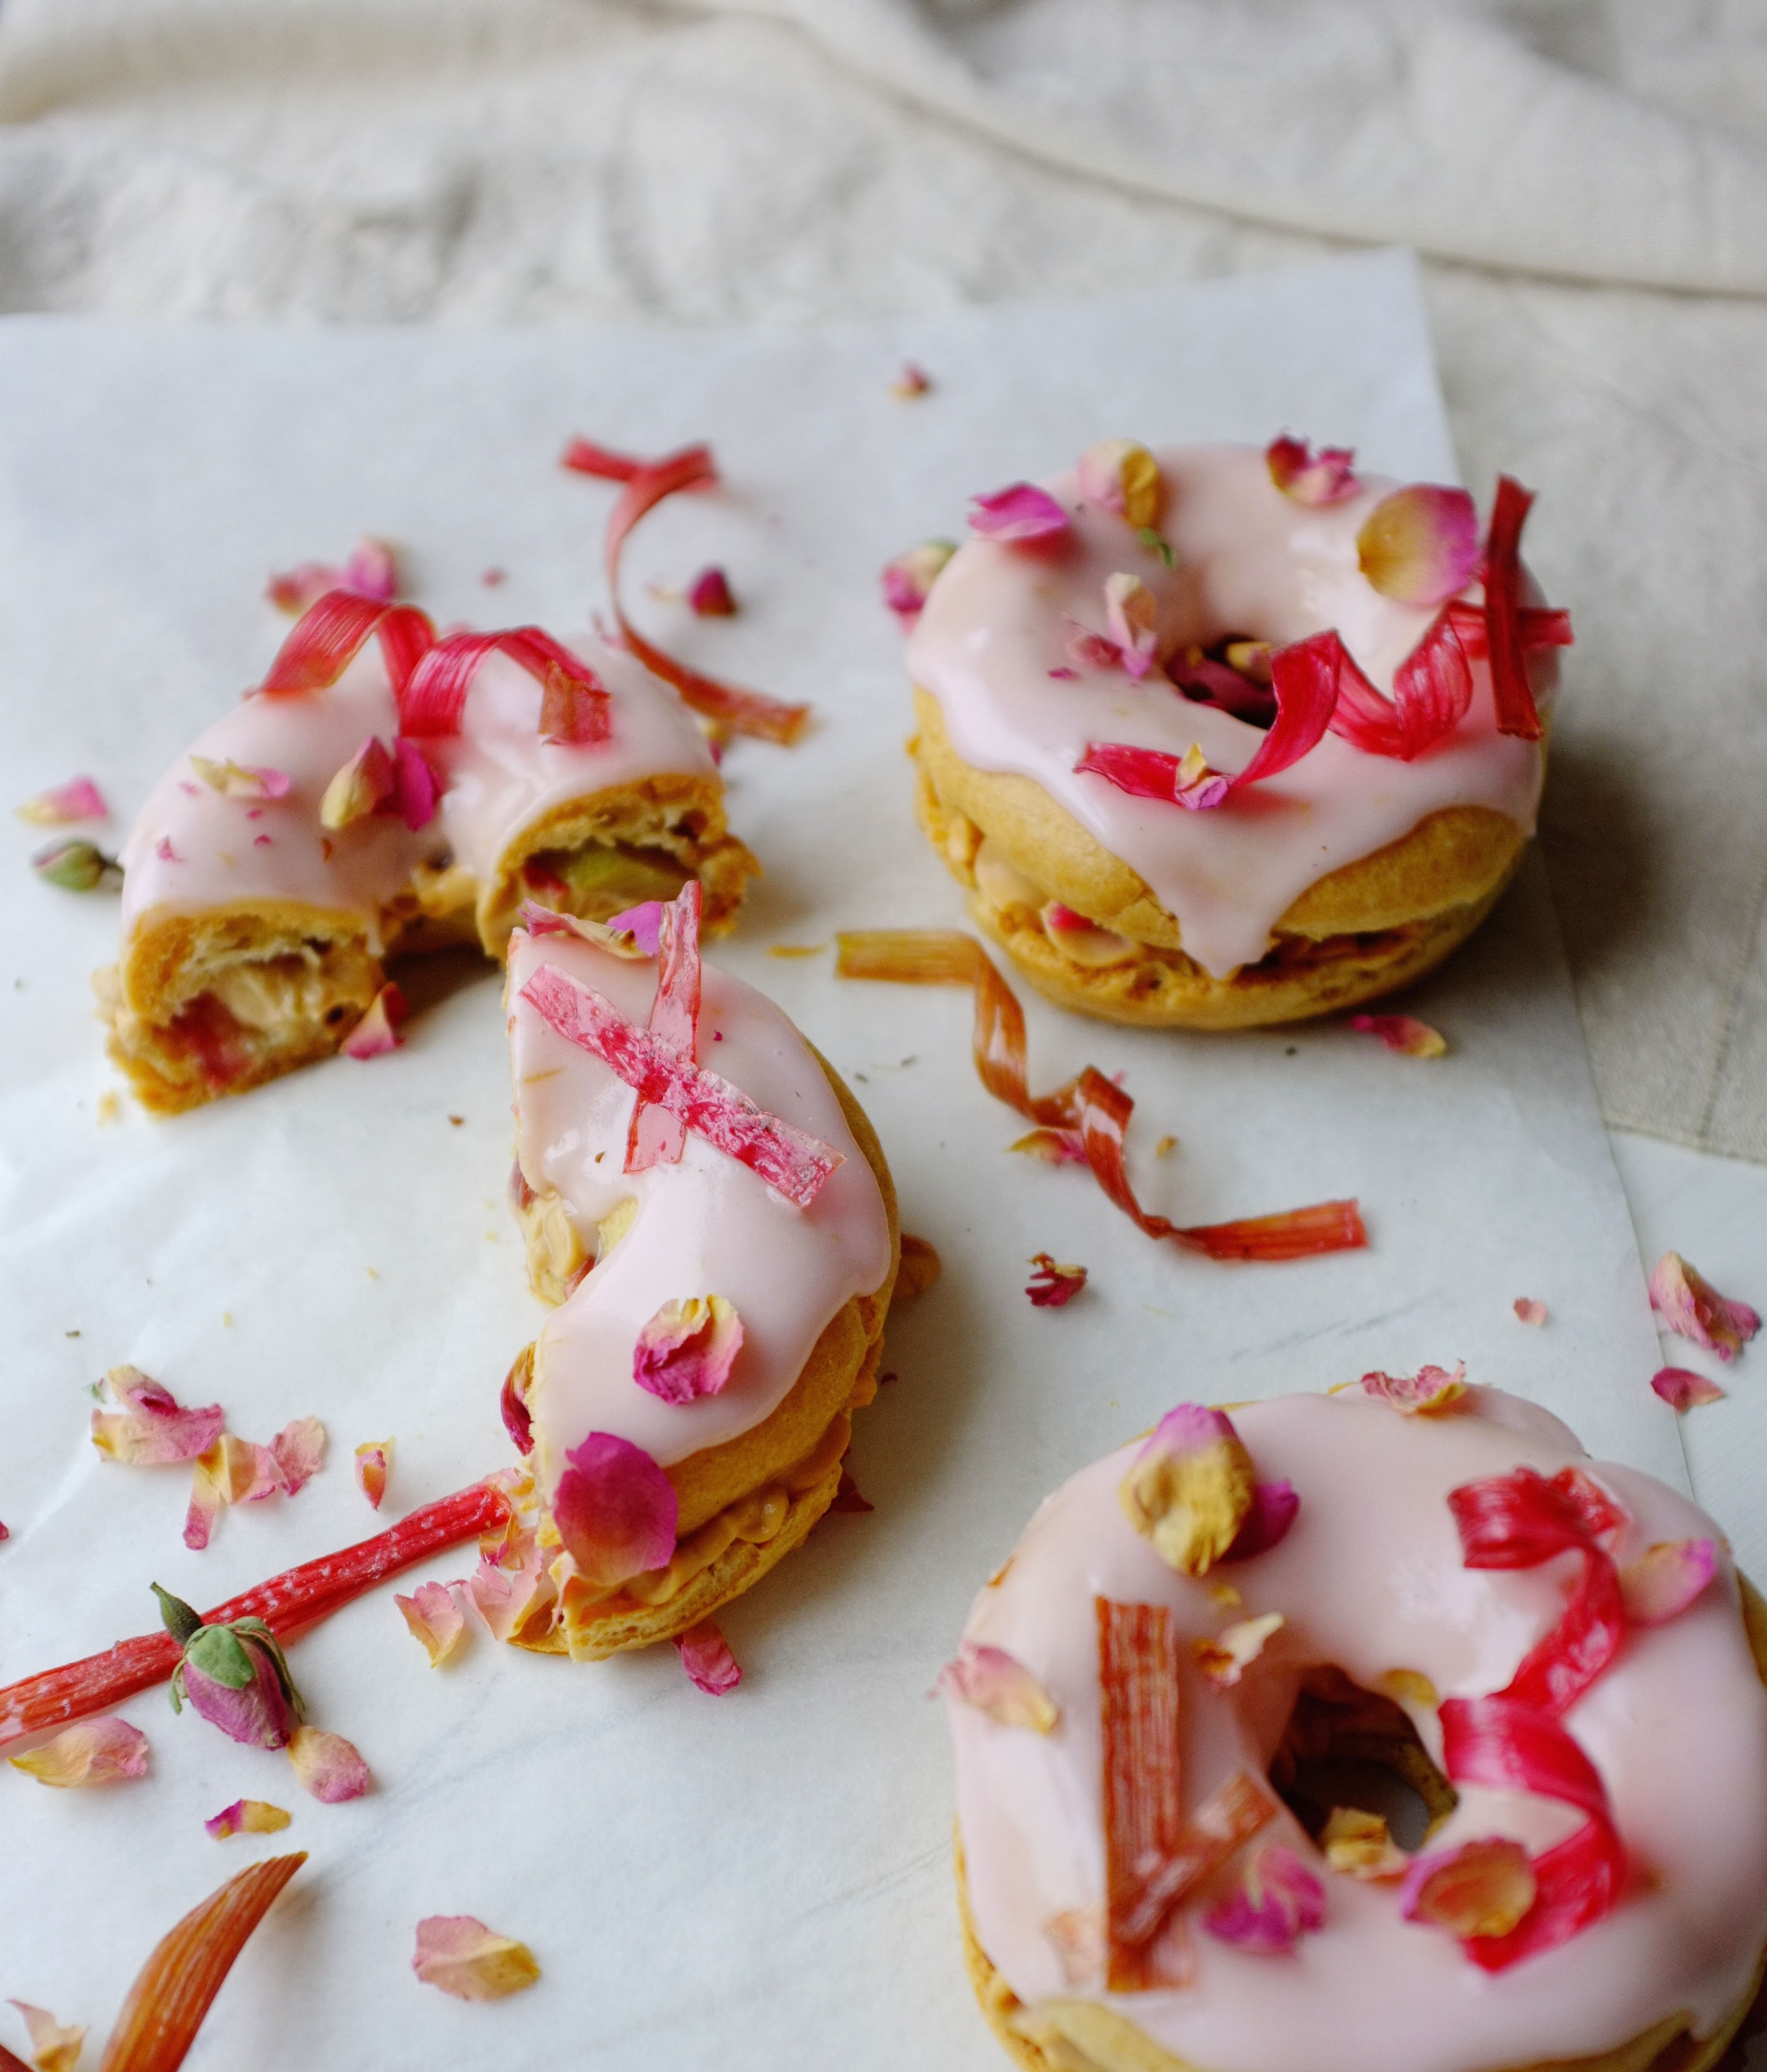
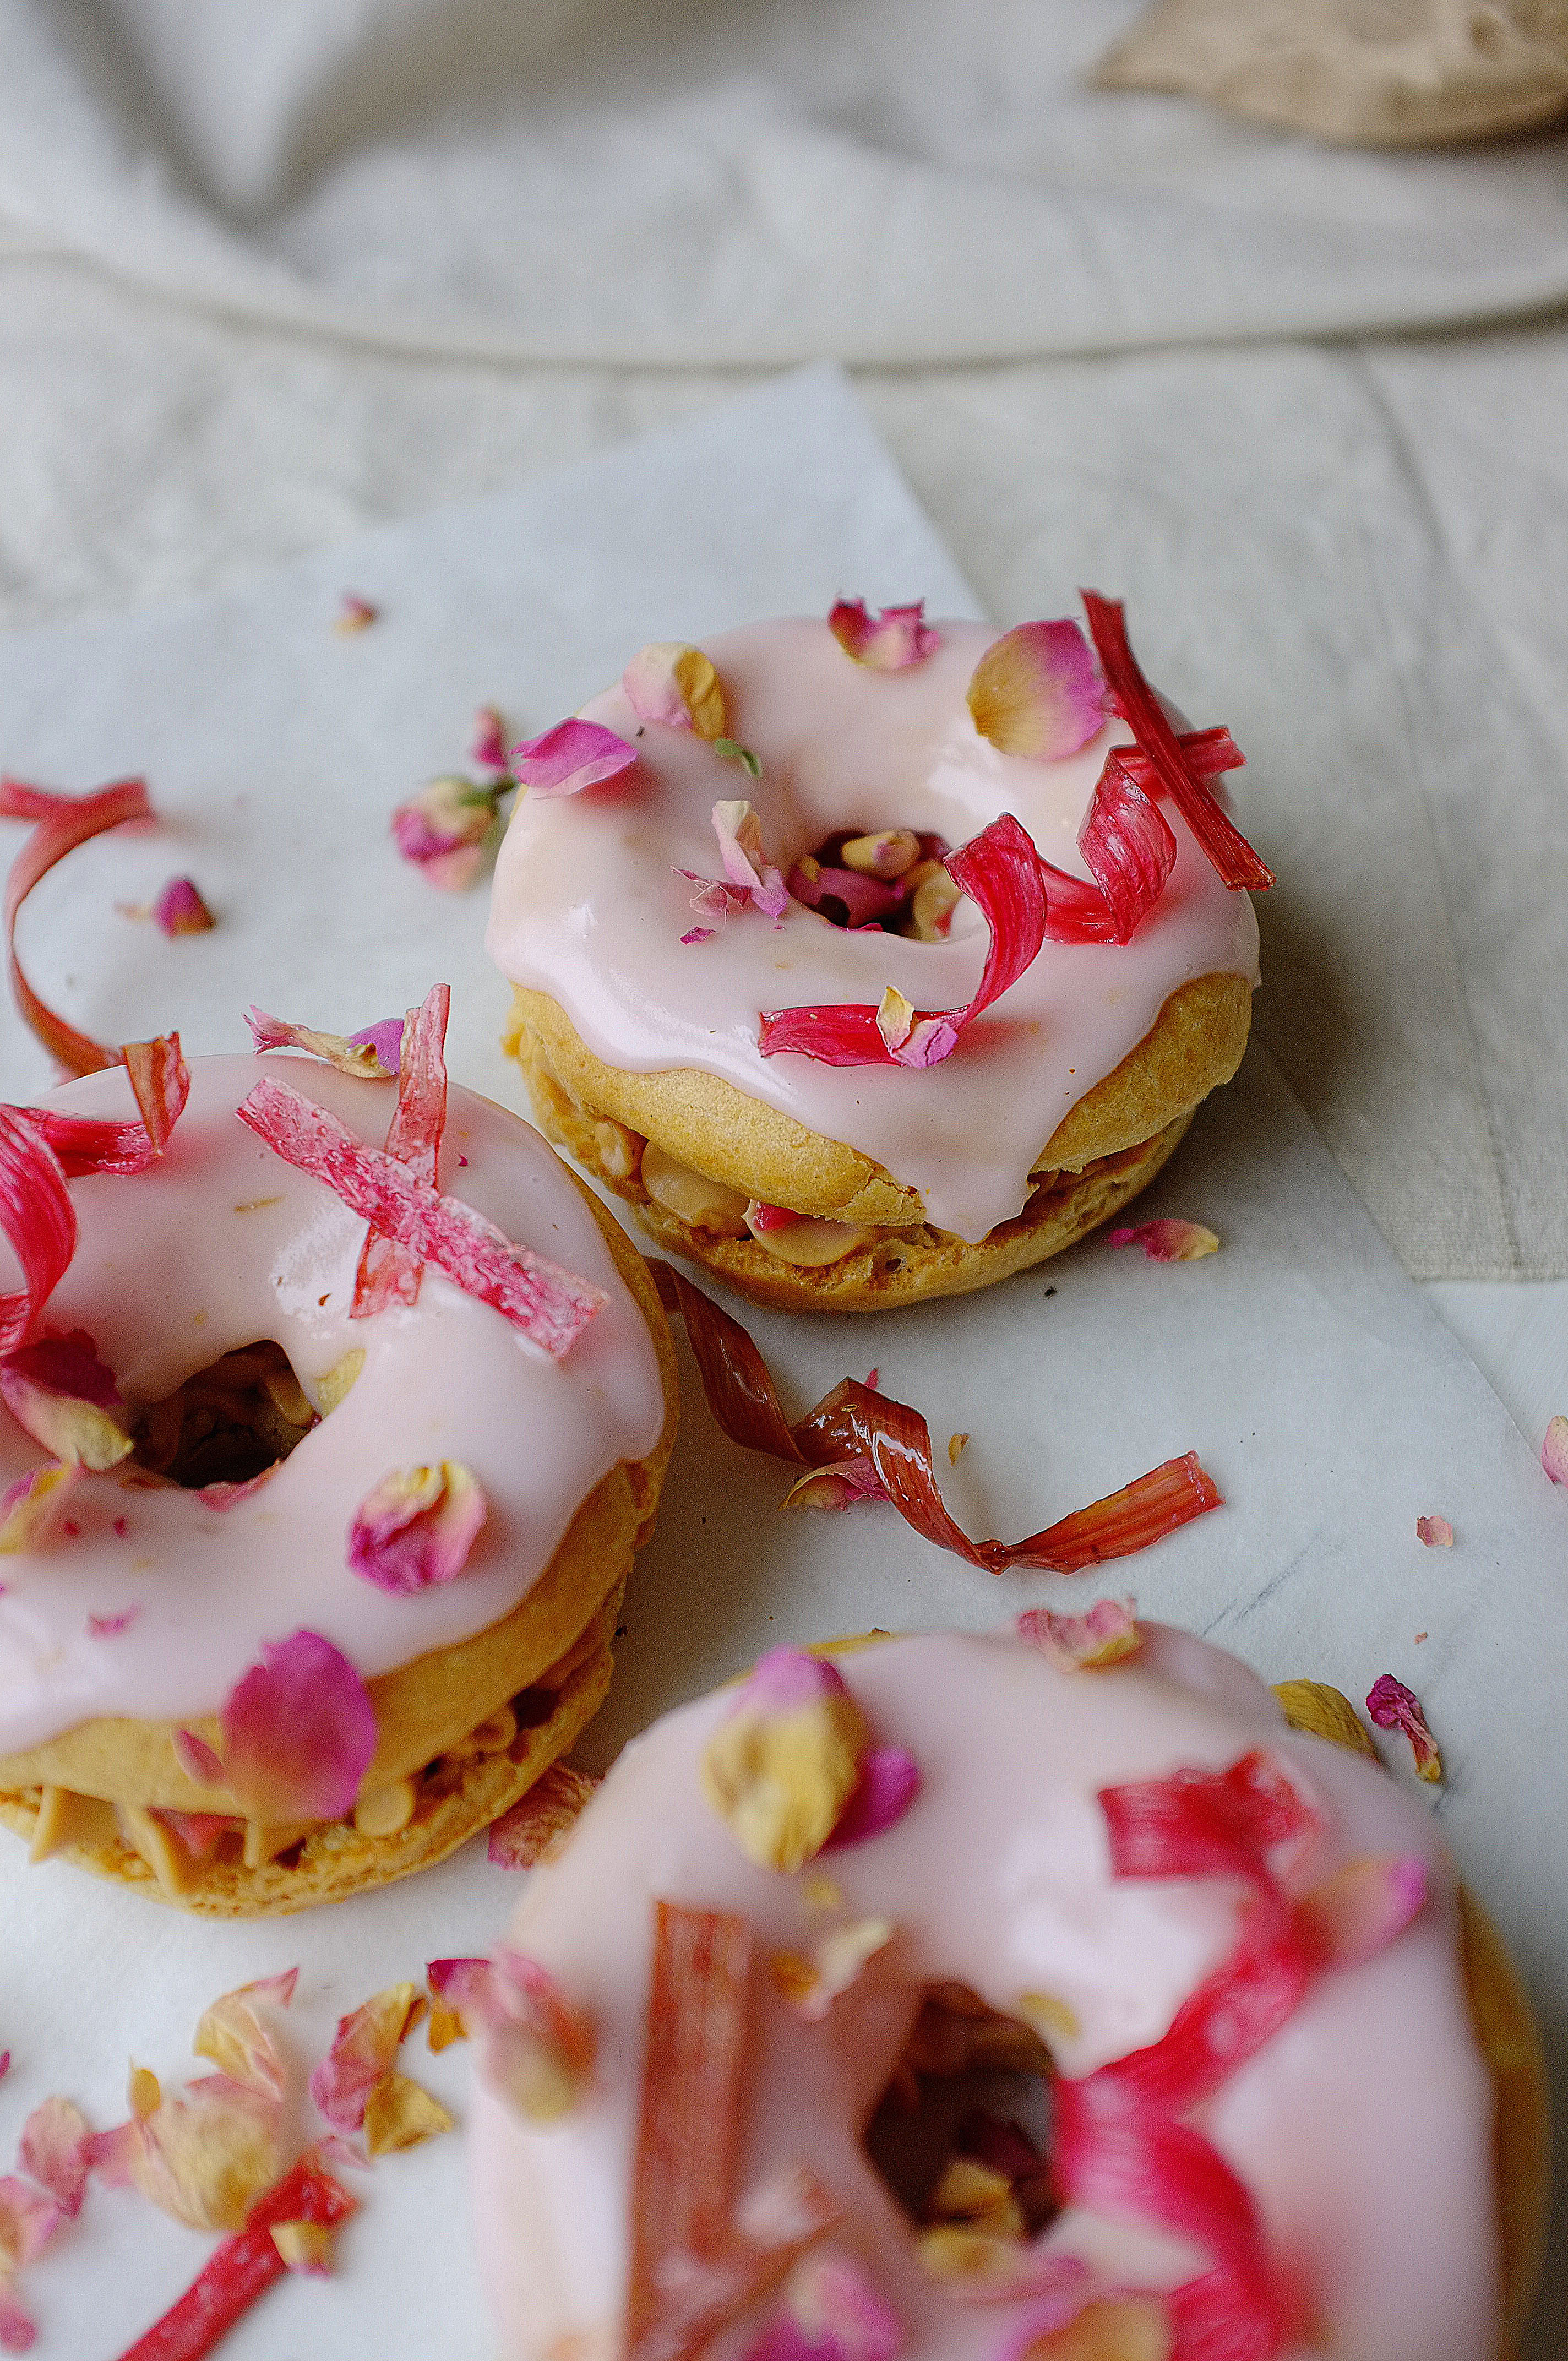
Cherry, super-sweet white chocolate, earthy pistachio; a pretty fool proof combination of flavours which marry together beautifully in these enriched sweet buns. I’ve added Arabica’s Cherry Molasses which they kindly gifted to me a couple of weeks back, and it brings a real tang to the overall flavour- delicious! I couldn’t resist adding cardamom to these as well; not only is it my favourite spice but it pairs really well with all three base flavours.

One thing to note before you embark on this recipe: while possible to make these by hand, it’s much easier with the help of a stand mixer and dough hook.

Ingredients

For the dough

  • 150ml milk
  • 140g room temperature unsalted butter
  • 100g plain flour
  • 150g strong white bread flour
  • ½ tsp salt
  • 50g caster sugar
  • 1 sachet fast action dried yeast (7g)
  • 1 egg

For the filling

  • 4tbsp cherry molasses
  • 50g unsalted butter
  • 60g soft light brown sugar
  • 100g white chocolate 
  • 1 1/2 tbsp ground cardamom
  • 150g pistachios, ground
  • Pinch salt

For the topping

  • 1 egg, beaten
  • Extra handful chopped pistachios (optional)

Method

  1. Place the milk and 40g of the butter in a saucepan and heat gently until the butter melts. Set aside to cool a little.
  2. Meanwhile mix the flours, salt, sugar and yeast together in the bowl of a stand mixer with dough hook attachment.
  3. Make a well in the middle of the dry ingredients and add the warm milk mixture and the egg. Mix briefly with a wooden spoon to combine then switch on the stand mixer and beat at a medium speed for about 10 minutes. Once the dough seems smooth, increase the speed and add the remaining butter in cubes, waiting for each one to be incorporated before adding the next. You should be left with an elastic, very soft dough. Transfer to a lightly oiled bowl and cover with oiled cling film. Leave to prove for 1 hour, then chill for 45 minutes (this controls the rise and allows the dough to firm up a little).
  4. For the filling, roughly chop the white chocolate and tip into a bowl. Place the butter, light brown sugar and ground cardamom in a saucepan and gently heat until the butter has melted and the sugar has almost all dissolved, then pour it over the white chocolate. Let it sit for a moment, then stir together. Set aside (don’t worry if it’s grainy).
  5. Roll the dough out into a large rectangle (about 30x50cm) and, making sure you’ve sat the dough landscape, cover 2/3 with the white chocolate mixture, leaving the right hand side bare. Sprinkle the pistachios on top and drizzle over the cherry molasses, then fold the uncovered dough over the top and the remaining left side on top of that, pressing down firmly to form another rectangle. Roll out to around 1.5 cm thick. 
  6. Using a sharp knife, slice the rectangle lengthways, into 2cm wide strips. Take each strip and twist it several times, then wind it around your fingers to form a bun shape, finally taking the end over and under to conceal it. Place each bun on a lined baking tray, leaving room for the second prove. Once all the buns are assembled, cover with a damp clean tea towel and leave to prove for 1 hour. 
  7. Preheat the oven to 170c (fan) and brush the proved buns with the beaten egg. Bake for 20-25 minutes or until cooked through and golden brown. Garnish with chopped pistachio and serve warm or cold (best enjoyed on the day or the day after, reheated to refresh).
Advertisement

Whole Roast Pumpkin with Autumnal Rice Pilaf

Cooking

I’ve been deliberating posting savoury recipes for a few years now but have always held back due to the simple fact that I called this site ‘tassybakes’ and so must, by my own ruling, share only baked goods (yeah, I’m quite neurotic). I’ve decided that’s a pretty stupid ruling especially as I’m a professional chef by day, who cooks savoury dishes the majority of the time.

Anyway you get the picture, I’m going to share savoury recipes with you, starting with this whole roast pumpkin. You part roast it before filling it with rice, wild mushrooms, cavolo nero, a load of spices, stock and pecans, then it’s popped in the oven for 15 minutes and voila, the rice is cooked and the flavours have seeped into the pumpkin flesh- delicious. You can adapt the recipe and use whatever veg or nuts you have lying around so go wild!

Ingredients (serves 4-6)

  • 2 small/medium pumpkins or 1 large pumpkin
  • 1tbsp rapeseed oil
  • 1/2tsp ground cumin
  • 1/2tsp mixed spice
  • sea salt and black pepper

For the rice

  • 250g basmati rice, rinsed thoroughly
  • 2tbsp rapeseed oil
  • 2 large white onions, thinly sliced
  • 4 garlic cloves, crushed
  • 2 inch piece fresh ginger, grated
  • 1 green chilli, diced
  • 1 cinnamon stick
  • 6-8 cardamom pods, cracked
  • 1tsp ground turmeric
  • 1tsp ground cumin
  • 2tsp garam masala
  • 2tsp mustard seeds
  • 2 bay leaves
  • 200g fresh wild mushrooms
  • large handful cavolo nero or kale
  • 100g pecans
  • 500ml vegetable stock
  • Green chutney, tamarind chutney, yoghurt and pomegranate seeds, to serve (optional)

Method

  1. Preheat the oven to 200c. Slice the top of the pumpkin (or pumpkins) off and hollow out (reserve the seeds and roast them with spices, if you like). Drizzle with oil and rub with spices and seasoning all over, inside and out. Place on a tray (lid included) and roast for 25-35 minutes or until the flesh is very tender.
  2. Rinse the rice several times in cold water then leave to soak until required.
  3. Heat the oil in a saucepan and add the sliced onions. Cook out until lightly browned and very soft, then add the garlic, ginger and chilli and cook for a further few minutes. Add the cinnamon stick, bay leaves, cardamom pods and all other spices and cook, stirring often until aromatic. Now add the mushrooms and a little more oil if required, and cook until caramelised. Don’t stir more often than is necessary or they won’t colour up.
  4. Drain the rice. Add the pecans, cavolo nero and rice to the saucepan and stir to coat in the oil and spices. Pour in the stock and bring to a boil, then carefully transfer to the cooked pumpkin. Turn the heat down to 160c on the oven and pop the lid on top of the pumpkin to seal in the steam.
  5. Return the now filled pumpkin to the oven for 15 minutes, then remove and leave to stand, lid on, for a further 10 minutes.
  6. Now you’re ready to serve. Slice the pilaf-filled pumpkin into big wedges and enjoy with green chutney, yoghurt, tamarind chutney and some pomegranate seeds, if you like.

Pecan Popcorn Custers with Smoked Salt, Dark Chocolate and Caramel

Uncategorized

These popcorn clusters are really simple to put together and would make for an apt post-firework snack (in fact, covered entirely in chocolate they could look a little like coal!). Think of them as the boujee sister of the rice crispie cake, with bonfire night inspired flavours making them feel a little more grown up.

  • Roughly 125g corn kernels (or 90g plain popcorn- popped weight)
  • 2tbsp sunflower or vegetable oil (omit this if you’re using ready popped corn)
  • 175g caster sugar
  • 40g unsalted butter
  • 75g pecans
  • 200g dark chocolate
  • generous pinch smoked salt

Method

  1. Line a large baking tray with greaseproof paper. Have another piece of greaseproof paper handy,
  2. If you’re popping your own kernels, put a large lidded pan on a medium/high heat and add the oil. Once the oil is hot, put a couple of kernels in and wait for them to pop. Once they’ve popped you know your oil is ready, so add the remaining kernels and put the lid on. You’ll hear lots of popping for a few minutes, but once it slows turn the heat off and set aside until it completely stops, then remove the lid and leave to cool. It’s a good idea to shake the pan occasionally during the popping process to avoid any catching on the base of the pan.
  3. Put the sugar in a heavy bottomed pan and heat gently until completely melted, swirling (but not stirring) the pan occasionally. Once the sugar has melted increase the heat and take the caramel to a golden brown colour, then add in the butter and melt until combined (careful, it will spit a little!). Set aside to cool slightly, then transfer the popcorn into a large mixing bowl along with the pecans and a generous pinch of smoked salt. Mix briefly. Tip the caramel into the bowl and, working quickly, stir to coat the popcorn and pecans before tipping the mix onto the prepared tray.
  4. Press the mix down using the spare greaseproof paper and a tea towel (it will be quite hot) to make a compact even layer. Set aside to cool and firm up.
  5. Once crisp, break the popcorn into rough pieces. Melt the chocolate in a bowl set over a pan of simmering water (don’t let the bowl touch the water) then dip the pieces in, or drizzle it over, if you prefer. Finish with a little more smoked salt then leave to set for about half an hour. Enjoy!

Chai Ice Cream

Uncategorized

As the temperatures drop and the evenings draw in, I’m getting really into making ice cream… I know, such a maverick, what will I do next!? I jest, ice cream can be enjoyed all year round in my opinion, especially when you create flavours which feel Autumnal; this chai variety is a great example of that. It’s cold, of course, but the hint of black tea and hum of warming, peppery spice is really comforting, plus it pairs beautifully with hot puddings, rich chocolate desserts and baked fruit.

Ingredients

  • 600ml double cream
  • 600ml whole milk
  • 225g golden caster sugar
  • 5 black tea bags
  • 10 cardamom pods
  • 1 vanilla pod
  • 2 cinnamon sticks, split in two
  • 1 1/2 tsp black peppercorns, roughly crushed
  • 1tsp fennel seeds, roughly crushed
  • 2 inches fresh ginger, chopped
  • 6 egg yolks
  • pinch salt

Method

  1. Place the cream, milk and 100g of the caster sugar in a large saucepan along with the tea bags, spices, ginger and vanilla. Heat to scalding point (just before it boils) over a medium heat, stirring to ensure the sugar has dissolved, then set aside to cool to room temperature. Once cooled, chill for at least an hour or overnight to allow the flavours to develop.
  2. Drain the infused cream into a large clean saucepan and heat to scalding point once more. Meanwhile, place the egg yolks and remaining 125g caster sugar in a large bowl (or bowl of a stand mixer with whisk attachment) and whisk until pale and thick. Remove the cream mixture from the heat and allow to cool slightly for a few minutes, then pour gradually into the yolks, whisking constantly.
  3. Once the mixture is combined, return to a clean saucepan and set over a low/medium heat. Stir until it has thickened to a custard consistency  (do not be tempted to increase the heat or it will curdle) then leave to cool completely.
  4. Once cooled, churn the custard until thick and creamy (about 25 minutes) then scrape into a container, cover and chill for at least 4 hours.

Cardamom Carrot Cake with Honeyed Rose Cream and Figs

Cakes, Uncategorized

At last we approach fig season- one of my absolute favourite fruits, and so synonymous with Middle Eastern cuisine that it would be wrong to incorporate them into a bake which didn’t boast nuts, heady spices or sweet floral flavours; of course this cake contains all three, making it one of my favourite recipes I’ve posted on here to date. It’s not too sweet, nor is the icing too heavy, just a well balanced, flavoursome bake with flavours which work beautifully together. I hope you enjoy.

Ingredients

For the cakes

  • 100g chopped dried figs
  • zest and juice 1 orange
  • 2-3tbsp rose water
  • 250g butter, cubed
  • 200g caster sugar
  • 50g soft light brown sugar
  • 4 eggs
  • 400g grated carrot
  • 225g plain flour
  • 1tsp bicarbonate of soda
  • 2tsp baking powder
  • large pinch salt
  • 1 1/2 tsp cinnamon
  • 2 heaped tsp ground cardamom
  • 1tsp mixed spice
  • 100g pistachios, roughly chopped

For the icing

  • 300ml double cream
  • 200g cream cheese
  • 3tbsp honey
  • 2-3tbsp rose water

Optional

  • 50g chopped pistachios
  • 1tbsp dried rose petals
  • 4-5 figs

Method

  1. Preheat the oven to 180c. Grease and line two 7 inch cake tins.
  2. Roughly chop the figs and discard the stalks. Tip into a bowl and add the orange juice and rose water. Leave to soak until required.
  3. In a large bowl (or bowl of a stand mixer with paddle attachment) cream together the butter and both sugars until pale and thick. Add in the eggs one at a time, beating well between each addition (add a small amount of the flour with each egg to prevent curdling).
  4. Stir through the grated carrot and soaked figs (along with any juice the figs haven’t absorbed). Mix together the dry ingredients and pistachios and fold through the batter until no streaks of flour remain.
  5. Split the batter between the prepared tins and level off. Bake for 25-35 minutes or until a skewer comes out clean when inserted.
  6. Let the cakes sit in the tins for 10 minutes, then turn out onto a wire rack and leave to cool completely.
  7. Meanwhile, place the cream, cream cheese, honey and rose water in a large bowl (or bowl of a stand mixer with whisk attachment) and whisk until pipe-able. Adjust the levels of sweetness and rose flavour to taste.
  8. Once the cakes have cooled down, slice them in half horizontally, leaving you with 4  equal layers. Pile the rose and honey cream into a piping bag with round nozzle. Place the first layer onto a serving plate and pipe little mounds all over the surface, then top with the next layer. Repeat until all the cream mixture is used up, then sprinkle rose petals and pistachios over the top and arrange the figs in an attractive way, if using.

Classic Chocolate Fudge Cake (Gluten Free)

Cakes, Uncategorized

I can never understand why gluten free options are, not always but so often, dry, dense and disappointing. I’m not a coeliac myself and am not a fan of demonising gluten, however, if you are genuinely unable to enjoy it then I’m a firm believer that there should and can be delicious alternatives! This cake is the first of many gluten free versions of classic baking staples I’m planning, and seriously, it’s so moreish it brings a tear to my eye (deeply melodramatic but you get the message).

Ingredients

For the cakes (makes one 7-8 inch sandwich cake)

  • 200g ground almonds
  • 1tsp bicarbonate of soda
  • generous pinch salt
  • 175ml boiling water
  • 2tsp instant coffee
  • 80g cocoa powder
  • 300g golden caster sugar
  • 5 eggs
  • 225ml vegetable oil

For the ganache 

  • 300ml double cream
  • 200g 70% dark chocolate
  • 100g mik chocolate

Method

  1. Preheat the oven to 180c. Grease and line two 7-8 inch cake tins.
  2. Stir the almonds, bicarbonate of soda and salt together in a small bowl. Mix the cocoa, coffee and boiling water together in a jug until smooth and set aside.
  3. Beat the eggs, oil and sugar in a large mixing bowl (or in a stand mixer with paddle attachment) until pale and thick.
  4. Add the cocoa mix and continue whisking until you have a fairly liquid cake batter with no streaks. Add the almond mixture down the side of the bowl and fold in gently.
  5. Split the batter between the two tins and bake for 35-45 minutes until a skewer comes out with only a few moist crumbs attached.
  6. While the cake is baking, make the ganache. Finely chop the chocolate and pop it in a heatproof bowl. Meanwhile, pour the cream into a saucepan and set over a medium heat. When it reaches scalding point (just before a simmer), take off the heat and pour directly over the chocolate. Let it sit for a couple of minutes, then stir to create a smooth, glossy ganache. Allow this to cool and thicken to a spreadable consistency (15 minutes in the fridge once cooled to room temperature helps achieve this).
  7. Once the cakes are baked leave to cool in the tins for 10 minutes before transferring to a wire rack.
  8. To assemble your cake, level off your cakes if necessary, then fill and cover with ganache.

Enjoy!

Espresso, Pecan & Dark Chocolate Ice Cream Sandwiches

Biscuits, Uncategorized

These cookie sandwiches are a culmination of my three favourite things; coffee, chocolate and ice cream. The pecans add crunch, and the bitter note of espresso prevents the result from being overly sweet. There’s not a lot else to say- other than go forth and make them (but proceed with caution, they’re like crack).

Ingredients (makes 10-12 cookie sandwiches, with a little extra cookie dough which will freeze well)

For the ice cream

  • 400ml double cream
  • 400ml whole milk
  • 8 egg yolks
  • 150g caster sugar
  • pinch salt
  • 30g good quality instant coffee

For the cookies

  • 225g soft unsalted butter
  • 125g caster sugar
  • 175g dark brown soft sugar
  • 2 eggs
  • 1tsp bicarbonate of soda
  • generous pinch salt
  • 150g plain flour
  • 125g rye flour
  • 75g roughly chopped pecans
  • 100g roughly chopped dark chocolate (70%)

Method

  1. Start off by making the ice cream. To do this, pour the double cream, milk and instant coffee into a saucepan and set over a medium heat. Meanwhile, place the egg yolks, sugar and salt in a large bowl (or bowl of a stand mixer with whisk attachment) and whisk until pale and thick. Once the instant coffee has dissolved into the cream mixture, bring it to a simmer then take off the heat and gradually add into the eggs and sugar, whisking constantly until well combined.
  2. Pass the mixture through a sieve into a clean saucepan, then heat gently, stirring until thick (make sure the custard doesn’t get too hot, or you’ll be left with something that looks a bit like scrambled eggs!). Pass the thickened custard through a sieve into a bowl, then close cover with cling film and leave to cool completely (I like to chill the custard at this point to make sure it’s as cold as possible before churning, but it’s not absolutely necessary).
  3. Once cooled, pour the custard into an ice cream maker and churn until creamy and thick. Line a shallow square/rectangular baking tin (about 2-3cm deep) with cling film and scrape the churned ice cream into it. Level off, cover with cling film and place in the freezer for at least 4 hours, until fully set. At this point you can cut the ice cream into rounds using a 3-4 inch cookie cutter, then cover and return the rounds to the freezer until required.
  4. For the cookies, place the butter and both sugars in a large bowl (or bowl of a stand mixer with paddle attachment) and beat until pale and fluffy. Add in the eggs one at a time, beating well between each addition. Add the bicarbonate of soda, salt and both flours and very briefly mix again until combined. Now stir in the pecans and chocolate with a wooden spoon. Chill the cookie dough for 10 minutes.
  5. Preheat the oven to 180c. Line a couple of baking trays with greaseproof paper and space tablespoons of cookie dough over them, allowing plenty of room for spreading. Bake for 12-15 minutes or until soft in the middle but golden in colour. At about 8-10 minutes into baking, take the baking tray and bang it on the work top in one sharp movement. This allows the cookie to spread a little and ensures the perfect thickness. Repeat the process until you’ve used up the cookie dough, then leave the cookies to cool.
  6. For a neat result, you can cut the cookies into perfect circles with the cutter you used for the ice cream, but this isn’t essential.
  7. Once the cookies have cooled, sandwich two together with a round of espresso ice cream.

Enjoy!

Rhubarb, Cardamom and White Chocolate Frangipane Tart

Pastry, Uncategorized

Tart rhubarb and sweet white chocolate is a delicious flavour pairing, and one I will keep returning to for the duration of the rhubarb season. In this bake I’ve applied the combination to a classic frangipane tart, using rhubarb compote in place of jam, and a filling studded with chocolate chunks and flavoured with cardamom. It’s a winner, and in my opinion, better than the standard strawberry variety (controversial).

Ingredients (enough for one 7.5 inch wide/ roughly 2 inch deep tart tin- serves 8)

For the pastry (there will be some leftover which will freeze well)

  • 250g plain flour
  • 140g unsalted butter
  • pinch salt
  • 30g caster sugar
  • 2 egg yolks

For the rhubarb filling

  • 400g rhubarb, sliced into 2 inch batons
  • juice and zest 1 orange
  • 30g caster sugar

For the almond frangipane

  • 120g soft unsalted butter
  • 120g caster sugar
  • 2 large eggs
  • 120g ground almonds
  • 1tsp ground cardamom
  • 100g white chocolate, roughly chopped
  • 30g roughly chopped almonds

Method

  1. Start off by making the pastry. Place the flour, butter, sugar and salt in a food processor and pulse until it resembles breadcrumbs. At this stage add the egg yolks  and pulse again until the mix comes together in large lumps (alternatively, rub the butter into the flour, salt and sugar using your fingertips then stir in the yolks using a cutlery knife). Tip the dough out and shape into a disc using your hands. Wrap in cling film and chill for 20 minutes.
  2. While the pastry is chilling start on the rhubarb compote filling. To do this simply put 300g of the rhubarb (reserve the other batons for the top of the tart), the orange juice and zest in a saucepan along with the caster sugar. Heat gently, stirring often, until the rhubarb has broken down and reduced to a thick compote consistency. Set aside to cool.
  3. Lightly grease an 7.5 (or 8) inch straight sided tart tin. Retrieve your pastry from the fridge and roll out to around 3mm thick and line the tin, pushing it right into the corners and trimming any excess. Prick the base all over with a fork and chill for 20 minutes or until firm. Preheat the oven to 190c.
  4. Line the pastry case with baking paper and fill with baking beans. Bake for 15-20 minutes or until the walls of the pastry are cooked and supporting themselves. Remove the beans and baking paper and return to the oven until the base is crisp and cooked through (about 10 minutes). Set aside to cool.
  5. While the pastry is baking, toss the reserved rhubarb batons in 1tbsp caster sugar and place on a tray- bake for 10 minutes.
  6. Now it’s time to make the frangipane. To do this simply cream together the butter and sugar until pale, light and fluffy, then add in the eggs one at a time, beating well between each addition. Finally, tip in the cardamom, salt and almonds and briefly mix once more until combined. Reduce the oven temperature to 170c.
  7. Now it’s time to assemble the tart. Spread the rhubarb compote over the base in one even layer, then add half the frangipane and sprinkle over half the chopped white chocolate pieces. Add the remaining frangipane and top with the rest of the white chocolate, chopped almonds and roasted rhubarb batons.
  8. Bake for 35-40 minutes or until golden brown and cooked through. Serve hot or cold.

Rhubarb & Caramelised White Chocolate Choux Nuts

Pastry

Crisp choux pastry, sharp roast rhubarb with a hint of vanilla, and butterscotch-sweet caramelised white chocolate cream; a delicious combination you’ve got to try, and a great way to celebrate seasonal British produce (and millennial pink… *sigh*).

Ingredients (makes 10-12)

For the choux

  • 85g unsalted butter
  • 220ml water
  • 100g plain flour
  • 3 eggs
  • pinch of salt

For the filling

  • 250g white chocolate (make sure it’s at least 30% cacao)
  • 300ml double cream
  • Pinch salt
  • 4 thick stems rhubarb
  • 3tbsp caster sugar
  • 2 vanilla pods or 1tsp vanilla extract
  • Juice and zest 1 lemon

For the topping

  • 100g icing sugar
  • Enough of the rhubarb syrup (leftover from roasting the rhubarb) to create an icing with a drizzle-consistency
  • Dried rose petals (optional)
  • Candied rhubarb ribbons (optional) (I make these by creating ribbons of rhubarb with a peeler, which I then simmer in a simple 2 parts sugar: 1 part water syrup for 5 minutes before draining off any excess liquid and cooking at 160c for 10-15 minutes, or until dried out, on a lined baking tray)

Method

  1. To make the choux put the water, butter and salt in a saucepan set over a medium heat (do not let it boil at this stage). Meanwhile, sieve the flour to remove any lumps. When the butter has melted into the water, increase the heat and bring to a rolling boil, then tip in the flour and stir vigorously until you have a smooth paste-like mix which comes away from the edges of the pan. Continue to stir for another minute to cook out the rawness of the flour, then tip into a clean bowl and close cover with cling film (this eggless stage is known as a ‘panade’). Leave to cool to room temperature.
  2. Preheat the oven to 190c. Line 2 large baking trays with greaseproof paper.
  3. Once the panade has cooled it’s time to add the eggs; whisk in a jug to break them up then very gradually add into the panade while beating with electric beaters. Stop adding the egg (you might have a little leftover) when the smooth, lump-free mixture reluctantly drops off the end of a spoon. Pile the choux mix into a piping bag, fitted with a large round nozzle.
  4. Pipe 10-12 doughnut shapes onto the prepared baking trays, leaving room for expansion. Bake the choux for 20-25 minutes or until crisp and golden, then skewer each one and return to the oven for around 10 minutes or until the middles have completely dried out. Set aside to cool and reduce the oven temperature to 180c.
  5. Slice the rhubarb into batons and toss in the caster sugar, lemon juice and zest and vanilla. Roast for 10-15 minutes in a high sided baking tray until the pieces are tender but still retain their shape. Set aside to cool and reduce the oven temperature to 120c.
  6. Chop up the white chocolate and scatter on a lined baking tray in an even layer. Place in the oven to allow the chocolate to melt for 10 minutes, then stir/turn and return to the oven for another 10 minutes. Repeat this step 2-3 more times until the chocolate reaches a deep golden colour, then scrape into a bowl and mix in a splash of cream to loosen the consistency (it can get a little grainy at this stage so pass through a sieve if necessary). Leave to cool.
  7. Once the white chocolate has cooled, place in a bowl (or bowl of a stand mixer with whisk attachment) and add in the cream and salt. Whisk until pipe-able.
  8. Slice the cooled choux nuts in half horizontally and pipe in a generous helping of caramelised white chocolate cream. Slice the roast rhubarb pieces thinly and arrange these on top of the cream, then pop the choux lid on top.
  9. For the pink icing, pour the cooking syrup from the rhubarb tray into the icing sugar and mix to create a smooth drizzle-like consistency (add in a little water if you don’t have enough syrup). Spoon this over the filled choux-nuts and garnish with edible petals and rhubarb ribbons.
Enjoy!

Mocha Banana Bread (Vegan)

Cakes, Uncategorized

This vegan banana bread is perfect if you’re after maximum taste pay off in exchange for minimal effort; the method calls for just a mixing bowl and hand whisk and you’ll have it in the oven in less than 10 minutes. I add chunks of dark chocolate and a shot of espresso to my banana bread as it adds a great depth of flavour and slight bittersweet finish, but feel free to omit these (if you’re weird and don’t like my two favourite things).

Ingredients

  • 125ml vegetable oil
  • 100ml dairy free yoghurt (I used Alpro plain)
  • 100ml nut milk (I used almond)
  • 3 very ripe bananas (roughly mashed) plus 1 extra banana (halved down the middle)
  • 2tbsp instant coffee granules dissolved in 2tbsp boiling water
  • 75g light brown soft sugar
  • 75g caster sugar
  • 225g plain flour
  • 1tsp baking power
  • 1tsp bicarbonate of soda
  • generous pinch of salt
  • 150g 70% dark chocolate

Method

  1. Preheat the oven to 180c. Line a large loaf tin with greaseproof paper.
  2. Place the oil, yoghurt, milk, mashed banana, both sugars and coffee in a bowl and whisk together. Now add in the flour, baking powder, bicarbonate of soda and salt and whisk again until you have a smooth batter. Roughly chop 100g of the dark chocolate and stir that in, reserving the rest. Scrape the batter into the prepared tin and arrange the banana halves on top.
  3. Bake for 50-55 minutes or until well risen, springy and golden. Once baked, leave to cool in the tin, then melt the remaining dark chocolate and drizzle over the top.

Enjoy!