Rhubarb, White Chocolate and Thyme Cake

Cakes, Uncategorized

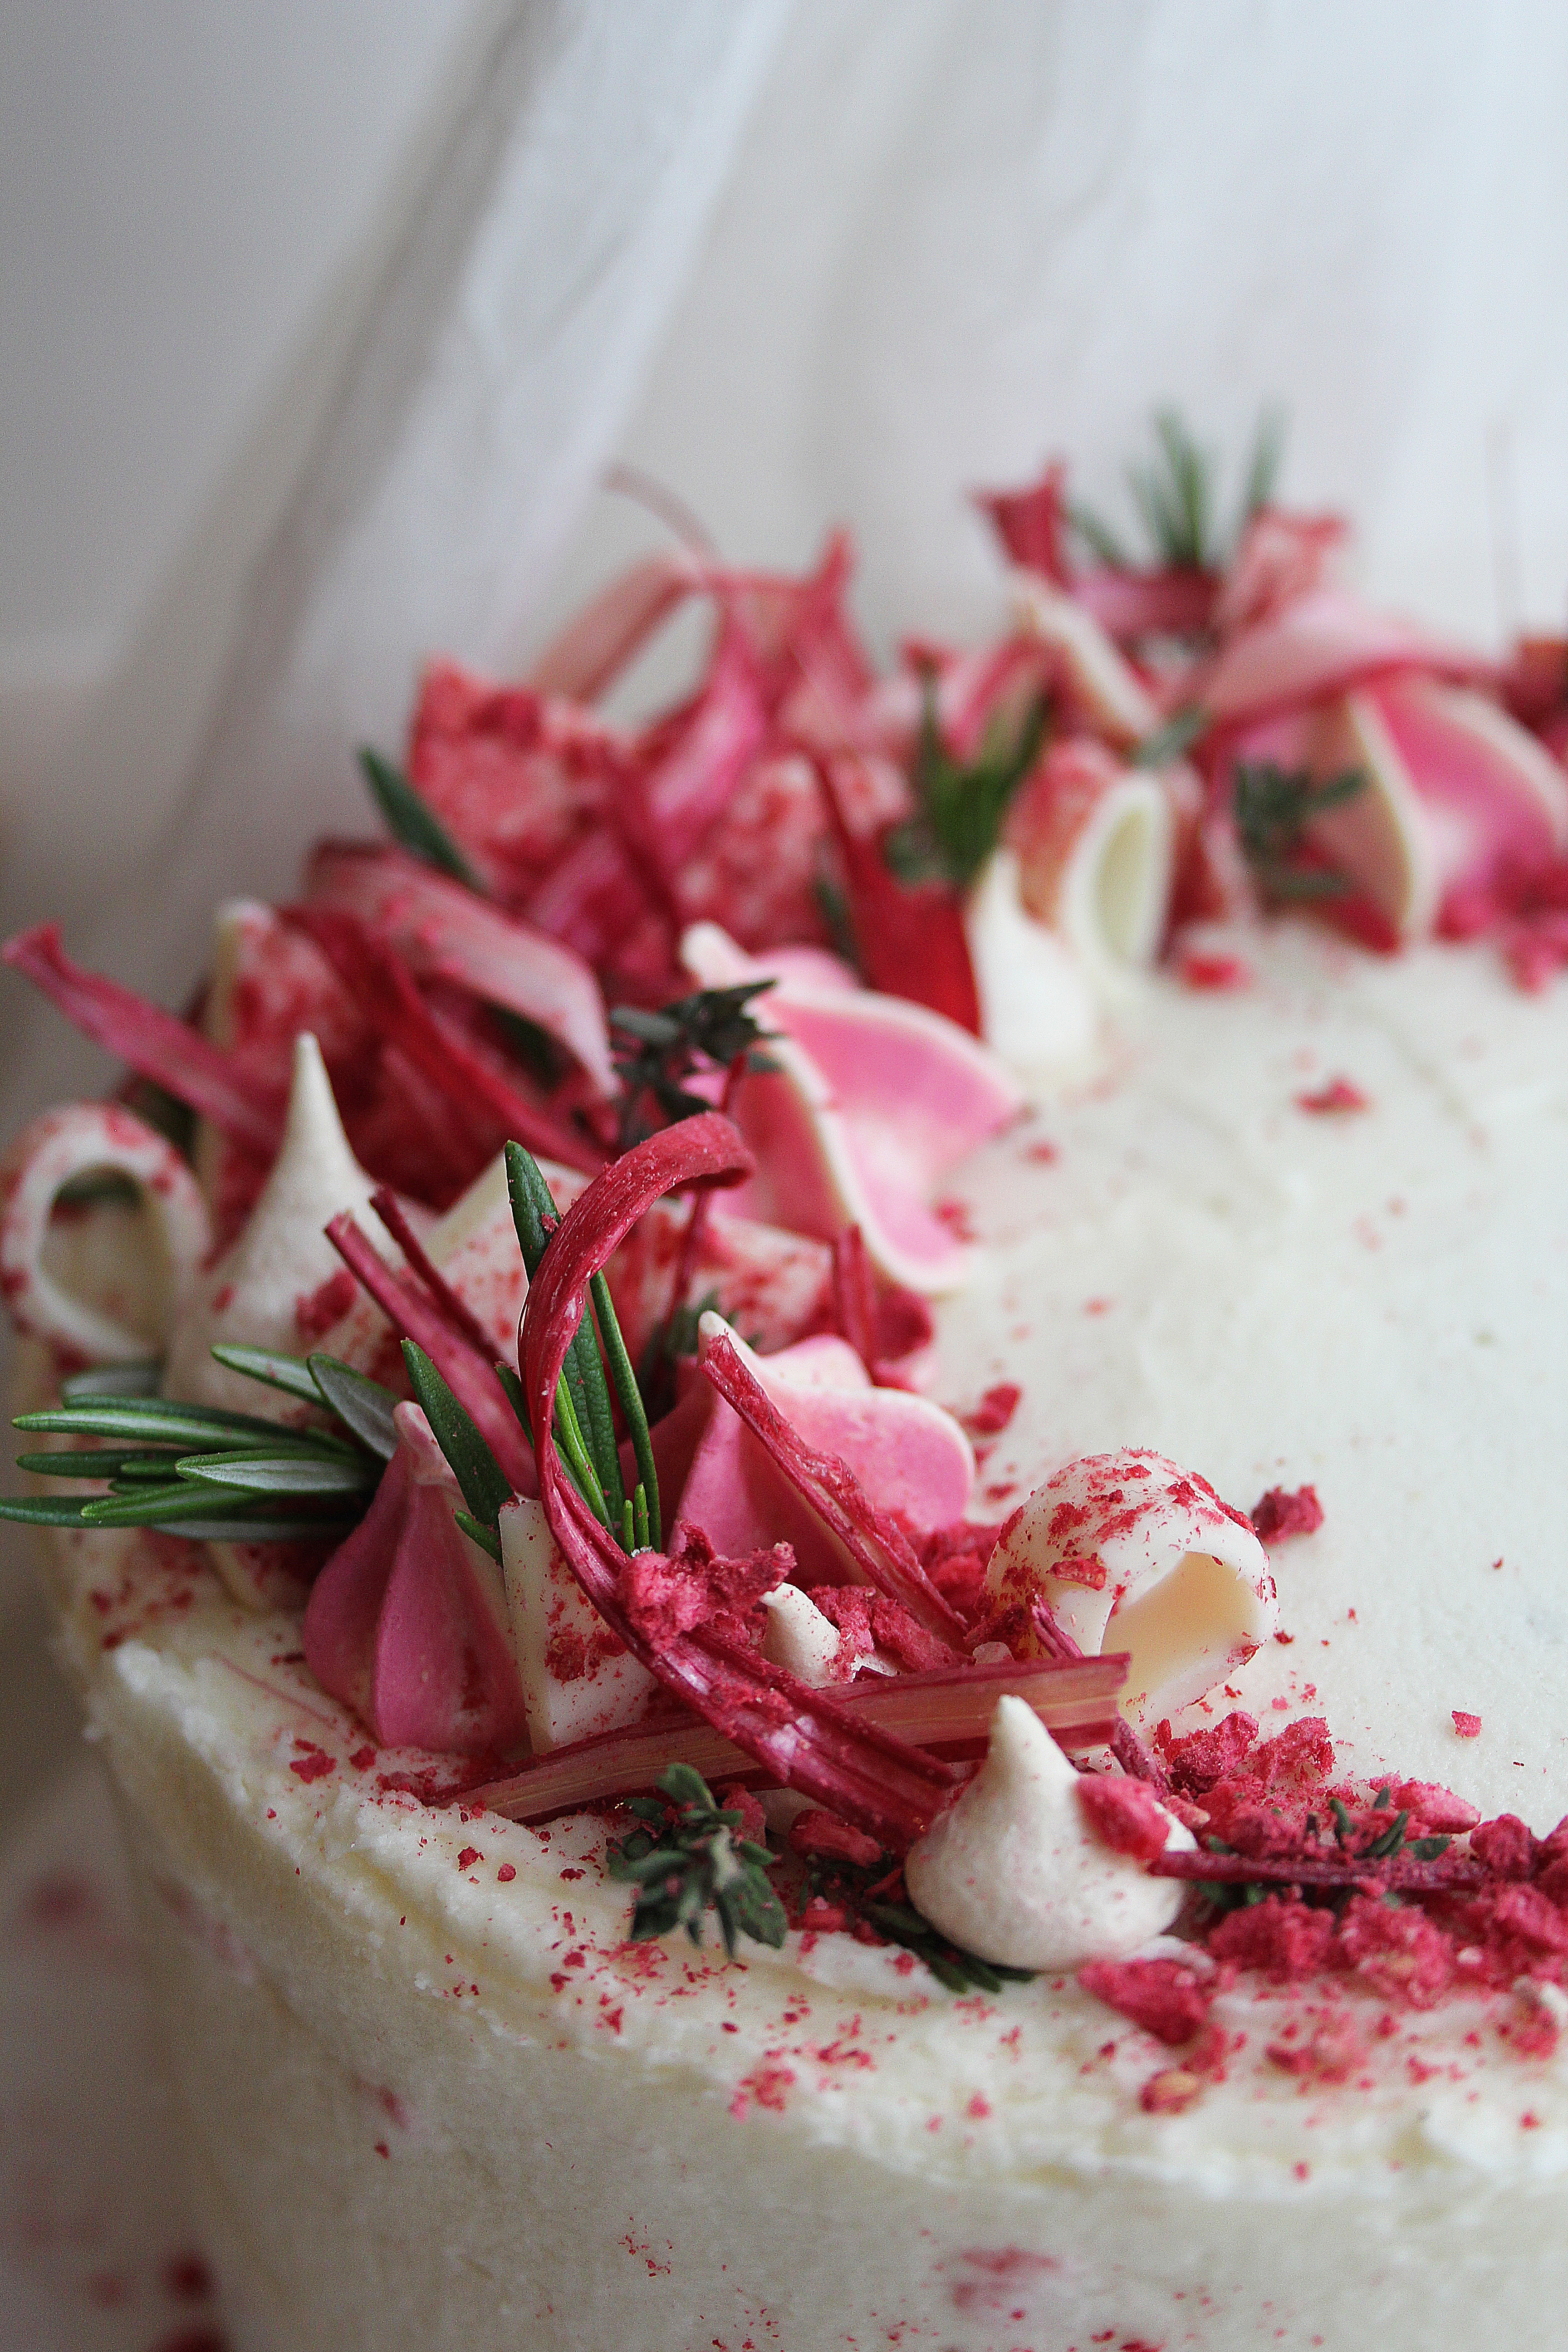
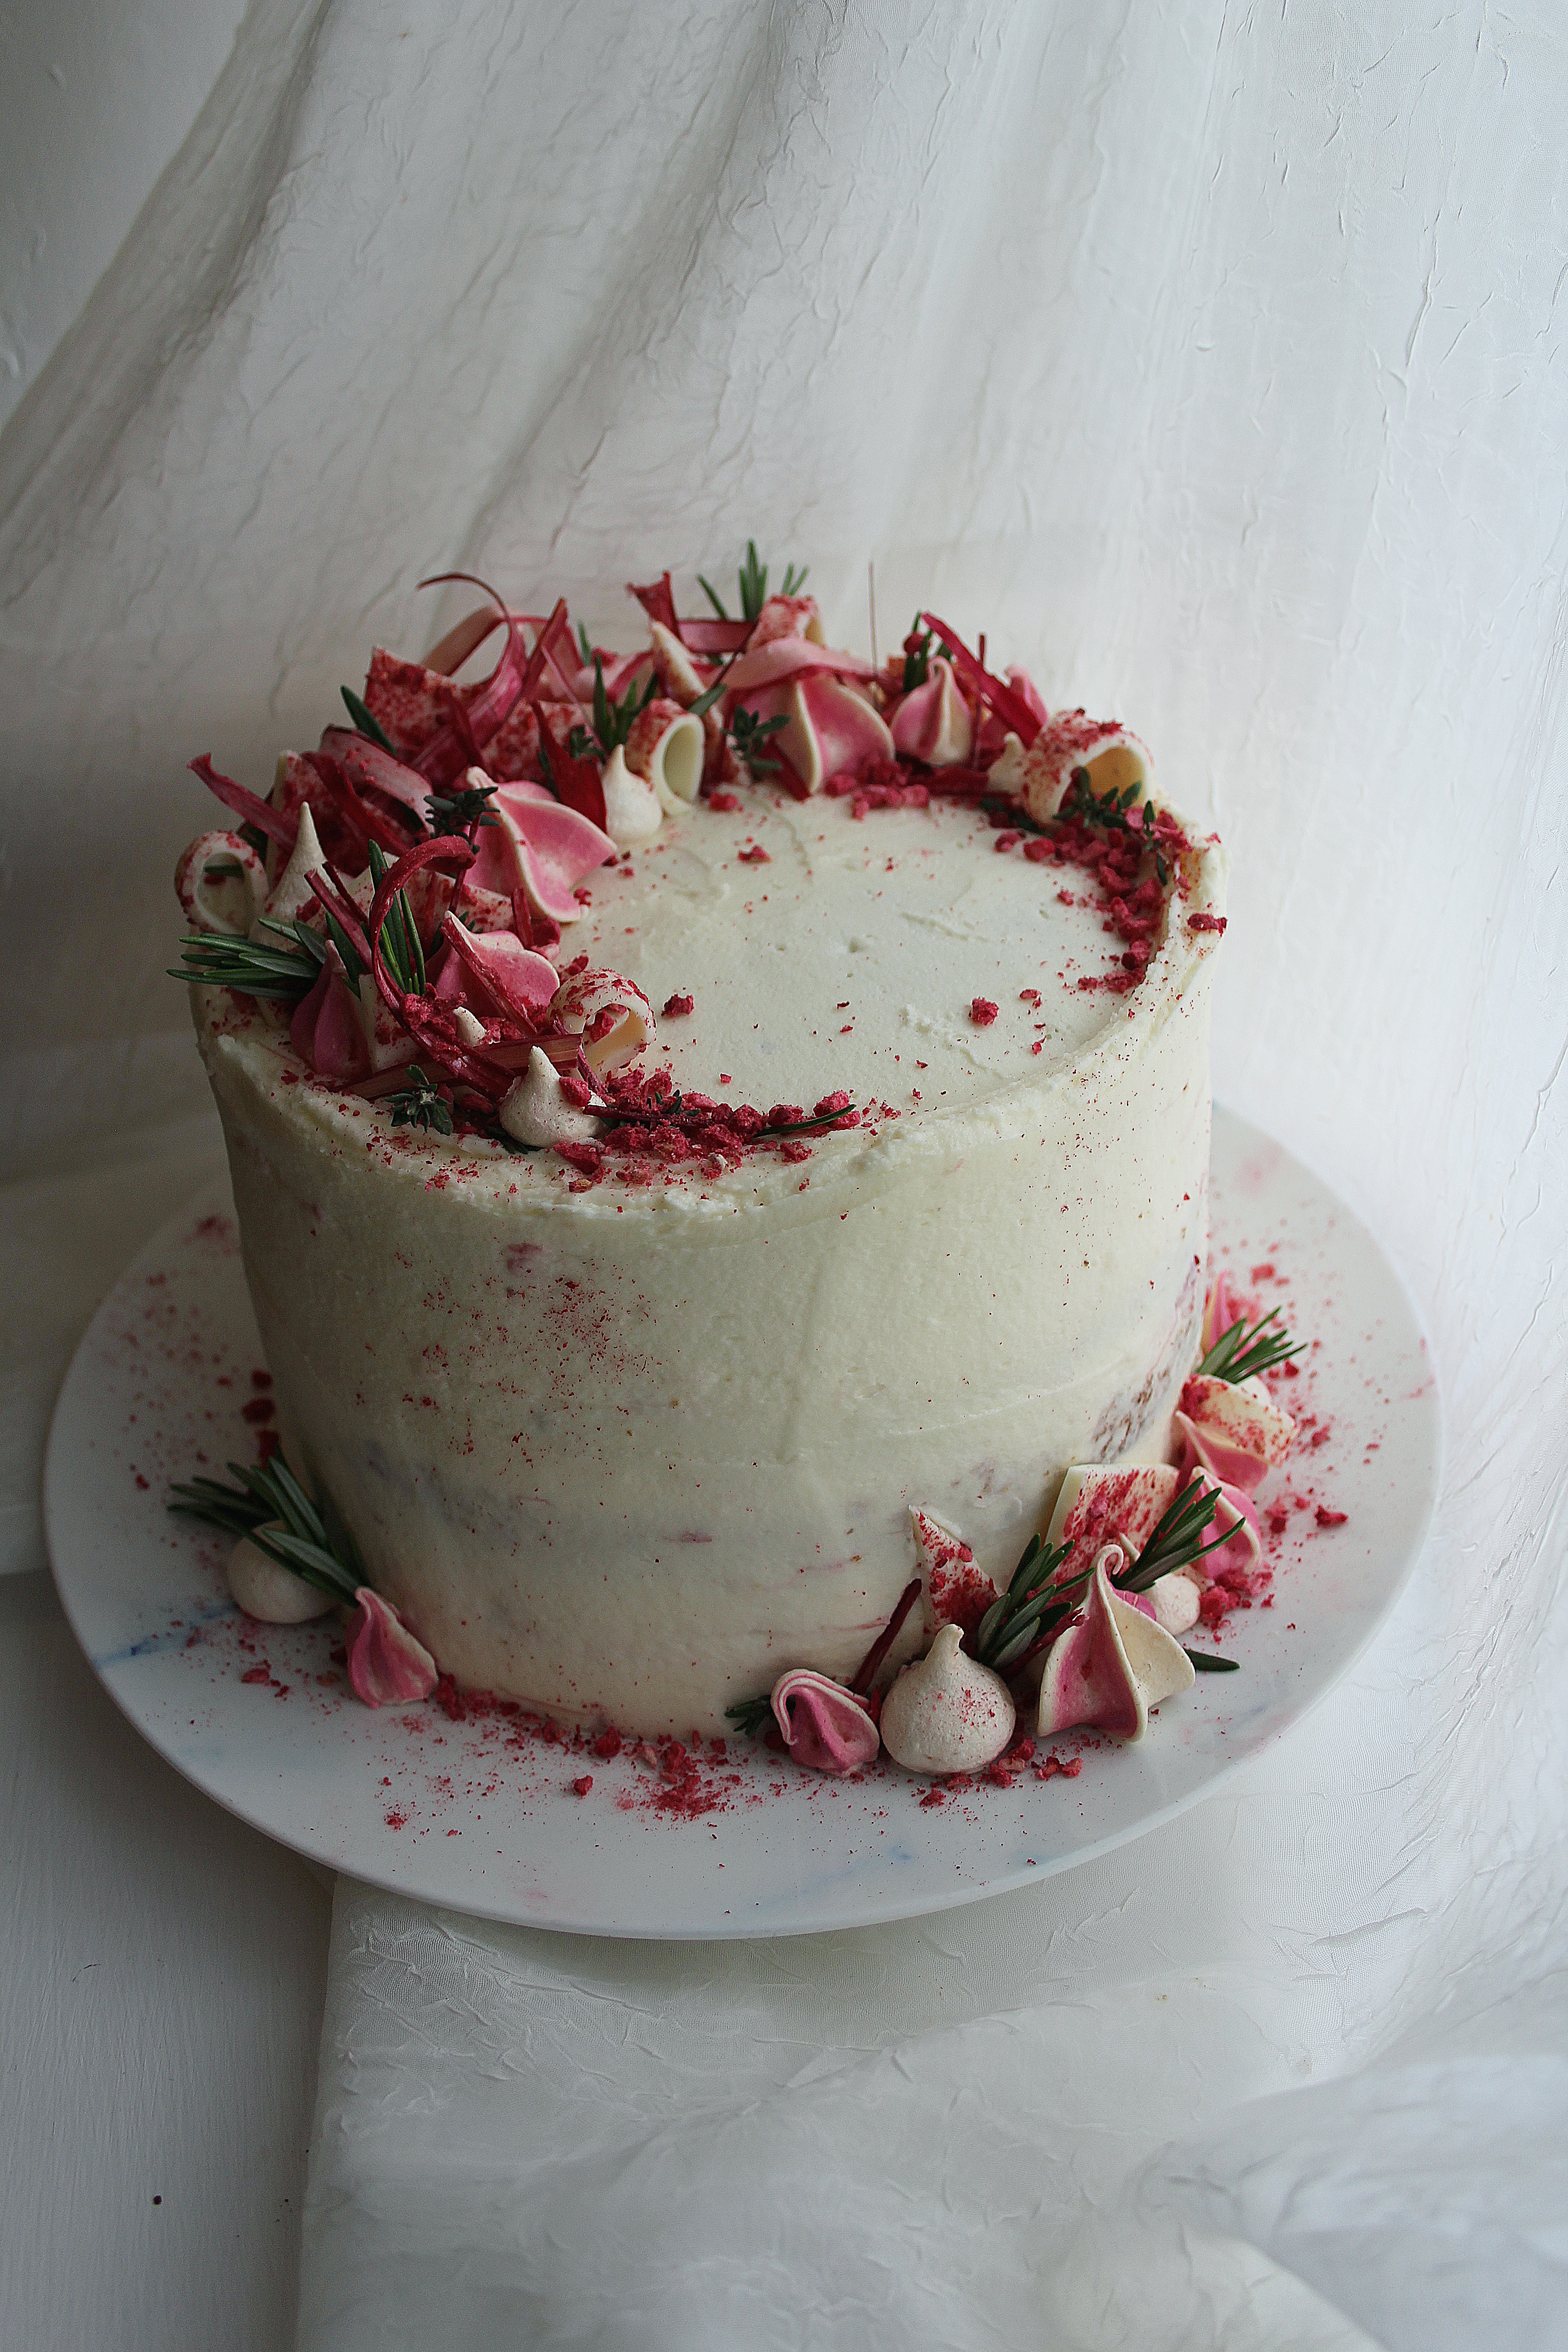
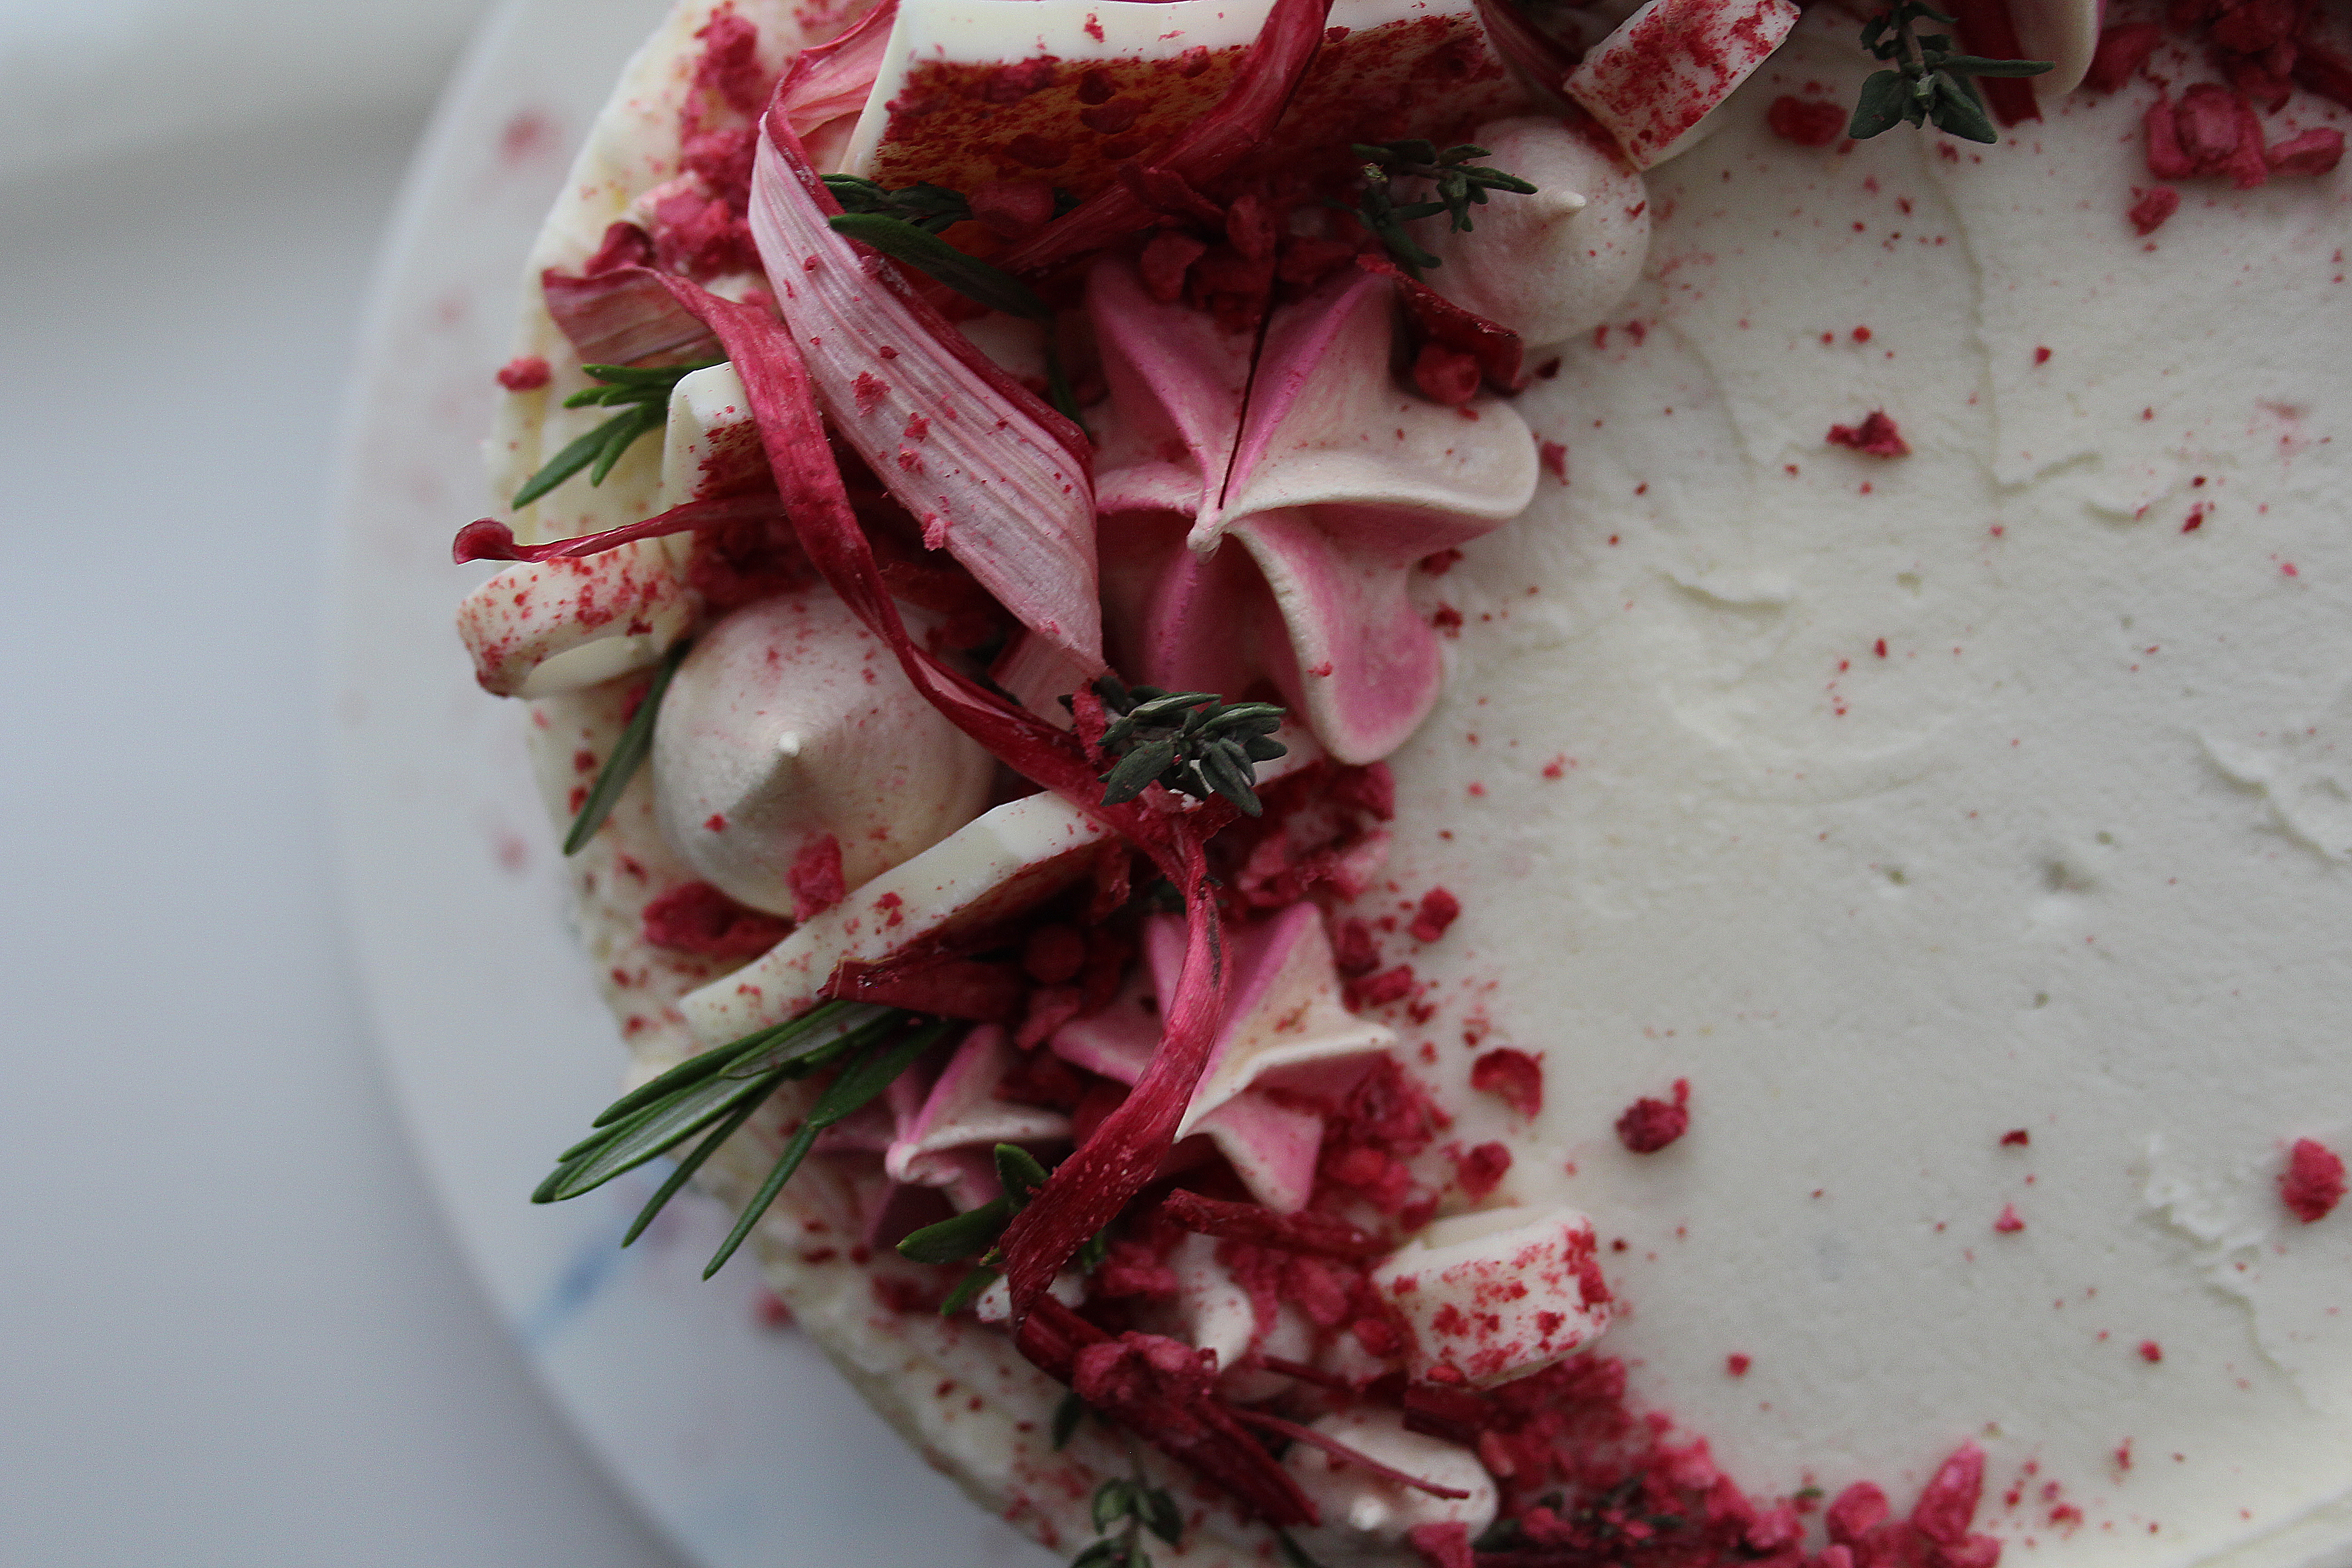
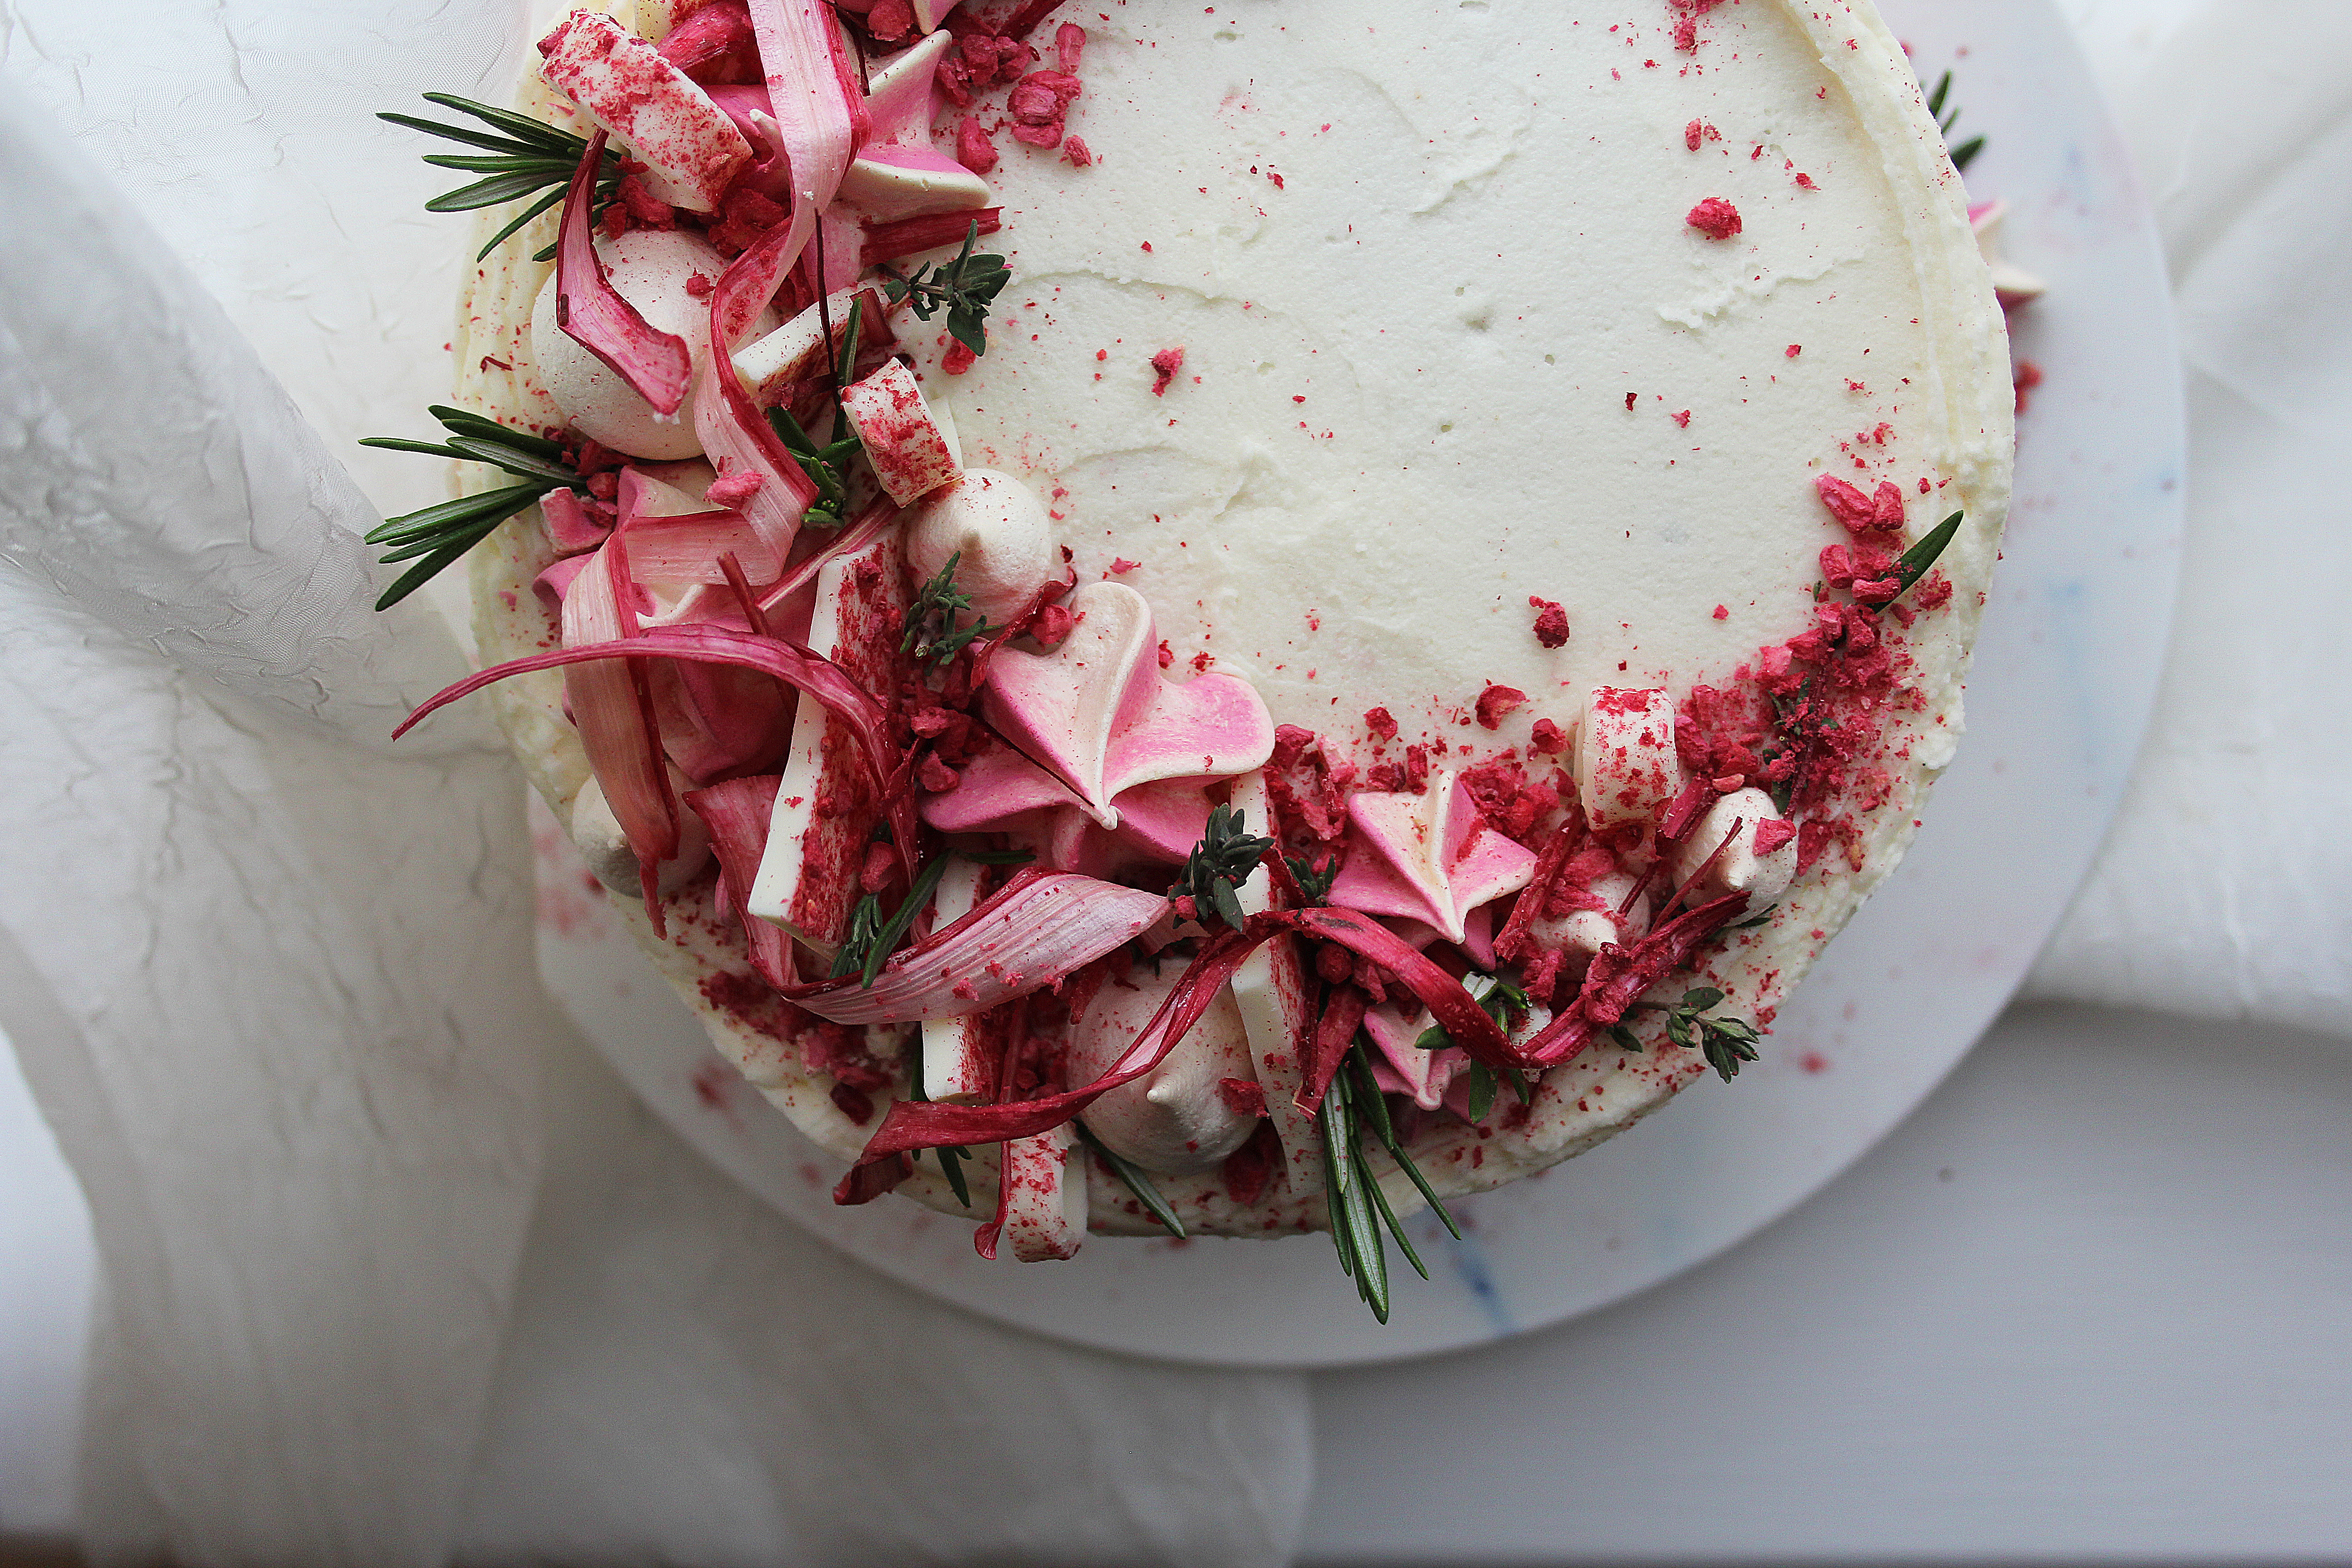
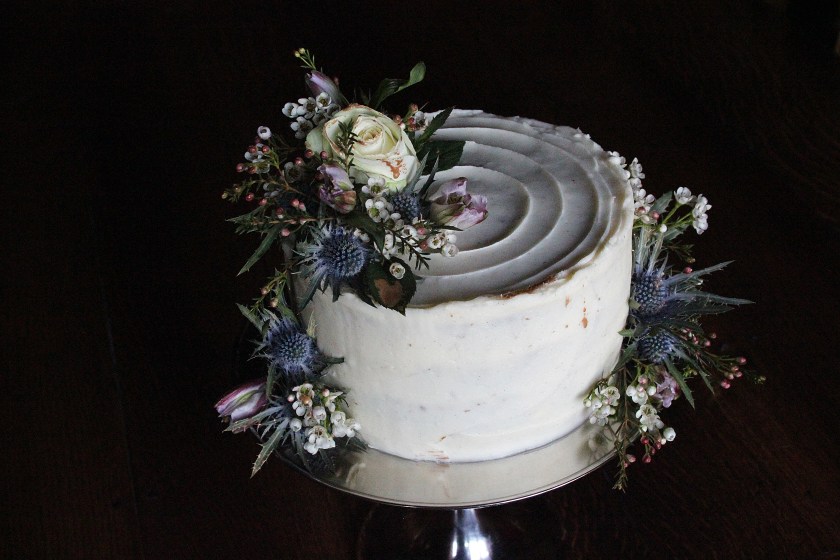
I’m on a bit of a rhubarb trip at the moment- in our house it’s going in just about anything, primarily, my mouth (I jest, but seriously; salad, granita, posset, sorbet, you name it). It’s got a versatile tart flavour and brilliant pink colour (if you buy the forced variety) which lends itself to so many recipes and pairs with lots of other ingredients, so naturally I’ve put it into a cake. This lightly flavoured thyme cake is sandwiched with a tart rhubarb compote which partners beautifully with the sweet white chocolate buttercream. Try it out and top with candied rhubarb ribbons and herby decorations for a statement nod to the season.

rhubarb-3

Ingredients:

For the cake:

  • 350g soft butter
  • 350g caster sugar
  • 6 large eggs
  • 350g self-raising flour, sifted
  • 2tsp baking powder
  • 1tsp vanilla extract
  • pinch of salt
  • 2tsp finely chopped thyme

For the rhubarb filling:

  • 400g rhubarb
  • 75g caster sugar

For the white chocolate buttercream:

  • 200g melted white chocolate
  • 250g soft butter
  • 500g icing sugar
  • 2-3tbsp milk

For the decorations (optional ideas): 

  • Candied rhubarb ribbons (to make these dissolve 100g caster sugar in 200ml water then bring to the boil and cool. Peel strips of rhubarb and dip into this syrup then line onto a baking tray and dry out in the oven at 110c for 1 hour. Once ready, mould around spoon handles or use as little strip decorations)
  • thyme/rosemary sprigs, freeze dried fruit, mini meringue kisses
  • 100g white chocolate (melt this then pour out onto a lined tray and set. Break into shards and use as desired)

rhubarb-2

rhubarb-1

Method:

  1. Preheat the oven to 170c and grease/line two 7 inch cake tins.
  2. For the cake, place all the ingredients in a large mixing bowl (or bowl of a stand mixer) and beat (with paddle attachment or electric beaters) until light and well combined. This all in one method is so easy and so long as you don’t over-beat results in a lovely even sponge.
  3. Split the batter between the two prepared cake tins and level out. Bake for 40-45 minutes or until a skewer comes out clean when inserted, and the tops are springy to the touch.
  4. While the cakes are cooking, make the rhubarb compote. Simply place the ingredients in a saucepan and stir occasionally over a gentle heat until the rhubarb breaks down and resembles a loose jam. Turn off the heat and set aside.
  5. Once the cakes are ready leave to cool in the tins for 10 minutes then turn out onto a rack to cool completely.
  6. While the cakes are cooling make the buttercream. For this just beat together the butter and icing sugar until really light and fluffy, then add the melted white chocolate (ensuring it is cool) and milk and beat again for a couple of minutes. Your buttercream should be pale (not yellow) and light when it’s ready.
  7. To assemble the cake, slice the sponges horizontally into two even layers so you have four in total. Place one down on your plate/board and spread over a dollop of the buttercream followed by 1/3 of the rhubarb compote. Repeat until you have a 4 layer cake. Take a few spoonfuls of the remaining buttercream, spread a thin layer all over the cake with a palette knife or cake scraper and chill for 10 minutes (this is your crumb coating).
  8. To finish, use all the remaining buttercream to cover the gaps and visible cake (unless you’re going for the naked look!) and smooth down. To decorate, use candied rhubarb, mini meringues, herbs, freeze dried fruits and chocolate shards!

rhubarb-6

rhubarb-5

Enjoy!

Carrot Cake with Pecan Brittle

Cakes, Uncategorized

This cake is a straight forward throw-it-all-in, mix, bake and frost situation (but tastes uh-mazing). The pecan brittle is optional but I think the nutty crunch and slightly bitter caramel really adds to the spiced sponge and tangy cream cheese frosting- definitely a winner!

carrot-cake-pecan1

Ingredients:

  • 225ml vegetable oil
  • 225g soft light brown sugar
  • 4 eggs
  • 250g grated carrot
  • 225g self raising flour
  • 1tsp bicarbonate of soda
  • 2tsp ginger
  • 2tsp cinnamon
  • pinch salt
  • 1/2tsp mixed spice
  • 75g chopped pecans
  • For the brittle: 100g caster sugar, 100g pecans, pinch salt
  • For the frosting: 80g butter, 250g full fat cream cheese, 400g icing sugar, zest 1 lemon

carrot-cake-3

Method:

  1. Preheat the oven to 180c. Grease and line a square brownie tray (about 22x22cm).
  2. Place the oil, sugar, eggs and grated carrot in a large mixing bowl and briefly whisk to combine. Now sift in the flour, bicarbonate of soda, ginger, cinnamon, salt and mixed spice and beat together with a wooden spoon until smooth. Fold in the pecans.
  3. Tip this mixture into the square tin and bake for 25-35 minutes until golden brown and a skewer comes out clean when inserted.
  4. While the cake is cooking, make the brittle. To do this simply place the pecans and sugar in a  heavy bottom pan and gently heat until the sugar melts (don’t stir but swirl the pan occasionally). Once the sugar has melted allow it to reach deep golden brown then pour onto a piece of greaseproof paper and allow to set hard and cool.
  5. Once your cake is cooked and cooling on a rack (in the tin), make the frosting. Beat the butter until smooth then add the cream cheese and whisk until combined. Gradually pour in the icing sugar and continue to whisk for a few minutes- you should achieve light smooth consistency. Stir in the lemon zest last.
  6. Turn the cake out of the tin once it’s cooled and level off if necessary. Spread a generous layer of the cream cheese frosting all over then break up the brittle and sprinkle on.
  7. Slice up and serve (and try to resist coming back for a second piece).

carrot-cake-2


Date and Ginger Pudding with Maple Sauce

Cakes, Uncategorized

This indulgent ginger and date pudding is made for those miserable winter evenings where you just want to curl up and watch a film with a bowl of something warm, comforting and nostalgic…

Ingredients:

  • 225g butter
  • 225g soft dark brown sugar
  • 70g black treacle
  • 165g golden syrup
  • 200g pitted dates
  • 200ml boiling water
  • 100ml milk
  • 350g plain flour
  • 2tsp bicarbonate of soda
  • 2tbsp ground ginger
  • 1tsp ground cinnamon
  • 1tsp mixed spice
  • 2 eggs
  • For the sauce: 100g dark brown sugar, 75g butter, 50ml maple syrup, 50g golden syrup, 75ml double cream, pinch sea salt

Method:

  1. Preheat the oven to 170c. Grease a pudding dish (or chosen vessel) with butter.
  2. Roughly chop the dates and place in a small bowl, then pour over the boiling water. While the dates are soaking, melt the butter, sugar, treacle and syrup in a large saucepan. Once melted, add the soaked dates and water. Stir together.
  3. Now gradually pour in the milk. Stir together until well combined. Set aside.
  4. Sift the plain flour, bicarbonate of soda, ginger, cinnamon and mixed spice into a large mixing bowl. Make a well in the middle and break in the eggs. Briefly mix the eggs to break up then gradually add the melted ingredients from the saucepan. Stir together with a wooden spoon until you have a smooth, lump-free batter.
  5. Pour the batter into the prepared dish and bake for 40-50 minutes (or until a skewer comes out with a few moist crumbs attached when inserted).
  6. While the pudding is cooking, make the butterscotch sauce. To do this simply place the sugar, butter and syrups in a small saucepan and melt together until gently bubbling, then remove from the heat and stir in the cream and salt.
  7. Serve the pudding warm with a generous helping of sauce and vanilla ice cream.

treacke

Mince Pie Bars

Pastry, Uncategorized

These Bakewell inspired bars are made up of a crisp pastry base, zesty mince meat centre, cinnamon frangipane top, toasted almond sprinkling and a dollop of obligatory brandy cream; delicious and oh-so festive!

Ingredients:

  • 250g plain flour
  • 140g butter
  • 1tbsp caster sugar
  • 3 egg yolks
  • 3tbsp water
  • 1 jar good quality mince meat (optional: add the zest of 1 orange and a handful chopped walnuts to it)
  • 150g butter
  • 150g golden caster sugar
  • 75g ground almonds
  • 75g self-raising flour
  • 1/2 tsp cinnamon
  • 3 eggs
  • handful flaked almonds
  • 150ml double cream
  • 1tbsp brandy
  • 2tbsp icing sugar (plus extra for dusting)


Method:

  1. First, make the pastry (or skip steps 1 and 2 if you’re using shop bought shortcrust!). Place the butter, sugar and flour in a food processor and blitz until they form breadcrumbs. Pour into a large bowl. In a small bowl whisk together the water and egg. Add 4tbsp of this mix to the crumbs and stir with a cutlery knife. If there are still dry patches add a little more liquid until the mixture comes together to form a dough. Press into a thin disc shape and wrap in cling film. Chill for 15 minutes.
  2. Preheat the oven to 190c. Lightly grease a rectangular tart tin. Take your chilled pastry and roll out to about 3mm thick. Line into the tart tin, pushing it into the corners as you go. Chill again for 10 minutes.
  3. Now it’s time to blind bake. Screw up a piece of greaseproof paper and unfold, then press down into the case. Fill with baking beans and spread out to completely cover the base. Bake for 15 minutes until the sides are set then remove the beans and paper and bake for a further 5-10 minutes until the base is dry and sandy. Don’t let it colour as it will be returning to the oven when filled.
  4. Reduce the oven temperature to 170c.
  5. Now make the frangipane. Cream together the butter and sugar until light and fluffy then add the eggs one at a time, beating well between each addition (add a little of the flour to prevent curdling if you like). Once well combined, beat in the ground almonds and fold in the remaining flour and cinnamon.
  6. Now it’s time to assemble. Take your tart case and spread a generous layer of mince meat across the base. Top this with the frangipane and level out as best you can. Sprinkle with flaked almonds.
  7. Bake for 20-25 minutes or until the frangipane is cooked through. If the pastry or almonds are browning too much just cover loosely with foil.
  8. Once baked, cool on a wire rack while you make the brandy cream. To do this simply whisk together the brandy, cream and icing sugar until thick. Spoon onto each bar, dust with icing sugar and serve.


Cranberry and White Chocolate Brownies

Chocolate, Uncategorized

These brownies are rich, dense and studded with cranberries and white chocolate chunks- a great (and easy) festive treat to whip up for visiting family and friends over the coming weeks…

Ingredients:

  • 300g dark chocolate
  • 210g butter
  • 310g caster sugar
  • pinch salt
  • 3 eggs, 1 egg yolk
  • 3tsp vanilla extract
  • 120g plain flour
  • 150g white chocolate, chopped into chunks
  • 100g dried cranberries

Method:

  1. Preheat the oven to 180c. Grease and line a square baking tin/ brownie tray.
  2. Place the butter and chocolate in a heatproof bowl and set it over a pan of gently simmering water. Do not allow the water to touch the bottom of the bowl or it could cause the chocolate to seize.
  3. Stir the butter and chocolate occasionally until melted then set aside to cool for a few minutes. Once the chocolate has cooled a little, add the sugar and salt then whisk (with electric beaters or in the bowl of a stand mixer) until well combined.
  4. Now add the eggs and whisk on high until the mix has lightened in colour and is glossy (about 5 minutes- whisking well at this stage is what gives you that classic flaky top!).
  5. Sift in the flour and fold then finally stir in the white chocolate and cranberries. Tip into the lined baking tin and spread out. Bake for 25-30 minutes or until set but still very moist in the middle.


Enjoy!

Ginger Spice Christmas Cake with Bloom & Wild

Cakes, Uncategorized

This four layer ginger cake filled with lightly salted toffee sauce and tangy cream cheese frosting is a great alternative to the classic Christmas fruit cake, and is usually the preferred option in my house.

The Scandi-style flowers I’ve used for decoration were sent to me by Bloom & Wild, a brilliant flower delivery company who focus on carefully selecting the best seasonal blooms. The bouquet I received ( the Sadie) is part of their Christmas range and I would definitely recommend you check out their other options; I don’t know about you, but I find it tricky to find a wide range of good quality cut flowers outside of London (I know, first world problems), so it’s great to know I can choose more unusual varieties online and have them delivered straight to my door the next day by Bloom & Wild.

I hope you like how I’ve made use of the flowers and perhaps this could inspire some other botanical themed Christmas cakes!

Ingredients:

  • 380g butter
  • 220g black treacle
  • 80g golden syrup
  • 340g dark brown soft sugar
  • 6 eggs
  • 380g self raising flour
  • 3tbsp ground ginger
  • 2tbsp ground cinnamon
  • 60g soured cream
  • 6 pieces stem ginger, grated (from a jar)
  • For the toffee sauce: 50g butter, 50g dark brown soft sugar, 50g golden syrup, 75ml double cream, large pinch sea salt
  • For the cream cheese frosting: 200g unsalted butter (soft), 250g cream cheese, 900g icing sugar, seeds of 2 vanilla pods

Method:

  1. Preheat the oven to 170c. Grease and line two 8 inch cake tins.
  2. Place the butter, treacle, syrup and sugar in a large bowl (or bowl of a standing mixer). Beat together until light and fluffy.
  3. Add the eggs in one at a time along with a little of the flour to prevent curdling. Mix well between each addition. Once the eggs are fully incorporated, sift in the remaining flour, cinnamon and ginger. Fold gently then finally stir in the stem ginger and soured cream. Split between the 2 prepared tins and bake for 30-40 minutes.
  4. While the cakes are cooking, make the toffee sauce. Place the butter, syrup and sugar in a saucepan and melt over a medium heat. Once melted pour in the cream and add the salt. Mix to create a smooth sauce then set aside to cool and thicken.
  5. Now make your cream cheese frosting. Put the butter in a large bowl (or the bowl of a stand mixer) and beat until fluffy and light in colour. Add the cream cheese and vanilla and beat once again until well combined. Now, still beating, gradually add the icing sugar. Once all the icing sugar has been added increase the speed and mix until the consistency is light, thick and spreadable.
  6. When the cakes are ready, a skewer should come out clean when inserted. Rest in their tins for 10 minutes then remove and leave on a wire rack until they are completely  cool.
  7. Now you are ready to assemble your layer cake. Level off the sponges as best you can then slice in two (you should be left with 4 layers). Place one layer down on your plate or cake board. Secure with some cream cheese frosting if it’s a little slippy. Now spread over a few tablespoons of the toffee sauce. Allow it to sink into the sponge then apply a thick even layer of cream cheese frosting. Top with the next sponge and repeat until the sponges are used up.
  8. With the remaining cream cheese frosting, cover the cake all over and smooth down with a cake scraper. Decorate with fresh flowers dusted in frosty edible glitter or get creative and come up with your own design to suit the occasion.

More decorating ideas: 

  • Leave the cream cheese frosting rough and decorate with mini gingerbread houses to create a snow drift scene.
  • Top with traditional/vintage Christmas cake decorations.
  • Make little white meringue kisses and cover the top of the cake with them, then dust with gold edible glitter.
  • Top with frosted fruit and rustic greenery.

Enjoy!

My Favourite Chocolate Cake

Cakes, Uncategorized

This chocolate cake is my absolute favourite; it’s moist, rich and filled with both ganache and buttercream (completely necessary in my opinion!). Make it for a celebration or get together and you will be very popular!

Ingredients (for a 3 layer 9 inch wide cake- half the recipe for a 6 inch cake): 

For the cake:

  • 340g plain flour
  • 525g caster sugar
  • 125g cocoa
  • 2 1/2tsp baking powder
  • 2 1/2tsp bicarbonate of soda
  • pinch salt
  • 3 eggs
  • 375ml milk
  • 185ml vegetable oil
  • 3tsp espresso coffee
  • 375ml boiling water

For the frosting:

  • 250g butter
  • 600g icing sugar
  • 100g cocoa
  • few drops milk

For the ganache:

  • 250g dark chocolate
  • 200ml double cream
  • pinch sea salt

For the toppers (optional):

  • 100g dark chocolate
  • 100g milk chocolate
  • any sprinkles, nuts or metallic sprays/glitter you fancy

Method:

  1. Preheat the oven to 170c. Grease and line three 8 inch cake tins.
  2. For the cake, place the flour, caster sugar, baking powder, bicarbonate of soda, salt and cocoa powder in a bowl. Stir together with a whisk or wooden spoon.
  3. In a jug, mix together the eggs, vegetable oil, milk and espresso. Pour into the mixing bowl with the dry ingredients and whisk until smooth.
  4. Now add the boiling water in batches, gently stirring between each addition (it’s supposed to be runny so don’t worry if the consistency seems a bit odd!).
  5. Split the mixture between the three cake tins and bake for 35-45 minutes until well risen and cooked through. To test whether they are ready, insert a skewer- if it comes out clean it is ready to come out of the oven.
  6. Cool the cakes in the tins for 10 minutes then remove and transfer to a wire rack. Leave to drop to room temperature while you make the fillings.

  1. Firstly, make the ganache. To do this simply chop the chocolate into small pieces and place in a jug, then heat the cream until almost simmering and pour straight over it. Leave the chocolate to melt for a couple of minutes then stir to form your ganache. Set aside in the fridge to thicken and cool before you use it.
  2. Now make your buttercream. Whisk the butter until light and fluffy then gradually add the icing sugar and cocoa, whilst beating to combine. Add the vanilla and double cream and give it a final whisk- stop when you have a light, smooth frosting.
  3. If you’d like to make your own toppers, simply melt the chocolate (melt separately for some contrasting shards) then spread a thin layer onto greaseproof paper. Set in the fridge while you assemble the cake then break into pieces and use as you wish.
  4. Now you are ready to assemble the cake. Level off the tops of the sponges with a cake cutter or large bread knife to make sure you have even layers. Take your first sponge and spread over  a layer of ganache followed by a layer of buttercream. Top with the next sponge and repeat until you have a stack of three. Cover the whole cake in buttercream and smooth the sides with a palette knife or cake scraper. Decorate with the shards or any other decorations you fancy.

Enjoy!

Cardamom, Pistachio and White Chocolate Cake

Cakes, Uncategorized

This cake is super easy to bake and is great if you’re looking to experiment with different flavours; the cardamom adds a distinct hum of spice to the light sponge which pairs really well with the earthy pistachios and super sweet white chocolate topping.

Ingredients:

For the cake:

  • 350g soft butter
  • 350g caster sugar
  • 6 eggs
  • 375g self raising flour
  • 1tsp baking powder
  • pinch salt
  • 1 1/2 tsp cardamom seeds, crushed to a fine powder
  • 150ml milk
  • 100g chopped pistachios

For the topping:

  • 150g white chocolate, chopped into small pieces
  • a few crushed pistachios and some dried rose petals (optional)

Method:

  1. Preheat the oven to 160 (fan). Generously grease a bundt in with butter then sprinkle over some flour. Shake to coat the edges completely then tip out any excess (this should ensure that the cake doesn’t stick).
  2. Cream together the butter and sugar with an electric whisk  (or a stand mixer) until light and fluffy. Add the eggs one at a time, beating between each addition (add a little bit of the flour each time if you’re worried about curdling!).
  3. Once the eggs are fully incorporated and you have a smooth mixture, add the (remaining) flour, baking powder, salt milk, and cardamom. Whisk until light and well combined.
  4. Now fold in the pistachios and scrape the batter into the prepared bundt tin. Even out and bake for 30-40 minutes.
  5. When your cake is ready a skewer should come out clean when inserted. Once cooked, rest for 5 minutes in the tin then turn out onto a wire rack and allow to cool completely.
  6. While your cake is cooling, melt the white chocolate gently in a heatproof bowl above a pan of simmering water. Set aside to cool.
  7. Once your cake and topping have cooled you’re ready to decorate. To do this drizzle the white chocolate over the bundt and let it drip down the sides. Sprinkle with pistachios and rose petals for a simple but elegant finish.

Snickers Cookie Sandwiches

Biscuits, Uncategorized

These Snickers cookies sandwiched together with peanut buttercream and caramel sauce are the ultimate indulgence- you must try them!

Ingredients:

For the cookies:

  • 225g soft butter
  • 125g caster sugar
  • 175g dark brown soft sugar
  • 2 eggs
  • 1tsp bicarbonate of soda
  • 300g plain flour
  • pinch salt
  • 4 chopped Snickers bars
  • 100g dark chocolate chips

For the caramel filling: 40g butter, 40g dark brown sugar, 40g golden syrup, 50ml double cream

For the peanut butter filling: 300g icing sugar, 50g butter, 50g peanut butter, few drops of milk

Method:

  1. Preheat the oven to 180c and line 2 large baking trays with greaseproof paper.
  2. Cream together the butter, brown sugar and caster sugar with an electric whisk or stand mixer until light and fluffy. Add the eggs and some of the flour then whisk again to incorporate them into the mix. Add the remaining flour and bicarbonate of soda. Mix again.
  3. Add the chopped snickers bars and chocolate chips then fold in with a wooden spoon.
  4. Roll the cookie dough into small even balls (slightly smaller than a ping pong ball) and line onto the baking trays (allowing space for spreading).
  5. Bake for 10-12 minutes. Once cooked allow to cool on the trays while you make the fillings.
  6. For the caramel, melt together the butter, sugar and syrup. Once melted, bring to the boil then add the cream off the heat. Stir and allow to cool and thicken.
  7. To make the peanut butter buttercream, whisk the butter until light and fluffy. Add the peanut butter and briefly whisk together, then add the icing sugar gradually, whisking constantly until you have a light buttercream. Add some milk if the frosting is too stiff to achieve the desired pipe-able consistency.
  8. Now it’s time to assemble your cookie sandwiches! Just take a cookie, pipe a ring of peanut buttercream around the edge, fill it with caramel and pair up with another cookie to form a sandwich.

Willie’s Cacao: Orange Blossom and Chocolate Melting Moments

Biscuits

If you’re a frequent reader of this blog, you may well have noticed that my recipes tend to be a little chocolate heavy (it is my vice- I can’t help it). With this in mind, I thought it would be interesting to team up with quality chocolate makers Willie’s Cacao to create a few recipes using different ‘single estate’ bars. By doing this I want to show how different beans create different flavours in chocolate, which in turn taste best when paired with specific ingredients and foods- as with grapes in fine wines.

Willie Harcourt Cooze, founder of Willie’s Cacao, focuses on ‘single estate’ cacao; what this means is that each bar is made from beans grown in one very carefully selected location (whether that be Peru, Venezuela or Cuba etc), instead of beans of various origins going into the same chocolate. The company work in this way to highlight how growing beans in varying climates and soils result in contrasting flavoured bars.

Having experimented with three of their chocolates, I have created three recipes in which the taste of the specific cacao is (hopefully)  highlighted by my choice of flavour pairings. This experimentation has made me realise how important it is to do your research when it comes to chocolate (and any ingredients really), as these bakes have a great depth of flavour I have never achieved before with chocolate based baking.

BISCUIT 3 USE

My first recipe is for these orange blossom and chocolate melting moments. For these I used the Colombian Los Llanos single estate bar- it has fruity and floral notes so really works with the orange centre. They are made up of two buttery chocolate biscuits, a delicious chocolate ganache and an orange blossom and fresh zest buttercream.

INGREDIENTS (makes 8-10 sandwich biscuits)

For the biscuits: 175g soft butter, 60g icing sugar, 60g corn flour, 20g cocoa, 150g plain flour

For the ganache: 50g 70% Colombian Los Llanos chocolate (or another good quality dark chocolate), 50g double cream

For the orange blossom centre: zest 1 orange, 1tsp orange blossom extract, 65g soft butter, 150g icing sugar

BISCUIT 1 USE

METHOD

Preheat the oven to 160c (fan) and line 2 baking trays with greaseproof paper.

For the biscuits, cream together the butter and sugar until light and fluffy. Sift in the cornflour, cocoa and plain flour then very briefly mix until smooth and combined. The less handling the biscuits have, the more buttery and crumbly they will be.

Once the dough is combined, take 1tbsp pieces and roll into balls, then line onto the prepared trays (with a little space between each). When all the dough has been used, press down on the balls with the back of a fork to create the line pattern. Chill for 10 minutes in the fridge.

Once chilled, bake for 10-12 minutes, then cool on a wire rack.

Meanwhile, make the fillings. For the ganache, grate the chocolate into a bowl. Heat the cream until almost bubbling then pour over the chocolate. Leave to melt for a couple of minutes then stir to combine. Set aside to cool.

For the orange buttercream, beat the butter and icing sugar until light and fluffy then add the zest and extract. Stir to combine.

Fill two piping bags- one with the ganache and the other with the buttercream.

Once the biscuits are cool pipe a ring of ganache around the outer edge then fill the centre with the orange buttercream. Place another biscuit on top to create a sandwich and repeat the process until all the biscuits have been used up.

Enjoy!

BISCUIT 2 USE

I hope you like these biscuits and find cacao as interesting as I do. Look out for two more chocolate recipes this week and do give them a try, I’m really pleased with the results!