Gooseberry and Elderflower Layer Cake

Cakes

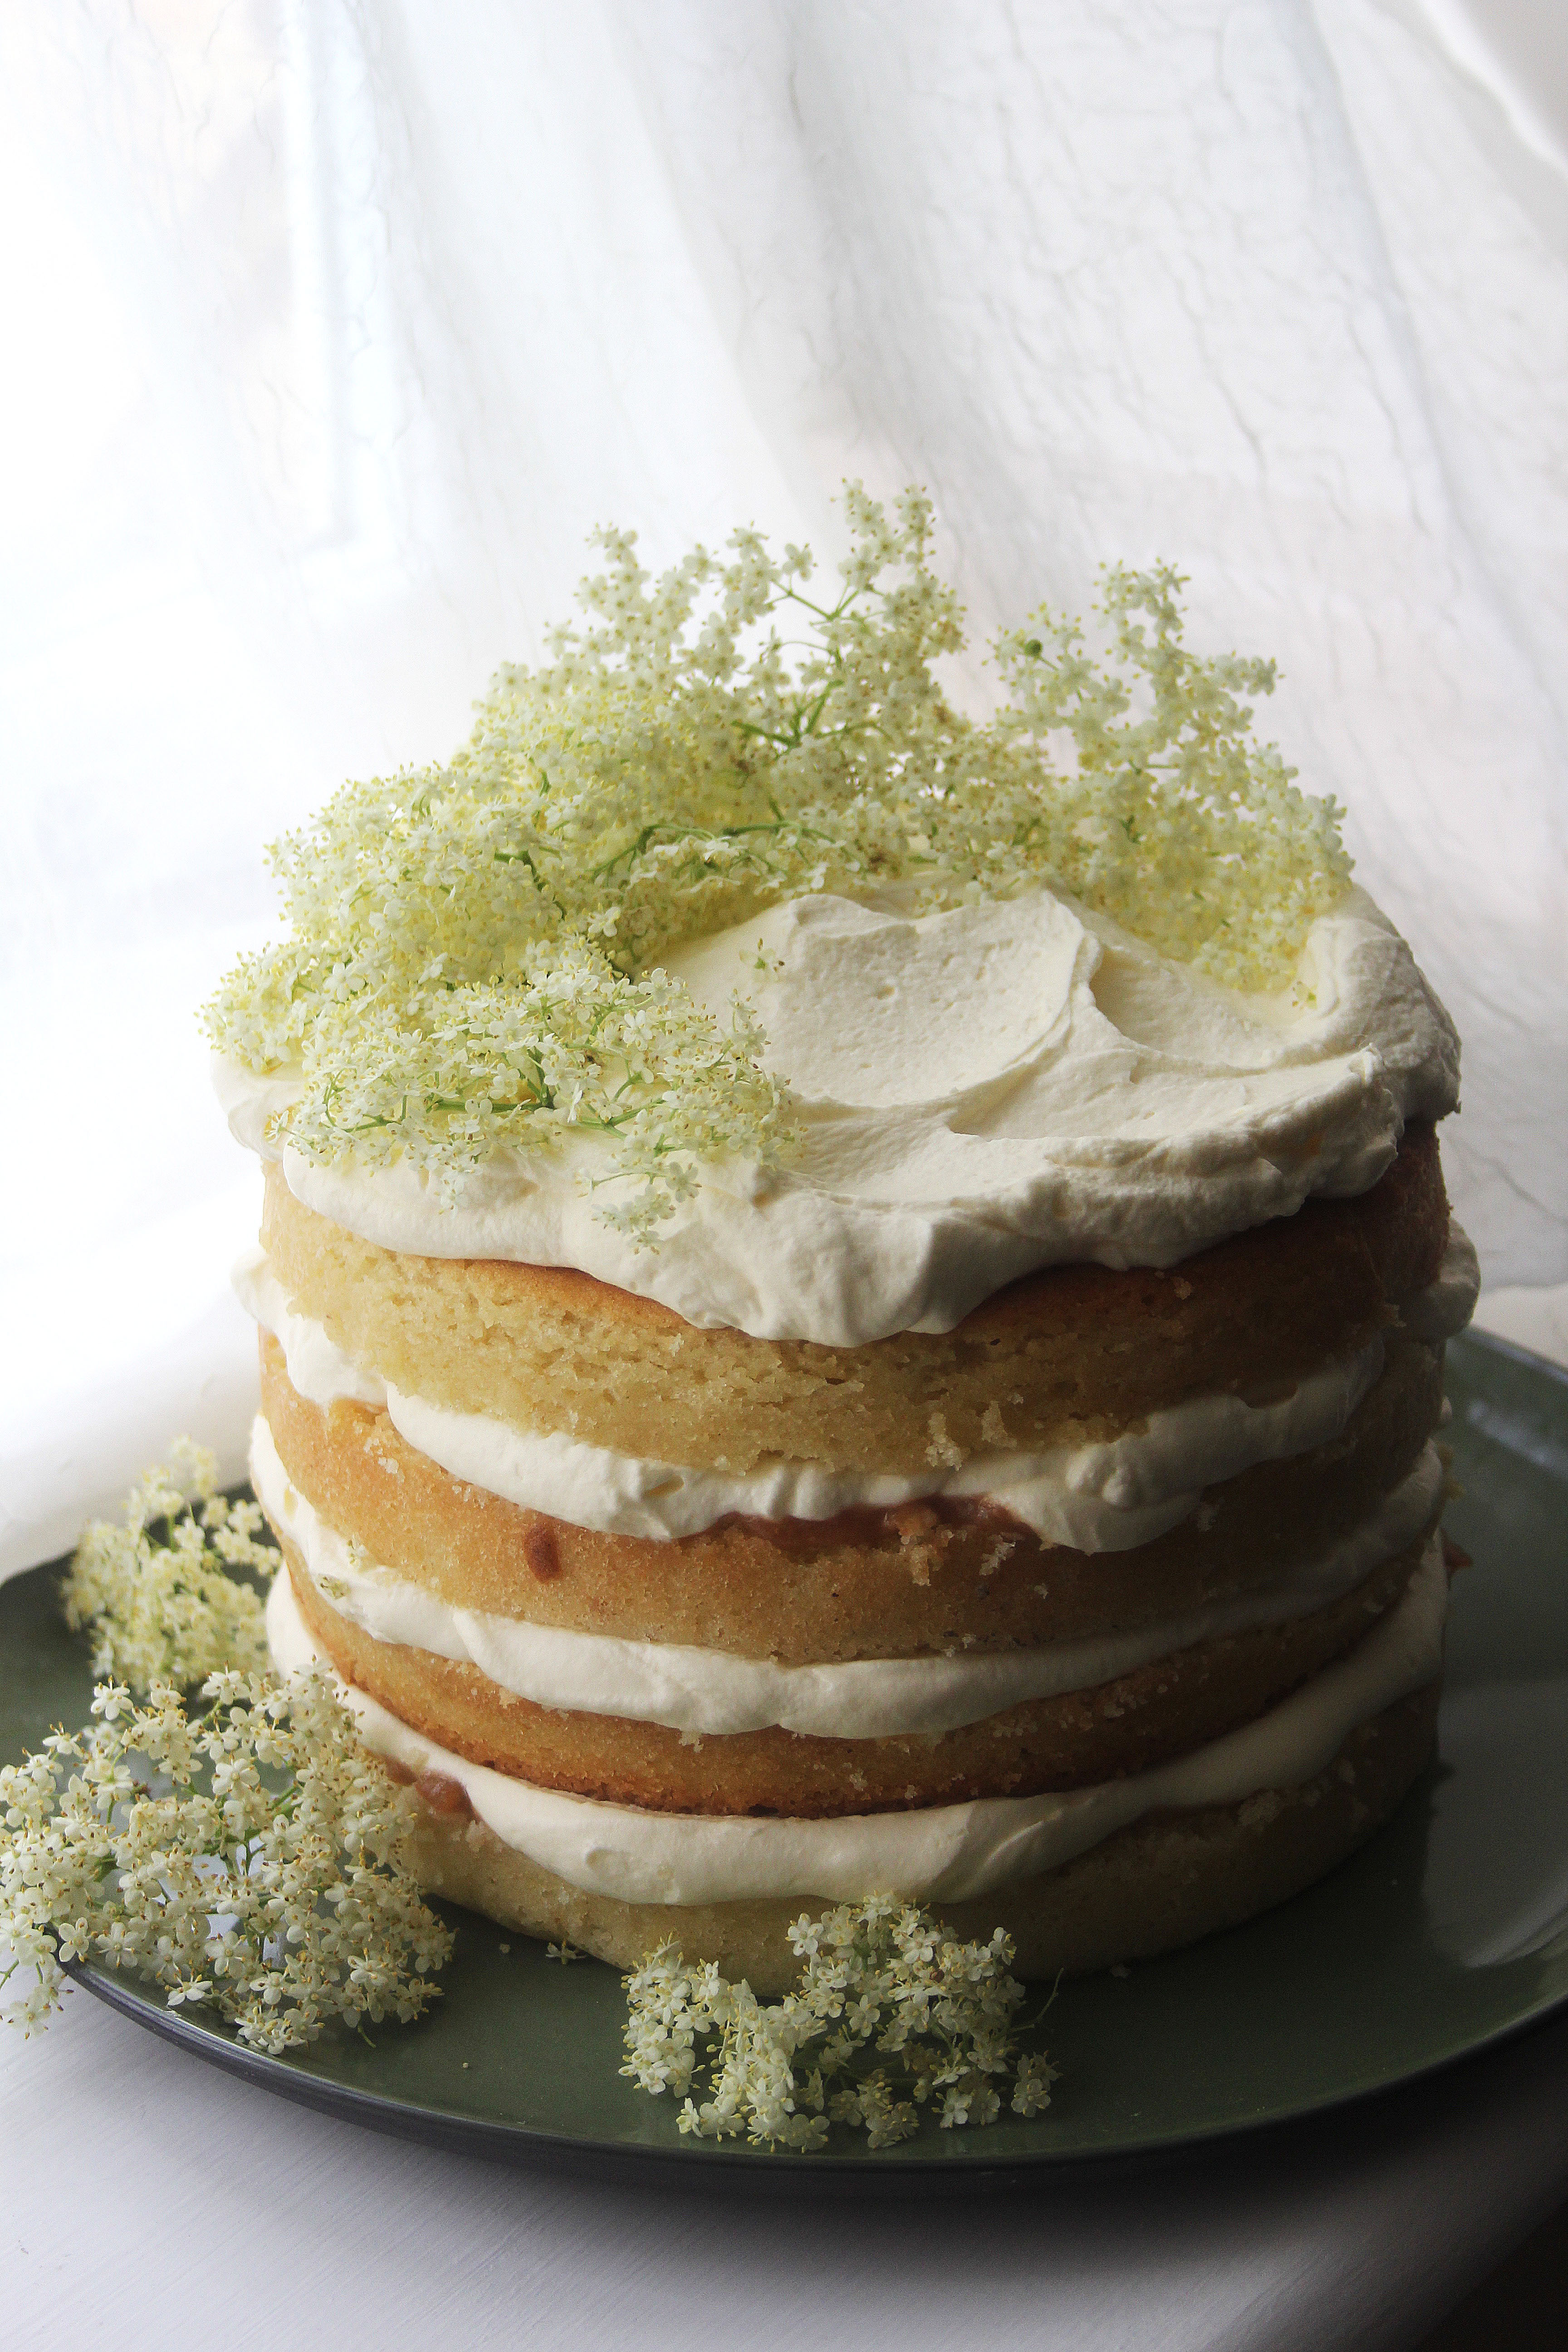
Layers of zesty elderflower sponge sandwiched together with tart gooseberry compote and lightly whipped elderflower cream make up this delicious nod to the British countryside. Bake it for a special mid-summer occasion or round off a Sunday lunch with a generous slice.

Ingredients:

  • 275g soft butter
  • 275g caster sugar
  • zest 1 lemon
  • 5 eggs
  • 275g self raising flour
  • 3-4tbsp elderflower cordial

For the gooseberry compote:

  • 500g fresh (or frozen and defrosted) gooseberries
  • 75g caster sugar
  • 50ml water

For the elderflower cream:

  • 600ml double cream
  • 4-5tbsp elderflower cordial
  • 1-2tbsp icing sugar

Method:

  1. Preheat the oven to 170c. Grease and line two 8 inch cake tins.
  2. Place the butter, sugar and zest in a large bowl (or bowl of a stand mixer with paddle attachment) and cream together until light, pale and fluffy.
  3. Add in the eggs one at a time, beating well between each addition to ensure they are fully incorporated. Now tip in the elderflower cordial and briefly mix once more to distribute it evenly through the batter.
  4. Sift over the flour and fold in with a large metal spoon. Split the mixture between the two prepared tins and level out. Bake for 35-45 minutes or until a skewer comes out clean when inserted.
    While the cakes are baking, make the gooseberry compote. Put the gooseberries, sugar and water in a saucepan and gently heat, stirring occasionally, until the fruits are soft and a loose compote has formed (10-15 minutes).
  5. When the cakes are ready, leave to cool completely in the tins. While they cool, make the elderflower cream. To do this simply whisk together the cream, cordial and sugar until soft peaks form.
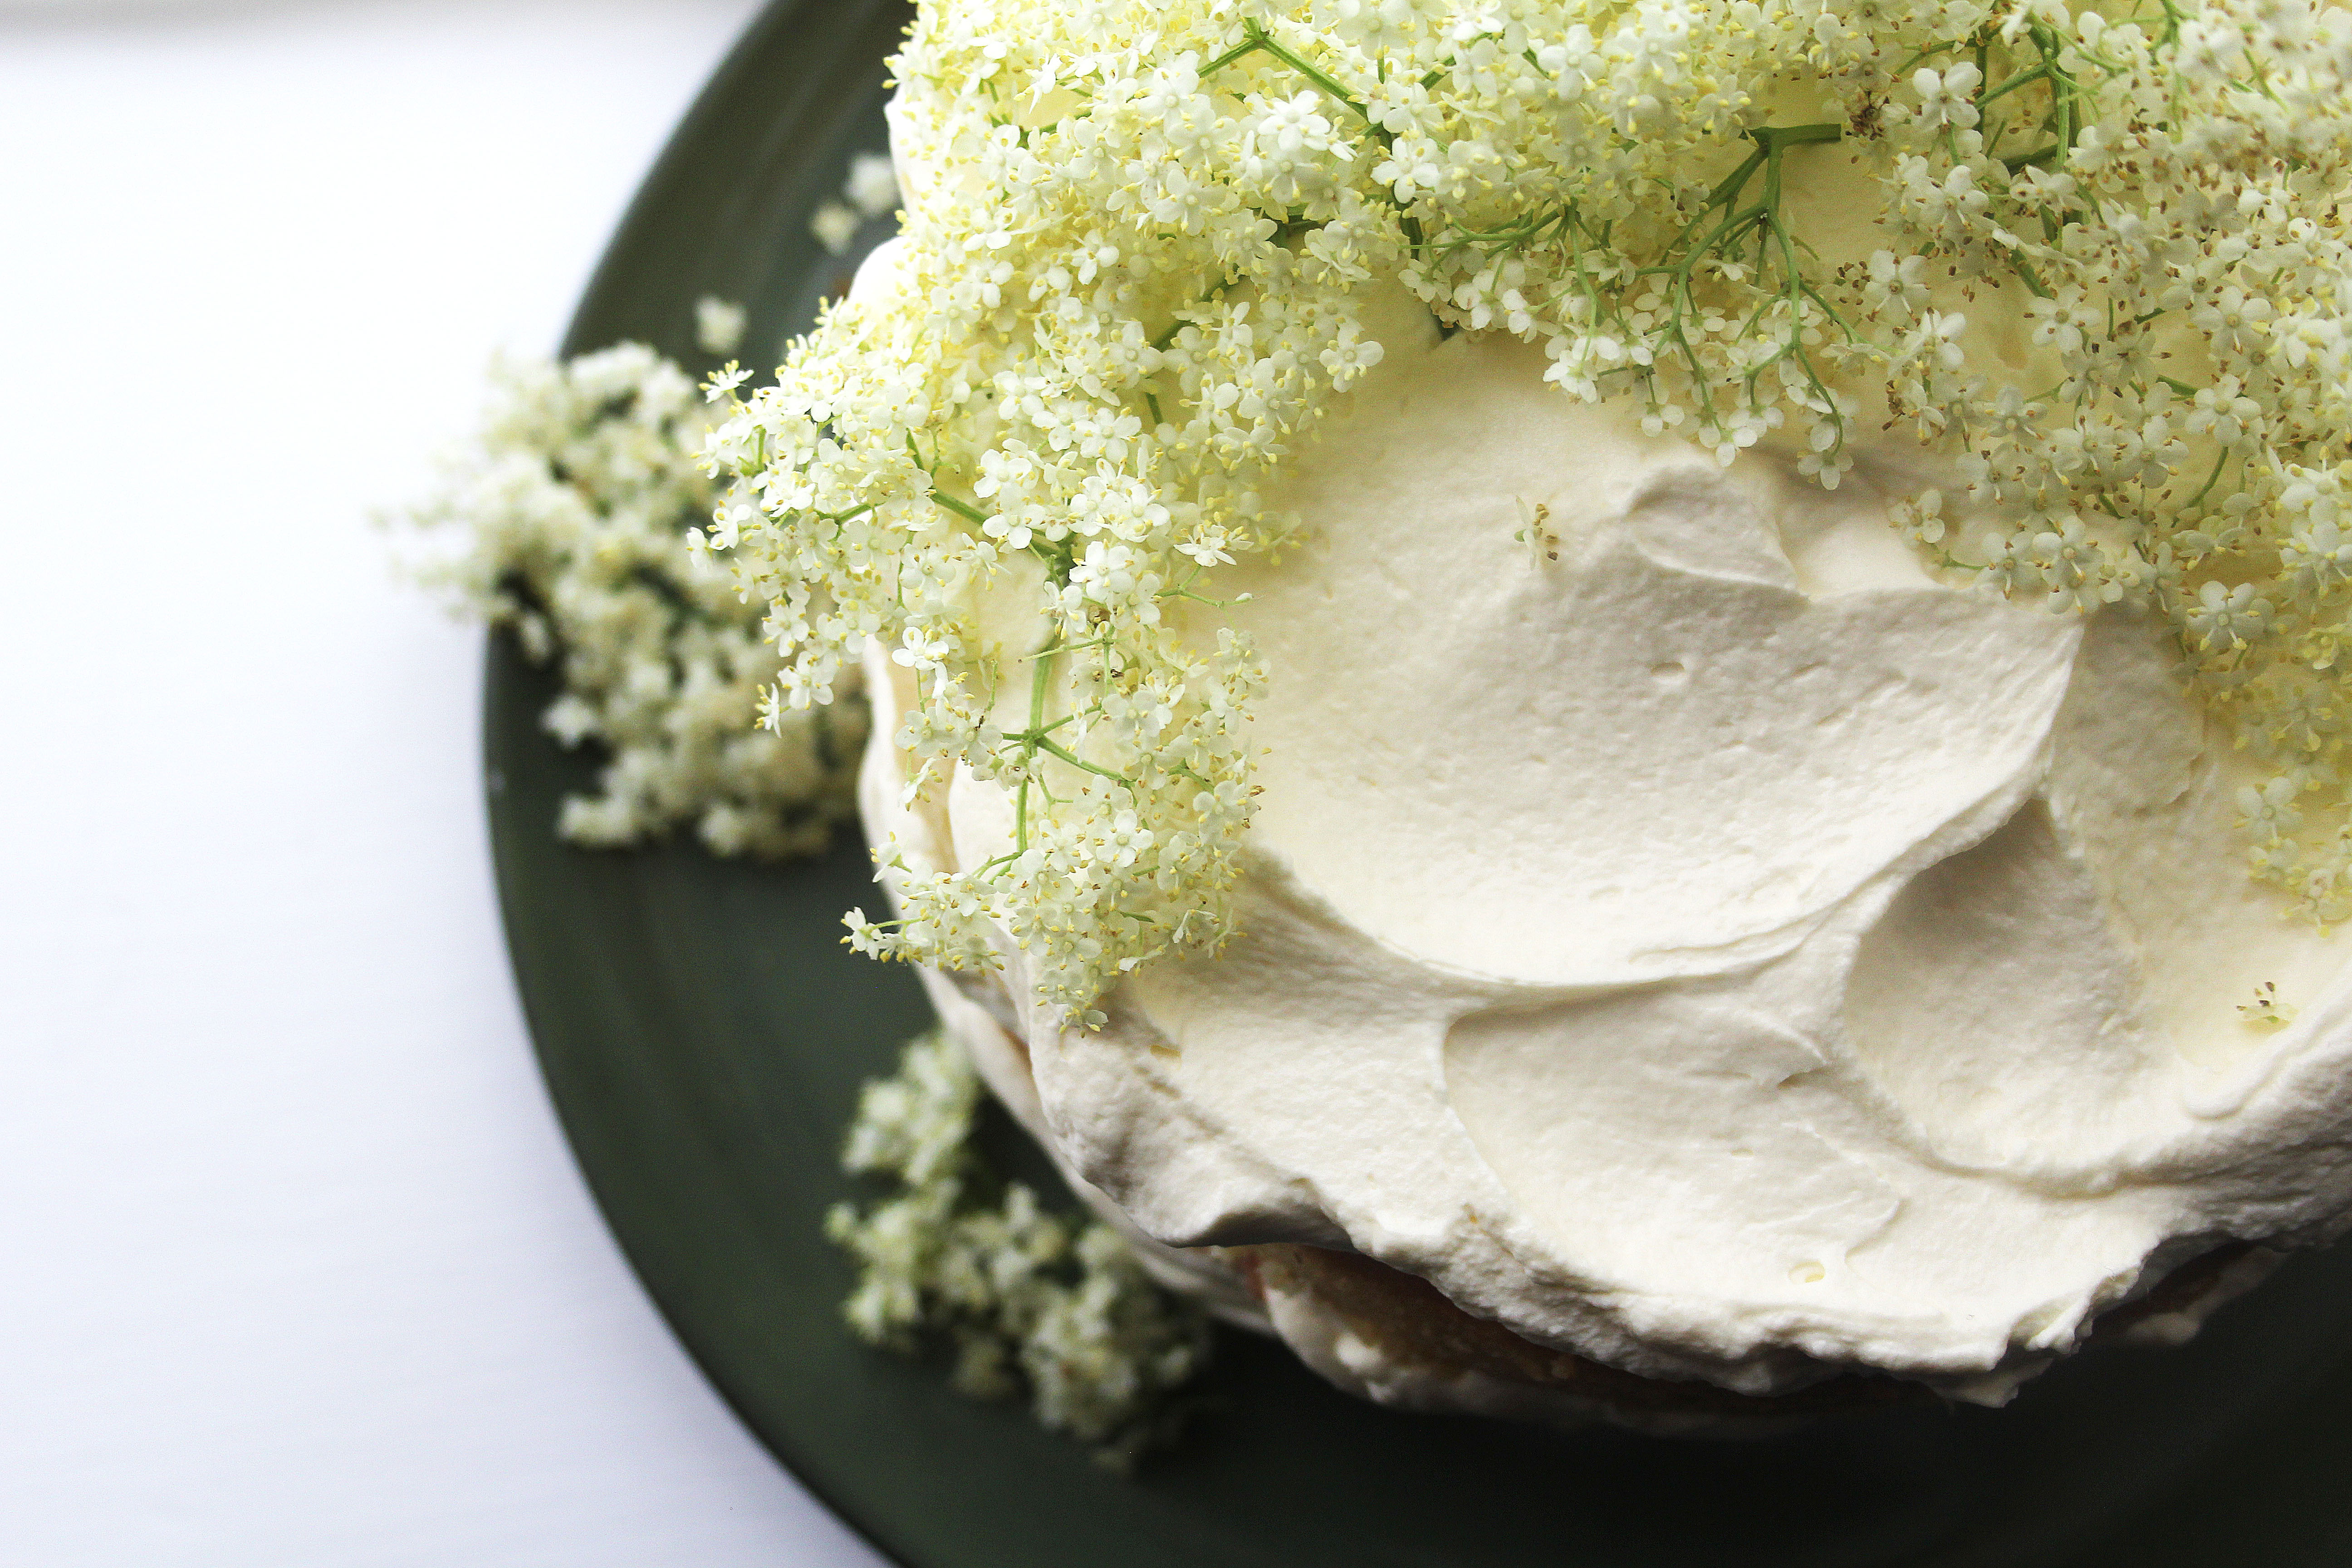
  6. Once all your elements are cool, assemble the cake. Spread a generous layer of compote and several dollops of elderflower cream between each sponge, then finish with a few sprigs of elderflower for a simple, effortless summer pudding.

Enjoy!

Cherry and White Chocolate Brownies

Chocolate

These fudgy brownies incite frenzied eating in my house; they barely saw the light of day when I made them last and half my family were out… It’s hardly surprising they are so addictive though- white chocolate matches brilliantly with fresh cherry compote (particularly when accompanied by a very generous glug of slightly unseasonal brandy).

Ingredients:

For the compote:

  • 300g cherries (stones removed)
  • 2tbsp caster sugar
  • 1tbsp water
  • large glug brandy (this amount is totally down to your taste)

For the brownies:

  • 300g dark chocolate
  • 200g butter
  • 2 eggs
  • caster sugar
  • 225g plain flour
  • 200g white chocolate chunks

Method:

  1. Start by making the compote. Roughly chop the cherries. Place in a pan along with the sugar, water and brandy. Heat gently, stirring occasionally, until the cherries become soft and the syrupy liquid starts to thicken (about 10 minutes). Once the consistency is somewhat jam-like, taste and add more brandy if you like (you can leave out the brandy entirely if it’s not your jam- ha.). Set aside to cool.
  2. Preheat the oven to 170c. Grease and line a brownie tin (around 22x22cm is perfect).
  3. Place the butter and dark chocolate in a  heatproof bowl and set over a pan of gently simmering water (don’t let the water touch the base of the bowl). Stir occasionally and remove from the heat once melted together.
  4. Place the eggs and caster sugar in a large bowl (or bowl of a stand mixer) and beat together until well combined.
  5. Add the chocolate mixture to the bowl and fold in followed by the flour and 2/3 of the white chocolate chunks. Tip into the lined baking tin and level out.
  6. Dollop the compote all over the surface of the brownie and finish by sprinkling on the remaining white chocolate. Bake for 25-35 minutes until the top is set but the inside is moist and a little gooey.
  7. Allow the brownie to cool completely in the tin then slice up and serve.

Enjoy!

Pistachio Meringues with Strawberry and Black Pepper Compote

Cooking, Uncategorized

Shake up the classic British pavlova by combining seasonal strawberries with black pepper, tangy creme fraiche and pistachio meringues; the combination of sweet, spicy and savoury balances beautifully and is a great dessert option for casual summer evenings.

Ingredients (makes 12):

  • 300g caster sugar
  • 6 egg whites
  • pinch salt
  • 125g chopped pistachios
  • 400g strawberries
  • 2tbsp caster sugar
  • splash water
  • cracked black pepper, to taste

Method:

  1. Preheat the oven to 180c. Line 2 trays with greaseproof paper (you can secure this down with a little meringue once it’s made).
  2. Put the sugar on a baking tray and heat for 10 minutes in the oven until hot to the touch (not melting), then set aside. Reduce the oven temperature to 120c.
  3. Place the egg whites in a large bowl (or bowl of a stand mixer) and whisk until you reach medium peak. Add one third of the hot sugar and increase the whisking speed until well incorporated. Add the remaining sugar in 2 additions, whisking well between each. You should eventually have a thick glossy meringue with no grains of sugar. Tip the chopped pistachios onto the meringue and fold in gently. Spoon the meringue into piles on the prepared trays and smooth into your desired shapes.
  4. Bake for 1-1/2 hours until the meringues can be peeled from the paper with ease. Once baked, turn the oven off and leave to cool with the door closed (to prevent cracking).
  5. Now make the strawberry compote; place the strawberries, sugar and water in a saucepan and heat, stirring occasionally, until the sugar melts and the strawberries release some juices. Now just cook until your desired consistency is achieved (I like to keep the fruit whole where possible but you can break down the strawberries by cooking for longer if a smoother result is what you’re after).
  6. Cool the compote and serve up with a generous spoonful of creme fraiche (or lightly whipped chantilly cream) and a crisp but chewy pistachio meringue.

Enjoy!

Carrot, Apple and Walnut Loaf with Maple Icing

Cakes

Looking at the photographs of this cake, you could be fooled into thinking it’s mid Autumn and the trees are turning. They’re not, but given the weather here in the UK (it’s pretty miserable; grey skies and that fluffy rain which get’s you far more wet than you’d think) it might as well be. With this in mind I thought I’d bake something spiced, nutty, simple and comforting to combat the bad weather blues: enter this moist carrot and apple loaf cake laced with cinnamon, ginger and walnuts topped with maple cream cheese frosting…

Ingredients:

  • 225ml vegetable oil
  • 225g soft light brown sugar
  • 4 eggs
  • 125g grated carrot
  • 125g grated apple
  • 225g self raising flour
  • 1tsp bicarbonate of soda
  • 2tsp ginger
  • 2tsp cinnamon
  • pinch salt
  • 100g chopped walnuts
  • zest 1 lemon

For the icing;

  • 5tbsp maple syrup
  • 2 heaped tbsp icing sugar
  • 250g cream cheese (full fat)
  • 100ml double cream

Method:

  1. Preheat the oven to 170c. Grease and line a large loaf tin with baking paper.
  2. Place the oil, sugar and eggs in a large bowl (or bowl of a stand mixer with paddle attachment) and, using electric beaters, beat together until voluminous and well combined. Now add the grated carrot and apple and briefly beat again to evenly distribute.
  3. Sift the flour, bicarbonate of soda, spices and salt over the wet ingredients and beat in until just combined. Lastly, fold in the walnuts and lemon zest. Pour the batter into the prepared loaf tin and bake for 40-50 minutes until a skewer comes out clean when inserted. Cool in the tin.
  4. While the cake is cooling, make the maple cream cheese icing. Simply whisk together all the ingredients until thick and spreadable.
  5. Once the cake is completely cool, top with the cream cheese icing and some walnuts, edible flowers or apple crisps, if you’re feeling fancy.

Enjoy!

Orange, Dark Chocolate, Pistachio and Cardamom Cookies

Biscuits, Uncategorized

This recipe takes the classic chewy chocolate cookie and turns it into something altogether more grown up with a little help from crushed pistachios, orange zest, dark chocolate chunks and ground cardamom. Stash them away from kids (and other adults- let’s be honest) and enjoy when you’ve got a quiet moment to yourself, preferably with a strong coffee.

Ingredients (makes 20-24 large cookies)

  • 225g butter
  • 125g caster sugar
  • 150g dark brown soft sugar
  • zest 1 orange
  • 1tsp ground cardamom (or 8-10 cardamom pods, crushed)
  • 2 eggs
  • 100g pistachios, roughly chopped
  • 1tsp bicarbonate of soda
  • 300g plain flour
  • pinch sea salt
  • 300g dark chocolate, roughly chopped

Method:

  1. Place the butter, sugars, zest and ground cardamom in a large bowl (or bowl of a stand mixer with paddle attachment) and cream together until light and fluffy using electric beaters (or a wooden spoon if you’re slightly mad/ less lazy than me).
  2. Add the eggs one at a time, beating well between each addition. Once the eggs are fully incorporated, tip in the pistachios and stir. Now sift the bicarbonate of soda, flour and salt into the batter and beat briefly to form a soft dough.
  3. Finally, add the chocolate chunks and stir with a spoon to evenly distribute. The dough won’t be firm and to make cooking easier I like to freeze it before baking. To do this simply lay a long rectangle of cling film across your work surface, spoon on the dough in a long line and roll up, shaping into a log. Chill for half an hour and at this stage preheat the oven to 180c and line some baking trays.
  4. Once your cookie dough logs have firmed up a bit, unwrap them and cut into slices (about 1.5 cm thick). Place the slices on the prepared baking trays with generous spaces between them for spreading (I usually put about 4 on each tray).
  5. Bake for 10-12 minutes until lightly golden but still soft and chewy in the middle. Leave to cool on a wire rack.

Enjoy!

Spring Lemon and Courgette Cake

Cakes, Uncategorized

This deliciously fresh tasting cake made up of homemade lemon curd, tangy cream cheese frosting and moist courgette sponge makes for the a great Easter treat, and the recipe will serve you well over the coming months when you’re looking for a simple and zesty summer bake too.

Ingredients:

  • zest 3 lemons
  • 200g butter
  • 200g caster sugar
  • 3 eggs
  • 375g grated courgette (2-3)
  • 75g sultanas
  • 300g self raising flour
  • 1tsp baking powder
  • 1/2 tsp bicarbonate of soda
  • 4-5tbsp milk

For the lemon curd filling:

  • 4 lemons (juice and zest)
  • 200g caster sugar
  • 100g butter, cubed
  • 3 eggs, 1 egg yolk

For the cream cheese icing:

  • 300g cream cheese
  • 100ml double cream
  • 100g icing sugar

To decorate: edible flowers, courgette ribbons, chocolate eggs

Method:

  1. Make the lemon curd first; put the lemon zest and juice, caster sugar and eggs in a saucepan and briefly whisk. Set over a gentle heat and gradually add the butter cubes, whisking constantly. After a few minutes the curd will start to thicken- keep whisking until you have used up the butter and stop when the lemon curd coats the back of the spoon (about 10-15 minutes). Set aside for later and cover the surface with cling film to prevent a thick skin from forming.
  2. Preheat the oven to 160c. Grease and line two 8 inch cake tins.
  3. Place the butter, lemon zest and caster sugar in a large bowl (or bowl of a stand mixer) and cream together until light, pale and fluffy. Add the eggs in one at a time, beating well between each addition.
  4. Squeeze any excess moisture out of the grated courgette then fold into the batter along with the sultanas.
  5. Sift over the flour, baking powder and bicarbonate of soda. Carefully fold in followed by the milk. The batter will be very thick- don’t be alarmed!
  6. Split the batter between the two tins and level off. Bake for 30-35 minutes until golden, well risen and a skewer comes out clean when inserted.
  7. Leave the cakes to cool in their tins while you make the cream cheese icing. Place the cream cheese and cream in a bowl and beat together until thick, then sift in the icing sugar and beat to combine.
  8. Now it’s time to assemble your bake. Take your first cake and level off the top (if necessary) then pipe a circle of cream cheese icing around the edge. Fill the middle with your lemon curd (using the cream cheese line as a barrier) and place the other cake on top. Cover the complete cake with the remaining cream cheese icing and decorate as you wish.


Coffee and Cardamom Cakes with Pistachio Praline

Cakes

Coffee cake is one of my all time favourites, but this spin on a classic is perhaps even better (I know, big claim). The cardamom hum in the sponge goes really well with the simple coffee buttercream, and the crunch of earthy pistachio praline rounds off the overall flavour and prevents it from being overly sweet. Make these for any occasion (you can fool people into thinking they’re fancy with the help of a piping bag and edible flowers) and they are sure to go down a storm.

Ingredients:

  • 200g softened butter
  • 200g soft brown sugar
  • 3 eggs
  • 200g self raising flour
  • pinch salt
  • 8 cardamom pods, emptied and ground
  • 3tbsp coffee granules mixed with 3tbsp boiling water
  • 3tbsp milk

For the buttercream:

  • 200g softened butter
  • 400g icing sugar
  • 2tbsp coffee granules mixed with 2tbsp boiling water

For the praline:

  • 100g pistachios
  • 100g caster sugar

Method:

  1. Preheat the oven to 170c. Grease and line a brownie tin (around 20x20cm).
  2. Cream together the butter and sugar until light and fluffy then add in the eggs one at a time, mixing well between each addition. Add the flour, salt and ground cardamom and fold in until well combined. Do the same with the coffee and milk.
  3. Once your straightforward batter is ready, spoon into the tin and level off. Bake for 30-35 minutes until well risen and a skewer comes out clean when inserted. Cool in the tin.
  4. While the cake is cooling, make the praline. Place the sugar and pistachios in a heavy bottom pan and allow the sugar to melt (don’t stir, just tip the pan to move the sugar around). Once it’s melted and golden, swirl the pan to coat the nuts in the caramel then tip onto some greaseproof paper and leave to set hard.
  5. Now make your buttercream. Beat the butter until light then gradually add the icing sugar, whisking until very light. Add in the coffee and whisk again to combine. Once it’s streak free and smooth, pile into a piping bag ready to decorate.
  6. Slice the cooled cake into nine squares (or larger/smaller pieces depending on your appetite!). Pipe the coffee buttercream on top in little kisses (or freestyle with rosettes/patterns using different nozzles). Break up the praline and roughly crush then sprinkle a generous helping on top of the buttercream.

Enjoy!


Spelt Banana Bread with Walnut Crumble

Bread, Cakes

Banana bread is a staple in many a baking repertoire- it’s simple, tasty and for some reason one of the only cakes deemed acceptable to eat for breakfast (what’s not to like). My version calls for wholemeal spelt flour, making it nutty in flavour and a little courser in texture than a regular banana bread; delicious when paired with the walnut crumble topping!

Ingredients:

  • 2 eggs
  • 175g soft brown sugar
  • 75g melted butter
  • 3 ripe bananas, mashed
  • 200g wholemeal spelt flour
  • 2tsp baking powder
  • pinch salt
  • 1tsp mixed spice
  • 1tsp ground ginger

For the crumble topping:

  • 50g spelt flour
  • 25g soft butter
  • 25g soft light brown sugar
  • 1tsp mixed spice
  • 75g chopped walnuts

 Method:

  1. Preheat the oven to 170c. Grease and line a loaf tin.
  2. Place the eggs, sugar and butter in a large bowl or bowl of a stand mixer. Whisk until thick, pale and voluminous then fold in the mashed banana.
  3. Add the dry ingredients (flour, spices, salt and baking powder) and fold again until well combined. Tip the mix into the prepared loaf tin and level out.
  4. For the crumble topping, rub together the butter, flour, sugar and mixed spice between your fingers until they resemble course crumbs, then stir in the chopped walnuts. Sprinkle this liberally over the top of the banana bread and bake for 45-55 minutes until well risen and a skewer comes out clean when inserted.
  5. Serve warm or cold, on it’s own or with cinnamon butter, creme fraiche or yoghurt.

Enjoy!

Rhubarb & Mixed Nut Flapjacks (Vegan/ Dairy Free)

Biscuits

These bars are the perfect grab and go treat to keep you going on a hectic day- I love my rhubarb and ginger jam sandwiched between the peanut butter flapjack and nutty topping, but you could choose any marmalade or jam in your version.

Ingredients:

Flapjack base:

  • 75g coconut oil
  • 175g peanut butter (or another nut butter ie. almond, cashew)
  • 150g dark brown soft sugar
  • 4tbsp golden syrup
  • 300g porridge oats

Filling and topping:

  • 200g rhubarb and ginger jam (or your favourite jam- fig or raspberry would work well)
  • 200g flaked almonds
  • 75g pecans
  • 75g brazil nuts
  • 100g caster sugar
  • 2tbsp water

Method:

  1. Preheat the oven to 180c. Grease and line a brownie tray.
  2. For the base place the coconut oil, peanut butter, sugar and syrup in a saucepan. Melt together over a medium heat. Tip the oats into a large bowl and add the melted liquid. Stir together until well combined then pack down into the prepared baking tin. Bake for 25-30 minutes until golden brown.
  3. For the topping, heat the caster sugar and water together over a medium heat. Allow the sugar to dissolve then pour into a bowl along with all the nuts. Stir together to coat.
  4. Now you can assemble the next layers. Spread the jam all over the flapjack base and spoon on the nuts in an even layer. Press down the top then bake for 15-20 minutes, until the nuts are golden brown.
  5. Cool then slice into bars.


Enjoy!

One For the Kids: Easter Tiffin Nests

Chocolate

I’m sure lots of you could make these little treats with your eyes closed, but that’s not to say the end result isn’t absolutely delicious and for me, very nostalgic. Calling for only a few ingredients and with barely any skill required, these are the perfect thing to make with children over Easter- they (and you, be real) will love mixing together the melted chocolate with their favourite biscuits, and who doesn’t get worked up into a frenzy over mini eggs?!

Ingredients (makes 12):

For the tiffin base: 200g dark chocolate, 100g butter, 1tbsp golden syrup, pinch salt, 200g your favourite crushed biscuits (I used ginger snaps)

For the nest topping: 200g crumbled up shredded wheat, 150g milk chocolate (melted), mini eggs

Method:

  1. Line a 12 hole muffin tin with cupcake cases. Place the dark chocolate, butter and golden syrup in a heatproof bowl and set over a pan of gently simmering water. Stir occasionally until melted then remove from the heat and add the biscuits and salt. Stir to coat then distribute the mix between the cupcake cases. Smooth down and chill for half an hour.
  2. While the tiffin bases are firming up, stir together the melted milk chocolate and crumbled shredded wheat until it resembles little twigs.
  3. Take the chilled bases and top with a spoonful of the chocolate coated shredded wheat. Make a little dip in the centre and press in three mini eggs.
  4. Chill the complete nests for a further half an hour then remove the cupcake cases and serve!

Enjoy!