Rhubarb & Caramelised White Chocolate Choux Nuts

Pastry

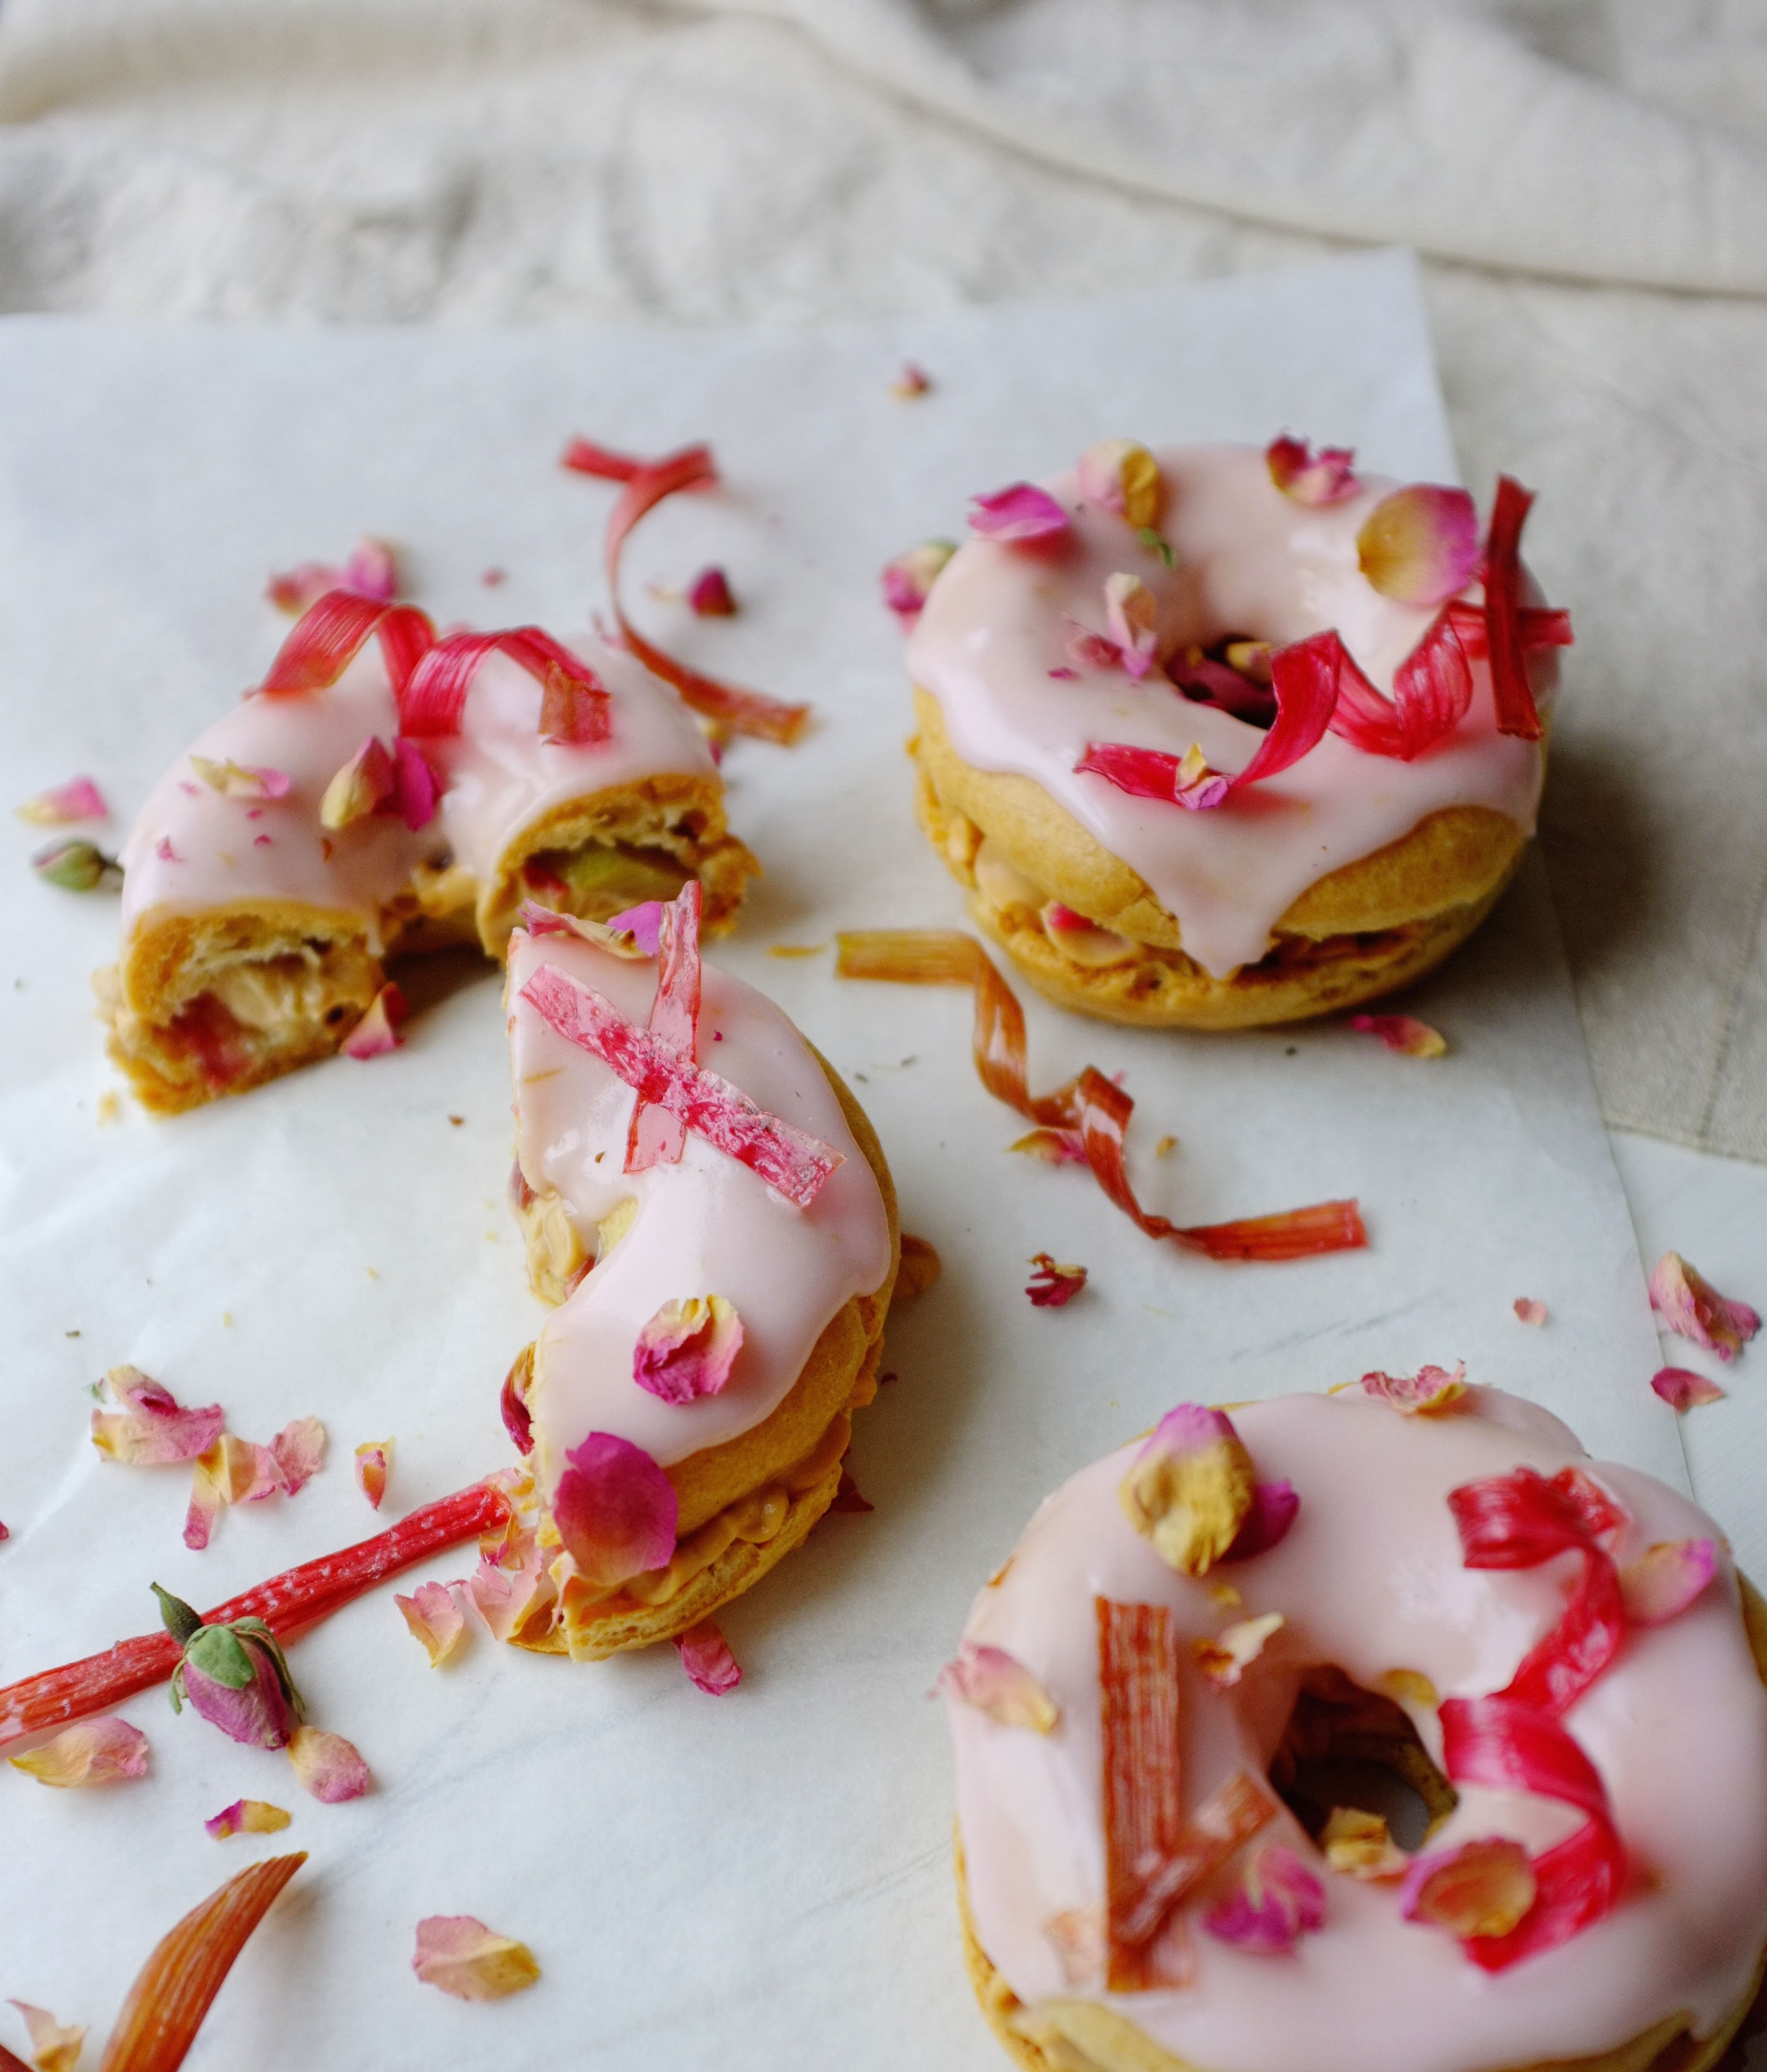
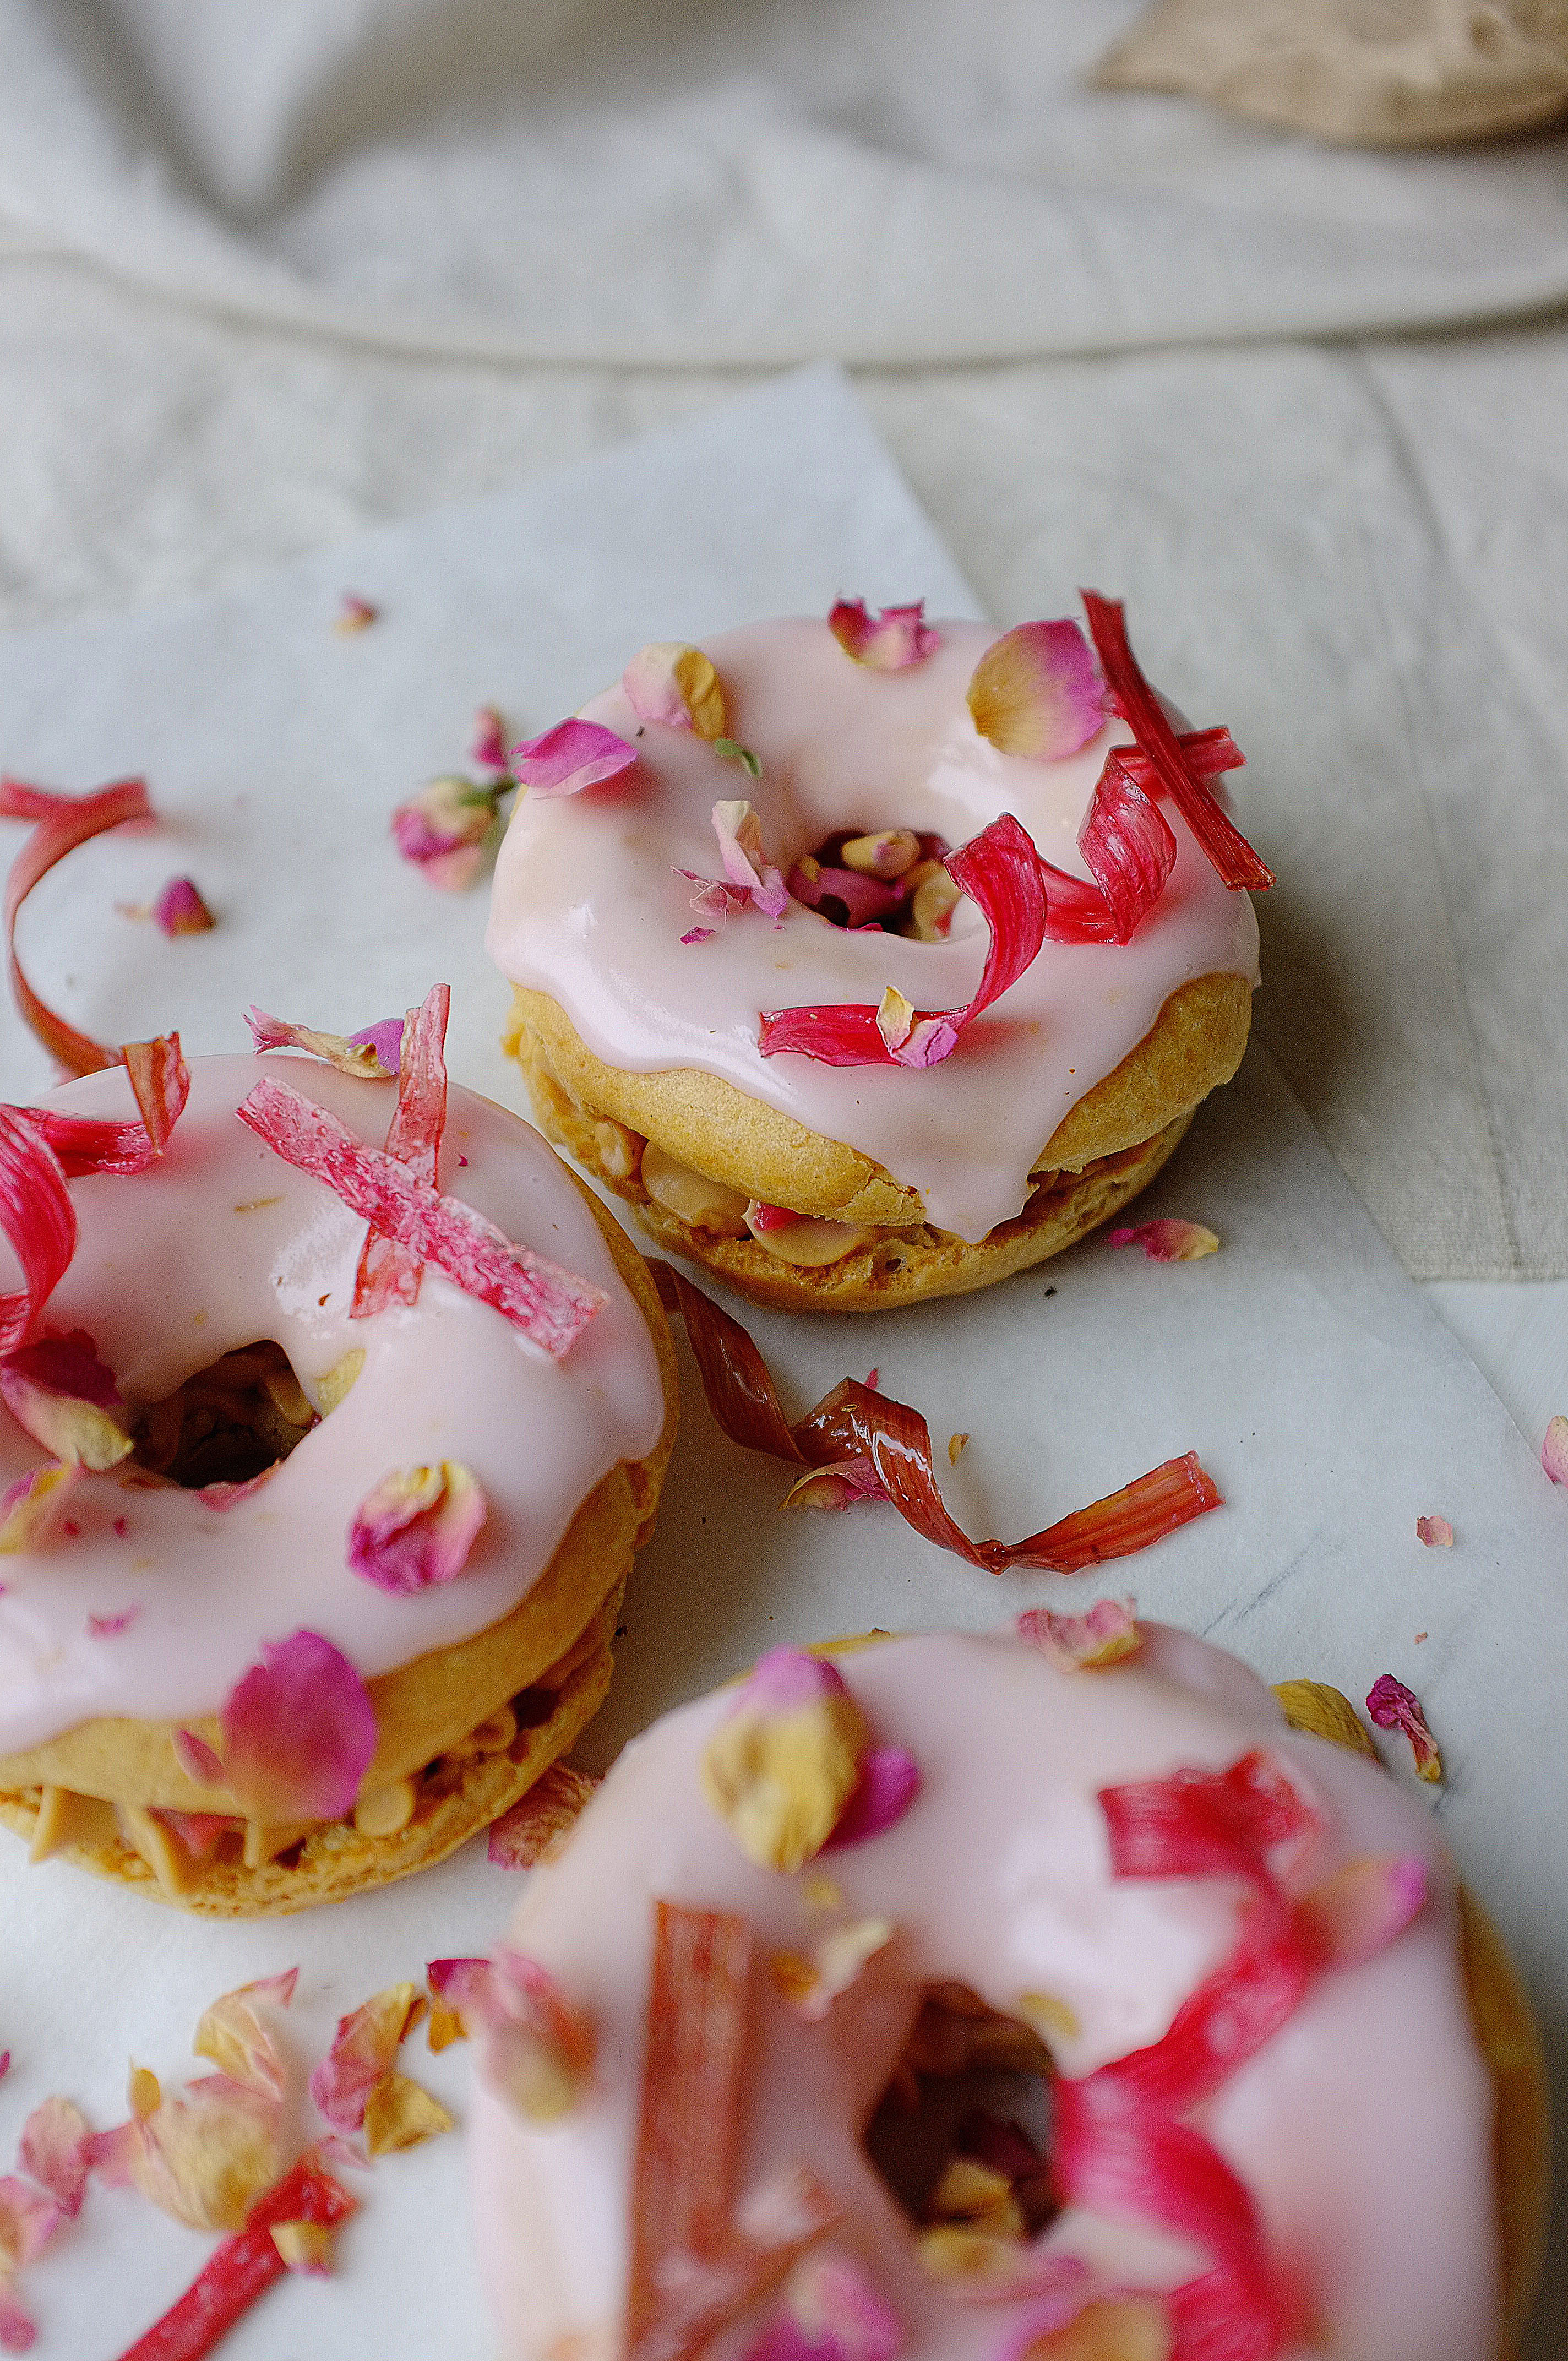
Crisp choux pastry, sharp roast rhubarb with a hint of vanilla, and butterscotch-sweet caramelised white chocolate cream; a delicious combination you’ve got to try, and a great way to celebrate seasonal British produce (and millennial pink… *sigh*).

Ingredients (makes 10-12)

For the choux

  • 85g unsalted butter
  • 220ml water
  • 100g plain flour
  • 3 eggs
  • pinch of salt

For the filling

  • 250g white chocolate (make sure it’s at least 30% cacao)
  • 300ml double cream
  • Pinch salt
  • 4 thick stems rhubarb
  • 3tbsp caster sugar
  • 2 vanilla pods or 1tsp vanilla extract
  • Juice and zest 1 lemon

For the topping

  • 100g icing sugar
  • Enough of the rhubarb syrup (leftover from roasting the rhubarb) to create an icing with a drizzle-consistency
  • Dried rose petals (optional)
  • Candied rhubarb ribbons (optional) (I make these by creating ribbons of rhubarb with a peeler, which I then simmer in a simple 2 parts sugar: 1 part water syrup for 5 minutes before draining off any excess liquid and cooking at 160c for 10-15 minutes, or until dried out, on a lined baking tray)

Method

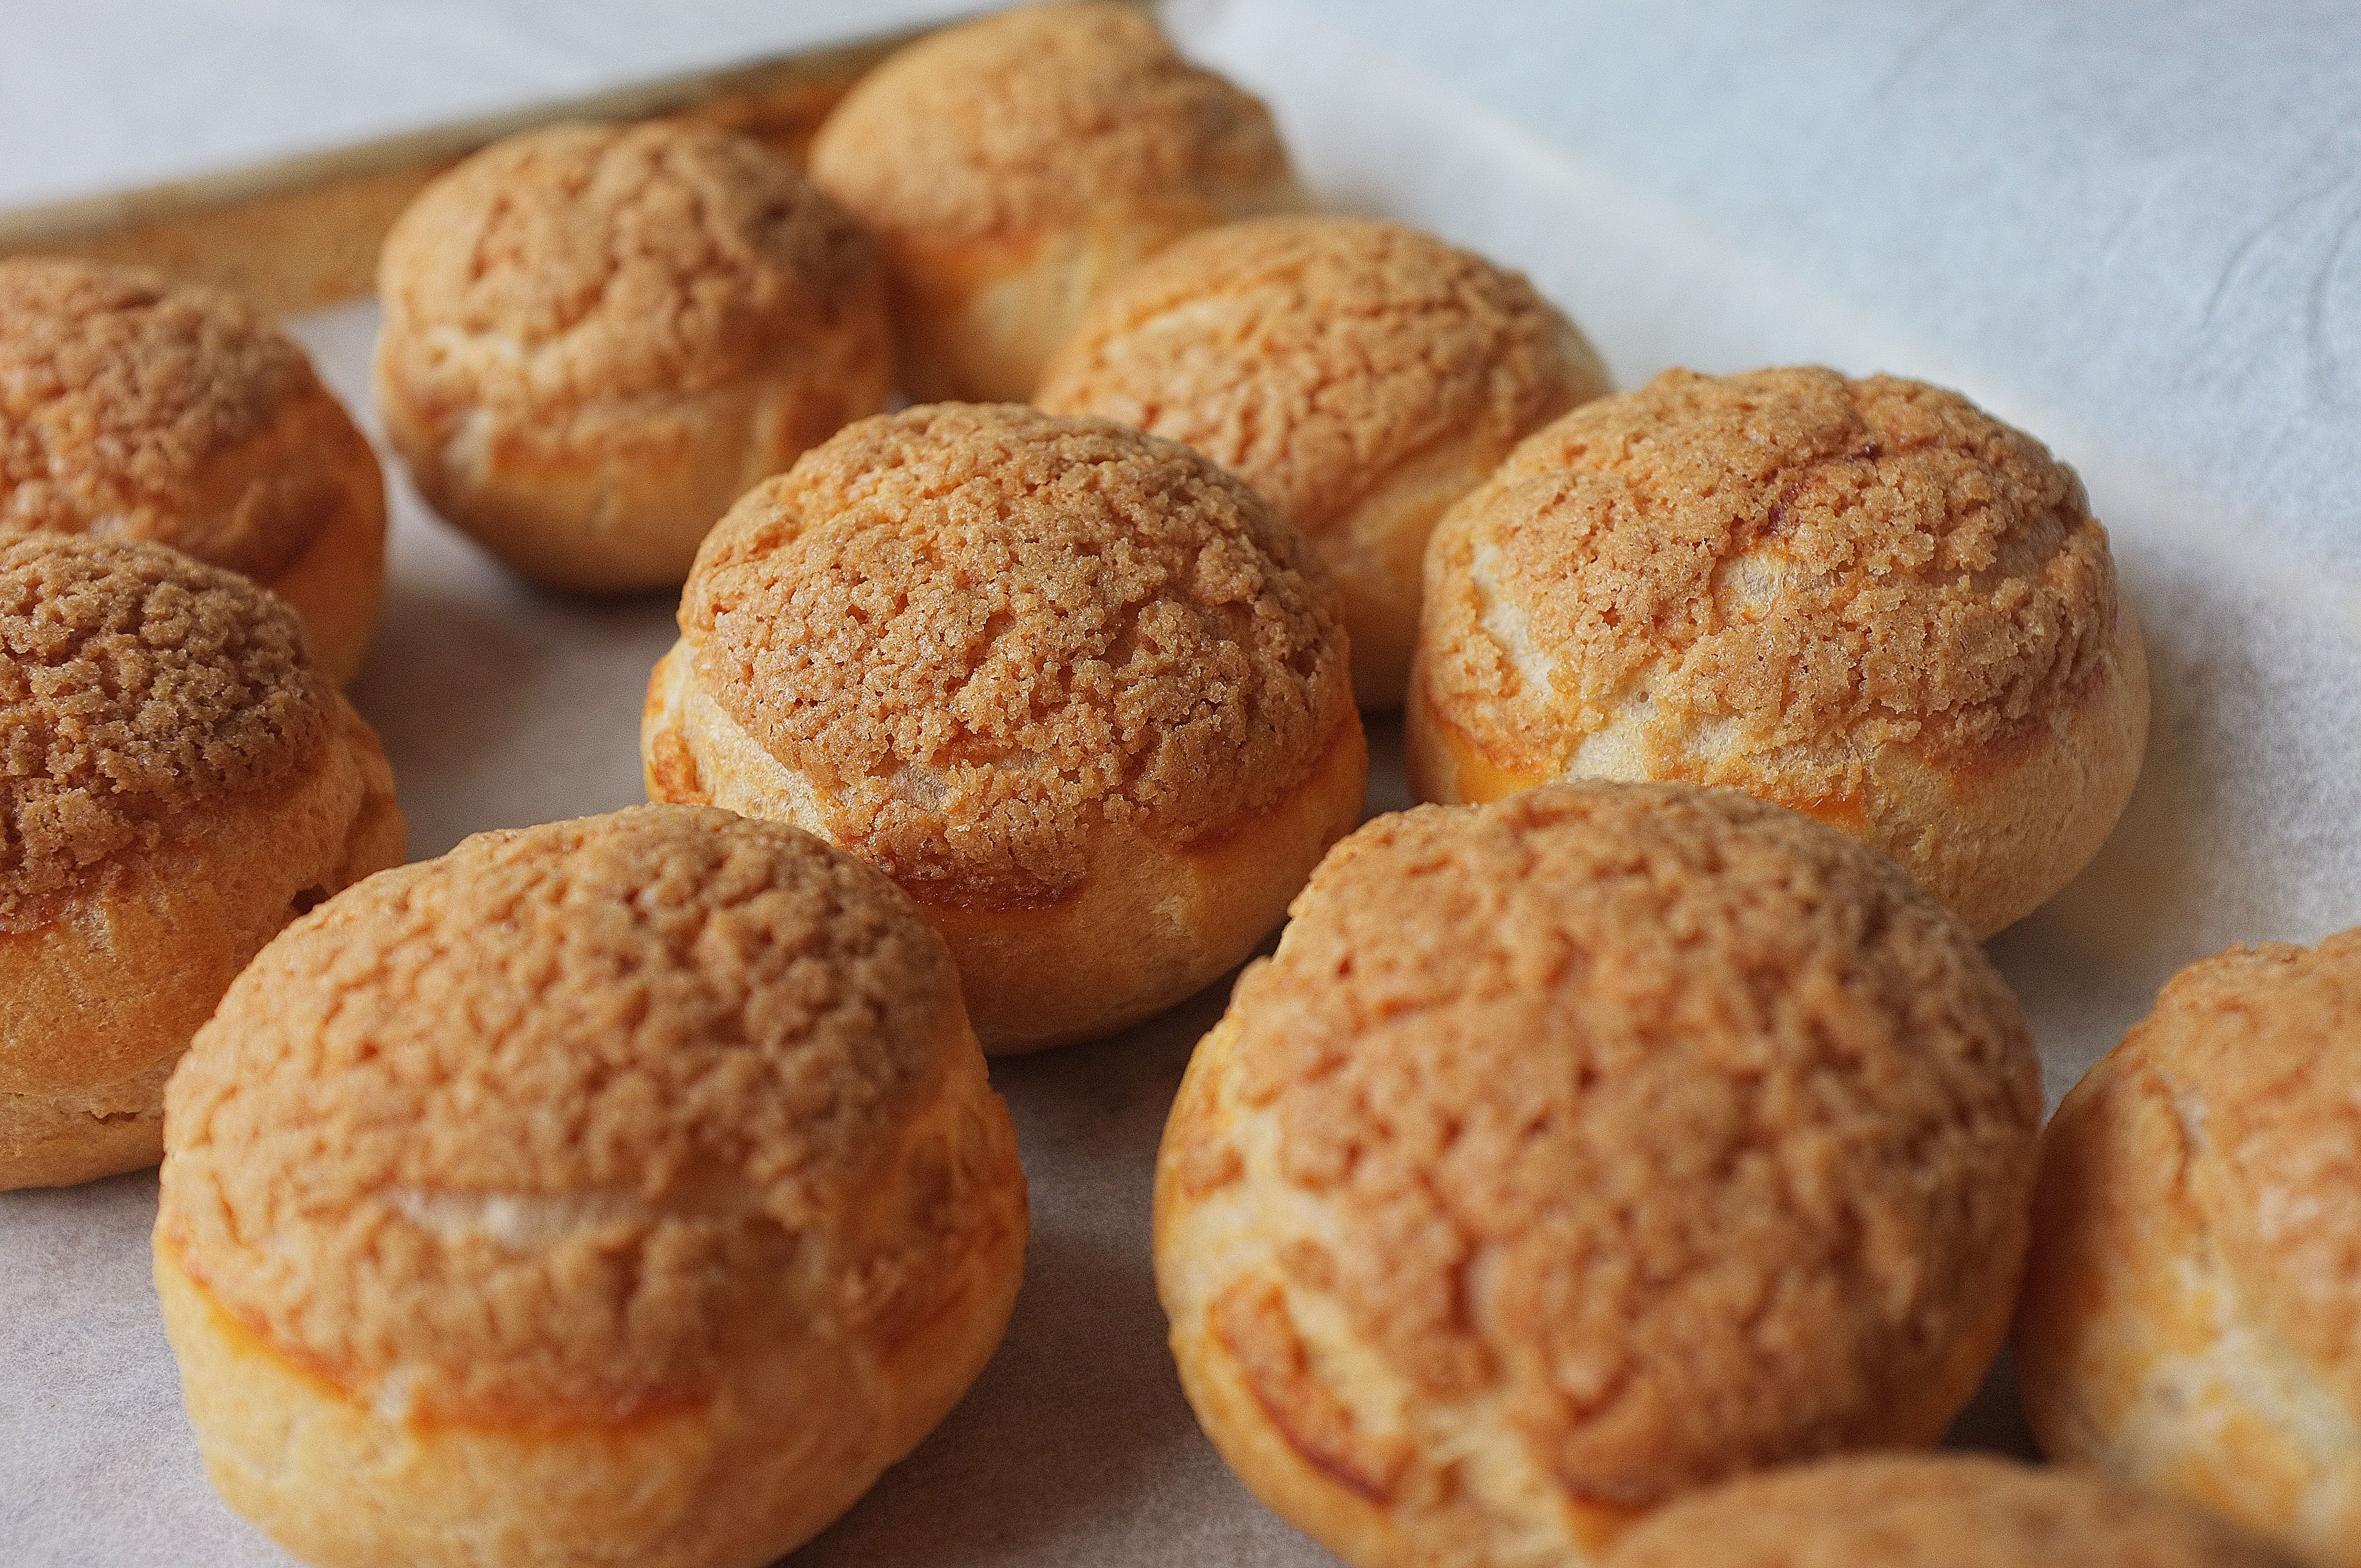
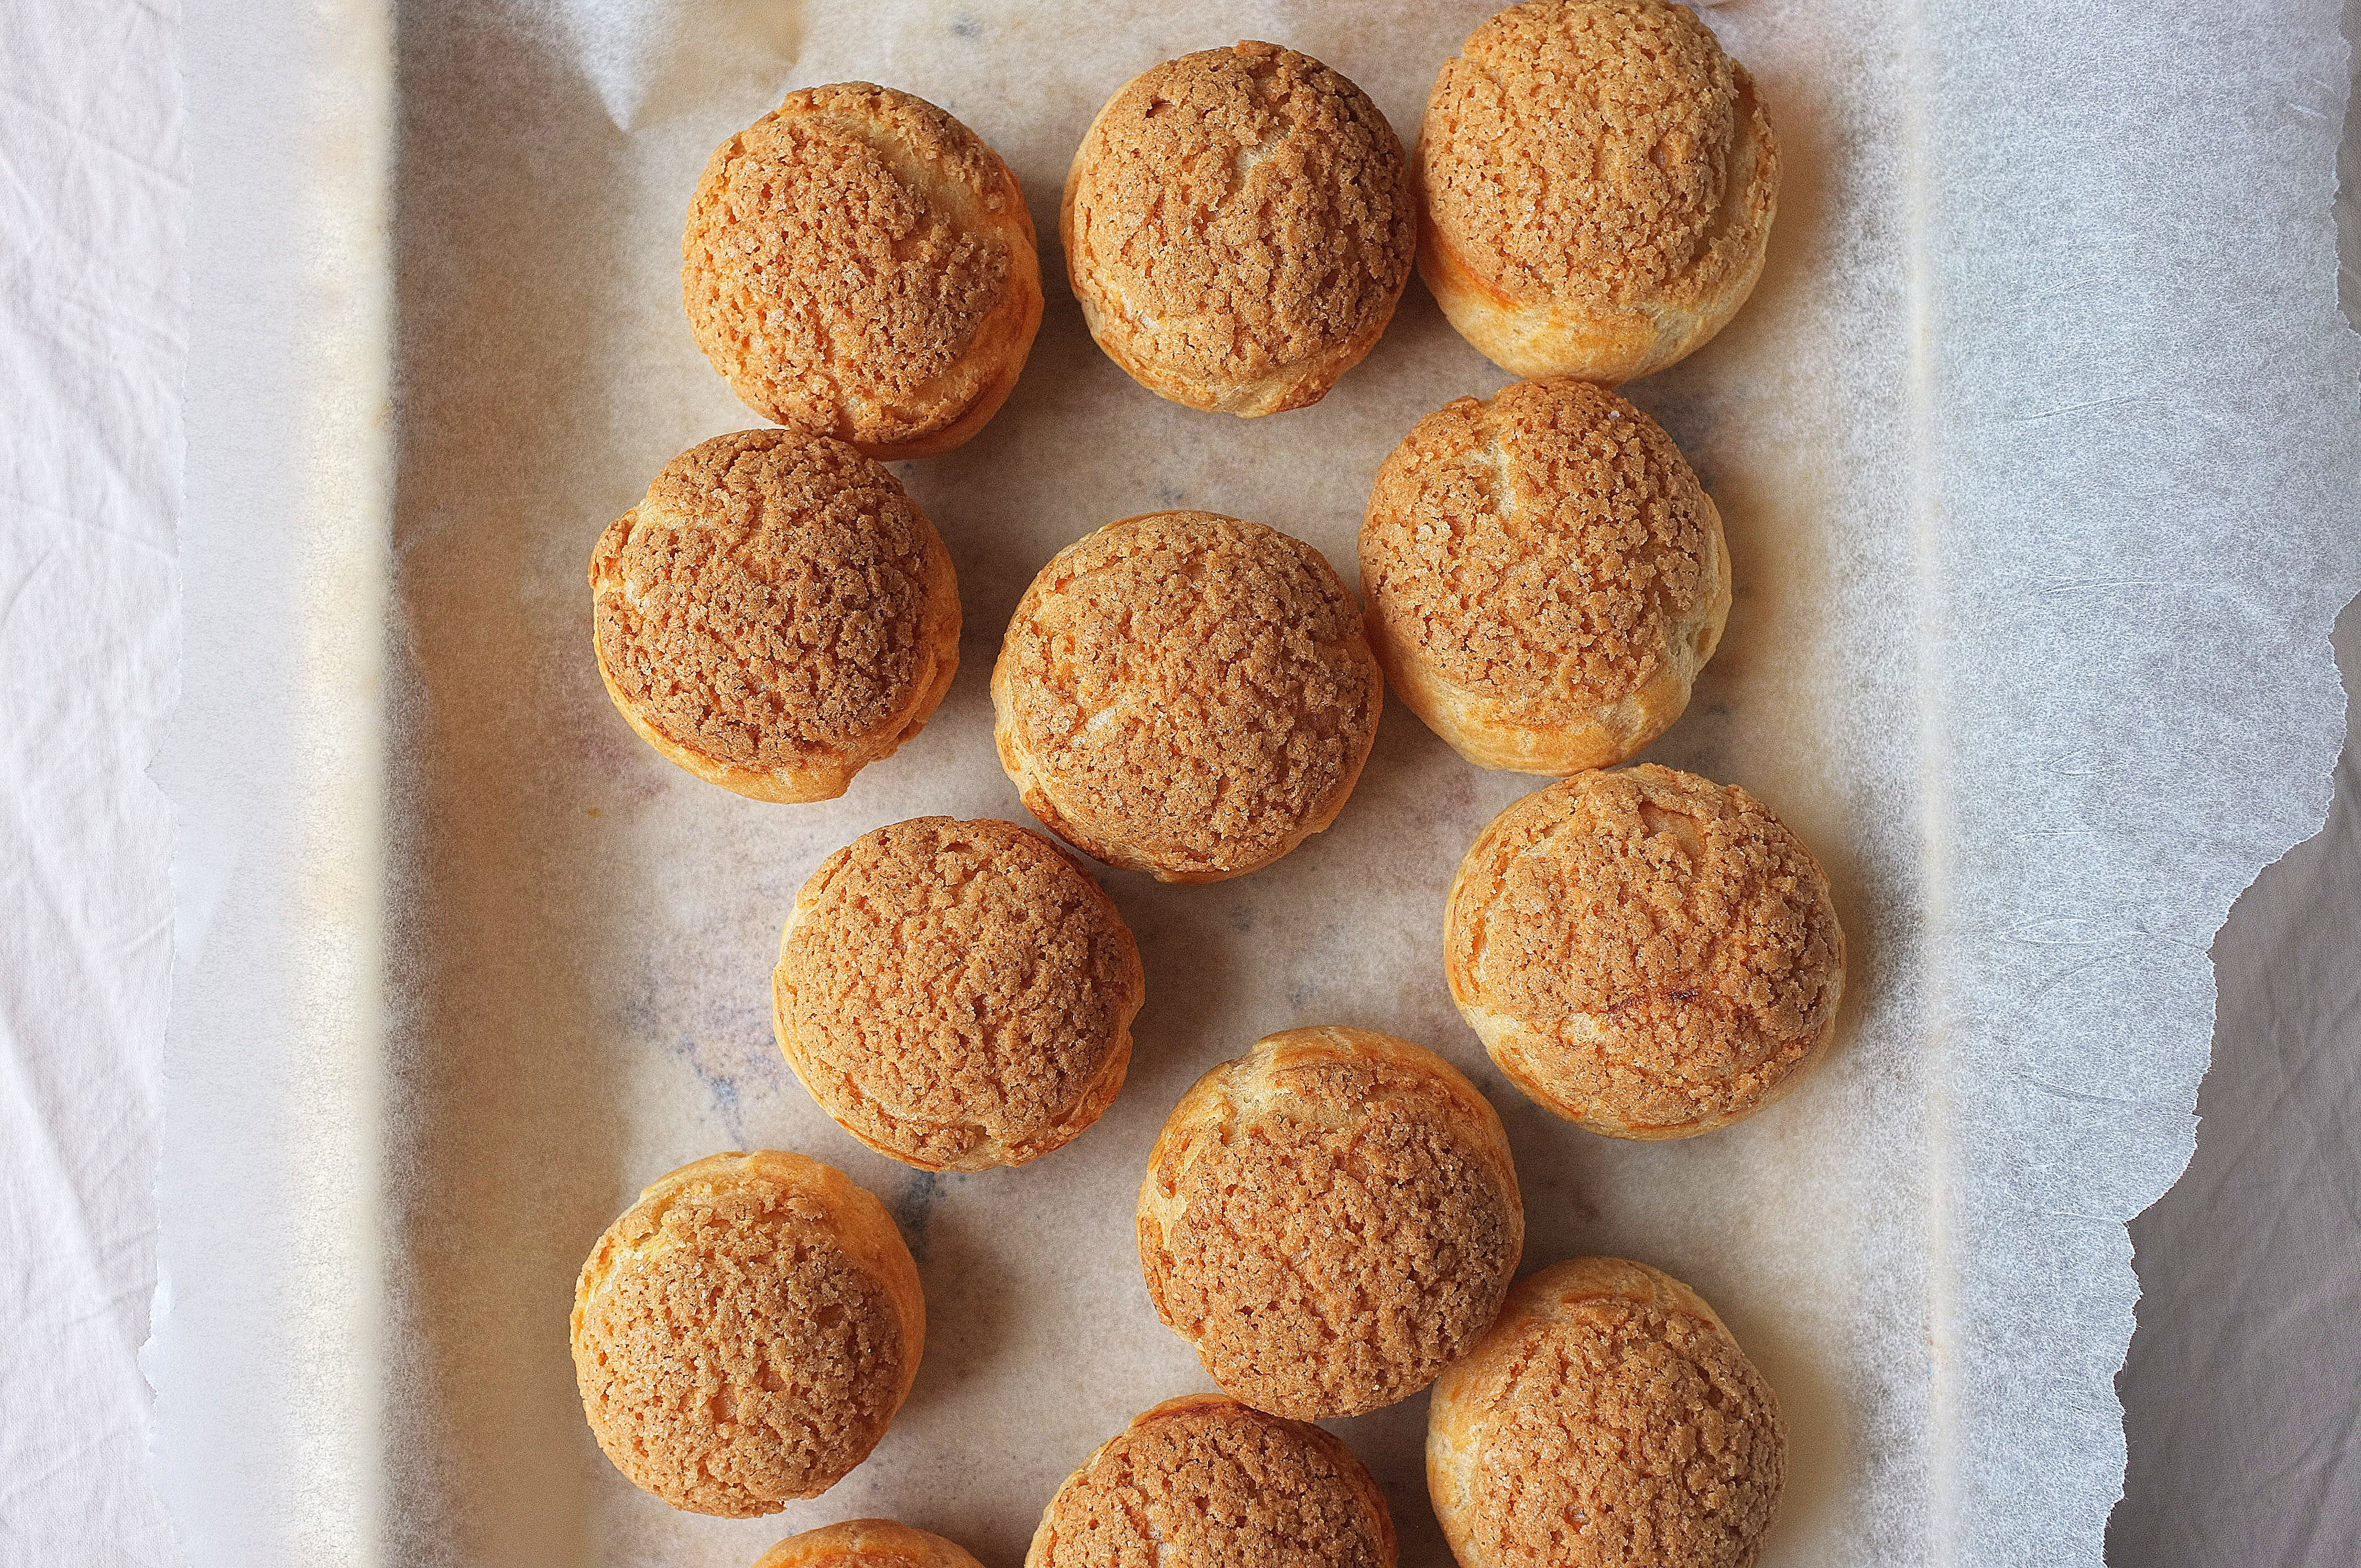
  1. To make the choux put the water, butter and salt in a saucepan set over a medium heat (do not let it boil at this stage). Meanwhile, sieve the flour to remove any lumps. When the butter has melted into the water, increase the heat and bring to a rolling boil, then tip in the flour and stir vigorously until you have a smooth paste-like mix which comes away from the edges of the pan. Continue to stir for another minute to cook out the rawness of the flour, then tip into a clean bowl and close cover with cling film (this eggless stage is known as a ‘panade’). Leave to cool to room temperature.
  2. Preheat the oven to 190c. Line 2 large baking trays with greaseproof paper.
  3. Once the panade has cooled it’s time to add the eggs; whisk in a jug to break them up then very gradually add into the panade while beating with electric beaters. Stop adding the egg (you might have a little leftover) when the smooth, lump-free mixture reluctantly drops off the end of a spoon. Pile the choux mix into a piping bag, fitted with a large round nozzle.
  4. Pipe 10-12 doughnut shapes onto the prepared baking trays, leaving room for expansion. Bake the choux for 20-25 minutes or until crisp and golden, then skewer each one and return to the oven for around 10 minutes or until the middles have completely dried out. Set aside to cool and reduce the oven temperature to 180c.
  5. Slice the rhubarb into batons and toss in the caster sugar, lemon juice and zest and vanilla. Roast for 10-15 minutes in a high sided baking tray until the pieces are tender but still retain their shape. Set aside to cool and reduce the oven temperature to 120c.
  6. Chop up the white chocolate and scatter on a lined baking tray in an even layer. Place in the oven to allow the chocolate to melt for 10 minutes, then stir/turn and return to the oven for another 10 minutes. Repeat this step 2-3 more times until the chocolate reaches a deep golden colour, then scrape into a bowl and mix in a splash of cream to loosen the consistency (it can get a little grainy at this stage so pass through a sieve if necessary). Leave to cool.
  7. Once the white chocolate has cooled, place in a bowl (or bowl of a stand mixer with whisk attachment) and add in the cream and salt. Whisk until pipe-able.
  8. Slice the cooled choux nuts in half horizontally and pipe in a generous helping of caramelised white chocolate cream. Slice the roast rhubarb pieces thinly and arrange these on top of the cream, then pop the choux lid on top.
  9. For the pink icing, pour the cooking syrup from the rhubarb tray into the icing sugar and mix to create a smooth drizzle-like consistency (add in a little water if you don’t have enough syrup). Spoon this over the filled choux-nuts and garnish with edible petals and rhubarb ribbons.
Enjoy!
Advertisement

Craquelin Choux Buns with Honeyed Walnuts, Mascarpone and Orange

Pastry, Uncategorized

A couple of months ago I bought, then promptly forgot about, some delicious pine honey which I intended to use as the central flavour in a pastry-based recipe. Now that it’s been retrieved from the depths of my cupboard it has well and truly fulfilled that destiny in these crisp craquelin choux buns. Simply filled with honeyed orange mascarpone and walnuts (also baked in the honey and a little salt) these make for a delicious treat, but served alongside honey butterscotch sauce and they’re next level- perfect for a fancy Autumnal dessert.

Ingredients

For the craquelin top

  • 55g unsalted butter, cubed, at room temperature
  • 65g soft light brown sugar
  • 65g plain flour

For the choux

  • 85g butter
  • 220ml water
  • 100g plain flour
  • 3 eggs (plus 1 extra for glazing)
  • pinch of salt

For the filling

  • 300g mascarpone
  • 200ml double cream
  • 2tbsp (heaped) good quality honey (I used Greek Pine Honey)
  • Zest of 2 oranges

For the honeyed walnuts

  • 100g walnuts
  • 2tbsp (heaped) good quality honey (as before)
  • good pinch salt

For the sauce (optional)

  • 75ml honey
  • Juice 1/2 orange
  • 25g butter
  • 100ml double cream
  • Generous pinch salt

Method

  1. Start off by making the craquelin topping (when baked, this forms a crispy sweet layer). To do this simply mix the butter, sugar and flour in a large bowl (or in the bowl of a stand mixer with paddle attachment on a slow speed) until it starts to form large lumps, then bring it together with your hands. Place the dough on a large piece of baking paper, top with another piece of baking paper, and roll out to about 3mm thick. Pop this onto a tray and leave in the freezer to solidify.
  2. To make the choux, put the water, butter and salt in a saucepan set over a medium heat (do not let it boil at this stage). Meanwhile, sieve the flour to remove any lumps. When the butter has melted into the water, increase the heat and bring to a rolling boil, then tip in the flour and stir vigorously until you have a smooth paste-like mix which comes away from the edges of the pan. Continue to stir for another minute to cook out the rawness of the flour, then tip into a clean bowl and close cover with cling film (this eggless stage is known as a ‘panade’). Leave to cool to room temperature.
  3. Preheat the oven to 190c. Line 2 large baking trays with greaseproof paper.
  4. Once the panade has cooled it’s time to add the eggs; whisk in a jug to break them up then very gradually add into the panade while beating with electric beaters. Stop adding the egg (you might have a little leftover) when the smooth, lump-free mixture reluctantly drops off the end of a spoon. Pile the choux mix into a piping bag, fitted with a large round nozzle.
  5. Pipe rounds of about 4cm wide onto the prepared baking trays, leaving plenty of room for expansion. Whisk the remaining egg in a bowl and brush a small amount onto each mound, smoothing down the tip. Take your craquelin sheet and stamp out 3cm circles. Place one on top of each choux mound (the egg will help secure it in place). Bake the choux for around 35 minutes, then skewer a small hole in each bun and return to the oven for a further 5 minutes, to dry out the middles. Once baked, they should be crisp and golden brown with a crackled appearance on top. Cool while you make the other elements.
  6. Toss the walnuts in the honey and salt and spread out on a baking tray. Cook for around 10 minutes or until caramelised then set aside to cool. Once cooled, roughly chop.
  7. For the filling, just whisk together the mascarpone, cream, honey and orange zest until light and smooth. Pile into a piping bag. Finally, for the sauce heat the honey and orange juice in a saucepan and simmer for a couple of minutes, add in the butter and stir until it’s melted, then add the cream and salt. Keep gently simmering, stirring occasionally, until slightly thicker (a few minutes should be fine), then set aside.
  8. To assemble the choux buns, slice each one in half and pipe some mascarpone cream into the base. Top with a sprinkling of walnuts and a little sauce, then place the lid on. Serve with some extra sauce.

Enjoy!