Craquelin Choux Buns with Honeyed Walnuts, Mascarpone and Orange

Pastry, Uncategorized

A couple of months ago I bought, then promptly forgot about, some delicious pine honey which I intended to use as the central flavour in a pastry-based recipe. Now that it’s been retrieved from the depths of my cupboard it has well and truly fulfilled that destiny in these crisp craquelin choux buns. Simply filled with honeyed orange mascarpone and walnuts (also baked in the honey and a little salt) these make for a delicious treat, but served alongside honey butterscotch sauce and they’re next level- perfect for a fancy Autumnal dessert.

Ingredients

For the craquelin top

  • 55g unsalted butter, cubed, at room temperature
  • 65g soft light brown sugar
  • 65g plain flour

For the choux

  • 85g butter
  • 220ml water
  • 100g plain flour
  • 3 eggs (plus 1 extra for glazing)
  • pinch of salt

For the filling

  • 300g mascarpone
  • 200ml double cream
  • 2tbsp (heaped) good quality honey (I used Greek Pine Honey)
  • Zest of 2 oranges

For the honeyed walnuts

  • 100g walnuts
  • 2tbsp (heaped) good quality honey (as before)
  • good pinch salt

For the sauce (optional)

  • 75ml honey
  • Juice 1/2 orange
  • 25g butter
  • 100ml double cream
  • Generous pinch salt

Method

  1. Start off by making the craquelin topping (when baked, this forms a crispy sweet layer). To do this simply mix the butter, sugar and flour in a large bowl (or in the bowl of a stand mixer with paddle attachment on a slow speed) until it starts to form large lumps, then bring it together with your hands. Place the dough on a large piece of baking paper, top with another piece of baking paper, and roll out to about 3mm thick. Pop this onto a tray and leave in the freezer to solidify.
  2. To make the choux, put the water, butter and salt in a saucepan set over a medium heat (do not let it boil at this stage). Meanwhile, sieve the flour to remove any lumps. When the butter has melted into the water, increase the heat and bring to a rolling boil, then tip in the flour and stir vigorously until you have a smooth paste-like mix which comes away from the edges of the pan. Continue to stir for another minute to cook out the rawness of the flour, then tip into a clean bowl and close cover with cling film (this eggless stage is known as a ‘panade’). Leave to cool to room temperature.
  3. Preheat the oven to 190c. Line 2 large baking trays with greaseproof paper.
  4. Once the panade has cooled it’s time to add the eggs; whisk in a jug to break them up then very gradually add into the panade while beating with electric beaters. Stop adding the egg (you might have a little leftover) when the smooth, lump-free mixture reluctantly drops off the end of a spoon. Pile the choux mix into a piping bag, fitted with a large round nozzle.
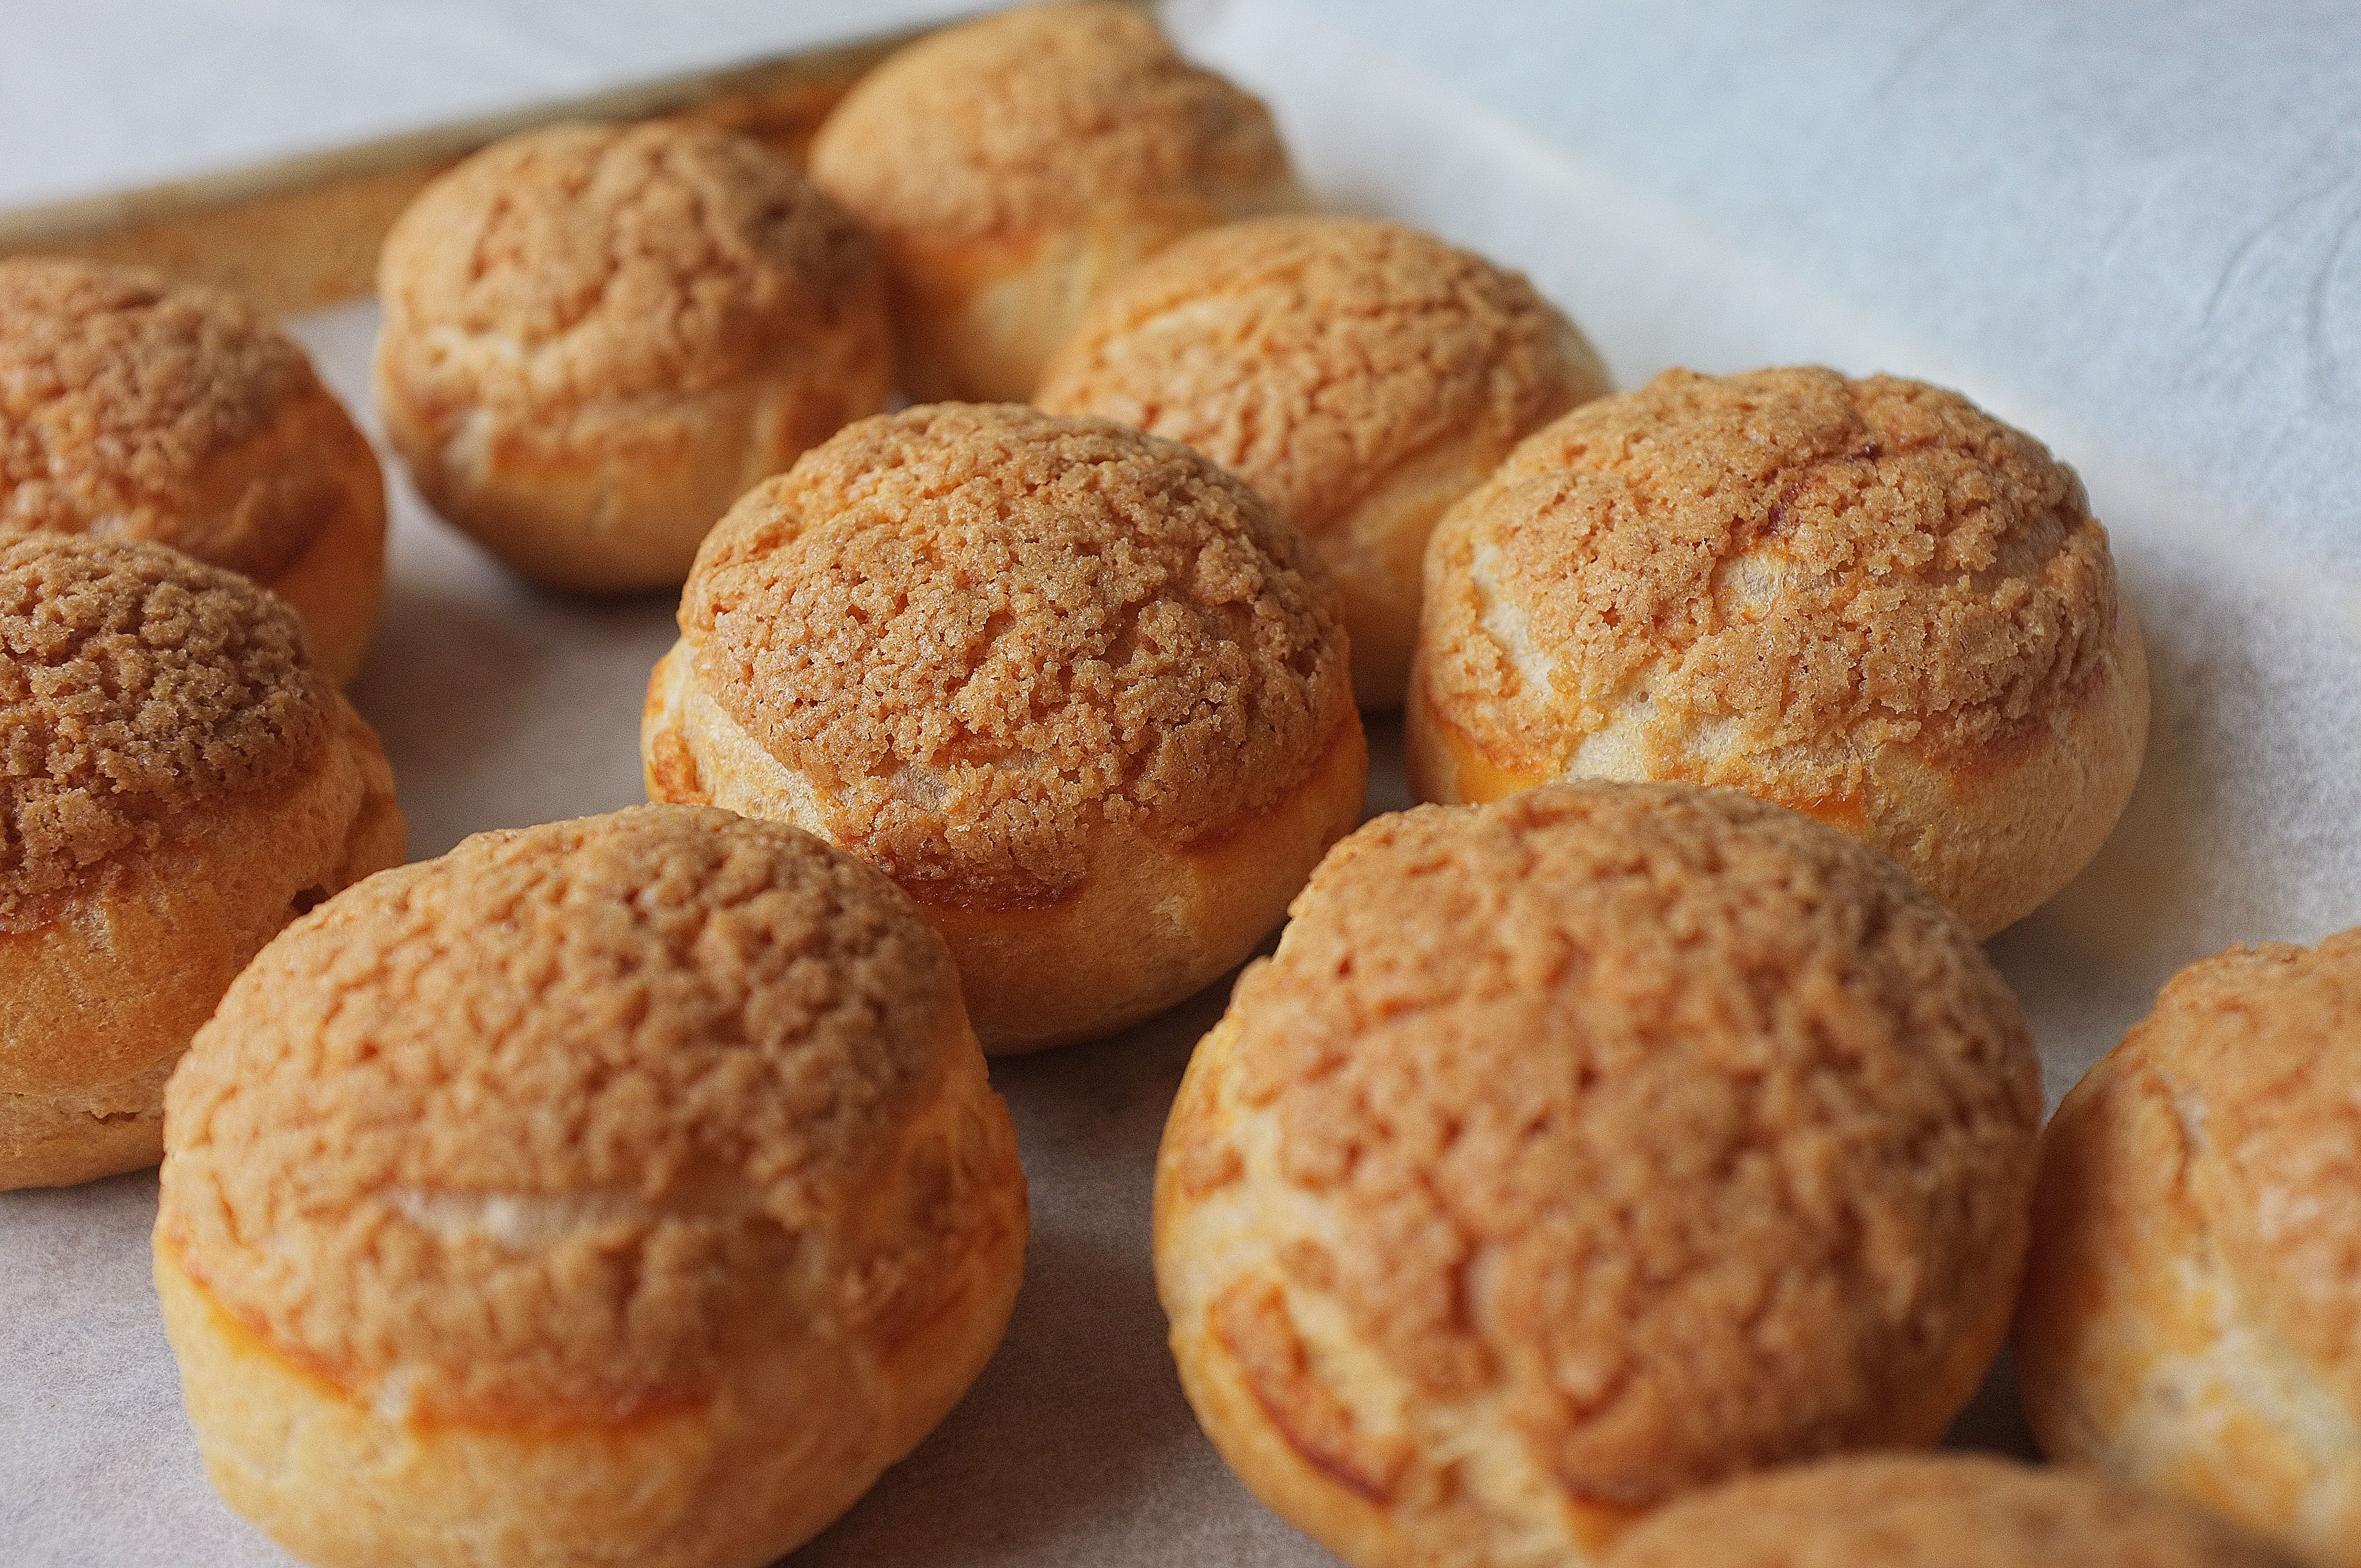
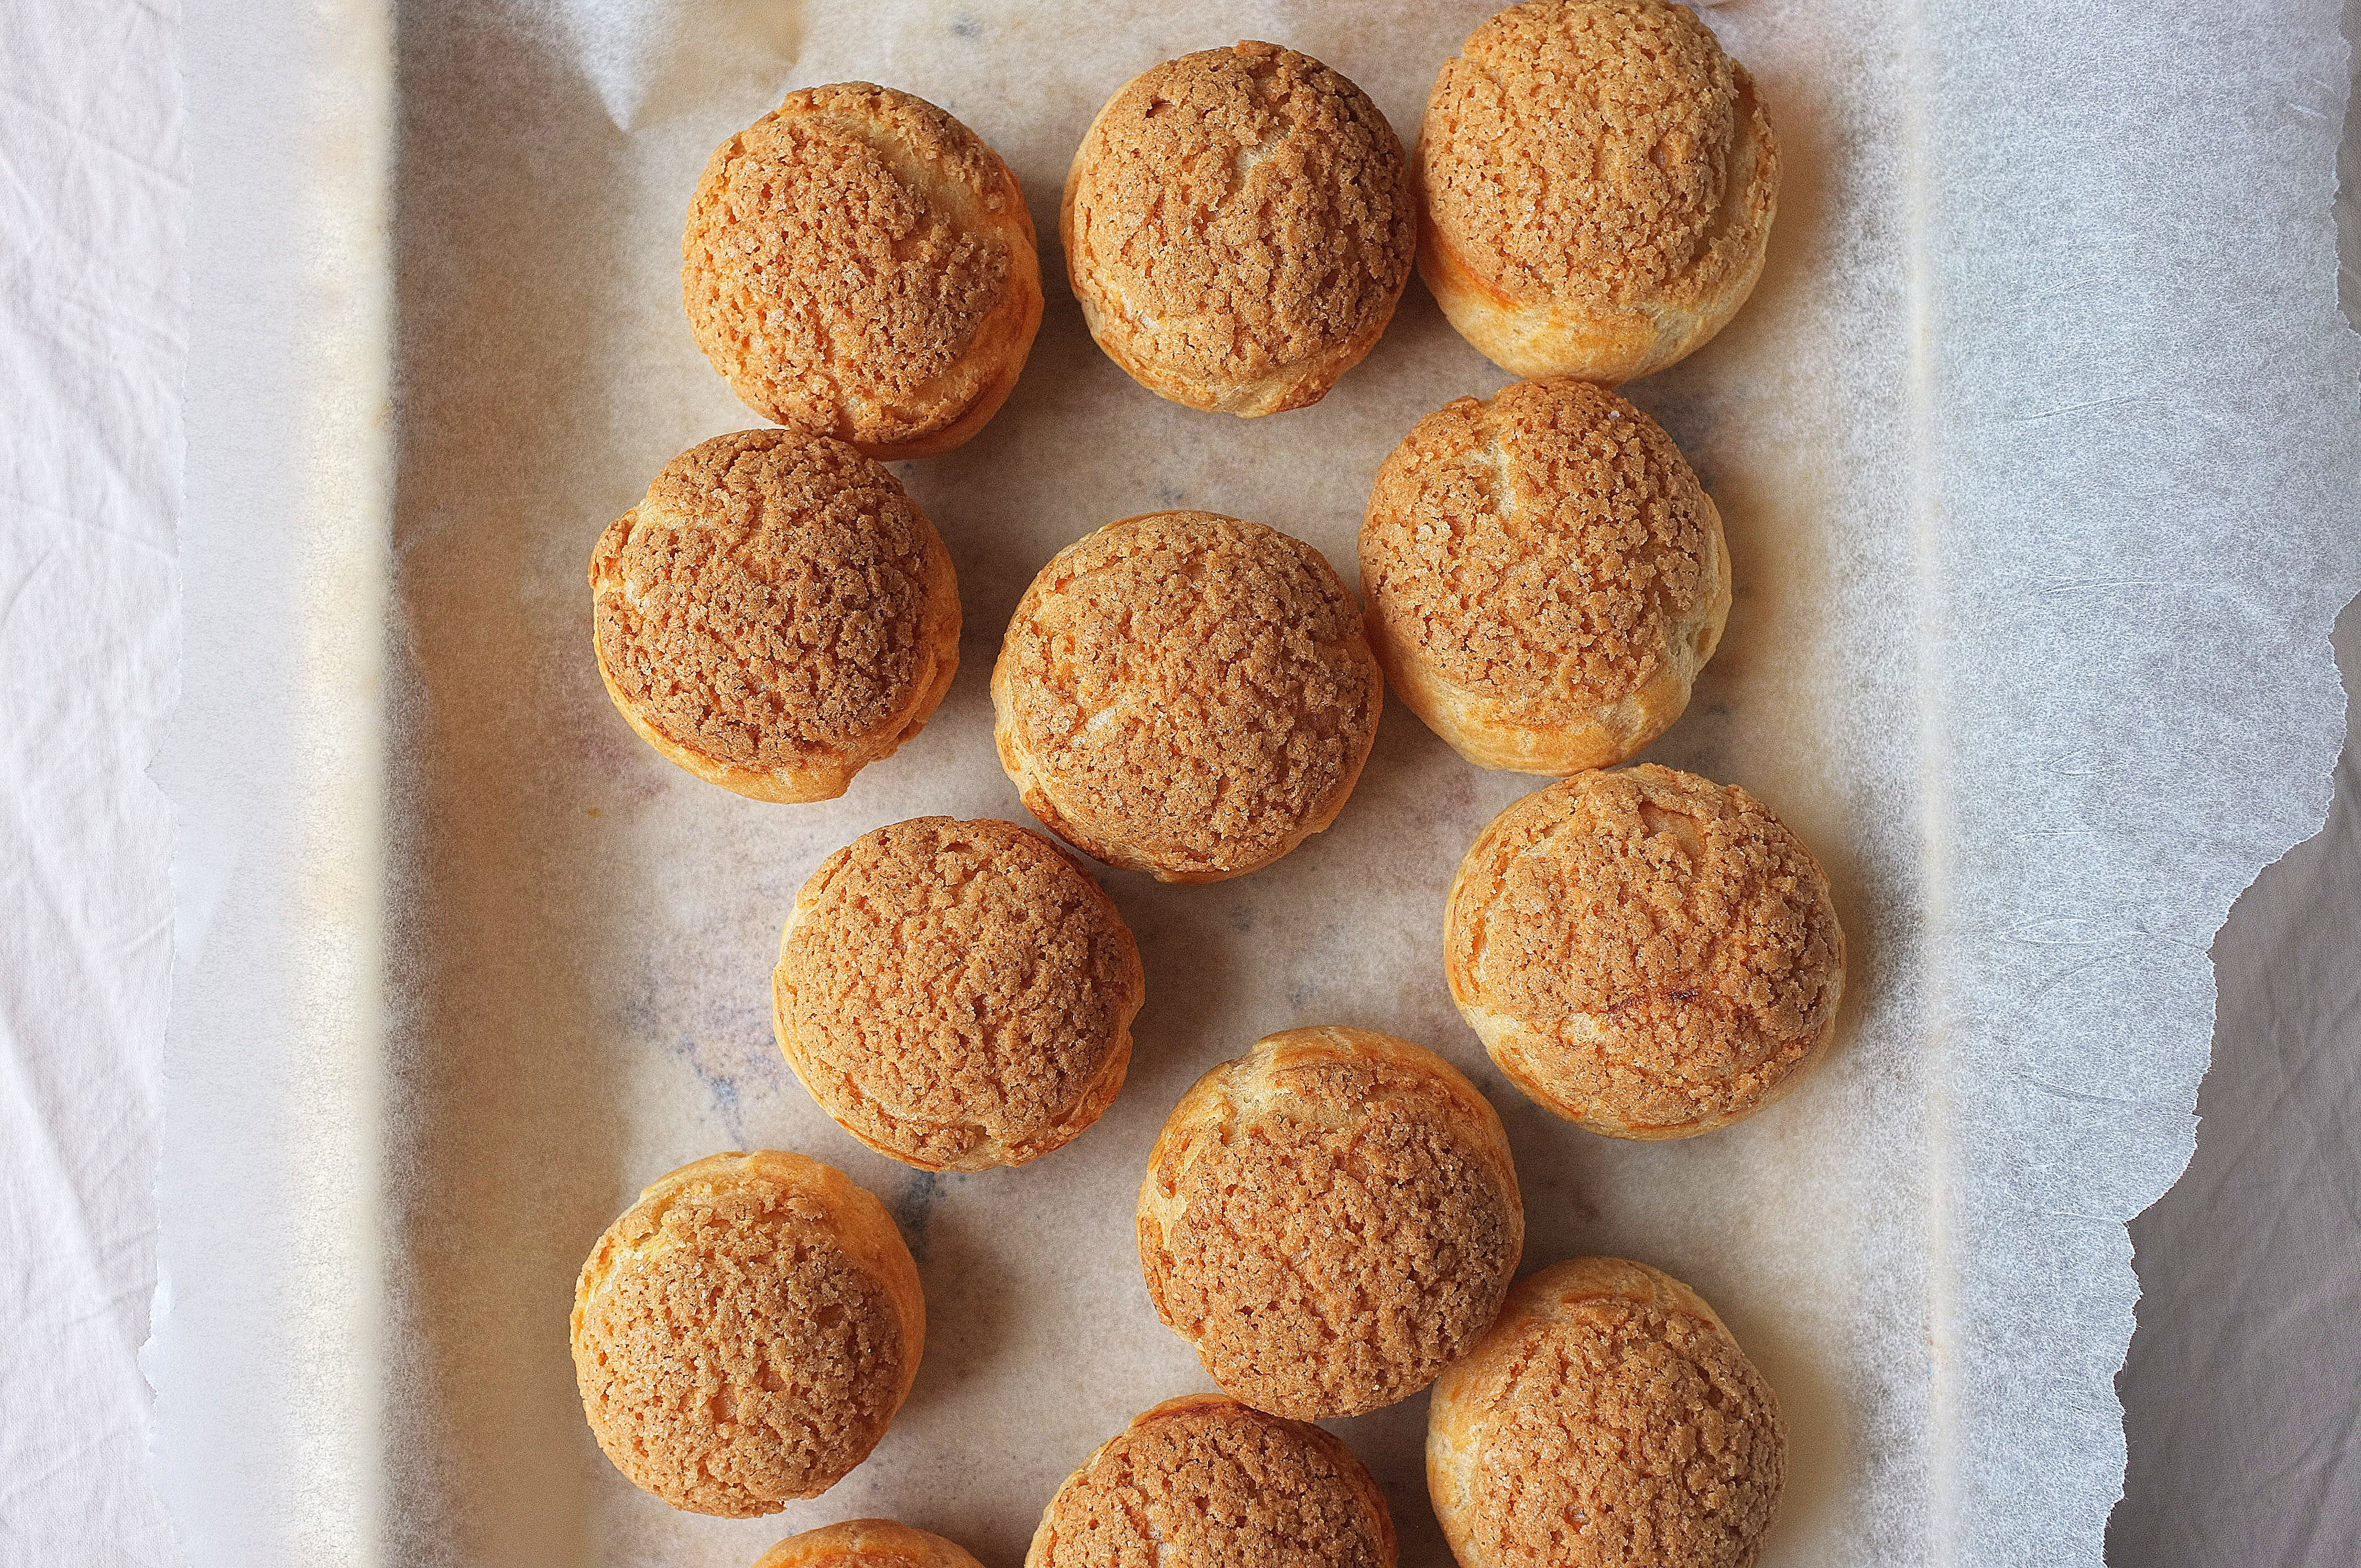
  5. Pipe rounds of about 4cm wide onto the prepared baking trays, leaving plenty of room for expansion. Whisk the remaining egg in a bowl and brush a small amount onto each mound, smoothing down the tip. Take your craquelin sheet and stamp out 3cm circles. Place one on top of each choux mound (the egg will help secure it in place). Bake the choux for around 35 minutes, then skewer a small hole in each bun and return to the oven for a further 5 minutes, to dry out the middles. Once baked, they should be crisp and golden brown with a crackled appearance on top. Cool while you make the other elements.
  6. Toss the walnuts in the honey and salt and spread out on a baking tray. Cook for around 10 minutes or until caramelised then set aside to cool. Once cooled, roughly chop.
  7. For the filling, just whisk together the mascarpone, cream, honey and orange zest until light and smooth. Pile into a piping bag. Finally, for the sauce heat the honey and orange juice in a saucepan and simmer for a couple of minutes, add in the butter and stir until it’s melted, then add the cream and salt. Keep gently simmering, stirring occasionally, until slightly thicker (a few minutes should be fine), then set aside.
  8. To assemble the choux buns, slice each one in half and pipe some mascarpone cream into the base. Top with a sprinkling of walnuts and a little sauce, then place the lid on. Serve with some extra sauce.

Enjoy!

Advertisement

Blackberry, Hazelnut and Lavender Honey Celebration Cake

Cakes, Uncategorized

This cake, decorated with whimsical blooms from the Eloise bouquet by Bloom and Wild, is made up of four layers of moist hazelnut sponge soaked in lavender honey syrup, filled with a fresh blackberry compote and covered in delicately flavoured lavender mascarpone cream. The bouquet is inspired by a summer meadow, so it seemed only right to pick out some of my favourite ingredients the British countryside has to offer for this recipe; together the balance of nutty, floral and fruity flavours are delicious. Try this one out in August/September for a really special seasonal centre piece.

Ingredients

For the lavender honey syrup (this is used to soak the sponges and flavour the mascarpone icing)

  • 100ml runny honey
  • 75ml water
  • 4 sprigs fresh lavender or 1tbsp dried lavender

For the blackberry compote

  • 400g fresh blackberries
  • 3tbsp runny honey
  • Zest and juice 1 lemon

For the hazelnut sponges

  • 350g soft unsalted butter
  • 325g light brown soft sugar
  • 6 eggs
  • 200g ground hazelnuts (to make these just blitz 200g blanched hazelnuts in a food processor until fine)
  • 150g plain flour
  • 2tsp baking powder
  • Pinch salt

For the lavender mascarpone cream

  • 3-4tbsp of the lavender honey
  • 350ml double cream
  • 300ml mascarpone

To garnish (optional)

  • The Eloise bouquet by Bloom and Wild
  • Fresh blackberries
  • Crushed and toasted hazelnuts

Method

  1. Start by making the lavender honey (to give it time to develop in flavour). To do this just place the honey, water and lavender (whichever sort you’re using) in a saucepan and gently heat until the honey has dissolved into the water. Once this has happened, simmer for 2 minutes then set aside and leave to infuse until required
  2. Now make the blackberry compote by gently heating the blackberries, honey, lemon zest and juice in a saucepan. Stir occasionally, until the blackberries release their juices and reduce down to form a compote consistency. Set aside to cool.
  3. Preheat the oven to 180c. Grease and line two 8 inch cake tins.
  4. Place the softened butter and sugar in a large bowl (or bowl of a stand mixer) and beat until very light and fluffy (about 5 minutes). Add the eggs, one at a time, beating very well between each addition (add a tablespoon of the flour each time to prevent curdling). Once all the eggs are well incorporated, fold in the ground hazelnuts, remaining flour, baking powder and salt with a large metal spoon.
  5. Divide the mix between the prepared tins and level the tops. Bake for 35-40 minutes (or until well risen and a skewer comes out clean when inserted). Once baked, prick the surfaces of the cakes with a fork and spoon over 3-4tbsp of the lavender honey syrup, then leave to cool completely in the tins.
  6. While the cakes are cooling, make the lavender mascarpone cream. Put all the ingredients in a large bowl (or bowl of a stand mixer) and whisk until thick and spreadable. Scrape half the mixture into a piping bag. Now you’re ready to assemble the cake (providing all your elements are completely cool!).
  7. To put the cake together, slice the sponges in half horizontally (so you have four even layers). Place the first layer down on your chosen plate and pipe a thick ring of mascarpone cream around the edge, then fill the middle with one third of the blackberry compote and repeat this until you’ve stacked up all four layers. With the remaining mascarpone cream, cover the cake and smooth with a palette knife. Decorate with blooms from the Eloise bouquet or freestyle with hazelnuts, fresh blackberries and lavender.

Enjoy!

Cherry, Chocolate and Tahini Parfait with Sesame Crumble

Chocolate, Cooking, Uncategorized

We’ve been enjoying a very unusual bout of beautiful hot weather here in the UK, so today’s recipe is an iced one. I served this up for my boyfriends birthday (after he broke the news to me that he didn’t want a cake- yeah, sacrilege I know) and although it requires a little more effort to make than a simple sponge, the creamy, indulgent and slightly bittersweet (thanks to the tahini and very dark chocolate) result is well worth it.

Ingredients

For the chocolate ripple

  • 150g bitter dark chocolate
  • 150ml double cream
  • pinch sea salt

For the cherry compote

  • 200g fresh cherries (de-stoned)
  • 3tbsp honey or caster sugar
  • Zest and juice of 1 orange

For the parfait base

  • 4 eggs
  • 75g caster sugar
  • 125ml whole milk
  • 250ml double cream
  • 150g tahini

For the tahini crumble

  • 25g tahini
  • 25g demerara sugar
  • 25g butter, cubed
  • 100g plain flour
  • 1tbsp black sesame seeds

Method

  1. Start by making the chocolate ganache for the ripple. To do this simply place the chocolate, salt and cream in a heatproof bowl and set over a pan of simmering water (don’t allow the water to touch the bottom of the bowl). Stir occasionally until it melts together and forms a smooth ganache. Set aside to cool.
  2. Now prepare the cherry compote. Put the cherries, honey (or sugar), orange zest and juice in a saucepan and gently heat, stirring occasionally, until it reaches a sticky compote consistency (5-10 minutes). Transfer to a bowl and leave to cool.
  3. Now it’s time to make the parfait base. Line a loaf tin with 2 layers of cling film, leaving an overhang on all sides.
  4. Separate the eggs. Put the yolks in a large bowl along with the sugar and whisk until pale, meanwhile, heat the milk until just boiling in a saucepan. Remove the milk from the heat and pour into the egg yolks, then stir together until smooth. Return the mix to a clean pan and gently heat, stirring constantly. After a few minutes, the mix will start to thicken- once it coats the back of the spoon set aside and cool to room temperature.
  5. Once the ganache, compote and custard have cooled to room temperature, whisk the double cream to soft peaks. In a separate bowl whisk the egg whites to medium peaks. Stir the tahini into the egg yolk mixture. Fold the double cream into the egg yolk/ tahini with a large metal spoon, then do the same with the egg whites, retaining as much air as possible. Ripple through 2/3 of the chocolate ganache and 2/3 of the cherry compote.
  6. Spoon the remaining chocolate ganache and cherry compote into the bottom of the prepared tin, then spoon in the parfait mix. Cover with cling film and freeze for at least 4 hours.
  7. While the parfait is freezing, make the sesame crumble. Preheat the oven to 180c. Rub together the butter and flour until they resemble breadcrumbs. Stir through the sugar and tahini, then tip onto a lined baking tray- bake for 10 minutes then check, shake and return to the oven to 10 more minutes, or until the crumble is golden brown. Stir through the sesame seeds and set aside to cool.
  8. Take the parfait out of the oven 10 minutes before you’d like to serve it to allow it to soften slightly. Sprinkle on the sesame crumble and finish with some fresh cherries.

Enjoy!

Gooseberry and Lemon Cake with Elderflower Mascarpone

Cakes, Uncategorized

Light, buttery sponge flavoured with lemon, tart pockets of soft, juicy gooseberries, and a generous swirl of elderflower mascarpone make up this simple summer cake and ode to the British countryside.

Ingredients

  • 225g butter, softened
  • 225g caster sugar
  • zest 2 lemons
  • 1tsp vanilla extract
  • 4 eggs
  • 225g self raising flour
  • 75g ground almonds
  • 1tsp baking powder
  • 250g gooseberries (blueberries, blackberries or raspberries would also work well)
  • 200g mascarpone
  • 3tbsp elderflower cordial
  • 1tbsp honey

Method

  1. Preheat the oven to 180c. Grease and line a 9 inch cake tin.
  2. Place the butter, sugar, lemon zest and vanilla in a large bowl (or bowl of a stand mixer with paddle attachment) and beat until very light, pale and fluffy. Add the eggs, one at a time, beating well between each addition. Add a little flour if you’re worried about curdling.
  3. Once all the eggs are well incorporated, fold in the flour, ground almonds and baking powder. Trim the tops and stalks of the gooseberries then fold them through the cake batter.
  4. Scrape the cake batter into the prepared tin and level off the top. Bake for 35-40 minutes or until the cake is springy and golden (or until a skewer comes out clean when inserted). Once baked, leave the cake to cool completely in the tin.
  5. Meanwhile, whisk together the mascarpone, elderflower and honey. When the cake is cool, swirl the mascarpone over the cake and decorate with fresh flowers.

Enjoy!

Cherry, Chocolate and Orange Blossom Tart with Cardamom Cream

Pastry, Uncategorized

Make the most of the fleeting cherry season with this deliciously indulgent ode to my favourite things (chocolate and cherries). Great for a summer dinner party dessert or post-BBQ chocolate fix, this tart layers up cherry compote, orange blossom infused chocolate filling and cardamom cream, all encased in crisp, zesty pastry; you’d be hard pushed to find someone who’d turn down a slice.

Ingredients

For the pastry

  • 225g plain flour
  • 150g unsalted butter, chilled and cubed
  • pinch salt
  • 50g caster sugar
  • zest 1 orange
  • 1 egg plus 1 egg yolk

For the cherry layer

  • 400g cherries (de-stoned)
  • 2tbsp caster sugar
  • zest and juice 1 orange
  • 2tbsp cherry molasses (optional)

For the chocolate filling

  • 125ml double cream
  • 100g butter
  • zest 1 orange
  • 2tsp orange blossom extract
  • 300g dark chocolate
  • 1 egg plus 3 egg yolks
  • 100g caster sugar

For the cardamom cream (optional)

  • 200ml double cream
  • 1tsp ground cardamom
  • 2tbsp icing sugar

To decorate (optional)

  • whole cherries
  • edible flowers, petals only

Method

  1. Grease a 20cm deep tart tin lightly with butter.
  2. Before you make the pastry, flavour the cream for the chocolate filling. To do this just pop the double cream, butter, orange zest and orange blossom extract in a saucepan and heat until the butter has melted and starts to gently simmer. Set aside until required.
  3. Place the plain flour, butter and salt in a food processor and whizz on a pulse setting until they resemble breadcrumbs. Tip this mix into a large bowl and stir through the caster sugar and orange zest. Briefly whisk together the egg and egg yolk and add to the bowl then stir with a cutlery knife to form pastry. Once it all comes together in big lumps, shape it into one large disc (handling as little as possible) and wrap in cling film. Chill for about an hour or until the pastry is a little firmer. Preheat the oven to 180c.
  4. While the pastry is chilling, make the cherry filling. To do this just place the de-stoned cherries, caster sugar, orange zest and juice, and the cherry molasses (if using- this is optional but it really helps intensify the cherry flavour) in a saucepan. Heat gently until the cherries release their juices, then up the heat and cook, stirring occasionally, until the cherries are sticky and resemble a compote.
  5. Once the pastry has firmed up, roll out to about 3mm thick on a well floured surface. Line the tart tin with the pastry, ensuring that you push it into the corners and flutes. Trim any overhanging pastry and chill for 20 minutes.
  6. When your pastry is sufficiently chilled, line with baking paper, fill with baking beans and blind bake for 10-15 minutes until the walls of the tart case can support themselves. At this stage remove the paper and beans and return to the oven for a further 5-10 minutes or until the pastry is completely cooked through with no grey, raw areas of pastry remaining. Set aside.
  7. Now make the chocolate filling. Gently melt the chocolate in a heatproof bowl set over a pan of simmering water. Meanwhile, remove the orange zest from the cream mixture and heat up. Once the chocolate has melted pour the cream into the bowl and briefly stir to combine, then set aside to cool a little. Put the egg, yolks and caster sugar in a large bowl (or bowl of a stand mixer) and whisk until very thick, pale and voluminous (5-6 minutes). Add a large spoonful of this to the chocolate and mix in, then add the rest and carefully fold.
  8. To assemble the tart, tip the cherry compote into the pastry case and spread out in an even layer, then scrape the chocolate filling on top. Bake for 15 minutes then leave to cool completely in the tin (it should have a little wobble).
  9. While the tart is cooling, make the cardamom cream. To do this simply whisk together the icing sugar, cream and ground cardamom until soft peaks form.
  10. You can enjoy the tart at this stage- it will have a very fudgy, mousse like texture. If you chill the tart it will have a slightly different, but still delicious, texture (the cold will set it a little firmer, like a conventional chocolate tart). However you serve your tart, top it with a spoonful of cardamom cream and fresh cherries.


Ricotta, Raspberry and Peach Cheesecake Bars

Cooking

With a light baked ricotta filling studded with fresh raspberries, crunchy almond-oat base and griddled peach topping, these cheesecake bars pay homage to 90s peach melba, and make for the perfect summer dessert.

Ingredients (makes 12 bars)

For the base

  • 150g digestives
  • 2tsp demerara sugar
  • 1tsp cinnamon
  • 50g rolled oats
  • 50g almonds
  • 140g unsalted butter, melted

For the filling

  • 500g ricotta
  • 125g golden caster sugar
  • 30g corn flour
  • 2 eggs, plus 1 egg yolk
  • 1tsp vanilla extract
  • 100g full fat greek yoghurt
  • 200g raspberries

For the topping

  • 2 peaches, sliced
  • few extra raspberries
  • decorative herbs, almonds, edible flowers (optional)

Method

  1. Preheat the oven to 160c and grease and line a 22x22cm baking tin. Place the digestives, demerara sugar and cinnamon in a food processor and blitz into crumbs. Add in the melted butter, almonds and oats and very briefly blitz again to combine- don’t over mix here, you want a nice crunchy base. Tip this mixture into the prepared tin and pack down with the back of a spoon. Chill for 15 minutes then bake for 10 minutes to set. Once baked set aside for later.
  2. Now make the filling. To do this simply whisk together the ricotta, golden caster sugar, corn flour and vanilla until very smooth, then add in the egg and egg yolk one at a time, whisking between each addition to bring the mixture together again. Lastly, whisk in the yoghurt. Roughly break up the raspberries with the back of a fork and tip them in. Ripple them through then scrape all the filling onto the base. Place the tin into another larger roasting tin and fill with water (about half way up the sides of your baking tin). Bake for 1 hour or until the cheesecake is set but still has a uniform wobble.
  3. Once baked, leave the cheesecake to cool completely then chill for 4-6 hours to set.
  4. While the cheesecake is chilling, lightly oil a griddle pan and slice the peaches into wedges. Heat the pan and char the slices on each side, then leave to cool.
  5. When your cheesecake has set, just remove it from the tin, slice into 12 bars (use a hot knife for this and you will get a cleaner result) and top with the griddled peach slices, extra raspberries and nuts.

Enjoy!

Rose Labneh with Sumac Baked Figs

Cooking

I know I’m getting a few months ahead of myself by posting a fig recipe (usually they come into season around late July), but when I saw some particularly plump, dark looking figs in my local fresh produce shop, I couldn’t help but cook them up with some delicious accompaniments. You could recreate this super simple recipe using any seasonal fruit- rhubarb, greengage or peach would work particularly well.

Ingredients (serves 6)

  • 400ml Greek yoghurt
  • 3tbsp runny honey
  • 2tsp rose water
  • 10-12 ripe figs
  • 1-2tsp sumac
  • Few sprigs thyme
  • 1 pomegranate, seeds only
  • 75g almonds

Method

  1. Place the yoghurt, 1tbsp of the honey and the rose water in a bowl. Mix together then transfer to a muslin cloth and tie up the corners. Sit this in a sieve over a bowl for at least 24 hours (refrigerated).
  2. After 24 hours the liquid will have drained from the yoghurt, leaving you with a thick, smooth labneh.
  3. Once the labneh is ready, prepare the other elements of your dessert. Preheat the oven to 200c and line a high sided baking tray with greaseproof paper. Slice the figs into either halves or quarters (depending on your visual preference!) and spread out on the tray (cut side up). Drizzle with the remaining 2tbsp honey and sprinkle over the sumac. Roughly break the thyme into the tray too.
  4. Roast the figs for 20-25 minutes until very tender and sticky. While the figs are cooking, toast the almonds in a dry frying pan until lightly coloured, then roughly chop.
  5. To serve, spread a generous spoonful of the labneh onto your dessert plates and arrange some fig pieces on top. Sprinkle over the almonds and pomegranate seeds and lastly, garnish with some thyme, if you like.

Enjoy!

Tahini & Pistachio Brownies

Chocolate

First off, apologies for the brief recipe hiatus. I’ve recently moved house and have been trying to figure out the perfect temperature to bake with in my new (incredibly retro) gas oven. And no, it’s not been as simple as converting degrees to gas marks- this oven has its own special way of working (i.e. it’s lukewarm for the majority of settings until the last when it turns into Mordor and burns everything in sight). Anyway I think I’ve cracked it now, so here’s my first recipe a la 1980s oven; tahini and pistachio brownies. They’re really simple to make but deliver everything you’d expect from a really good brownie- a dense, moist texture with added crunch from the pistachios and a deep indulgent chocolate flavour, which is definitely enhanced by the slightly salty, nutty pockets of tahini and halva.

Ingredients

  • 250g good quality dark chocolate
  • 250g unsalted butter
  • 250g golden caster sugar
  • 4 eggs
  • generous pinch sea salt
  • 150g plain flour
  • 100g milk chocolate, roughly chopped
  • 50g dark chocolate, roughly chopped
  • 75g chopped pistachios
  • 100g halva, crumbled
  • 100g tahini, well stirred

Method

  1. Preheat the oven to 180c. Grease and line a 22x22cm brownie tray.
  2. Place the dark chocolate and the butter in a heatproof bowl and set over a pan of simmering water (don’t allow the water to touch the base of the bowl or the chocolate will burn). Melt gently, stirring occasionally, then set aside to cool a little.
  3. In a large bowl (or bowl of a stand mixer) whisk together the golden caster sugar and eggs until pale and voluminous (about 3-5 minutes). Fold in the cooled chocolate mixture followed by the sea salt and flour. Add the milk chocolate and dark chocolate chunks and most of the pistachios (reserve a few for sprinkling on the top) then stir.
  4. Tip half the brownie mix into the prepared tin then dollop over half the tahini and sprinkle on half the halva. Top with the rest of the brownie mix and repeat, then finish with the reserved pistachios.
  5. Bake for 30-35 minutes or until the middle is almost set but retains a slight wobble. Set aside to cool completely in the tin.
  6. Once cooled, slice up and serve.

Blood Orange and Ginger Celebration Cake

Cakes

This ode to the fruits of winter will brighten any grey day with it’s sticky layers of spiced sponge, fresh ginger mascarpone cream and smooth blood orange curd. Decorate with pomegranate seeds, candied blood orange slices and chopped pistachios for a welcome explosion of colour during these colder months.

Ingredients

For the cake

  • 250g golden syrup
  • 3 tbsp ginger syrup
  • 190g butter
  • 3-4 lumps stem ginger, diced
  • 175g dark brown soft sugar
  • zest 1 orange
  • 375g self-raising flour
  • 2tsp ground ginger
  • 1tsp ground cinnamon
  • 1 1/2 tsp bicarbonate of soda
  • a pinch of salt
  • 3 eggs
  • 260ml milk

For the blood orange curd

  • juice and zest 2 blood oranges
  • juice and zest 1 lemon
  • 2 eggs
  • 2 egg yolks
  • 100g caster sugar
  • 100g butter, cubed

For the ginger mascarpone cream

  • 1tbsp icing sugar
  • 1tbsp ginger syrup
  • 300ml double cream
  • 250g mascarpone

Garnish ideas (optional)

  • pomegranate seeds
  • chopped pistachios
  • candied orange slices
  • shards of tuile or ginger biscuit

Method

  1. Start off with the ginger cake. Grease and line two 7 inch cake tins and preheat the oven to 180c.
  2. Place the golden syrup, ginger syrup, butter, diced stem ginger, dark brown sugar and orange zest in a saucepan and melt over a low/medium heat. Once the ingredients are melted bring to the boil and leave to bubble for about a minute, then set aside to cool a little.
  3. Meanwhile, in a large bowl stir together the flour, ginger, cinnamon, bicarbonate of soda and salt. Make a large well in the centre and tip in the melted butter mixture. Whisk the wet and dry ingredients together until smooth and flour lump free. In a jug whisk the eggs and milk together with a fork and add those into the mixing bowl. Whisk once more to combine then split the batter between the prepared cake tins.
  4. Bake for 30-35 minutes or until a skewer comes out clean when inserted.
  5. While the cakes are baking make the blood orange curd. To do this simply place the blood orange zest and juice, lemon zest and juice, eggs and egg yolks and caster sugar into a heatproof bowl. Whisk together to combine then set over a pan of simmering water (without the water touching the bowl). Add the butter cubes one at a time, constantly whisking. Once all the butter has been added and is melted, continue to whisk until the curd has thickened to a coating consistency (this will take between 5-10 minutes). Once the curd is ready, set aside to cool in a clean bowl with cling film flat across the surface (this will prevent a skin from forming).
  6. When the cakes are ready leave them to cool completely in the tins. Once cool, even the tops off if necessary then slice each horizontally (so you are left with 4 even cake layers).
  7. Now make the mascarpone cream; tip the double cream, icing sugar, ginger syrup and mascarpone into a bowl (or bowl of a stand mixer) and whisk until thickened and smooth.
  8. Once all your components are cool it’s time to assemble the cake. Place one layer on your chosen serving plate and pipe dots of mascarpone cream around the edge then fill the centre with blood orange curd. Repeat until you’ve used up the cake layers and decorate the top as desired.


Enjoy!

Rhubarb and Ginger Cake with Cardamom Creme Fraiche

Cakes

It’s hardly surprising that a combination of some of my very favourite ingredients (brilliant pink forced rhubarb, fiery stem ginger and warming cardamom) have married together to form my perfect cake (aside from fudgy, rich chocolate cake- that space in my heart will never be replaced). The recipe is super easy and the result is a moist, fruity bake packed full of flavour. Serve up with pistachio praline and additional poached rhubarb to brighten up the miserable grey that is January…

Ingredients (serves 8-12)

For the cake

  • 250g self-raising flour
  • 2tsp ground ginger
  • 1tsp ground cinnamon
  • 1tsp bicarbonate of soda
  • pinch salt
  • 175g golden syrup
  • 3tbsp ginger syrup (from a stem ginger jar)
  • 125g butter
  • 4 balls stem ginger, diced
  • 125g dark soft brown sugar
  • 2 eggs
  • 250ml milk
  • 200g forced rhubarb

For the cardamom creme fraiche

  • 300ml creme fraiche
  • 10 cardamom pods, seeds removed and ground to a fine powder
  • 1tbsp icing sugar

Optional extras

  • poached rhubarb pieces (just pop 125ml water and 125g caster sugar in a saucepan and heat to melt the sugar- once it’s dissolved, bring to the boil and add 200g sliced rhubarb. Remove from the heat and leave for 5 minutes or until the rhubarb is tender but not mushy, then drain and use as desired)
  • pistachio praline (put 100g caster sugar in a heavy bottom pan and leave it to melt, swirling occasionally. Once completely melted add in 100g pistachios and swirl until the syrup has reached a deep golden colour. Scrape onto some greaseproof paper to set hard then break into a mixer, blitz and use as desired)

Method

  1. Preheat the oven to 180c. Grease and line a 20cm cake tin.
  2. Stir together the flour, ginger, cinnamon, bicarbonate of soda and salt in a large bowl. In a saucepan melt together the golden syrup, ginger syrup, butter, diced stem ginger and sugar. Bring to the boil for a minute then make a well in the dry ingredients and add the melted mixture. Stir together to eliminate any lumps then whisk the eggs and milk in a jug and add those in too and beat once more.
  3. Slice the rhubarb into 2 inch lengths and stir through, then tip the batter into the prepared tin (the mix is quite loose but don’t worry, it bakes beautifully and the rhubarb levels out within the cake during baking and doesn’t end up sinking to the bottom!)
  4. Bake for 1 hour- 1 hour 10 minutes or until the cake has reached a deep golden colour and a skewer comes out clean when inserted (it’s quite a long cooking time but this is necessary as there is a fair amount of liquid in the fruit- if the cake starts colouring a little too much before it’s cooked through, just cover it in foil for the remaining cooking time).
  5. While the cake is baking make the cardamom creme fraiche topping. To do this simply whisk together the creme fraiche, ground cardamom and icing sugar.
  6. Once your cake is baked, allow it to cool completely in the tin before removing it and presenting it on your chosen plate. Dollop on the creme fraiche just before serving and decorate with rhubarb and pistachios. I like to be quite free with this presentation but you can make yours more refined if you like.

Enjoy!